
User Manual
Page 3
Interface Panel...20 Projector Parts - Front/Top ...18 Projector Parts - Base...22 Projector Parts - Interactive Pens 24 Projector Parts - Remote Control 25 Setting Up the Projector ...27 Projector Placement...27 Projector Setup and Installation Options ...or USB Mouse Control 38 Connecting to Go for Sound 39 3 Side...19 Projector Parts - Control Panel ...23 Projector Parts - Contents BrightLink 475Wi/480i/485Wi User's Guide 11 Introduction to Your Projector ...12 Projector Features...12 Product Box Contents...13 Additional Components ...15 Optional Equipment and Replacement ...
Interface Panel...20 Projector Parts - Front/Top ...18 Projector Parts - Base...22 Projector Parts - Interactive Pens 24 Projector Parts - Remote Control 25 Setting Up the Projector ...27 Projector Placement...27 Projector Setup and Installation Options ...or USB Mouse Control 38 Connecting to Go for Sound 39 3 Side...19 Projector Parts - Control Panel ...23 Projector Parts - Contents BrightLink 475Wi/480i/485Wi User's Guide 11 Introduction to Your Projector ...12 Projector Features...12 Product Box Contents...13 Additional Components ...15 Optional Equipment and Replacement ...

User Manual
Page 6
... Automatically ...112 Calibrating Manually ...114 Using BrightLink With a Computer 117 Adjusting the Pen Operation Area 118 Easy Interactive Tools ...120 Easy Interactive Tools System Requirements 120 Installing Easy Interactive Tools 121 Starting and Exiting Easy Interactive Tools 123 Using the Easy Interactive Tools for Interactive Mode 125 Easy Interactive Tools for Interactive Mode 125 Using the On-Screen Keyboard...
... Automatically ...112 Calibrating Manually ...114 Using BrightLink With a Computer 117 Adjusting the Pen Operation Area 118 Easy Interactive Tools ...120 Easy Interactive Tools System Requirements 120 Installing Easy Interactive Tools 121 Starting and Exiting Easy Interactive Tools 123 Using the Easy Interactive Tools for Interactive Mode 125 Easy Interactive Tools for Interactive Mode 125 Using the On-Screen Keyboard...

User Manual
Page 7
... Reset Options - Extended Menu 157 Projector Network Settings - Selecting Line Width and Color With Easy Interactive Tools 131 Using the Easy Interactive Tools for Whiteboard Mode 132 Easy Interactive Tools for Whiteboard Mode 132 Using the Shapes Tool in Whiteboard Mode 133 Using Easy...Interactive Tools for Saving, Printing, and More 134 Working With the Page List...135 Saving Your Pages ...136 Selecting Language and General Settings 139 Windows Tablet PC and Ink Tools 140 Enabling Windows Tablet PC and Ink Features 141 Using Windows Tablet PC and Ink Features 142 Using BrightLink...
... Reset Options - Extended Menu 157 Projector Network Settings - Selecting Line Width and Color With Easy Interactive Tools 131 Using the Easy Interactive Tools for Whiteboard Mode 132 Easy Interactive Tools for Whiteboard Mode 132 Using the Shapes Tool in Whiteboard Mode 133 Using Easy...Interactive Tools for Saving, Printing, and More 134 Working With the Page List...135 Saving Your Pages ...136 Selecting Language and General Settings 139 Windows Tablet PC and Ink Tools 140 Enabling Windows Tablet PC and Ink Features 141 Using Windows Tablet PC and Ink Features 142 Using BrightLink...

User Manual
Page 8
... Problems 196 Solutions to Projector Power or Shut-Off Problems 196 Solutions to Problems with the Remote Control 196 Solutions to Password Problems 197 Solving Interactive Pen Problems ...197 8
... Problems 196 Solutions to Projector Power or Shut-Off Problems 196 Solutions to Problems with the Remote Control 196 Solutions to Password Problems 197 Solving Interactive Pen Problems ...197 8

User Manual
Page 9
...When "Error Occurred in the Easy Interactive Function" Message Appears 198 Solutions When the Interactive Pens Do Not Work 198 Solutions When Manual Calibration is Difficult 199 Solutions When the Built-In Toolbar Does Not Work 199 Solutions When the Interactive Pen Position Is Not Accurate 200 ...Solutions When the Interactive Pens Are Slow or Difficult to Use 200 Solutions When the Interactive Pens Cause Interference or Unwanted Effects 201 Solutions When Network Alert E-Mails...
...When "Error Occurred in the Easy Interactive Function" Message Appears 198 Solutions When the Interactive Pens Do Not Work 198 Solutions When Manual Calibration is Difficult 199 Solutions When the Built-In Toolbar Does Not Work 199 Solutions When the Interactive Pen Position Is Not Accurate 200 ...Solutions When the Interactive Pens Are Slow or Difficult to Use 200 Solutions When the Interactive Pens Cause Interference or Unwanted Effects 201 Solutions When Network Alert E-Mails...
User Manual
Page 12
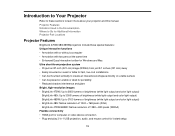
...) away • Easily mounted on a wall or table for fast, low-cost installations • Can be mounted vertically to create an interactive workspace directly on a table surface • Can be placed on a table or desk for portability • Reduced shadow interference and glare ...lumens of brightness (white light output and color light output) BrightLink 485Wi: Up to 3100 lumens of brightness (white light output and color light output) • BrightLink 480i: Native resolution of 1024 × 768 pixels (XGA) BrightLink 475Wi/485Wi: Native resolution of 1280 × 800 pixels (WXGA) Flexible...
...) away • Easily mounted on a wall or table for fast, low-cost installations • Can be mounted vertically to create an interactive workspace directly on a table surface • Can be placed on a table or desk for portability • Reduced shadow interference and glare ...lumens of brightness (white light output and color light output) BrightLink 485Wi: Up to 3100 lumens of brightness (white light output and color light output) • BrightLink 480i: Native resolution of 1024 × 768 pixels (XGA) BrightLink 475Wi/485Wi: Native resolution of 1280 × 800 pixels (WXGA) Flexible...

User Manual
Page 14
1 Projector 2 Remote control 3 Remote control batteries (two AA alkaline) 4 Pens and batteries (one AA alkaline battery for each pen) 5 USB cable 6 Power cord 7 Battery charger with 2 AA rechargeable pen batteries 8 Pen tray 9 Password Protected sticker 10 Projector feet 11 Projector software CD-ROM (for network usage) 12 Projector software for Easy Interactive Function CD-ROM Parent topic: Projector Features 14
1 Projector 2 Remote control 3 Remote control batteries (two AA alkaline) 4 Pens and batteries (one AA alkaline battery for each pen) 5 USB cable 6 Power cord 7 Battery charger with 2 AA rechargeable pen batteries 8 Pen tray 9 Password Protected sticker 10 Projector feet 11 Projector software CD-ROM (for network usage) 12 Projector software for Easy Interactive Function CD-ROM Parent topic: Projector Features 14
User Manual
Page 16
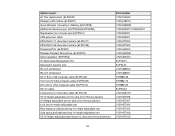
Option or part Air filter replacement (ELPAF40) Wireless LAN module (ELPAP07) Quick Wireless Connection USB key (ELPAP08) Additional interactive pen (ELPPN03A/ELPPN03B) Replacement set of 6 pen tips (ELPPS01) USB extension cable EPSON DC-11 document camera (ELPDC11) EPSON DC-06 document camera (ELPDC06) PowerLite Pilot (ELPCB01) Wireless Pendant Microphone (ELPMC02) Active speakers (ELPSP02) On...
Option or part Air filter replacement (ELPAF40) Wireless LAN module (ELPAP07) Quick Wireless Connection USB key (ELPAP08) Additional interactive pen (ELPPN03A/ELPPN03B) Replacement set of 6 pen tips (ELPPS01) USB extension cable EPSON DC-11 document camera (ELPDC11) EPSON DC-06 document camera (ELPDC06) PowerLite Pilot (ELPCB01) Wireless Pendant Microphone (ELPMC02) Active speakers (ELPSP02) On...

User Manual
Page 18
... references Where to Get Help Projector Part Locations Check the projector part illustrations to learn about the parts on your questions to Epson technical support 24 hours a day. • If you still need help after checking this manual and the sources listed above, ...you can use the EPSON PrivateLine Support service to get help fast. Interface Panel Projector Parts - Interactive Pens Projector Parts - Side Projector Parts - Front/Top 18 Projector Parts - Base Projector Parts - Remote Control ...
... references Where to Get Help Projector Part Locations Check the projector part illustrations to learn about the parts on your questions to Epson technical support 24 hours a day. • If you still need help after checking this manual and the sources listed above, ...you can use the EPSON PrivateLine Support service to get help fast. Interface Panel Projector Parts - Interactive Pens Projector Parts - Side Projector Parts - Front/Top 18 Projector Parts - Base Projector Parts - Remote Control ...

User Manual
Page 20
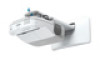
Interface Panel 1 Optional wireless LAN unit slot 2 Audio1 port 3 Audio2 port 4 Computer1 port 20 1 Filter cover switch 2 Security cable installation slot 3 Wireless LAN light 4 Interactive pen receiver 5 Obstacle sensor 6 Remote receiver 7 Projection window 8 Security lock port 9 Air filter cover 10 Air intake vent (air filter) 11 Focus lever Parent topic: Projector Part Locations Projector Parts -
Interface Panel 1 Optional wireless LAN unit slot 2 Audio1 port 3 Audio2 port 4 Computer1 port 20 1 Filter cover switch 2 Security cable installation slot 3 Wireless LAN light 4 Interactive pen receiver 5 Obstacle sensor 6 Remote receiver 7 Projection window 8 Security lock port 9 Air filter cover 10 Air intake vent (air filter) 11 Focus lever Parent topic: Projector Part Locations Projector Parts -

User Manual
Page 24
Projector Parts - Interactive Pens 1 Pen tip 2 Attachment for optional strap or cord 3 Battery light 4 Power switch 5 Battery cover Parent topic: Projector Part Locations 24
Projector Parts - Interactive Pens 1 Pen tip 2 Attachment for optional strap or cord 3 Battery light 4 Power switch 5 Battery cover Parent topic: Projector Part Locations 24

User Manual
Page 27
... to set up your projector to view presentations in the following ways: Mounted on the wall or ceiling 27 Keep these sections to create an interactive tabletop workspace.
... to set up your projector to view presentations in the following ways: Mounted on the wall or ceiling 27 Keep these sections to create an interactive tabletop workspace.

User Manual
Page 28
Mounted vertically on a table to position it squarely in the projector's menu system. 28 Front projection from a table or portable cart, be sure to select correct Projection option in front of the screen, not at an angle. If you project from a table or portable cart Wherever you set up the projector, make sure to create an interactive workspace.
Mounted vertically on a table to position it squarely in the projector's menu system. 28 Front projection from a table or portable cart, be sure to select correct Projection option in front of the screen, not at an angle. If you project from a table or portable cart Wherever you set up the projector, make sure to create an interactive workspace.

User Manual
Page 35
...8226; For slide shows without a computer, you can project through the computer's USB port (preferably USB 2.0). Caution: If you will use the interactive pens with your computer meets the system requirements, you can send video and audio output to a Computer for USB Video and Audio If your ...is regulated properly. Note: This also lets you can connect USB devices (such as a flash drive or camera) or an optional EPSON document camera. Extended Menu Product Box Contents Connecting to a Document Camera Parent topic: Setting Up the Projector Related references Projector Setup Settings -
...8226; For slide shows without a computer, you can project through the computer's USB port (preferably USB 2.0). Caution: If you will use the interactive pens with your computer meets the system requirements, you can send video and audio output to a Computer for USB Video and Audio If your ...is regulated properly. Note: This also lets you can connect USB devices (such as a flash drive or camera) or an optional EPSON document camera. Extended Menu Product Box Contents Connecting to a Document Camera Parent topic: Setting Up the Projector Related references Projector Setup Settings -

User Manual
Page 36
...the projector to Computer Sources Related references Projector Setup Settings - Connect the other end to any on -screen instructions to install the EPSON USB Display software. Parent topic: Connecting to the computer. For the best performance, VGA or HDMI connections are recommended. 1. Extended... Menu 36 USB Display will slow interactive pen function. Do one of the following: • Windows 7/Windows Vista: Select Run EMP_UDSE.exe in the dialog box that appears to install the EPSON USB Display software. • Windows XP: Wait as messages...
...the projector to Computer Sources Related references Projector Setup Settings - Connect the other end to any on -screen instructions to install the EPSON USB Display software. Parent topic: Connecting to the computer. For the best performance, VGA or HDMI connections are recommended. 1. Extended... Menu 36 USB Display will slow interactive pen function. Do one of the following: • Windows 7/Windows Vista: Select Run EMP_UDSE.exe in the dialog box that appears to install the EPSON USB Display software. • Windows XP: Wait as messages...

User Manual
Page 51
... your computer for network projection. After connecting and setting up the projector as described here, install the network software from the Epson Projector Software CD-ROM on your projector through a wired network. Wired Network Projection Wireless Network Projection Setting Up Projector Network E-... Web Browser Crestron RoomView Support Wired Network Projection You can download the latest software and documentation from your projector for use the interactive pens with your projected computer image, you need to connect the USB cable, even if you monitor and control your projector...
... your computer for network projection. After connecting and setting up the projector as described here, install the network software from the Epson Projector Software CD-ROM on your projector through a wired network. Wired Network Projection Wireless Network Projection Setting Up Projector Network E-... Web Browser Crestron RoomView Support Wired Network Projection You can download the latest software and documentation from your projector for use the interactive pens with your projected computer image, you need to connect the USB cable, even if you monitor and control your projector...
User Manual
Page 55
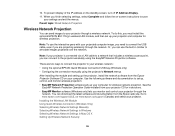
.... Parent topic: Wired Network Projection Wireless Network Projection You can download the latest software and documentation from the Epson Projector Software CD on your projector through the network. Or, you can use the interactive pens with your projected computer image, you are two ways to connect the projector to set up your...
.... Parent topic: Wired Network Projection Wireless Network Projection You can download the latest software and documentation from the Epson Projector Software CD on your projector through the network. Or, you can use the interactive pens with your projected computer image, you are two ways to connect the projector to set up your...

User Manual
Page 76
... projecting from a table or other flat surface, and the image is not tilted an an angle of more than ± 3º vertically or horizontally. 1. For interactive use, make sure the projector is too high or low, you can adjust the image height using the projector's adjustable feet. Turn on the projector...
... projecting from a table or other flat surface, and the image is not tilted an an angle of more than ± 3º vertically or horizontally. 1. For interactive use, make sure the projector is too high or low, you can adjust the image height using the projector's adjustable feet. Turn on the projector...

User Manual
Page 77
Parent topic: Using Basic Projector Features Related concepts Image Shape Related references Projector Feature Settings - Note: For interactive use, the image must be evenly rectangular, without distortion. 4. If the projected image is tilted, rotate the rear feet to adjust their height. If you ...
Parent topic: Using Basic Projector Features Related concepts Image Shape Related references Projector Feature Settings - Note: For interactive use, the image must be evenly rectangular, without distortion. 4. If the projected image is tilted, rotate the rear feet to adjust their height. If you ...

User Manual
Page 78
Note: You can use , make sure the degree of horizontal and vertical keystone correction is unevenly rectangular on the sides. Press one of an image that is no more than ± 6º. 1. Note: For interactive use the projector's keystone correction buttons to correct the shape of these keystone buttons on the projector and display an image. Correcting Image Shape with the Keystone Buttons You can display a pattern to aid in adjusting the projected image using the Settings menu. 2. Turn on the control panel to display the Keystone adjustment screen. 78
Note: You can use , make sure the degree of horizontal and vertical keystone correction is unevenly rectangular on the sides. Press one of an image that is no more than ± 6º. 1. Note: For interactive use the projector's keystone correction buttons to correct the shape of these keystone buttons on the projector and display an image. Correcting Image Shape with the Keystone Buttons You can display a pattern to aid in adjusting the projected image using the Settings menu. 2. Turn on the control panel to display the Keystone adjustment screen. 78

