
User Manual
Page 5
... Keystone Buttons 78 Correcting Image Shape with Quick Corner 80 Resizing the Image with the Wide and Tele Buttons 82 Adjusting the Image Position...82 Focusing the Image...83 Remote Control Operation ...84 Using the Remote Control as a Wireless Mouse 86 Using the Remote Control as a Presentation Pointer 87 Selecting an...
... Keystone Buttons 78 Correcting Image Shape with Quick Corner 80 Resizing the Image with the Wide and Tele Buttons 82 Adjusting the Image Position...82 Focusing the Image...83 Remote Control Operation ...84 Using the Remote Control as a Wireless Mouse 86 Using the Remote Control as a Presentation Pointer 87 Selecting an...

User Manual
Page 20
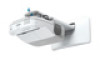
Interface Panel 1 Optional wireless LAN unit slot 2 Audio1 port 3 Audio2 port 4 Computer1 port 20 1 Filter cover switch 2 Security cable installation slot 3 Wireless LAN light 4 Interactive pen receiver 5 Obstacle sensor 6 Remote receiver 7 Projection window 8 Security lock port 9 Air filter cover 10 Air intake vent (air filter) 11 Focus lever Parent topic: Projector Part Locations Projector Parts -
Interface Panel 1 Optional wireless LAN unit slot 2 Audio1 port 3 Audio2 port 4 Computer1 port 20 1 Filter cover switch 2 Security cable installation slot 3 Wireless LAN light 4 Interactive pen receiver 5 Obstacle sensor 6 Remote receiver 7 Projection window 8 Security lock port 9 Air filter cover 10 Air intake vent (air filter) 11 Focus lever Parent topic: Projector Part Locations Projector Parts -

User Manual
Page 72
... the Language for the Projector Menus Adjusting the Image Height Image Shape Resizing the Image with the Wide and Tele Buttons Adjusting the Image Position Focusing the Image Remote Control Operation Selecting an Image Source Projection Modes Image Aspect Ratio Color Mode Controlling the Volume with the Volume Buttons Projecting a Slide...
... the Language for the Projector Menus Adjusting the Image Height Image Shape Resizing the Image with the Wide and Tele Buttons Adjusting the Image Position Focusing the Image Remote Control Operation Selecting an Image Source Projection Modes Image Aspect Ratio Color Mode Controlling the Volume with the Volume Buttons Projecting a Slide...

User Manual
Page 76
... low, you can adjust the image height using the projector's adjustable feet. Caution: Tilting the projector will distort the image shape and may cause difficulty focusing the image. Make sure the feet have been installed. Adjusting the Image Height If you are projecting from a table or other flat surface, and the...
... low, you can adjust the image height using the projector's adjustable feet. Caution: Tilting the projector will distort the image shape and may cause difficulty focusing the image. Make sure the feet have been installed. Adjusting the Image Height If you are projecting from a table or other flat surface, and the...

User Manual
Page 83
... of the projector. 3. Adjust the image size using the Settings menu. 2. Note: You can display a pattern to sharpen the image. 83 Raise or lower the focus lever to aid in adjusting the projected image using the Wide and Tele buttons. Turn on the projector and display an image. 2. Settings Menu...
... of the projector. 3. Adjust the image size using the Settings menu. 2. Note: You can display a pattern to sharpen the image. 83 Raise or lower the focus lever to aid in adjusting the projected image using the Wide and Tele buttons. Turn on the projector and display an image. 2. Settings Menu...

User Manual
Page 113
Adjust the focus if necessary, by opening the cover on the side of the projector and sliding the focus lever. 5. Press Enter to calibrate manually. 113 A pattern appears, and the system is calibrated. Select Auto Calibration and press Enter. 4. 2. If you see a message that calibration failed, you need to select Yes. Select the Easy Interactive Function setting and press Enter. 3.
Adjust the focus if necessary, by opening the cover on the side of the projector and sliding the focus lever. 5. Press Enter to calibrate manually. 113 A pattern appears, and the system is calibrated. Select Auto Calibration and press Enter. 4. 2. If you see a message that calibration failed, you need to select Yes. Select the Easy Interactive Function setting and press Enter. 3.

User Manual
Page 115
Select the Easy Interactive Function setting and press Enter. 3. Select Manual Calibration and press Enter. 4. A flashing green circle appears in the upper left corner of the pen. 115 Press Enter to select Yes. Touch the center of the circle with the tip of your projected image. 6. Adjust the focus if necessary, by opening the cover on the side of the projector and sliding the focus lever. 5. 2.
Select the Easy Interactive Function setting and press Enter. 3. Select Manual Calibration and press Enter. 4. A flashing green circle appears in the upper left corner of the pen. 115 Press Enter to select Yes. Touch the center of the circle with the tip of your projected image. 6. Adjust the focus if necessary, by opening the cover on the side of the projector and sliding the focus lever. 5. 2.

User Manual
Page 127
Connect a document camera to your computer and use Easy Interactive Tools to annotate and work with any image projected from the camera. 1. Select the letters and numbers on the on the image you want to enter text. 4. Tap on the projected field where you want to project. 2. You see a window like this: 127 Select the Camera tool. Parent topic: Using the Easy Interactive Tools for Interactive Mode Using a Document Camera With Easy Interactive Tools You can connect a document camera to your computer's USB port and focus on -screen keyboard. 3.
Connect a document camera to your computer and use Easy Interactive Tools to annotate and work with any image projected from the camera. 1. Select the letters and numbers on the on the image you want to enter text. 4. Tap on the projected field where you want to project. 2. You see a window like this: 127 Select the Camera tool. Parent topic: Using the Easy Interactive Tools for Interactive Mode Using a Document Camera With Easy Interactive Tools You can connect a document camera to your computer's USB port and focus on -screen keyboard. 3.

User Manual
Page 157
... or line pattern to display User Pattern: captures a projected screen and saves it as a pattern for display Test Pattern: displays a test pattern to assist in focusing and zooming the image and correcting image shape Parent topic: Adjusting the Menu Settings Projector Setup Settings -
... or line pattern to display User Pattern: captures a projected screen and saves it as a pattern for display Test Pattern: displays a test pattern to assist in focusing and zooming the image and correcting image shape Parent topic: Adjusting the Menu Settings Projector Setup Settings -

User Manual
Page 193
...; Position the projector so the keystone adjustment angle is not so wide that is fuzzy or blurry, try the following solutions: • Adjust the image focus. • Position the projector close enough to the screen, and directly in the signal.
...; Position the projector so the keystone adjustment angle is not so wide that is fuzzy or blurry, try the following solutions: • Adjust the image focus. • Position the projector close enough to the screen, and directly in the signal.

User Manual
Page 194
... Quality Settings - Signal Menu Projector Feature Settings - Parent topic: Solving Image or Sound Problems Related references Input Signal Settings - Image Menu Projection Distance Related tasks Focusing the Image Cleaning the Projection Window Solutions When the Image Brightness or Colors are Incorrect If the projected image is too dark or light, or...
... Quality Settings - Signal Menu Projector Feature Settings - Parent topic: Solving Image or Sound Problems Related references Input Signal Settings - Image Menu Projection Distance Related tasks Focusing the Image Cleaning the Projection Window Solutions When the Image Brightness or Colors are Incorrect If the projected image is too dark or light, or...

User Manual
Page 204
... Optical aspect ratio (width-to-height) Focus adjustment Zoom adjustment Zoom ratio (Tele-to-Wide) BrightLink 480i: Normal Power Consumption mode: White light output 3000 lumens (ISO 21118 standard) Color light output 3000 lumens ECO Power Consumption mode: White light output 1800 lumens (ISO 21118 standard) BrightLink 485Wi: Normal Power Consumption mode: White light...
... Optical aspect ratio (width-to-height) Focus adjustment Zoom adjustment Zoom ratio (Tele-to-Wide) BrightLink 480i: Normal Power Consumption mode: White light output 3000 lumens (ISO 21118 standard) Color light output 3000 lumens ECO Power Consumption mode: White light output 1800 lumens (ISO 21118 standard) BrightLink 485Wi: Normal Power Consumption mode: White light...

Installation Guide
Page 4
... arm to the wall mount 9. Change the aspect ratio if necessary 4. Adjust the vertical slide 11. Attach the projector to the wall plate 7. Adjust the focus 5. Turn off the display of the arm 8. Attach the cable cover to the projector s 23 6 Adjusting the Image 1. Display the test pattern 3. 1 Package Contents s5...
... arm to the wall mount 9. Change the aspect ratio if necessary 4. Adjust the vertical slide 11. Attach the projector to the wall plate 7. Adjust the focus 5. Turn off the display of the arm 8. Attach the cable cover to the projector s 23 6 Adjusting the Image 1. Display the test pattern 3. 1 Package Contents s5...

Installation Guide
Page 36
... you finish making the adjustment, close the air filter cover. D Adjust the focus 1. After you loosened in the following illustration ( ). 2. Use the focus lever to , tighten the screw you finish making all of the adjustments in steps to adjust the focus ( ). E Use the adjustment knob on the left side to adjust the horizontal...
... you finish making the adjustment, close the air filter cover. D Adjust the focus 1. After you loosened in the following illustration ( ). 2. Use the focus lever to , tighten the screw you finish making all of the adjustments in steps to adjust the focus ( ). E Use the adjustment knob on the left side to adjust the horizontal...
Product Brochure
Page 6
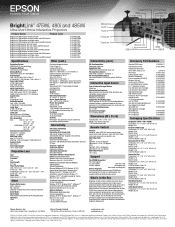
...BrightLink 485Wi projector with table mount and RM Easiteach V11H453520W V11H453520WR V11H453520T V11H453520TR V11H486520W V11H486520WR V11H486520T V11H486520TR V11H452520W V11H452520WR V11H452520T V11H452520TR Microphone Audio 1 Audio 2 Computer 1 Computer 2 Monitor Out LAN USB-A HDMI USB-B Specifications Other (cont.) Interactivity (cont.) Accessory Part Numbers Projection System Computer/component video PC-Free Annotation Genuine EPSON lamp V13H010L71 EPSON... Software Requirements Interactive Pen Manual focus EPSON Easy Interactive Driver F-number Windows and Linux: ...
...BrightLink 485Wi projector with table mount and RM Easiteach V11H453520W V11H453520WR V11H453520T V11H453520TR V11H486520W V11H486520WR V11H486520T V11H486520TR V11H452520W V11H452520WR V11H452520T V11H452520TR Microphone Audio 1 Audio 2 Computer 1 Computer 2 Monitor Out LAN USB-A HDMI USB-B Specifications Other (cont.) Interactivity (cont.) Accessory Part Numbers Projection System Computer/component video PC-Free Annotation Genuine EPSON lamp V13H010L71 EPSON... Software Requirements Interactive Pen Manual focus EPSON Easy Interactive Driver F-number Windows and Linux: ...