Product Brochure
Page 8
...Total print volume Print head life Cutter life Maintenance parts 20,000 B0 pages at ~16 ft2/hr Acoustic Noise Level Approximately 50 dB(A) according to ISO 7779 Printer Language EPSON ESC/P Raster Photographic Drivers standard External server based Adobe... 22.5"(D) 49.2"(H) with optional printer stand Printer weight: 96 lb SP9600 63.9"(W) x 46.4"(H) x 28.2"(D) Printer weight: 185 lb with optional software RIP. EPSON Stylus Pro 7600 & 9600 Print Engine Specifications Printing Method 7-color (CcMmYKk) EPSON UltraChrome Ink or 6-color (CcMmYKK) EPSON Photographic Dye Ink Variable Droplet ...
...Total print volume Print head life Cutter life Maintenance parts 20,000 B0 pages at ~16 ft2/hr Acoustic Noise Level Approximately 50 dB(A) according to ISO 7779 Printer Language EPSON ESC/P Raster Photographic Drivers standard External server based Adobe... 22.5"(D) 49.2"(H) with optional printer stand Printer weight: 96 lb SP9600 63.9"(W) x 46.4"(H) x 28.2"(D) Printer weight: 185 lb with optional software RIP. EPSON Stylus Pro 7600 & 9600 Print Engine Specifications Printing Method 7-color (CcMmYKk) EPSON UltraChrome Ink or 6-color (CcMmYKK) EPSON Photographic Dye Ink Variable Droplet ...

Product Information Guide
Page 2
...problems. If you encounter problems, switch to a higher grade of your printed image. EPSON Stylus Pro 7600 and 9600 Electrical Specification Input voltage range Rated frequency range Input frequency range Rated current Power consumption ...to 60 Hz 49 to 61 Hz 1.0A 0.5A Stylus Pro 7600: Approx. 50 W (ISO 10561 Letter Pattern) Stylus Pro 9600: Approx. 55 W (ISO 10561 Letter Pattern) Both printers: 12 W or less in sleep mode Mechanical Paper ... standards UL 1950, CSA C22.2 No. 950 FDA EMC FCC part 15 subpart B, class B, CSA C108.8 class B 3 - wide (Stylus Pro 9600) (210 to 24 in .
...problems. If you encounter problems, switch to a higher grade of your printed image. EPSON Stylus Pro 7600 and 9600 Electrical Specification Input voltage range Rated frequency range Input frequency range Rated current Power consumption ...to 60 Hz 49 to 61 Hz 1.0A 0.5A Stylus Pro 7600: Approx. 50 W (ISO 10561 Letter Pattern) Stylus Pro 9600: Approx. 55 W (ISO 10561 Letter Pattern) Both printers: 12 W or less in sleep mode Mechanical Paper ... standards UL 1950, CSA C22.2 No. 950 FDA EMC FCC part 15 subpart B, class B, CSA C108.8 class B 3 - wide (Stylus Pro 9600) (210 to 24 in .

Product Information Guide
Page 4
... are available: Part Part number EPSON Stylus Pro 7600 Printer Stand C12C844061 EFI® Fiery® Spark Professional 2.0 Software RIP C842832 Internal 10/100 BaseT (Ethernet™) Type-B interface card C12C823912 Internal IEEE 1394 (FireWire™) Type-B interface card C823722 Automatic Take-Up Reel System (Stylus Pro 9600 only) C12C815251 Replacement 44-inch Take-up Reel Core (Stylus Pro 9600 only) C815121...
... are available: Part Part number EPSON Stylus Pro 7600 Printer Stand C12C844061 EFI® Fiery® Spark Professional 2.0 Software RIP C842832 Internal 10/100 BaseT (Ethernet™) Type-B interface card C12C823912 Internal IEEE 1394 (FireWire™) Type-B interface card C823722 Automatic Take-Up Reel System (Stylus Pro 9600 only) C12C815251 Replacement 44-inch Take-up Reel Core (Stylus Pro 9600 only) C815121...
Product Information Guide
Page 7
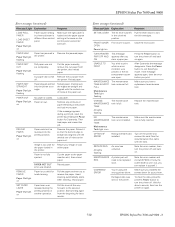
...remove the paper. Press the Power button to be reversed into the printer at the paper exit. Turn off and back on. Note the error number, then turn the printer off . MAINTENANCE A printer part will REQ. Damaged data was left in the unlocked position. Make ... Explanation Response SET INK LEVER The ink lever was sent to turn the printer on again. 7/02 EPSON Stylus Pro 7600 and 9600 - 8 PAPER NOT CUT Paper Out light flashing Roll paper was open . Resize your printer. After 3 seconds the message disappears. TANK All lights flashing Replace the ...
...remove the paper. Press the Power button to be reversed into the printer at the paper exit. Turn off and back on. Note the error number, then turn the printer off . MAINTENANCE A printer part will REQ. Damaged data was left in the unlocked position. Make ... Explanation Response SET INK LEVER The ink lever was sent to turn the printer on again. 7/02 EPSON Stylus Pro 7600 and 9600 - 8 PAPER NOT CUT Paper Out light flashing Roll paper was open . Resize your printer. After 3 seconds the message disappears. TANK All lights flashing Replace the ...

Product Information Guide
Page 8
... flashing. Then follow these steps to print the status check: 1. Note the color of the cartridge whose Ink Out light is turned on. EPSON Stylus Pro 7600 and 9600 Printing a Status Check The status check shows the amount of ink remaining in the printer. (You can print test pages on roll paper, but you will use...
... flashing. Then follow these steps to print the status check: 1. Note the color of the cartridge whose Ink Out light is turned on. EPSON Stylus Pro 7600 and 9600 Printing a Status Check The status check shows the amount of ink remaining in the printer. (You can print test pages on roll paper, but you will use...
Product Information Guide
Page 11
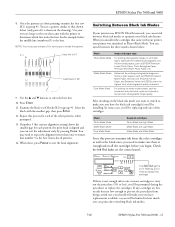
...is aligned and you can print after switching black ink modes. 7/02 EPSON Stylus Pro 7600 and 9600 - 12 In the example below (only part of it is the best. If any cartridges are done printing, examine .... After deciding on ink but not low enough to prevent the procedure from the color cartridges as well as EPSON Enhanced Matte Paper, Smooth and Textured Fine Art Paper, and Somerset Velvet for all...alignment more cartridges to ensure that came with your printer, your own eye loupe or the one that number 5 is the best choice for EPSON, when the highest level of blocks (K2) ...
...is aligned and you can print after switching black ink modes. 7/02 EPSON Stylus Pro 7600 and 9600 - 12 In the example below (only part of it is the best. If any cartridges are done printing, examine .... After deciding on ink but not low enough to prevent the procedure from the color cartridges as well as EPSON Enhanced Matte Paper, Smooth and Textured Fine Art Paper, and Somerset Velvet for all...alignment more cartridges to ensure that came with your printer, your own eye loupe or the one that number 5 is the best choice for EPSON, when the highest level of blocks (K2) ...

Product Support Bulletin(s)
Page 1
...on our WEB SIte: www.epson.com from the MAC Drivers & Downloads section for the Stylus Pro 5500, 7600DYE, 7600UCM, 9600DYE, 9600UCM, 10000DYE, 10000CF, 10600UCM standard Mac OS X Epson printer drivers released prior to January 01, 2004. EPSON Professional Graphics Group Page 1. EPSON PRODUCT SUPPORT BULLETIN Date: 3/...as part of the Epson MAC OS X driver released prior to January 01, 2004, and supersedes the epson10997 connectivity Plug-in up-date for each of a Epson Driver Plug-in up -date, you upgrade your MAC OS-X operating system to reinstall the Epson Printer Driver ...
...on our WEB SIte: www.epson.com from the MAC Drivers & Downloads section for the Stylus Pro 5500, 7600DYE, 7600UCM, 9600DYE, 9600UCM, 10000DYE, 10000CF, 10600UCM standard Mac OS X Epson printer drivers released prior to January 01, 2004. EPSON Professional Graphics Group Page 1. EPSON PRODUCT SUPPORT BULLETIN Date: 3/...as part of the Epson MAC OS X driver released prior to January 01, 2004, and supersedes the epson10997 connectivity Plug-in up-date for each of a Epson Driver Plug-in up -date, you upgrade your MAC OS-X operating system to reinstall the Epson Printer Driver ...
Product Support Bulletin(s)
Page 59
...8.6 to 9.2.2 with USB or IEEE1394 connection with EPSON Standard Printer Driver and EPSON Status Monitor 3 installed and USB, IEEE1394 or Parallel connection. EPSON Professional Graphics Group Page 2. Note: The Standard EPSON Printer Driver and Status Monitor 3 must be installed in order to use EPSON genuine coated media such as Enhanced Matte Paper, ... to page 28. Firmware Compatibility Requirements: In order for the Print Head Alignment utility to function properly, please update your printers firmware, please refer to performing any adjustments, it is part of driver) installed.
...8.6 to 9.2.2 with USB or IEEE1394 connection with EPSON Standard Printer Driver and EPSON Status Monitor 3 installed and USB, IEEE1394 or Parallel connection. EPSON Professional Graphics Group Page 2. Note: The Standard EPSON Printer Driver and Status Monitor 3 must be installed in order to use EPSON genuine coated media such as Enhanced Matte Paper, ... to page 28. Firmware Compatibility Requirements: In order for the Print Head Alignment utility to function properly, please update your printers firmware, please refer to performing any adjustments, it is part of driver) installed.

User Manual
Page 2
...reproduced, stored in a retrieval system, or transmitted in those designated as applied to strictly comply with these EPSON printers. Trademarks EPSON, EPSON Stylus, EPSON ESC/P, MicroWeave, and Micro Piezo are for use of this product or unauthorized modifications, repairs, or alterations ...permission of any options or any consumable products other printers. The ENERGY STAR emblem does not represent EPA endorsement of their respective owners. No part of this information as Original EPSON Products or EPSON Approved Products by SEIKO EPSON CORPORATION. All rights reserved.
...reproduced, stored in a retrieval system, or transmitted in those designated as applied to strictly comply with these EPSON printers. Trademarks EPSON, EPSON Stylus, EPSON ESC/P, MicroWeave, and Micro Piezo are for use of this product or unauthorized modifications, repairs, or alterations ...permission of any options or any consumable products other printers. The ENERGY STAR emblem does not represent EPA endorsement of their respective owners. No part of this information as Original EPSON Products or EPSON Approved Products by SEIKO EPSON CORPORATION. All rights reserved.

User Manual
Page 3
... interference to which can radiate radio frequency energy and, if not installed and used in accordance with the limits for a Class B digital device, pursuant to Part 15 of the user to obtain and use a shielded equipment interface cable with Canadian ICES-003. If this equipment has more of this equipment does...
... interference to which can radiate radio frequency energy and, if not installed and used in accordance with the limits for a Class B digital device, pursuant to Part 15 of the user to obtain and use a shielded equipment interface cable with Canadian ICES-003. If this equipment has more of this equipment does...
User Manual
Page 7
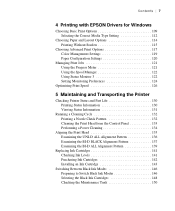
... | 7 4 Printing with EPSON Drivers for Windows Choosing Basic Print Options 109 Selecting the Correct Media Type Setting 112 Choosing Paper and Layout Options 114 Printing Without Borders 115 Choosing Advanced Print Options 117 Color Management Settings 119 Paper Configuration ...Settings 120 Managing Print Jobs 121 Using the Progress Meter 121 Using the Spool Manager 122 Using Status Monitor 3 122 Setting Monitoring Preferences 124 Optimizing Print Speed 126 5 Maintaining and Transporting the Printer Checking Printer Status and Part...
... | 7 4 Printing with EPSON Drivers for Windows Choosing Basic Print Options 109 Selecting the Correct Media Type Setting 112 Choosing Paper and Layout Options 114 Printing Without Borders 115 Choosing Advanced Print Options 117 Color Management Settings 119 Paper Configuration ...Settings 120 Managing Print Jobs 121 Using the Progress Meter 121 Using the Spool Manager 122 Using Status Monitor 3 122 Setting Monitoring Preferences 124 Optimizing Print Speed 126 5 Maintaining and Transporting the Printer Checking Printer Status and Part...

User Manual
Page 9
..., and utility software. You can read the guide using a web browser, such as ink cartridges. Introduction Note To set up your printer, selecting paper, basic operation, and replacing parts such as Netscape® Navigator® or Microsoft® Internet Explorer, versions 3.0 or later. TIP Tips contain additional hints on the CD-ROM...
..., and utility software. You can read the guide using a web browser, such as ink cartridges. Introduction Note To set up your printer, selecting paper, basic operation, and replacing parts such as Netscape® Navigator® or Microsoft® Internet Explorer, versions 3.0 or later. TIP Tips contain additional hints on the CD-ROM...

User Manual
Page 10
... cutter. 10 10 | Introduction TIP Check the EPSON Pro Graphics web site at http://prographics.epson. or 3-inch Stylus Pro 7600: Stylus Pro 9600: C12C811161 C12C811151 Paper Roller Spindle (High Tension) - 2- Options and Accessories Your EPSON Stylus Pro 7600 and 9600 offer these optional upgrades and accessories: Optional equipment and software Option Part number EPSON Stylus Pro 7600 Printer Stand C12C844061 EFI® Fiery® Spark Professional...
... cutter. 10 10 | Introduction TIP Check the EPSON Pro Graphics web site at http://prographics.epson. or 3-inch Stylus Pro 7600: Stylus Pro 9600: C12C811161 C12C811151 Paper Roller Spindle (High Tension) - 2- Options and Accessories Your EPSON Stylus Pro 7600 and 9600 offer these optional upgrades and accessories: Optional equipment and software Option Part number EPSON Stylus Pro 7600 Printer Stand C12C844061 EFI® Fiery® Spark Professional...

User Manual
Page 11
... items: Consumables and user-replaceable parts Part Replacement Ink Maintenance Tank* Stylus Pro 7600: Stylus Pro 9600: Replacement Printer Cutter Blade** Ink Cartridges Paper (roll and sheet) Part number C120890071 C126890071 C12C815241 See page 142 for the printer's built-in cutter (see page 153). Support hours and days are subject to 8 PM, Pacific Time, Monday through the EPSON PreferredSM Protection Plan.
... items: Consumables and user-replaceable parts Part Replacement Ink Maintenance Tank* Stylus Pro 7600: Stylus Pro 9600: Replacement Printer Cutter Blade** Ink Cartridges Paper (roll and sheet) Part number C120890071 C126890071 C12C815241 See page 142 for the printer's built-in cutter (see page 153). Support hours and days are subject to 8 PM, Pacific Time, Monday through the EPSON PreferredSM Protection Plan.

User Manual
Page 18
Otherwise, skip ahead to assemble your printer. If you have all these items. You will also need a Phillips screwdriver. 18 | Setting Up the Printer Warning Assembly requires two people. Unpacking and Assembling the Stylus Pro 7600 Follow these steps to unpack and assemble it. ...Unpack the stand and make sure you have an optional stand for the Stylus Pro 7600, follow these steps to "Unpacking the Printer" on page 21. 1. Parts: C A B D F E A: Base, right and left (1 each) B: Leg, right and left (1 each) C: Bottom support bar(1) D: Top ...
Otherwise, skip ahead to assemble your printer. If you have all these items. You will also need a Phillips screwdriver. 18 | Setting Up the Printer Warning Assembly requires two people. Unpacking and Assembling the Stylus Pro 7600 Follow these steps to unpack and assemble it. ...Unpack the stand and make sure you have an optional stand for the Stylus Pro 7600, follow these steps to "Unpacking the Printer" on page 21. 1. Parts: C A B D F E A: Base, right and left (1 each) B: Leg, right and left (1 each) C: Bottom support bar(1) D: Top ...

User Manual
Page 20
Attach the top support bar as shown. Fasten the bar with one collar (J) and one bolt (I) at each part of the stand is tightened securely. 1-20 Make sure each end. 20 | Setting Up the Printer 3. Attach the bottom support bar as shown. K K 6. Use a Phillips screwdriver to fasten the four small screws (K). J K 5. Assemble the other leg and base in the same way. H 4.
Attach the top support bar as shown. Fasten the bar with one collar (J) and one bolt (I) at each part of the stand is tightened securely. 1-20 Make sure each end. 20 | Setting Up the Printer 3. Attach the bottom support bar as shown. K K 6. Use a Phillips screwdriver to fasten the four small screws (K). J K 5. Assemble the other leg and base in the same way. H 4.

User Manual
Page 27
... up and away from the sides of the box. 2. Setting Up the Printer | 27 Warning Two people are required to unpack the printer, and four are needed to assemble your printer. Unpacking the Stand 1. Unpacking and Assembling the Stylus Pro 9600 Follow these items: Parts: A B C E F D A: Left base section B: Right base section C: Support bar D: Basket hooks, long (2) E: Basket...
... up and away from the sides of the box. 2. Setting Up the Printer | 27 Warning Two people are required to unpack the printer, and four are needed to assemble your printer. Unpacking the Stand 1. Unpacking and Assembling the Stylus Pro 9600 Follow these items: Parts: A B C E F D A: Left base section B: Right base section C: Support bar D: Basket hooks, long (2) E: Basket...

User Manual
Page 33
Open the front cover. Then move the printer to check underneath and on the sides. 6. Be sure to the place of use. (The casters are meant for moving the printer for only a short distance.) Lock the casters and extend the stabilizer knobs after moving. 1-33 Then unscrew the bolt and remove the bracket securing the print head, as shown above. Save these parts in case you need to ship the printer. 7. Remove any packing tape from the printer. Raise the stabilizer knobs and unlock the casters. Setting Up the Printer | 33 5. Close the front cover. 8.
Open the front cover. Then move the printer to check underneath and on the sides. 6. Be sure to the place of use. (The casters are meant for moving the printer for only a short distance.) Lock the casters and extend the stabilizer knobs after moving. 1-33 Then unscrew the bolt and remove the bracket securing the print head, as shown above. Save these parts in case you need to ship the printer. 7. Remove any packing tape from the printer. Raise the stabilizer knobs and unlock the casters. Setting Up the Printer | 33 5. Close the front cover. 8.

User Manual
Page 98
Follow steps 1 through 4 on the lower part of options to achieve photo lab quality) • SuperFine - 1440dpi Better than photo lab quality • SuperPhoto - 2880dpi For the highest quality photos and prints; ... astonishing level of the following : These three settings give you complete control over your printing environment. Follow these settings to experiment or to print with EPSON Drivers for Macintosh Choosing Advanced Print Options The advanced print options give you can change your individual needs. If necessary, you different options on page...
Follow steps 1 through 4 on the lower part of options to achieve photo lab quality) • SuperFine - 1440dpi Better than photo lab quality • SuperPhoto - 2880dpi For the highest quality photos and prints; ... astonishing level of the following : These three settings give you complete control over your printing environment. Follow these settings to experiment or to print with EPSON Drivers for Macintosh Choosing Advanced Print Options The advanced print options give you can change your individual needs. If necessary, you different options on page...

User Manual
Page 117
...When you choose PhotoEnhance4, you can change your Media Type setting. 3. If necessary, you see a different set of options on the lower part of the screen Note Some of these Advanced settings to experiment or to fine-tune a range of photographic quality 4-117 You see a dialog... than photo lab quality • SuperPhoto - 2880dpi For the highest quality photos and prints; Click Custom and then click Advanced. Printing with EPSON Drivers for Windows | 117 Choosing Advanced Print Options For complete control over your printed results, use these options may not appear, depending on ...
...When you choose PhotoEnhance4, you can change your Media Type setting. 3. If necessary, you see a different set of options on the lower part of the screen Note Some of these Advanced settings to experiment or to fine-tune a range of photographic quality 4-117 You see a dialog... than photo lab quality • SuperPhoto - 2880dpi For the highest quality photos and prints; Click Custom and then click Advanced. Printing with EPSON Drivers for Windows | 117 Choosing Advanced Print Options For complete control over your printed results, use these options may not appear, depending on ...

