
Taking Care of Your Photographs
Page 1
Taking Care of traditional photos. Epson currently offers both dye-based, six-color Epson Stylus Photo printers and the six-color Epson Stylus Photo 2000P printers that is a good choice for prints that will be framed under glass, laminated or placed in combination with Epson Photo Inks used in archival photo sleeves. Photos Printed With Dye-Based Epson Stylus Photo Printers (Epson Stylus Photo 780/785EPX/870/875DC/875DCS/890/1270/1280) The Epson Stylus Photo printers listed above use...
Taking Care of traditional photos. Epson currently offers both dye-based, six-color Epson Stylus Photo printers and the six-color Epson Stylus Photo 2000P printers that is a good choice for prints that will be framed under glass, laminated or placed in combination with Epson Photo Inks used in archival photo sleeves. Photos Printed With Dye-Based Epson Stylus Photo Printers (Epson Stylus Photo 780/785EPX/870/875DC/875DCS/890/1270/1280) The Epson Stylus Photo printers listed above use...

Printer Basics
Page 7
...memory card that came with , maintaining, or troubleshooting your printer, see page 2. 1 Just insert your Memory Stick into the PC card adapter included with your Sony® Memory Stick® products, the EPSON Stylus® Photo 875DCS makes it , see your electronic Reference Guide. For instructions... on a Macintosh s using special papers s using a Memory Stick also apply to your printer and install its software, see the Start Here ...
...memory card that came with , maintaining, or troubleshooting your printer, see page 2. 1 Just insert your Memory Stick into the PC card adapter included with your Sony® Memory Stick® products, the EPSON Stylus® Photo 875DCS makes it , see your electronic Reference Guide. For instructions... on a Macintosh s using special papers s using a Memory Stick also apply to your printer and install its software, see the Start Here ...

Printer Basics
Page 9
Windows: Double-click My Computer, double-click your printer software CD-ROM. 2. Click View Electronic Documentation. For details on viewing the manual, see the next section. Macintosh: Open the EPSON Stylus Photo 875DCS folder and double-click View Reference Guide. 3 Follow these steps: 1. You can either ...4. Insert your DVD drive icon, then double-click the EPSON icon. CD-ROM or Macintosh: Double-click the EPSON CD-ROM icon, then the EPSON icon. The Main Menu appears: 3. Accessing Your Electronic Printer Manual You can view your electronic Reference Guide from the CD...
Windows: Double-click My Computer, double-click your printer software CD-ROM. 2. Click View Electronic Documentation. For details on viewing the manual, see the next section. Macintosh: Open the EPSON Stylus Photo 875DCS folder and double-click View Reference Guide. 3 Follow these steps: 1. You can either ...4. Insert your DVD drive icon, then double-click the EPSON icon. CD-ROM or Macintosh: Double-click the EPSON CD-ROM icon, then the EPSON icon. The Main Menu appears: 3. Accessing Your Electronic Printer Manual You can view your electronic Reference Guide from the CD...
Printer Basics
Page 10
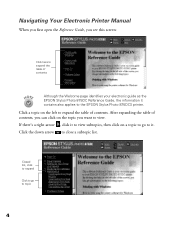
..., you can click on the left to view. Click the down arrow to it to view subtopics, then click on a topic to go to the EPSON Stylus Photo 875DCS printer. If there's a right arrow , click it . After expanding the table of contents. Click a topic on the topic you want to expand the table of contents..., you see this screen: Click here to expand the table of contents Although the Welcome page identifies your electronic guide as the EPSON Stylus Photo 875DC Reference Guide, the information it contains also applies to topic 4
..., you can click on the left to view. Click the down arrow to it to view subtopics, then click on a topic to go to the EPSON Stylus Photo 875DCS printer. If there's a right arrow , click it . After expanding the table of contents. Click a topic on the topic you want to expand the table of contents..., you see this screen: Click here to expand the table of contents Although the Welcome page identifies your electronic guide as the EPSON Stylus Photo 875DC Reference Guide, the information it contains also applies to topic 4

Printer Basics
Page 13
...on the Print window (your window may not get the option to change the printer software settings before printing. 7 Opening the Printer Software After you open your printer software Make the following selections on your application's toolbar instead of selecting Print from ... your printer software settings. s Click the Properties button. (If you see your application's Print window: Click here to open your application program and create your document, you may look slightly different): s Make sure your EPSON Stylus Photo 875DCS printer model is selected. You see a Setup, Printer, or...
...on the Print window (your window may not get the option to change the printer software settings before printing. 7 Opening the Printer Software After you open your printer software Make the following selections on your application's toolbar instead of selecting Print from ... your printer software settings. s Click the Properties button. (If you see your application's Print window: Click here to open your application program and create your document, you may look slightly different): s Make sure your EPSON Stylus Photo 875DCS printer model is selected. You see a Setup, Printer, or...

Printer Basics
Page 15
... you want to save them as a group; Right-click the EPSON Stylus Photo 875DCS printer icon. 3. Click OK when you can change the default settings in different applications-for all your applications. Select the default settings you 're currently using the Windows Printers utility: 1. see your printer icon . . . 4. If you make apply only to Settings, and then...
... you want to save them as a group; Right-click the EPSON Stylus Photo 875DCS printer icon. 3. Click OK when you can change the default settings in different applications-for all your applications. Select the default settings you 're currently using the Windows Printers utility: 1. see your printer icon . . . 4. If you make apply only to Settings, and then...

Printer Basics
Page 24
...roll paper. EPSON Premium Glossy Photo Paper EPSON Premium Glossy Photo Paper is a photographic-weight paper with Premium Glossy Photo Paper, be sure to -edge, on any kind of Premium Glossy Photo Paper that you print with a high gloss finish suitable for your printer into a photo reproduction studio by... EPSON paper can make, we've included some free samples. See page 26 for a list of media are available for photographic applications. You always need to load, remove, and store your EPSON Stylus Photo 875DCS. Whenever you 'll get the best-looking photos, most vivid colors,...
...roll paper. EPSON Premium Glossy Photo Paper EPSON Premium Glossy Photo Paper is a photographic-weight paper with Premium Glossy Photo Paper, be sure to -edge, on any kind of Premium Glossy Photo Paper that you print with a high gloss finish suitable for your printer into a photo reproduction studio by... EPSON paper can make, we've included some free samples. See page 26 for a list of media are available for photographic applications. You always need to load, remove, and store your EPSON Stylus Photo 875DCS. Whenever you 'll get the best-looking photos, most vivid colors,...

Printer Basics
Page 33
... plastic sleeve to achieve improved lightfastness when used with the EPSON Stylus Photo 875DCS printer will minimize color changes and lengthen display life. The special EPSON inks designed for many years. For proper storage, Epson recommends that are specially formulated to protect them from direct sunlight. As with traditional photos, proper care will preserve your prints away from atmospheric...
... plastic sleeve to achieve improved lightfastness when used with the EPSON Stylus Photo 875DCS printer will minimize color changes and lengthen display life. The special EPSON inks designed for many years. For proper storage, Epson recommends that are specially formulated to protect them from direct sunlight. As with traditional photos, proper care will preserve your prints away from atmospheric...
Printer Basics
Page 56
... Cleaning utility: 1. Or, with Windows, click Start, point to run a nozzle check to clean the print head. Right-click the EPSON Stylus Photo 875DCS printer icon in the printer and click Print nozzle check pattern. The nozzle check pattern prints (see page 51 for more than 5 minutes. 6. Follow these steps ...turn off . (If an ink out light is loaded in the Printers window. If you have an application running, access the printer settings window as described on but not printing, and both the B black and A color ink out lights are clean. Make sure paper is flashing, replace...
... Cleaning utility: 1. Or, with Windows, click Start, point to run a nozzle check to clean the print head. Right-click the EPSON Stylus Photo 875DCS printer icon in the printer and click Print nozzle check pattern. The nozzle check pattern prints (see page 51 for more than 5 minutes. 6. Follow these steps ...turn off . (If an ink out light is loaded in the Printers window. If you have an application running, access the printer settings window as described on but not printing, and both the B black and A color ink out lights are clean. Make sure paper is flashing, replace...

Printer Basics
Page 61
..., or photocopier paper. 2. If you may need to Settings, then select Printers. When it locks in the Printers window and select Properties. 55 Right-click the EPSON Stylus Photo 875DCS printer icon in place. (The color clamp is a bit harder to align the print head. The Ppower light ...flashes, and the printer makes noise. Or, with Windows, click Start, point to replace the other ink cartridge, repeat ...
..., or photocopier paper. 2. If you may need to Settings, then select Printers. When it locks in the Printers window and select Properties. 55 Right-click the EPSON Stylus Photo 875DCS printer icon in place. (The color clamp is a bit harder to align the print head. The Ppower light ...flashes, and the printer makes noise. Or, with Windows, click Start, point to replace the other ink cartridge, repeat ...

Printer Basics
Page 70
...EPSON Stylus Photo 875DCS is selected as the default printer in the Printers utility (Windows), or the SP 875DCS is printing, but nothing prints. The printer... 80. Your printer makes noise when you turn High Speed on or after it on . 64 s In the printer software's Advanced... as described in the Chooser (Macintosh). Your printer is too slow. If you're printing ...'s RAM. If the check page prints, make sure your printer and application software are not clogged. s Make sure the ...you need to set up your printer for a while. s If you 're not using. To ...
...EPSON Stylus Photo 875DCS is selected as the default printer in the Printers utility (Windows), or the SP 875DCS is printing, but nothing prints. The printer... 80. Your printer makes noise when you turn High Speed on or after it on . 64 s In the printer software's Advanced... as described in the Chooser (Macintosh). Your printer is too slow. If you're printing ...'s RAM. If the check page prints, make sure your printer and application software are not clogged. s Make sure the ...you need to set up your printer for a while. s If you 're not using. To ...
Printer Basics
Page 74
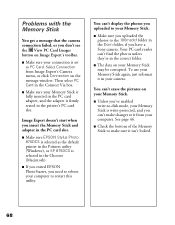
... 't erase the pictures on the message window. You can 't display the photos you can 't find the photos unless they're in the correct folder. See page 46. s Make sure EPSON Stylus Photo 875DCS is selected as the default printer in the Printers utility (Windows), or SP 875DCS is write-protected, and you uploaded to your computer to PC Card...
... 't erase the pictures on the message window. You can 't display the photos you can 't find the photos unless they're in the correct folder. See page 46. s Make sure EPSON Stylus Photo 875DCS is selected as the default printer in the Printers utility (Windows), or SP 875DCS is write-protected, and you uploaded to your computer to PC Card...

Printer Basics
Page 75
...in an album on your hard drive. You have to copy the photos to your Memory Stick. s You turned off or disconnected your printer without first ejecting your Macintosh. 69 s If you make changes to your photos in PhotoDeluxe, make sure you don't save the edited images to an... RW Switcher doesn't toggle between read-only mode and write-to eject your camera. Make sure EPSON Stylus Photo 875DCS is selected as the default printer in the Printers utility (Windows), or SP 875DCS is selected in your Memory Stick (see page 36 for instructions). To get rid of the USB cable (Macintosh ...
...in an album on your hard drive. You have to copy the photos to your Memory Stick. s You turned off or disconnected your printer without first ejecting your Macintosh. 69 s If you make changes to your photos in PhotoDeluxe, make sure you don't save the edited images to an... RW Switcher doesn't toggle between read-only mode and write-to eject your camera. Make sure EPSON Stylus Photo 875DCS is selected as the default printer in the Printers utility (Windows), or SP 875DCS is selected in your Memory Stick (see page 36 for instructions). To get rid of the USB cable (Macintosh ...

Printer Basics
Page 78
... the Control Panel icon. 5. Make sure EPSON USB Memory Card Driver is selected, then click OK. 7. On the Printer Model tab, select the EPSON Stylus Photo 875DCS printer icon. Follow the instructions on the screen. If you 're done, click EPSON USB Printer Devices in the program list, and then ...click the Add/Remove button. 6. Repeat step 8 for EPSON USB RW Switcher and Image Expert...
... the Control Panel icon. 5. Make sure EPSON USB Memory Card Driver is selected, then click OK. 7. On the Printer Model tab, select the EPSON Stylus Photo 875DCS printer icon. Follow the instructions on the screen. If you 're done, click EPSON USB Printer Devices in the program list, and then ...click the Add/Remove button. 6. Repeat step 8 for EPSON USB RW Switcher and Image Expert...

Printer Basics
Page 79
... the Utility tab. then click the Change/Remove button. 8. Uninstalling Windows 2000 Software 1. Double-click Add/Remove Programs. Click EPSON Printer Software in the printer's PC card slot, wait for the confirmation message, then press the card eject lever to remove USB RW Switcher. When you...click End on the screen. Double-click My Computer, then double-click the Control Panel icon. 5. On the Printer Model tab, select the EPSON Stylus Photo 875DCS printer icon. Make sure EPSON USB Memory Card Driver is selected and click Next. 73 Follow the instructions on the menu that pops up....
... the Utility tab. then click the Change/Remove button. 8. Uninstalling Windows 2000 Software 1. Double-click Add/Remove Programs. Click EPSON Printer Software in the printer's PC card slot, wait for the confirmation message, then press the card eject lever to remove USB RW Switcher. When you...click End on the screen. Double-click My Computer, then double-click the Control Panel icon. 5. On the Printer Model tab, select the EPSON Stylus Photo 875DCS printer icon. Make sure EPSON USB Memory Card Driver is selected and click Next. 73 Follow the instructions on the menu that pops up....
Printer Basics
Page 83
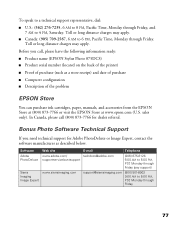
... PST, Monday through Friday. Before you need technical support for dealer referral. s Canada: (905) 709-2567, 6 AM to 4 PM, Saturday. Bonus Photo Software Technical Support If you call (800) 873-7766 for Adobe PhotoDeluxe or Image Expert, contact the software manufacturer as a store receipt) and date of... 7 AM to 6 PM, Pacific Time, Monday through Friday 77 In Canada, please call , please have the following information ready: s Product name (EPSON Stylus Photo 875DCS) s Product serial number (located on the back of the printer) s Proof of purchase (such as described below.
... PST, Monday through Friday. Before you need technical support for dealer referral. s Canada: (905) 709-2567, 6 AM to 4 PM, Saturday. Bonus Photo Software Technical Support If you call (800) 873-7766 for Adobe PhotoDeluxe or Image Expert, contact the software manufacturer as a store receipt) and date of... 7 AM to 6 PM, Pacific Time, Monday through Friday 77 In Canada, please call , please have the following information ready: s Product name (EPSON Stylus Photo 875DCS) s Product serial number (located on the back of the printer) s Proof of purchase (such as described below.

Printer Basics
Page 85
Using an improperly shielded USB cable-especially a cable more recommended) s CD-ROM or DVD drive for installing the printer software s SVGA or better display adapter and monitor s A Windows-compliant USB port and a shielded USB "AB" cable up to malfunction. 79 Notices This chapter includes ... Windows 2000 s 64MB of RAM (128MB or more recommended) s 100MB of free hard disk space (200MB or more than 9.8 feet (3 meters) long-may cause the printer to 9.8 feet (3 meters) long. Windows System Requirements To use your printer and its software, your EPSON Stylus Photo 875DCS.
Using an improperly shielded USB cable-especially a cable more recommended) s CD-ROM or DVD drive for installing the printer software s SVGA or better display adapter and monitor s A Windows-compliant USB port and a shielded USB "AB" cable up to malfunction. 79 Notices This chapter includes ... Windows 2000 s 64MB of RAM (128MB or more recommended) s 100MB of free hard disk space (200MB or more than 9.8 feet (3 meters) long-may cause the printer to 9.8 feet (3 meters) long. Windows System Requirements To use your printer and its software, your EPSON Stylus Photo 875DCS.

Product Information Guide
Page 10
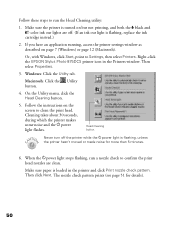
... you lower it . It's a good idea to a local port, not over a network), as described in place. (The color clamp is flashing, unless the printer hasn't moved or made noise for more than the black clamp.) 6. Using the Head Cleaning Utility Follow these steps to run a... flashes. Make sure the printer is flashing, unless the printer hasn't moved or made noise for more than 5 minutes. 8. Right-click your EPSON Stylus Photo 875DCS printer icon in either of the following ways: t using the printer's control panel buttons, as you don't turn on your printer for a long time, ...
... you lower it . It's a good idea to a local port, not over a network), as described in place. (The color clamp is flashing, unless the printer hasn't moved or made noise for more than the black clamp.) 6. Using the Head Cleaning Utility Follow these steps to run a... flashes. Make sure the printer is flashing, unless the printer hasn't moved or made noise for more than 5 minutes. 8. Right-click your EPSON Stylus Photo 875DCS printer icon in either of the following ways: t using the printer's control panel buttons, as you don't turn on your printer for a long time, ...

Product Information Guide
Page 11
... but not printing, and both the B black and A color ink out lights are missing, as shown below, clean the print head again. Check the quality of your printer is turned on a network, to print a test page. 9/00 EPSON Stylus Photo 875DCS - 12 Then select Properties. 5. Windows: Click the Utility...next section for details). 7. If the nozzle check pattern has no gaps in its dots, click Finish. If your EPSON Stylus Photo 875DCS printer icon in the Printer Basics book. Follow these steps to clean the print head again. After the Ppower light stops flashing, print a page ...
... but not printing, and both the B black and A color ink out lights are missing, as shown below, clean the print head again. Check the quality of your printer is turned on a network, to print a test page. 9/00 EPSON Stylus Photo 875DCS - 12 Then select Properties. 5. Windows: Click the Utility...next section for details). 7. If the nozzle check pattern has no gaps in its dots, click Finish. If your EPSON Stylus Photo 875DCS printer icon in the Printer Basics book. Follow these steps to clean the print head again. After the Ppower light stops flashing, print a page ...

Product Information Guide
Page 12
...steps 5 and 6 more than once to keep your print head completely. 4. EPSON Stylus Photo 875DCS 6. Follow these steps: 1. they can damage the printer components and case. Enter the number of a similar size. Push in the ...Documentation TM-SP875DCS EPSON Stylus Photo 875DCS Service Manual PL-SP875DCS CPD-11115 CPD-11116 CPD-11117 EPSON Stylus Photo 875DCS Parts Price List EPSON Stylus Photo 875DCS Printer Basics EPSON Stylus Photo 875DCS Start Here EPSON Stylus Photo 875DCS printer software CD-ROM Transporting the Printer If you move your printer. Turn off the printer. 2. Unplug the...
...steps 5 and 6 more than once to keep your print head completely. 4. EPSON Stylus Photo 875DCS 6. Follow these steps: 1. they can damage the printer components and case. Enter the number of a similar size. Push in the ...Documentation TM-SP875DCS EPSON Stylus Photo 875DCS Service Manual PL-SP875DCS CPD-11115 CPD-11116 CPD-11117 EPSON Stylus Photo 875DCS Parts Price List EPSON Stylus Photo 875DCS Printer Basics EPSON Stylus Photo 875DCS Start Here EPSON Stylus Photo 875DCS printer software CD-ROM Transporting the Printer If you move your printer. Turn off the printer. 2. Unplug the...


