

Color Management Workbook
Page 5
... profiles to print the printer profiling target from one can produce certain colors that your EPSON Perfection 3200 scanner and EPSON photo printer. The result is to ensure that the others can help you build a scanner and printer profile in the EPSON Perfection 3200 Pro software ..., paper, and printer settings. LaserSoft® SilverFast® provides powerful tools to create profiles for your EPSON printer. The good news is to deliver great scans that the devices have different color ranges or gamuts. By using the same printer settings you need little or...
... profiles to print the printer profiling target from one can produce certain colors that your EPSON Perfection 3200 scanner and EPSON photo printer. The result is to ensure that the others can help you build a scanner and printer profile in the EPSON Perfection 3200 Pro software ..., paper, and printer settings. LaserSoft® SilverFast® provides powerful tools to create profiles for your EPSON printer. The good news is to deliver great scans that the devices have different color ranges or gamuts. By using the same printer settings you need little or...

Printer Basics
Page 22
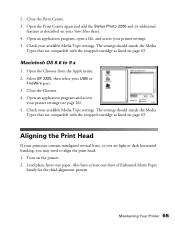
Adjusting the Cutting Position Before you print your photos. Windows and Mac OS 8.6 to 9.x: Access the printer settings window (see page 20 for Windows or page 26 for Macintosh OS 8.6 to 9.x). You see an adjustment screen. 4. You see a ... OS X: Open the OS X Applications folder and select EPSON Printer Utility. This adjustment affects roll paper only. 1. Then click the Maintenance tab (Windows) or the utility icon (Macintosh OS 8.6 to 9.x). Then double-click SP 2200. 2. The printer prints and cuts a cutting position pattern like this : 5. Now adjust the cutting position ...
Adjusting the Cutting Position Before you print your photos. Windows and Mac OS 8.6 to 9.x: Access the printer settings window (see page 20 for Windows or page 26 for Macintosh OS 8.6 to 9.x). You see an adjustment screen. 4. You see a ... OS X: Open the OS X Applications folder and select EPSON Printer Utility. This adjustment affects roll paper only. 1. Then click the Maintenance tab (Windows) or the utility icon (Macintosh OS 8.6 to 9.x). Then double-click SP 2200. 2. The printer prints and cuts a cutting position pattern like this : 5. Now adjust the cutting position ...

Printer Basics
Page 25
For the best-looking photos, most vivid colors, and greatest detail, always use genuine EPSON papers and EPSON UltraChrome inks. ■ Choose the right printer settings for the paper. Your printer automatically adjusts itself for the type of paper you've selected, so make sure you loaded. 19 Printing From ... page 32 ■ "Using PRINT Image Matching" on page 41 ■ "Printing Borderless Cut Sheets" on page 43 ■ "Managing Color with Custom Profiles" on page 48 Tip: Whenever you print, make sure your printer settings are correct for the paper you : ■ Use the right paper.
For the best-looking photos, most vivid colors, and greatest detail, always use genuine EPSON papers and EPSON UltraChrome inks. ■ Choose the right printer settings for the paper. Your printer automatically adjusts itself for the type of paper you've selected, so make sure you loaded. 19 Printing From ... page 32 ■ "Using PRINT Image Matching" on page 41 ■ "Printing Borderless Cut Sheets" on page 43 ■ "Managing Color with Custom Profiles" on page 48 Tip: Whenever you print, make sure your printer settings are correct for the paper you : ■ Use the right paper.

Printer Basics
Page 26
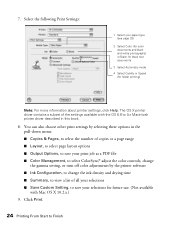
Then click Properties or Preferences on the next screen.) 20 Printing From Start to open your printer name here Click here to Finish Make sure EPSON Stylus Photo 2200 is selected. 3. Click the Properties or Preferences button. (If you create a document in a software program, follow these steps to print it . From the File menu, click Print. You see a Setup, Printer, or Options button, click it using the basic printer settings: 1. Basic Printing in Windows After you see a Print window like this one: Check for your printer software 2.
Then click Properties or Preferences on the next screen.) 20 Printing From Start to open your printer name here Click here to Finish Make sure EPSON Stylus Photo 2200 is selected. 3. Click the Properties or Preferences button. (If you create a document in a software program, follow these steps to print it . From the File menu, click Print. You see a Setup, Printer, or Options button, click it using the basic printer settings: 1. Basic Printing in Windows After you see a Print window like this one: Check for your printer software 2.
Printer Basics
Page 27
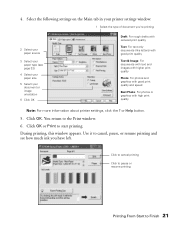
...32) 4 Select your paper size 5 Select your paper type (see how much ink you have left. Select the following settings on the Main tab in your printer settings window: 1 Select the type of document you're printing: 2 Select your paper source 3 Select your document or image ... print quality Text & Image: For documents with text and images with higher print quality Photo: For photos and graphics with good print quality and speed Best Photo: For photos or graphics with high print quality Note: For more information about printer settings, click the ? 4. During printing, this window appears.
...32) 4 Select your paper size 5 Select your paper type (see how much ink you have left. Select the following settings on the Main tab in your printer settings window: 1 Select the type of document you're printing: 2 Select your paper source 3 Select your document or image ... print quality Text & Image: For documents with text and images with higher print quality Photo: For photos and graphics with good print quality and speed Best Photo: For photos or graphics with high print quality Note: For more information about printer settings, click the ? 4. During printing, this window appears.

Printer Basics
Page 28
... 32 for pop-up menu Select the Paper Size, Orientation, and any other available Page Setup settings, then click OK. Selecting the Settings You Use Most Often Your printer settings apply only to the program you're currently using a Macintosh Classic mode application, follow the steps...X compatible printing application, follow the steps on page 26 instead.) Make sure you added your printer to Finish Select the default settings you 're using . Select Printer Settings. You can change the printer settings in the lower right corner of your programs. 1. Select any optional feature. (For roll...
... 32 for pop-up menu Select the Paper Size, Orientation, and any other available Page Setup settings, then click OK. Selecting the Settings You Use Most Often Your printer settings apply only to the program you're currently using a Macintosh Classic mode application, follow the steps...X compatible printing application, follow the steps on page 26 instead.) Make sure you added your printer to Finish Select the default settings you 're using . Select Printer Settings. You can change the printer settings in the lower right corner of your programs. 1. Select any optional feature. (For roll...
Printer Basics
Page 30
... paper type (see page 32) 2 Select Color (for color documents and black and white photographs) or Black for black text documents 3 Select Automatic mode 4 Select Quality or Speed (for future use. (Not available with Mac OS X 10.2.x.) 9. You can also choose other print settings by the printer software ■ Ink Configuration, to change the...
... paper type (see page 32) 2 Select Color (for color documents and black and white photographs) or Black for black text documents 3 Select Automatic mode 4 Select Quality or Speed (for future use. (Not available with Mac OS X 10.2.x.) 9. You can also choose other print settings by the printer software ■ Ink Configuration, to change the...

Printer Basics
Page 32
..., make sure you see page 32) 2 Select Color (for color documents and black and white photographs) or Black (for black text documents) 3 Select Automatic mode 4 Select Quality or Speed (for faster printing) Note: For more information about printer settings, click the ? From the File menu, select ...Page Setup. button. 26 Printing From Start to close the Page Setup window. 3. Select the following settings: 1 Select your paper type (see SP 2200 2 Select your paper size 3 Select your...
..., make sure you see page 32) 2 Select Color (for color documents and black and white photographs) or Black (for black text documents) 3 Select Automatic mode 4 Select Quality or Speed (for faster printing) Note: For more information about printer settings, click the ? From the File menu, select ...Page Setup. button. 26 Printing From Start to close the Page Setup window. 3. Select the following settings: 1 Select your paper type (see SP 2200 2 Select your paper size 3 Select your...

Printer Basics
Page 34
... ■ Click the Basic button to return to select layout options. Note: To create custom color profiles when you can reuse them as necessary Select a Color Management method To choose No Color Adjustment, click ICM first 3. Click Continue on saving them later, click the Help or ? ... button in the bottom right corner of the window. Customizing Your Windows Print Settings 1. The Basic settings change to use the Advanced screen each time you can : ■ Click OK to save your printer settings, select the Show this screen first checkbox. 28 Printing From Start to Finish...
... ■ Click the Basic button to return to select layout options. Note: To create custom color profiles when you can reuse them as necessary Select a Color Management method To choose No Color Adjustment, click ICM first 3. Click Continue on saving them later, click the Help or ? ... button in the bottom right corner of the window. Customizing Your Windows Print Settings 1. The Basic settings change to use the Advanced screen each time you can : ■ Click OK to save your printer settings, select the Show this screen first checkbox. 28 Printing From Start to Finish...

Printer Basics
Page 36
... match printed colors with compatible device colors) from the Custom Settings list Note: For more information on custom settings, click ?. 3. Macintosh OS 8.6 to 9.x Click Custom, then choose ColorSync (to step 4. 4. To access advanced settings, click Advanced Settings (OS X) or click Custom, then click Advanced (OS 8.6 to 9.x). 30 Printing From Start to open it. Open the printer settings window...
... match printed colors with compatible device colors) from the Custom Settings list Note: For more information on custom settings, click ?. 3. Macintosh OS 8.6 to 9.x Click Custom, then choose ColorSync (to step 4. 4. To access advanced settings, click Advanced Settings (OS X) or click Custom, then click Advanced (OS 8.6 to 9.x). 30 Printing From Start to open it. Open the printer settings window...

Printer Basics
Page 39
Printing From Start to 9.x" on page 37 Windows 1. Access the printer settings window (see page 20). 3. Select the type of these sections to select your photo file, and resize it as the Type option: ■ Premium Semigloss Photo Paper ■ Premium Luster Photo Paper ■ Premium Glossy Photo Paper 4. If you loaded as necessary. 2. Start your print...
Printing From Start to 9.x" on page 37 Windows 1. Access the printer settings window (see page 20). 3. Select the type of these sections to select your photo file, and resize it as the Type option: ■ Premium Semigloss Photo Paper ■ Premium Luster Photo Paper ■ Premium Glossy Photo Paper 4. If you loaded as necessary. 2. Start your print...

Printer Basics
Page 41
... sizes listed on page 43; Borderless Banner) Select a Stylus Photo 2200 Roll Paper setting for setting: ■ Stylus Photo 2200(Roll Paper) ■ Stylus Photo 2200(Roll Paper - Click OK to Finish 35 Borderless) ■ Stylus Photo 2200(Roll Paper - Printing From Start to close the Page Setup dialog box. 6. Click File > Print to open your printer here Select the size of the following as...
... sizes listed on page 43; Borderless Banner) Select a Stylus Photo 2200 Roll Paper setting for setting: ■ Stylus Photo 2200(Roll Paper) ■ Stylus Photo 2200(Roll Paper - Click OK to Finish 35 Borderless) ■ Stylus Photo 2200(Roll Paper - Printing From Start to close the Page Setup dialog box. 6. Click File > Print to open your printer here Select the size of the following as...

Printer Basics
Page 42
... Glossy Photo Paper 10. If the settings are different, you loaded as the Format for option in the Page Setup window and the Printer option in step 3. Select the same Roll Paper setting here 8. Select Print Settings from the pull-down menu. 9. You see these options: 36 Printing From Start to Finish For the Printer setting, select...
... Glossy Photo Paper 10. If the settings are different, you loaded as the Format for option in the Page Setup window and the Printer option in step 3. Select the same Roll Paper setting here 8. Select Print Settings from the pull-down menu. 9. You see these options: 36 Printing From Start to Finish For the Printer setting, select...

Printer Basics
Page 44
... paper at the end of printing Print and cut borderless photos Print borderless photos and cut them yourself Print photos, panoramics, or banners with borders Borderless checkbox Checked Checked Auto Cutter setting Normal Cut (don't select Paper-Saving Cut; Click File > Print to open the printer settings dialog box. 38 Printing From Start to close the...
... paper at the end of printing Print and cut borderless photos Print borderless photos and cut them yourself Print photos, panoramics, or banners with borders Borderless checkbox Checked Checked Auto Cutter setting Normal Cut (don't select Paper-Saving Cut; Click File > Print to open the printer settings dialog box. 38 Printing From Start to close the...

Printer Basics
Page 50
... checkbox. 7. Follow the steps for your photo file. 2. Start your printing application and open your operating system below to Finish Click OK. 10. Select the type of paper you loaded as the Size setting. 8. Access the printer settings window (see page 20). 3. Windows 1.... Select your paper size as the Type setting: ■ Premium Semigloss Photo Paper ■ Premium Luster Photo Paper ■ Premium Glossy Photo Paper 6. Select Portrait or Landscape as the...
... checkbox. 7. Follow the steps for your photo file. 2. Start your printing application and open your operating system below to Finish Click OK. 10. Select the type of paper you loaded as the Size setting. 8. Access the printer settings window (see page 20). 3. Windows 1.... Select your paper size as the Type setting: ■ Premium Semigloss Photo Paper ■ Premium Luster Photo Paper ■ Premium Glossy Photo Paper 6. Select Portrait or Landscape as the...

Printer Basics
Page 52
... and the Printer option in step 3, Stylus Photo 2200(Sheet Feeder - Select Print Settings from the pull-down menu. 10. Move the slider to Finish Note: Always select the same setting as the Media Type option: ■ Premium Semigloss Photo Paper ■ Premium Luster Photo Paper ■ Premium Glossy Photo Paper 11. As the Printer setting, select the same setting that you...
... and the Printer option in step 3, Stylus Photo 2200(Sheet Feeder - Select Print Settings from the pull-down menu. 10. Move the slider to Finish Note: Always select the same setting as the Media Type option: ■ Premium Semigloss Photo Paper ■ Premium Luster Photo Paper ■ Premium Glossy Photo Paper 11. As the Printer setting, select the same setting that you...

Printer Basics
Page 56
... test target you plan to print a test target for the most consistent results. The color quality of the profiles you choose as described below . 50 Printing From Start to the printer settings window. 10. IMPORTANT! Repeat these steps to print on the quality and accuracy of... your profile-building software (such as recommended by Microsoft or Apple®. 8. Then click No Color Adjustment. Click OK (Windows) or Print (Macintosh)...
... test target you plan to print a test target for the most consistent results. The color quality of the profiles you choose as described below . 50 Printing From Start to the printer settings window. 10. IMPORTANT! Repeat these steps to print on the quality and accuracy of... your profile-building software (such as recommended by Microsoft or Apple®. 8. Then click No Color Adjustment. Click OK (Windows) or Print (Macintosh)...

Printer Basics
Page 70
... swapped is selected here 2. Right-click the printer icon on page 63. Confirm that your paper Type and/or Quality Type settings are not compatible with your printer software. Highlight the Stylus Photo 2200 entries and click Delete 64 Maintaining Your Printer You see a message telling you swap the Photo Black and Matte Black cartridges, follow the steps...
... swapped is selected here 2. Right-click the printer icon on page 63. Confirm that your paper Type and/or Quality Type settings are not compatible with your printer software. Highlight the Stylus Photo 2200 entries and click Delete 64 Maintaining Your Printer You see a message telling you swap the Photo Black and Matte Black cartridges, follow the steps...
Printer Basics
Page 71
...Media Types that are compatible with the swapped cartridge as described on the printer. 2. Check your Start Here sheet. 4. Turn on your available Media Type settings. Open the Print Center again and add the Stylus Photo 2200 and its additional features as listed on page 63. Close the Chooser.... 4. Close the Print Center. 3. The settings should match the Media Types that are compatible with...
...Media Types that are compatible with the swapped cartridge as described on the printer. 2. Check your Start Here sheet. 4. Turn on your available Media Type settings. Open the Print Center again and add the Stylus Photo 2200 and its additional features as listed on page 63. Close the Chooser.... 4. Close the Print Center. 3. The settings should match the Media Types that are compatible with...

Printer Basics
Page 74
...Printer Settings, click the Maintenance tab, then select Printer and Option Information. Macintosh OS 8.6 to clean the paper feeders. 3. You see page 15). 3. The printer prints on the printer...5. Macintosh OS X: Open the OS X Applications folder and select EPSON Printer Utility. Click the Clean button. 6. Turn off the printer, unplug the power cord, and disconnect the interface cable. 2. ...SP 2200 and select Printer and Option Information. 4. Click the utility button, then select Printer Option Information. Click the Cutter Cleaning button. Clean the exterior of your printer ...
...Printer Settings, click the Maintenance tab, then select Printer and Option Information. Macintosh OS 8.6 to clean the paper feeders. 3. You see page 15). 3. The printer prints on the printer...5. Macintosh OS X: Open the OS X Applications folder and select EPSON Printer Utility. Click the Clean button. 6. Turn off the printer, unplug the power cord, and disconnect the interface cable. 2. ...SP 2200 and select Printer and Option Information. 4. Click the utility button, then select Printer Option Information. Click the Cutter Cleaning button. Clean the exterior of your printer ...


