

Printer Basics
Page 4
Printing on Roll Paper 32 Selecting Roll Paper Print Settings 33 Removing Your Printed Photos 39 Removing and Storing Roll Paper 40 Using PRINT Image Matching 41 Using Film Factory 42 Using the P.I.M. II Plug-in for Adobe ...Target 48 Creating Your Custom Profile 50 Printing With Your Custom Profile 50 Solving Color Management Problems 56 Maintaining Your Printer 57 Cleaning the Print Head 57 Running the Head Cleaning Utility 58 Examining the Nozzle Check Pattern 59 Replacing an Ink Cartridge 59 Checking the Ink Supply 60 Purchasing Ink Cartridges 60 Ink...
Printing on Roll Paper 32 Selecting Roll Paper Print Settings 33 Removing Your Printed Photos 39 Removing and Storing Roll Paper 40 Using PRINT Image Matching 41 Using Film Factory 42 Using the P.I.M. II Plug-in for Adobe ...Target 48 Creating Your Custom Profile 50 Printing With Your Custom Profile 50 Solving Color Management Problems 56 Maintaining Your Printer 57 Cleaning the Print Head 57 Running the Head Cleaning Utility 58 Examining the Nozzle Check Pattern 59 Replacing an Ink Cartridge 59 Checking the Ink Supply 60 Purchasing Ink Cartridges 60 Ink...

Printer Basics
Page 13
...! 7 See the instructions in ink replacement mode, charging ink, or cleaning the print head. Moves the print head to the ink cartridge replacement position and returns it to the removal position after roll paper printing. z roll paper Prints a cutting guideline and feeds roll paper to its home position. Flashing: printer is performing an ink operation...
...! 7 See the instructions in ink replacement mode, charging ink, or cleaning the print head. Moves the print head to the ink cartridge replacement position and returns it to the removal position after roll paper printing. z roll paper Prints a cutting guideline and feeds roll paper to its home position. Flashing: printer is performing an ink operation...

Printer Basics
Page 63
... all red H ink lights are missing, you don't turn on your printer for moving, if necessary: ■ "Cleaning the Print Head" below ■ "Replacing an Ink Cartridge" on page 59 ■ "Swapping the Interchangeable Ink Cartridge" on page 63 ■ "Aligning the Print Head" on page 65 ■ "Cleaning the Automatic Roll Paper Cutter...
... all red H ink lights are missing, you don't turn on your printer for moving, if necessary: ■ "Cleaning the Print Head" below ■ "Replacing an Ink Cartridge" on page 59 ■ "Swapping the Interchangeable Ink Cartridge" on page 63 ■ "Aligning the Print Head" on page 65 ■ "Cleaning the Automatic Roll Paper Cutter...

Printer Basics
Page 64
... on the screen to clean the print head again. Windows: Right-click the printer icon on page 78. Macintosh OS X: Open the Applications folder and select EPSON Printer Utility. Cleaning takes about 45 seconds, during which the printer makes noise and the green P power ...head again. 58 Maintaining Your Printer Caution: Never turn the printer off . (If an H ink light is flashing, unless the printer hasn't moved or made noise for details.) 2. Select Head Cleaning. Select SP 2200 in the lower right corner of your screen). If you need to replace a cartridge; Make sure the printer...
... on the screen to clean the print head again. Windows: Right-click the printer icon on page 78. Macintosh OS X: Open the Applications folder and select EPSON Printer Utility. Cleaning takes about 45 seconds, during which the printer makes noise and the green P power ...head again. 58 Maintaining Your Printer Caution: Never turn the printer off . (If an H ink light is flashing, unless the printer hasn't moved or made noise for details.) 2. Select Head Cleaning. Select SP 2200 in the lower right corner of your screen). If you need to replace a cartridge; Make sure the printer...

Printer Basics
Page 65
... guidelines and additional instructions. see any gaps (as shown), clean the print head again; Red ink lights When a cartridge is low on ink. Maintaining Your Printer 59 When an H ink light stays on certain papers. You can replace the cartridge even if all the red H ink lights are off. Before... and after cleaning and aligning the print head, you can also swap the Photo Black ink cartridge for the optional Matte...
... guidelines and additional instructions. see any gaps (as shown), clean the print head again; Red ink lights When a cartridge is low on ink. Maintaining Your Printer 59 When an H ink light stays on certain papers. You can replace the cartridge even if all the red H ink lights are off. Before... and after cleaning and aligning the print head, you can also swap the Photo Black ink cartridge for the optional Matte...
Printer Basics
Page 67
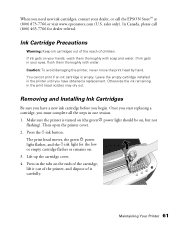
... cartridges out of the reach of it carefully. Caution: To avoid damaging the printer, never move the print head by hand. Removing and Installing Ink Cartridges Be sure you begin. Once you start replacing a cartridge, you need new ink cartridges, contact your dealer, or call (...a replacement. Maintaining Your Printer 61 Otherwise the ink remaining in the tabs on . 3. Make sure the printer is empty. Lift up the cartridge cover. 4. Then open the printer cover. 2. When you must complete all the steps in one session. 1. sales only). In Canada, please call the EPSON StoreSM...
... cartridges out of the reach of it carefully. Caution: To avoid damaging the printer, never move the print head by hand. Removing and Installing Ink Cartridges Be sure you begin. Once you start replacing a cartridge, you need new ink cartridges, contact your dealer, or call (...a replacement. Maintaining Your Printer 61 Otherwise the ink remaining in the tabs on . 3. Make sure the printer is empty. Lift up the cartridge cover. 4. Then open the printer cover. 2. When you must complete all the steps in one session. 1. sales only). In Canada, please call the EPSON StoreSM...

Printer Basics
Page 77
if output is misaligned, align the print head (see page 57); Repack the printer and its attachments in print quality, clean the print head (see page 65). After transporting the printer, remove all the tape and replace your printer. Close the output tray and tape it . 15. Maintaining Your Printer 71 11. Tape it vertically and horizontally to...
if output is misaligned, align the print head (see page 57); Repack the printer and its attachments in print quality, clean the print head (see page 65). After transporting the printer, remove all the tape and replace your printer. Close the output tray and tape it . 15. Maintaining Your Printer 71 11. Tape it vertically and horizontally to...
Printer Basics
Page 80
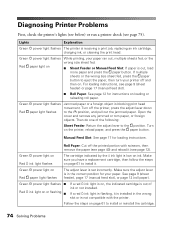
Lights Explanation Green P power light flashes The printer is blocking print head movement. If multiple sheets or the wrong size sheet fed... or is flashing, it . Follow the steps on page 61 to eject the paper, then turn your printer off the printer, press the adjust lever down to the m position. Green P power light flashes Red m paper light ...flashes Jammed paper or a foreign object is receiving a print job, replacing an ink cartridge, charging ink, or cleaning the print head....
Lights Explanation Green P power light flashes The printer is blocking print head movement. If multiple sheets or the wrong size sheet fed... or is flashing, it . Follow the steps on page 61 to eject the paper, then turn your printer off the printer, press the adjust lever down to the m position. Green P power light flashes Red m paper light ...flashes Jammed paper or a foreign object is receiving a print job, replacing an ink cartridge, charging ink, or cleaning the print head....

Printer Basics
Page 84
...12; Set it 's usually whiter or shinier. ■ Check the adjust lever. For roll paper, see page 17. ■ The ink cartridges may need replacing; for thick paper, see banding (light lines). it to m for most papers. for thick paper, see page 12; Your print is face up; Quality... Problems You see page 17. ■ Align the print head as described on -screen Reference Guide. ■ Use EPSON papers for proper saturation and absorption of the paper is blurry or smeared. ■ Clean the print...
...12; Set it 's usually whiter or shinier. ■ Check the adjust lever. For roll paper, see page 17. ■ The ink cartridges may need replacing; for thick paper, see banding (light lines). it to m for most papers. for thick paper, see page 12; Your print is face up; Quality... Problems You see page 17. ■ Align the print head as described on -screen Reference Guide. ■ Use EPSON papers for proper saturation and absorption of the paper is blurry or smeared. ■ Clean the print...

Printer Basics
Page 100
...Horizontal setting, 81 G Gamma setting, 79 Grainy prints, 79 H Head Cleaning utility, 57 to 59 Help EPSON, 83 to 84 see also Printer Information Center and Troubleshooting High Speed setting, 77 to 78 I ICM (Image Color Matching) setting, 56, 79 Incorrect characters, 81 colors, 79 margins, 81 Ink cartridge confirming swapped, 64 to 65... level of ink in, 21, 27, 60 Matte Black, optional, 59 to 60, 63 to 64 ordering, 60 to 61 Photo Black, 59 to 60, 63 to 64 problems, solving, 74, 76 removing for transport, 70 to 71 replacing, 59...
...Horizontal setting, 81 G Gamma setting, 79 Grainy prints, 79 H Head Cleaning utility, 57 to 59 Help EPSON, 83 to 84 see also Printer Information Center and Troubleshooting High Speed setting, 77 to 78 I ICM (Image Color Matching) setting, 56, 79 Incorrect characters, 81 colors, 79 margins, 81 Ink cartridge confirming swapped, 64 to 65... level of ink in, 21, 27, 60 Matte Black, optional, 59 to 60, 63 to 64 ordering, 60 to 61 Photo Black, 59 to 60, 63 to 64 problems, solving, 74, 76 removing for transport, 70 to 71 replacing, 59...

Service Manual
Page 3
...NOT BEEN APPROVED ARE USED, THEY COULD CAUSE DAMAGE TO THE EPSON PRODUCT, OR COULD VOID THE WARRANTY OFFERED BY EPSON. DANGER Signals a precaution which , if ignored, could result in performing procedures preceded by DANGER Headings. DANGER 1. WHEN THE POWER SUPPLY CABLE MUST BE CONNECTED,... to equipment. Great caution should always be exercised in serious or fatal personal injury. DO NOT REPLACE IMPERFECTLY FUNCTIONING COMPONENTS WITH COMPONENTS WHICH ARE NOT MANUFACTURED BY EPSON. NO WORK SHOULD BE PERFORMED ON THE UNIT BY PERSONS UNFAMILIAR WITH BASIC SAFETY MEASURES AS DICTATED...
...NOT BEEN APPROVED ARE USED, THEY COULD CAUSE DAMAGE TO THE EPSON PRODUCT, OR COULD VOID THE WARRANTY OFFERED BY EPSON. DANGER Signals a precaution which , if ignored, could result in performing procedures preceded by DANGER Headings. DANGER 1. WHEN THE POWER SUPPLY CABLE MUST BE CONNECTED,... to equipment. Great caution should always be exercised in serious or fatal personal injury. DO NOT REPLACE IMPERFECTLY FUNCTIONING COMPONENTS WITH COMPONENTS WHICH ARE NOT MANUFACTURED BY EPSON. NO WORK SHOULD BE PERFORMED ON THE UNIT BY PERSONS UNFAMILIAR WITH BASIC SAFETY MEASURES AS DICTATED...
Service Manual
Page 7
... Overview 215 6.1.1 ROM Replacement 215 6.1.2 Cleaning 215 6.1.3 Service Maintenance 216 6.1.4 Lubrication 217 Chapter 7 APPENDIX 7.1 Connector Summary 227 7.1.1 Connectors and Pin Layouts 227 7.1.2 EEPROM Address Map 231 7.2 Exploded Diagram 236 7.3 Parts List for EPSON Stylus Photo 2100 248 7.4 Circuit... Like 196 5.2 Adjustments 197 5.2.1 Servicing Program Usage Outline 197 5.2.2 Head ID Input Function 199 5.2.3 CR motor drive torque dispersion measurement 199 5.2.4 PG Adjustment 200 5.2.5 Head Angular Adjustment 204 5.2.6 CR Tooth Skip Prevention Mechanism Adjustment 206 5.2.7 ...
... Overview 215 6.1.1 ROM Replacement 215 6.1.2 Cleaning 215 6.1.3 Service Maintenance 216 6.1.4 Lubrication 217 Chapter 7 APPENDIX 7.1 Connector Summary 227 7.1.1 Connectors and Pin Layouts 227 7.1.2 EEPROM Address Map 231 7.2 Exploded Diagram 236 7.3 Parts List for EPSON Stylus Photo 2100 248 7.4 Circuit... Like 196 5.2 Adjustments 197 5.2.1 Servicing Program Usage Outline 197 5.2.2 Head ID Input Function 199 5.2.3 CR motor drive torque dispersion measurement 199 5.2.4 PG Adjustment 200 5.2.5 Head Angular Adjustment 204 5.2.6 CR Tooth Skip Prevention Mechanism Adjustment 206 5.2.7 ...

Service Manual
Page 36
...or had come off. Cutter Jam Error " This error occurs if the printer detects that the gap between the head and paper is narrow when thick paper is not adequate for the monochrome and color inks. EPSON Stylus PHOTO 2100/2200 1.3.13 Error Status If any of the following states is detected, this.... ! Ink Combination Error " This error occurs if the printer detects that the new ink cartridge inserted during ink replacement does not exist in the double-sided printing mode. No Ink cartridge or Ink cartridge error " The printer detected that the cutter could not be reset until the necessary...
...or had come off. Cutter Jam Error " This error occurs if the printer detects that the gap between the head and paper is narrow when thick paper is not adequate for the monochrome and color inks. EPSON Stylus PHOTO 2100/2200 1.3.13 Error Status If any of the following states is detected, this.... ! Ink Combination Error " This error occurs if the printer detects that the new ink cartridge inserted during ink replacement does not exist in the double-sided printing mode. No Ink cartridge or Ink cartridge error " The printer detected that the cutter could not be reset until the necessary...

Service Manual
Page 61
... was executed again. EPSON Stylus PHOTO 2100/2200 Revision B ! When the Carriage is set ), and when the printer is powered on next time, it was powered off for the nozzle lines other than A and B. (Replacement CL is not applied.) As the ink consumption, total suction is 1.35g and 2.12 x 10⁶ of each color is executed instead of...
... was executed again. EPSON Stylus PHOTO 2100/2200 Revision B ! When the Carriage is set ), and when the printer is powered on next time, it was powered off for the nozzle lines other than A and B. (Replacement CL is not applied.) As the ink consumption, total suction is 1.35g and 2.12 x 10⁶ of each color is executed instead of...

Service Manual
Page 112
...check the image graininess. If Bi-D displacements occur after the above adjustments have been made properly. 1. Improper adjustment or Head 1. Make adjustments according to normal 2. Remove the paper powder or scrap of the paper is on the paper 1....EPSON Stylus PHOTO 2100/2200 Revision B Table 3-18. Replace the PW sensor. If the graininess of the image does not change after tunr on /off the printer again. If the difference of image The whole image is lower than BB data, the PW sensor may be performerd with the Release lever placed in Improper 1. Color...
...check the image graininess. If Bi-D displacements occur after the above adjustments have been made properly. 1. Improper adjustment or Head 1. Make adjustments according to normal 2. Remove the paper powder or scrap of the paper is on the paper 1....EPSON Stylus PHOTO 2100/2200 Revision B Table 3-18. Replace the PW sensor. If the graininess of the image does not change after tunr on /off the printer again. If the difference of image The whole image is lower than BB data, the PW sensor may be performerd with the Release lever placed in Improper 1. Color...

Service Manual
Page 188
...Read the QR code label from left and right gauges) in general repair.) At the time of head replacement, this adjustment is made to correct head manufacturing variations and eliminate the individual differences of CR variation correction or to measure CR variations, and ... being damaged by Tester continuity. EPSON Stylus PHOTO 2100/2200 Revision B 5.1 Adjustment Items and Overview This chapter describes adjustments to be made after the disassembly/reassembly of this product. 5.1.1 Servicing Adjustment Item List The adjustment items of the printer CR main shaft/sub shaft. ...
...Read the QR code label from left and right gauges) in general repair.) At the time of head replacement, this adjustment is made to correct head manufacturing variations and eliminate the individual differences of CR variation correction or to measure CR variations, and ... being damaged by Tester continuity. EPSON Stylus PHOTO 2100/2200 Revision B 5.1 Adjustment Items and Overview This chapter describes adjustments to be made after the disassembly/reassembly of this product. 5.1.1 Servicing Adjustment Item List The adjustment items of the printer CR main shaft/sub shaft. ...

Service Manual
Page 191
...to prevent the repaired printer from the Head properly, e.g. Maintenance Functions Function Item Purpose Adjustment Outline Tool Ink charge sequence execution This function is close to the predetermined near-end value or end value, to recommend Pad replacement to the user in ...This function is used together with the nozzle check pattern to make a simple print check at the time of Board replacement. EPSON Stylus PHOTO 2100/2200 Revision B Maintenance items Table 5-2. dot missing or skewed injection. Exclusive servicing program Main board data read the Waste ink...
...to prevent the repaired printer from the Head properly, e.g. Maintenance Functions Function Item Purpose Adjustment Outline Tool Ink charge sequence execution This function is close to the predetermined near-end value or end value, to recommend Pad replacement to the user in ...This function is used together with the nozzle check pattern to make a simple print check at the time of Board replacement. EPSON Stylus PHOTO 2100/2200 Revision B Maintenance items Table 5-2. dot missing or skewed injection. Exclusive servicing program Main board data read the Waste ink...

Service Manual
Page 194
...; Powerful CL (Executed as required) 2 Head ID input 3 4 Head angular adjustment 4 3 Bi-D adjustment 5 4 5 Pixel shift adjustment... 2 2 ADJUSTMENT Adjustment Items and Overview 194 EPSON Stylus PHOTO 2100/2200 Revision B 5.1.3 Replacement Part-Based Adjustment Priorities The following table indicates the adjustment items and priorities on...
...; Powerful CL (Executed as required) 2 Head ID input 3 4 Head angular adjustment 4 3 Bi-D adjustment 5 4 5 Pixel shift adjustment... 2 2 ADJUSTMENT Adjustment Items and Overview 194 EPSON Stylus PHOTO 2100/2200 Revision B 5.1.3 Replacement Part-Based Adjustment Priorities The following table indicates the adjustment items and priorities on...

Service Manual
Page 195
...-Based Adjustment Item and Priority List 2 CR Motor Replacement PF Motor Replacement ASF/Pump Motor Replacement PF Encoder Sensor Replacement CR Unit Removal PF Roller Replacement Paper Eject Roller A Removal &#...Head, ASF, Waste ink pads, Housing and like, the adjustment items marked (*c) have already been executed but are executed as extra precautions. *d: Basically, peel the IEEE-1394 label applied to the old ASP mechanism and apply it to the specified position of the new mechanism. EPSON Stylus PHOTO 2100/2200...
...-Based Adjustment Item and Priority List 2 CR Motor Replacement PF Motor Replacement ASF/Pump Motor Replacement PF Encoder Sensor Replacement CR Unit Removal PF Roller Replacement Paper Eject Roller A Removal &#...Head, ASF, Waste ink pads, Housing and like, the adjustment items marked (*c) have already been executed but are executed as extra precautions. *d: Basically, peel the IEEE-1394 label applied to the old ASP mechanism and apply it to the specified position of the new mechanism. EPSON Stylus PHOTO 2100/2200...

Service Manual
Page 197
...IN T In this case, connect the printer and the PC with new one and run the Adjustment program again. EPSON Stylus PHOTO 2100/2200 Revision B 5.2 Adjustments The procedures of the adjustment item screens shows the adjustment procedure and outline. Head angular adjustment ! In this program, clicking ... and execute any of the adjustment items will be restored to perform each adjustment requested after specific parts have been repaired or replaced. ! ADJUSTMENT Adjustments 197 PG adjustment ! Compatible OS : Windows 95/98/Me ! IEEE 1394 ! After that require the...
...IN T In this case, connect the printer and the PC with new one and run the Adjustment program again. EPSON Stylus PHOTO 2100/2200 Revision B 5.2 Adjustments The procedures of the adjustment item screens shows the adjustment procedure and outline. Head angular adjustment ! In this program, clicking ... and execute any of the adjustment items will be restored to perform each adjustment requested after specific parts have been repaired or replaced. ! ADJUSTMENT Adjustments 197 PG adjustment ! Compatible OS : Windows 95/98/Me ! IEEE 1394 ! After that require the...


