
Product Information Guide
Page 3
... refill them. Other products may vary, depending on how often you turn on the printer and clean the print head. ** Ink thaws and is based on the package has expired. 1/01 EPSON Stylus Photo 1280 - 3 Environmental Temperature Operation 50 to 95 °F (10 to 35 °C)...950 EMC FCC part 15 subpart B class B EPSON Stylus Photo 1280 Ink Cartridges Black ink cartridge Specification (T007201) Color ink cartridge (T009201) Color(s) Black Cyan, Magenta, Yellow, Light Cyan, Light Magenta Print capacity* 540 pages (3.5% ECMA at 330 pages (5% each color 360 dpi, 370 pages 5% in CcMmY [...
... refill them. Other products may vary, depending on how often you turn on the printer and clean the print head. ** Ink thaws and is based on the package has expired. 1/01 EPSON Stylus Photo 1280 - 3 Environmental Temperature Operation 50 to 95 °F (10 to 35 °C)...950 EMC FCC part 15 subpart B class B EPSON Stylus Photo 1280 Ink Cartridges Black ink cartridge Specification (T007201) Color ink cartridge (T009201) Color(s) Black Cyan, Magenta, Yellow, Light Cyan, Light Magenta Print capacity* 540 pages (3.5% ECMA at 330 pages (5% each color 360 dpi, 370 pages 5% in CcMmY [...

Product Information Guide
Page 6
.... If that doesn't work, turn on your printer can't use. If ink gets on the printer again. Then turn it on page 8. If paper is receiving a print job, charging ink, or cleaning the print head. Then replace the cartridge as described on . EPSON Stylus Photo 1280 1/01 Also, make sure you 're printing on roll paper, press the z roll paper...
.... If that doesn't work, turn on your printer can't use. If ink gets on the printer again. Then turn it on page 8. If paper is receiving a print job, charging ink, or cleaning the print head. Then replace the cartridge as described on . EPSON Stylus Photo 1280 1/01 Also, make sure you 're printing on roll paper, press the z roll paper...

Product Information Guide
Page 7
...when the P power light stops flashing. 4. As you face the printer, tilt each cartridge forward (toward you) slightly as you need to press the color clamp a little more ink than necessary. Make sure both the printer and computer are turned off the blue part. Make sure letter-size... the print head; see page 10.) 5. If the check page doesn't print, you close the printer cover. Only the nozzle check pattern is loaded in step 2) and close it will start over, using more firmly.) 1/01 EPSON Stylus Photo 1280 - 7 Then reconnect the interface cable and turn off the printer or ...
...when the P power light stops flashing. 4. As you face the printer, tilt each cartridge forward (toward you) slightly as you need to press the color clamp a little more ink than necessary. Make sure both the printer and computer are turned off the blue part. Make sure letter-size... the print head; see page 10.) 5. If the check page doesn't print, you close the printer cover. Only the nozzle check pattern is loaded in step 2) and close it will start over, using more firmly.) 1/01 EPSON Stylus Photo 1280 - 7 Then reconnect the interface cable and turn off the printer or ...
Product Information Guide
Page 8
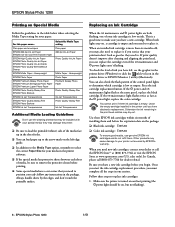
...print head nozzles may be included with your ink cartridges is low on ink. When you begin. Follow these EPSON ink cartridges within six months of your special media; Always handle sheets by EPSON's warranty. You can also check the flash pattern of the media face up to your media in the printer...good results, use the cleaning sheets that your printouts don't look as good as the P power light, replace the color cartridge. EPSON Stylus Photo 1280 Printing on Special Media Follow the guidelines in the table below when selecting the Media Type setting for your dealer or call (...
...print head nozzles may be included with your ink cartridges is low on ink. When you begin. Follow these EPSON ink cartridges within six months of your special media; Always handle sheets by EPSON's warranty. You can also check the flash pattern of the media face up to your media in the printer...good results, use the cleaning sheets that your printouts don't look as good as the P power light, replace the color cartridge. EPSON Stylus Photo 1280 Printing on Special Media Follow the guidelines in the table below when selecting the Media Type setting for your dealer or call (...

Product Information Guide
Page 9
... cartridge replacement button EPSON Stylus Photo 1280 5. Don't pull off the blue portion or try to remove the clear seal underneath the cartridge. Keep ink cartridges out of the reach of the hooks on your eyes, flush them immediately with soap and water. Open the printer cover and press... damage it into its holder. you lower it . The print head moves left . The color cartridge is on the right and the black cartridge is on the holder clamp; To avoid damaging the printer, never move the print head by hand. 3. The cartridge rises up the ink cartridge ...
... cartridge replacement button EPSON Stylus Photo 1280 5. Don't pull off the blue portion or try to remove the clear seal underneath the cartridge. Keep ink cartridges out of the reach of the hooks on your eyes, flush them immediately with soap and water. Open the printer cover and press... damage it into its holder. you lower it . The print head moves left . The color cartridge is on the right and the black cartridge is on the holder clamp; To avoid damaging the printer, never move the print head by hand. 3. The cartridge rises up the ink cartridge ...

Product Information Guide
Page 10
... Printer Basics book. Make sure the printer is turned on but not printing, and the b maintenance light is off . (You can't clean the print head if the b maintenance light is connected to soften-and then try cleaning the print head again. Follow the instructions on the color clamp.) 8. If you have to turn on your printed image is on . EPSON Stylus Photo 1280...
... Printer Basics book. Make sure the printer is turned on but not printing, and the b maintenance light is off . (You can't clean the print head if the b maintenance light is connected to soften-and then try cleaning the print head again. Follow the instructions on the color clamp.) 8. If you have to turn on your printed image is on . EPSON Stylus Photo 1280...
Product Information Guide
Page 11
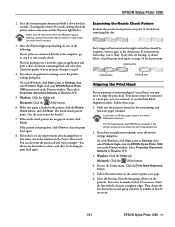
...Printers. For the best results, load EPSON ink jet paper in the Printers window. Click the Print Head Alignment button. 5. Select the line with Windows, click Start, point to clean the print head again. 8. Check the quality of your EPSON Stylus Photo 1280 printer icon in the printer whenever you print... below, clean the print head again; see the Utility menu. missing dots missing dots missing dots Aligning the Print Head If your printout looks okay, you 're printing over a network, open an application and print a short document containing black and color data. Follow these...
...Printers. For the best results, load EPSON ink jet paper in the Printers window. Click the Print Head Alignment button. 5. Select the line with Windows, click Start, point to clean the print head again. 8. Check the quality of your EPSON Stylus Photo 1280 printer icon in the printer whenever you print... below, clean the print head again; see the Utility menu. missing dots missing dots missing dots Aligning the Print Head If your printout looks okay, you 're printing over a network, open an application and print a short document containing black and color data. Follow these...
Product Information Guide
Page 12
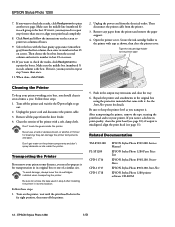
... times a year. Remove all the paper from the electrical outlet. Don't get water on screen. 10. Follow these steps: 1. After transporting the printer, remove the tape securing the print head and test your print head completely. 8. EPSON Stylus Photo 1280 1/01 Make sure the middle line (numbered 8) in box #1 on screen. Click Next and follow the instructions on the...
... times a year. Remove all the paper from the electrical outlet. Don't get water on screen. 10. Follow these steps: 1. After transporting the printer, remove the tape securing the print head and test your print head completely. 8. EPSON Stylus Photo 1280 1/01 Make sure the middle line (numbered 8) in box #1 on screen. Click Next and follow the instructions on the...


