User Manual (English)
Page 2
... wall-mount bracket 4 TV components 5 Front 5 Side 5 Back 6 Remote control 7 Using the remote control 8 Installing remote control batteries 8 Aiming the remote control 8 Programming a universal remote control to work with your TV 9 Making connections 9 Connecting the power 9 Connecting an antenna, cable TV, or satellite TV box 10 Connecting a... the volume 16 Adjusting basic settings 16 Displaying additional information 16 Adjusting the picture 16 Adjusting the TV picture 16 Adjusting Advanced Video settings 17 Adjusting the computer image 17 Adjusting the sound 18 Adjusting ...
... wall-mount bracket 4 TV components 5 Front 5 Side 5 Back 6 Remote control 7 Using the remote control 8 Installing remote control batteries 8 Aiming the remote control 8 Programming a universal remote control to work with your TV 9 Making connections 9 Connecting the power 9 Connecting an antenna, cable TV, or satellite TV box 10 Connecting a... the volume 16 Adjusting basic settings 16 Displaying additional information 16 Adjusting the picture 16 Adjusting the TV picture 16 Adjusting Advanced Video settings 17 Adjusting the computer image 17 Adjusting the sound 18 Adjusting ...
User Manual (English)
Page 3
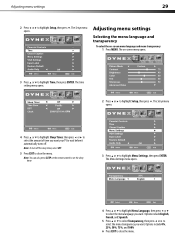
iii Using closed captioning 26 Turning closed captioning on or off 26 Selecting the closed captioning mode 26 Customizing DTV closed captioning styles 27 Adjusting time settings 28 Setting the clock 28 Setting the sleep timer 28 Adjusting menu settings 29 Selecting the menu language and transparency 29 Labeling an input source 30 Restoring default settings 30 Troubleshooting 31 Video and audio 31 Remote control 31 General 31 Maintenance 32 Cleaning 32 Specifications 32 Legal notices 32 One-year limited warranty 33
iii Using closed captioning 26 Turning closed captioning on or off 26 Selecting the closed captioning mode 26 Customizing DTV closed captioning styles 27 Adjusting time settings 28 Setting the clock 28 Setting the sleep timer 28 Adjusting menu settings 29 Selecting the menu language and transparency 29 Labeling an input source 30 Restoring default settings 30 Troubleshooting 31 Video and audio 31 Remote control 31 General 31 Maintenance 32 Cleaning 32 Specifications 32 Legal notices 32 One-year limited warranty 33

User Manual (English)
Page 6
... lines or circuits. Lightning For added protection for your device receiver during lightning storms or when unused for replacement of your TV. Handling the LCD panel • Your TV's screen is made of power supplied to this apparatus near water. 6 Clean only with liquids, such as power-supply...type plug is the disconnecting device. If you connect the class I apparatus to a mains socket outlet with a protective earthing connection. 17 Remote control batteries should not be exposed to excessive heat such as sunshine, fire, or the like. 18 The apparatus shall not be exposed to...
... lines or circuits. Lightning For added protection for your device receiver during lightning storms or when unused for replacement of your TV. Handling the LCD panel • Your TV's screen is made of power supplied to this apparatus near water. 6 Clean only with liquids, such as power-supply...type plug is the disconnecting device. If you connect the class I apparatus to a mains socket outlet with a protective earthing connection. 17 Remote control batteries should not be exposed to excessive heat such as sunshine, fire, or the like. 18 The apparatus shall not be exposed to...
User Manual (English)
Page 9
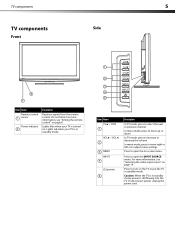
.... 1 2 3 4 5 Item Name CH / CH 1 VOL / VOL 2 3 MENU INPUT 4 (power) 5 Description In TV mode, press to move right or left or to adjust menu settings. TV components 5 TV components Side Front 2 1 Item Name Remote control 1 sensor Power indicator 2 Description Receives signals from the remote control. Do not block. In menu mode, press to move up or...
.... 1 2 3 4 5 Item Name CH / CH 1 VOL / VOL 2 3 MENU INPUT 4 (power) 5 Description In TV mode, press to move right or left or to adjust menu settings. TV components 5 TV components Side Front 2 1 Item Name Remote control 1 sensor Power indicator 2 Description Receives signals from the remote control. Do not block. In menu mode, press to move up or...
User Manual (English)
Page 11
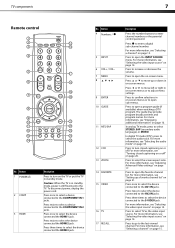
... the device connected the HDMI 3 jack. Press or to move up a favorite channel list" on page 17. In digital TV mode (DTV), press to select the device connected the HDMI 2 jack. TV components 7 Remote control 1 2 15 3 16 4 5 17 6 18 19 7 20 8 9 10 21 11 22 12 23 13 24 ...14 25 No. Press twice to select the audio track. Press to move left or right in standby mode, power is still flowing into the TV. Press or to...
... the device connected the HDMI 3 jack. Press or to move up a favorite channel list" on page 17. In digital TV mode (DTV), press to select the device connected the HDMI 2 jack. TV components 7 Remote control 1 2 15 3 16 4 5 17 6 18 19 7 20 8 9 10 21 11 22 12 23 13 24 ...14 25 No. Press twice to select the audio track. Press to move left or right in standby mode, power is still flowing into the TV. Press or to...
User Manual (English)
Page 12
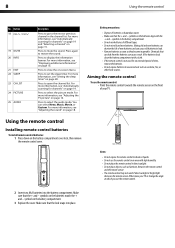
... timer" on the batteries align with a cloth. • If the remote control is not used for an extended period of your TV or change the angle at which you use the remote control: • Point the remote control towards the remote sensor on the battery compartment cover lock, then remove the... and "Selecting a channel" on page 16. For more information, see "Adjusting the TV picture" on page 15. Aiming the remote control To use the remote control. 2 Insert two AAA batteries into place. 8 Using the remote control No. Button 18 CH / CH 19 MUTE 20 INFO 21 EXIT 22 SLEEP 23...
... timer" on the batteries align with a cloth. • If the remote control is not used for an extended period of your TV or change the angle at which you use the remote control: • Point the remote control towards the remote sensor on the battery compartment cover lock, then remove the... and "Selecting a channel" on page 16. For more information, see "Adjusting the TV picture" on page 15. Aiming the remote control To use the remote control. 2 Insert two AAA batteries into place. 8 Using the remote control No. Button 18 CH / CH 19 MUTE 20 INFO 21 EXIT 22 SLEEP 23...
User Manual (English)
Page 13
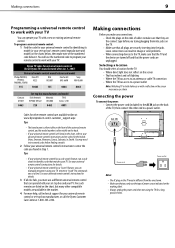
... You should select a location for the brands Orion, Emerson, Memorex, Sansui, Sylvania, or Zenith. Dynex TV codes for universal remote controls (for all Dynex TVs manufactured after Jan. 1, 2007) Universal remote control manufacturer and model Philips PHDVD5, DirectTV PH5DSS, RC23 PMDVR8, PDVR8 RCA RCU807 One for All URC... you found in the market. 4 For more help, call the Dynex Customer Care Center at 1-800-305-2204. Tips: • If your universal remote control has a code search feature, run a code search to the TV, make any connections: • Check the plugs on the...
... You should select a location for the brands Orion, Emerson, Memorex, Sansui, Sylvania, or Zenith. Dynex TV codes for universal remote controls (for all Dynex TVs manufactured after Jan. 1, 2007) Universal remote control manufacturer and model Philips PHDVD5, DirectTV PH5DSS, RC23 PMDVR8, PDVR8 RCA RCU807 One for All URC... you found in the market. 4 For more help, call the Dynex Customer Care Center at 1-800-305-2204. Tips: • If your universal remote control has a code search feature, run a code search to the TV, make any connections: • Check the plugs on the...
User Manual (English)
Page 17
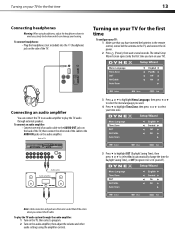
... Connecting headphones Warning: When using the amplifier controls. Turning on your TV). The initial Setup Wizard screen opens (only the first time you have inserted the batteries in the remote control, connected the antenna to select your TV for Daylight Saving Time), or Off (to the AUDIO IN jacks ...on the side of the TV. Note: Cable connectors and jacks are often color-coded. To connect ...
... Connecting headphones Warning: When using the amplifier controls. Turning on your TV). The initial Setup Wizard screen opens (only the first time you have inserted the batteries in the remote control, connected the antenna to select your TV for Daylight Saving Time), or Off (to the AUDIO IN jacks ...on the side of the TV. Note: Cable connectors and jacks are often color-coded. To connect ...
User Manual (English)
Page 18
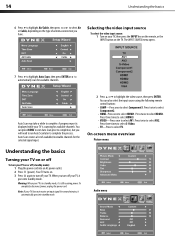
... INPUT SOURCE menu opens. 7 Press to highlight Auto Scan, then press ENTER or to select TV. You can also select the input source using the following remote control buttons: • COMP-Press once to select AV1. Press twice to select Component2. • HDMI-Press once to complete the process. When you ...menu Understanding the basics Turning your TV on or off To turn your TV, it goes into an AC power outlet. 2 Press (power). Audio menu Selecting the video input source To select the video input source: 1 Turn on your TV, then press the INPUT key on the remote, or the INPUT button on ...
... INPUT SOURCE menu opens. 7 Press to highlight Auto Scan, then press ENTER or to select TV. You can also select the input source using the following remote control buttons: • COMP-Press once to select AV1. Press twice to select Component2. • HDMI-Press once to complete the process. When you ...menu Understanding the basics Turning your TV on or off To turn your TV, it goes into an AC power outlet. 2 Press (power). Audio menu Selecting the video input source To select the video input source: 1 Turn on your TV, then press the INPUT key on the remote, or the INPUT button on ...
User Manual (English)
Page 21
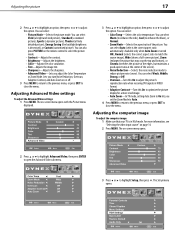
... You can select Auto (selects the correct aspect ratio automatically. Adjusting the computer image To adjust the computer image: 1 Make sure that your TV is turned ON), Normal (selects the correct aspect ratio to match the source image), Wide (shows a full-screen picture), Zoom (enlarges the... ratio of the picture. The Setup menu opens. Lets you adjust the Color Temperature or Zoom Mode. You can also press PICTURE on the remote control to select the picture mode. • Contrast-Adjusts the contrast. • Brightness-Adjusts the brightness. • Color-Adjusts the color saturation...
... You can select Auto (selects the correct aspect ratio automatically. Adjusting the computer image To adjust the computer image: 1 Make sure that your TV is turned ON), Normal (selects the correct aspect ratio to match the source image), Wide (shows a full-screen picture), Zoom (enlarges the... ratio of the picture. The Setup menu opens. Lets you adjust the Color Temperature or Zoom Mode. You can also press PICTURE on the remote control to select the picture mode. • Contrast-Adjusts the contrast. • Brightness-Adjusts the brightness. • Color-Adjusts the color saturation...

User Manual (English)
Page 22
... opens. You can adjust: • H-Position-Moves the image right or left and right audio channels. • Surround-Turns the surround sound effect on the remote one or more times. You can select: • Sound Mode-Selects the sound mode.
... opens. You can adjust: • H-Position-Moves the image right or left and right audio channels. • Surround-Turns the surround sound effect on the remote one or more times. You can select: • Sound Mode-Selects the sound mode.
User Manual (English)
Page 33
.... 4 Press or to highlight Sleep Timer, then press or to select the amount of time you want your TV to highlight Setup, then press . Note: You can also press SLEEP on the remote control to set the sleep timer. 2 Press or to wait before it automatically turns off the sleep timer, select...
.... 4 Press or to highlight Sleep Timer, then press or to select the amount of time you want your TV to highlight Setup, then press . Note: You can also press SLEEP on the remote control to set the sleep timer. 2 Press or to wait before it automatically turns off the sleep timer, select...
User Manual (English)
Page 35
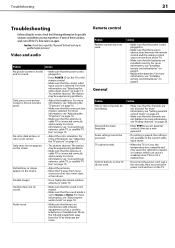
...it on page 16. • Try another channel. For more information, see "Connecting an antenna, cable TV, or satellite TV box" on the TV. For more information, see "Installing remote control batteries" on page 16. • Make sure that the correct picture mode is connected correctly and ... selected. General Problem Solution One or more information, see "Connecting an antenna, cable TV, or satellite TV box" on the TV or the remote control. • Make sure that the antenna or cable TV is selected. Some settings cannot be experiencing problems. • Make sure that the ...
...it on page 16. • Try another channel. For more information, see "Connecting an antenna, cable TV, or satellite TV box" on the TV. For more information, see "Installing remote control batteries" on page 16. • Make sure that the correct picture mode is connected correctly and ... selected. General Problem Solution One or more information, see "Connecting an antenna, cable TV, or satellite TV box" on the TV or the remote control. • Make sure that the antenna or cable TV is selected. Some settings cannot be experiencing problems. • Make sure that the ...


