User Manual (English)
Page 2
... wall-mount bracket 4 TV components 5 Front 5 Side 5 Back 6 Remote control 7 Using the remote control 8 Installing remote control batteries 8 Aiming the remote control 8 Programming a universal remote control to work with your TV 9 Making connections 9 Connecting the power 9 Connecting an antenna, cable TV, or satellite TV box 10 Connecting a... the volume 16 Adjusting basic settings 16 Displaying additional information 16 Adjusting the picture 16 Adjusting the TV picture 16 Adjusting Advanced Video settings 17 Adjusting the computer image 17 Adjusting the sound 18 Adjusting ...
... wall-mount bracket 4 TV components 5 Front 5 Side 5 Back 6 Remote control 7 Using the remote control 8 Installing remote control batteries 8 Aiming the remote control 8 Programming a universal remote control to work with your TV 9 Making connections 9 Connecting the power 9 Connecting an antenna, cable TV, or satellite TV box 10 Connecting a... the volume 16 Adjusting basic settings 16 Displaying additional information 16 Adjusting the picture 16 Adjusting the TV picture 16 Adjusting Advanced Video settings 17 Adjusting the computer image 17 Adjusting the sound 18 Adjusting ...
User Manual (English)
Page 3
iii Using closed captioning 26 Turning closed captioning on or off 26 Selecting the closed captioning mode 26 Customizing DTV closed captioning styles 27 Adjusting time settings 28 Setting the clock 28 Setting the sleep timer 28 Adjusting menu settings 29 Selecting the menu language and transparency 29 Labeling an input source 30 Restoring default settings 30 Troubleshooting 31 Video and audio 31 Remote control 31 General 31 Maintenance 32 Cleaning 32 Specifications 32 Legal notices 32 One-year limited warranty 33
iii Using closed captioning 26 Turning closed captioning on or off 26 Selecting the closed captioning mode 26 Customizing DTV closed captioning styles 27 Adjusting time settings 28 Setting the clock 28 Setting the sleep timer 28 Adjusting menu settings 29 Selecting the menu language and transparency 29 Labeling an input source 30 Restoring default settings 30 Troubleshooting 31 Video and audio 31 Remote control 31 General 31 Maintenance 32 Cleaning 32 Specifications 32 Legal notices 32 One-year limited warranty 33

User Manual (English)
Page 6
...your mouth, immediately gargle, rinse, and consult with your TV or hit, jolt, or press hard against the LCD panel. Make sure that you connect the class I apparatus to a mains socket outlet with a protective earthing connection. 17 Remote control batteries should not be exposed to excessive heat such as... or splashing and that no objects filled with liquids, such as vases, shall be placed on the marking label. Handling the LCD panel • Your TV's screen is made of overhead power lines or other apparatus (including amplifiers) that have the same characteristics as power-supply cord ...
...your mouth, immediately gargle, rinse, and consult with your TV or hit, jolt, or press hard against the LCD panel. Make sure that you connect the class I apparatus to a mains socket outlet with a protective earthing connection. 17 Remote control batteries should not be exposed to excessive heat such as... or splashing and that no objects filled with liquids, such as vases, shall be placed on the marking label. Handling the LCD panel • Your TV's screen is made of overhead power lines or other apparatus (including amplifiers) that have the same characteristics as power-supply cord ...
User Manual (English)
Page 9
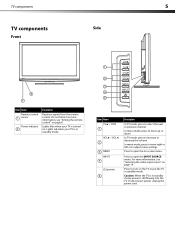
... information, see "Selecting the video input source" on page 8. TV components 5 TV components Side Front 2 1 Item Name Remote control 1 sensor Power indicator 2 Description Receives signals from the remote control. Lights blue when your TV is still flowing into the TV. For more information, see "Aiming the remote control" on page 14. Press to increase or decrease the...
... information, see "Selecting the video input source" on page 8. TV components 5 TV components Side Front 2 1 Item Name Remote control 1 sensor Power indicator 2 Description Receives signals from the remote control. Lights blue when your TV is still flowing into the TV. For more information, see "Aiming the remote control" on page 14. Press to increase or decrease the...
User Manual (English)
Page 11
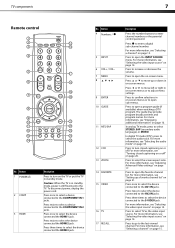
..., power is in on or off " on -screen menu. Press three times to select the device connected to select the device connected the HDMI 1 jack. TV components 7 Remote control 1 2 15 3 16 4 5 17 6 18 19 7 20 8 9 10 21 11 22 12 23 13 24 14 25 No. Button 1 POWER 2 COMP... 3 HDMI Description Press to open the INPUT SOURCE menu. Caution: When the TV is still flowing into the TV. To disconnect power, unplug the power cord. Press...
..., power is in on or off " on -screen menu. Press three times to select the device connected to select the device connected the HDMI 1 jack. TV components 7 Remote control 1 2 15 3 16 4 5 17 6 18 19 7 20 8 9 10 21 11 22 12 23 13 24 14 25 No. Button 1 POWER 2 COMP... 3 HDMI Description Press to open the INPUT SOURCE menu. Caution: When the TV is still flowing into the TV. To disconnect power, unplug the power cord. Press...
User Manual (English)
Page 12
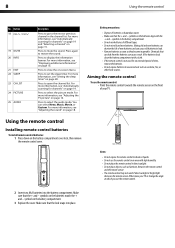
...the battery compartment. 3 Replace the cover. symbols in the battery compartment. • Do not mix batteries of your TV or change the angle at which you use the remote control in direct sunlight. • Do not place objects, such as they become inoperable. Make sure that can leak...on page 19 and "Selecting a channel" on page 28. Either move your TV. Press to open the channel list. Press to display the information banner. Press to shock or liquids. • Do not use the remote control. 2 Insert two AAA batteries into place. For more information, see "...
...the battery compartment. 3 Replace the cover. symbols in the battery compartment. • Do not mix batteries of your TV or change the angle at which you use the remote control in direct sunlight. • Do not place objects, such as they become inoperable. Make sure that can leak...on page 19 and "Selecting a channel" on page 28. Either move your TV. Press to open the channel list. Press to display the information banner. Press to shock or liquids. • Do not use the remote control. 2 Insert two AAA batteries into place. For more information, see "...
User Manual (English)
Page 13
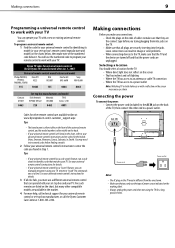
...; When connecting devices to identify a code that they are unplugged. See your universal remote control's instructions for details. 3 If all Dynex TVs manufactured after Jan. 1, 2007) Universal remote control manufacturer and model Philips PHDVD5, DirectTV PH5DSS, RC23 PMDVR8, PDVR8 RCA RCU807 One... Sansui, Sylvania, or Zenith. Dynex TV codes for universal remote controls (for your universal remote control by identifying its model (or your set-top box's remote control manufacturer and model) on the charts below it using the TV for the TV: • Where direct light ...
...; When connecting devices to identify a code that they are unplugged. See your universal remote control's instructions for details. 3 If all Dynex TVs manufactured after Jan. 1, 2007) Universal remote control manufacturer and model Philips PHDVD5, DirectTV PH5DSS, RC23 PMDVR8, PDVR8 RCA RCU807 One... Sansui, Sylvania, or Zenith. Dynex TV codes for universal remote controls (for your universal remote control by identifying its model (or your set-top box's remote control manufacturer and model) on the charts below it using the TV for the TV: • Where direct light ...
User Manual (English)
Page 17
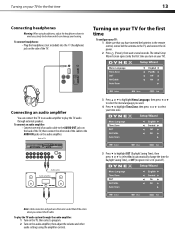
.... Match the colors when you have inserted the batteries in the remote control, connected the antenna to the TV, and connect the AC power. 2 Press (Power), then wait several seconds. To play the TV audio through the audio amplifier: 1 Turn on the TV, then select a program. 2 Turn on the audio amplifier, then ...headphones: • Plug the headphones (not included) into the (headphone) jack on the side of the cable to the AUDIO IN jacks on your TV for the first time To configure your time zone. 5 Press to highlight DST (Daylight Saving Time), then press or to select On (to select your...
.... Match the colors when you have inserted the batteries in the remote control, connected the antenna to the TV, and connect the AC power. 2 Press (Power), then wait several seconds. To play the TV audio through the audio amplifier: 1 Turn on the TV, then select a program. 2 Turn on the audio amplifier, then ...headphones: • Plug the headphones (not included) into the (headphone) jack on the side of the cable to the AUDIO IN jacks on your TV for the first time To configure your time zone. 5 Press to highlight DST (Daylight Saving Time), then press or to select On (to select your...
User Manual (English)
Page 18
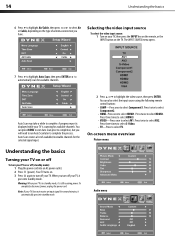
...highlight the video source, then press ENTER. Selecting the video input source To select the video input source: 1 Turn on your TV, then press the INPUT key on the remote, or the INPUT button on or off (standby mode): 1 Plug the power cord into an AC power outlet. 2 Press (.... • VIDEO-Press once to automatically scan for available channels. You can also select the input source using the following remote control buttons: • COMP-Press once to complete the process. Warning: When your TV. Audio menu On-screen menu overview Picture menu Understanding the basics Turning your...
...highlight the video source, then press ENTER. Selecting the video input source To select the video input source: 1 Turn on your TV, then press the INPUT key on the remote, or the INPUT button on or off (standby mode): 1 Plug the power cord into an AC power outlet. 2 Press (.... • VIDEO-Press once to automatically scan for available channels. You can also select the input source using the following remote control buttons: • COMP-Press once to complete the process. Warning: When your TV. Audio menu On-screen menu overview Picture menu Understanding the basics Turning your...
User Manual (English)
Page 21
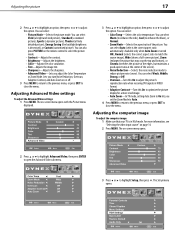
... Video settings To adjust the Advanced Video settings: 1 Press MENU. Adjusting the computer image To adjust the computer image: 1 Make sure that your TV is turned ON), Normal (selects the correct aspect ratio to adjust the option. The Setup menu opens. You can select Warm (to enhance the reds...or to highlight Setup, then press . For more vivid image. • Auto Zoom-In TV mode, setting Auto Zoom to On lets you turn Noise Reduction, Overscan, Adaptive Contrast, and Auto Zoom on the remote control to adjust the picture's reproduction rate when receiving DVI signals in VGA mode. You ...
... Video settings To adjust the Advanced Video settings: 1 Press MENU. Adjusting the computer image To adjust the computer image: 1 Make sure that your TV is turned ON), Normal (selects the correct aspect ratio to adjust the option. The Setup menu opens. You can select Warm (to enhance the reds...or to highlight Setup, then press . For more vivid image. • Auto Zoom-In TV mode, setting Auto Zoom to On lets you turn Noise Reduction, Overscan, Adaptive Contrast, and Auto Zoom on the remote control to adjust the picture's reproduction rate when receiving DVI signals in VGA mode. You ...

User Manual (English)
Page 22
...: • Press MTS/SAP on -screen menu opens. 3 Press or to highlight an option, then press or to highlight Audio, then press . The on the remote one or more times. You can adjust: • H-Position-Moves the image right or left and right audio channels. • Surround-Turns the surround sound...
...: • Press MTS/SAP on -screen menu opens. 3 Press or to highlight an option, then press or to highlight Audio, then press . The on the remote one or more times. You can adjust: • H-Position-Moves the image right or left and right audio channels. • Surround-Turns the surround sound...
User Manual (English)
Page 33
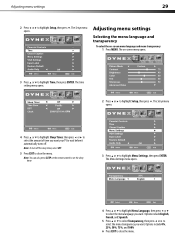
... transparency To select the on -screen menu opens. 3 Press or to select the menu language you want. Note: You can also press SLEEP on the remote control to set the sleep timer. 2 Press or to select the menu transparency you want . Options include English, French, and Spanish. 5 Press or to select...: 1 Press MENU. The time setting menu opens. 4 Press or to highlight Sleep Timer, then press or to select the amount of time you want your TV to close the menu. Options include 0%, 25%, 50%, 75%, and 100% 6 Press EXIT to wait before it automatically turns off the sleep timer, select Off...
... transparency To select the on -screen menu opens. 3 Press or to select the menu language you want. Note: You can also press SLEEP on the remote control to set the sleep timer. 2 Press or to select the menu transparency you want . Options include English, French, and Spanish. 5 Press or to select...: 1 Press MENU. The time setting menu opens. 4 Press or to highlight Sleep Timer, then press or to select the amount of time you want your TV to close the menu. Options include 0%, 25%, 50%, 75%, and 100% 6 Press EXIT to wait before it automatically turns off the sleep timer, select Off...
User Manual (English)
Page 35
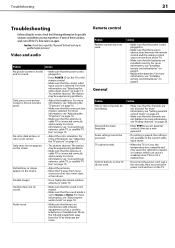
...see "Hiding channels" on page 8. • Replace the batteries. For more information, see "Connecting an antenna, cable TV, or satellite TV box" on the TV or the remote control. • Make sure that the correct video input source is selected. Some settings cannot be experiencing problems. Dark... control levels" on page 18. Audio noise. • Make sure that the channels are not blocked. Remote control Problem Remote control does not work , turn off the TV, then turn on again. Password has been forgotten. • Enter 9999 to expand or contract which can...
...see "Hiding channels" on page 8. • Replace the batteries. For more information, see "Connecting an antenna, cable TV, or satellite TV box" on the TV or the remote control. • Make sure that the correct video input source is selected. Some settings cannot be experiencing problems. Dark... control levels" on page 18. Audio noise. • Make sure that the channels are not blocked. Remote control Problem Remote control does not work , turn off the TV, then turn on again. Password has been forgotten. • Enter 9999 to expand or contract which can...


