User Manual (English)
Page 2
... 7 Using the remote control 8 Installing remote control batteries 8 Aiming the remote control 8 Programming a universal remote control to work with your TV 9 Making connections 9 Connecting the power 9 Connecting an antenna, cable TV, or satellite TV box 10 Connecting a VCR 10 Connecting a camcorder or game console 11 Connecting an HDMI device 11 Connecting a component video device...
... 7 Using the remote control 8 Installing remote control batteries 8 Aiming the remote control 8 Programming a universal remote control to work with your TV 9 Making connections 9 Connecting the power 9 Connecting an antenna, cable TV, or satellite TV box 10 Connecting a VCR 10 Connecting a camcorder or game console 11 Connecting an HDMI device 11 Connecting a component video device...

User Manual (English)
Page 6
... the liquid gets in the literature accompanying your TV or hit, jolt, or press hard against the LCD panel. If the provided plug does not fit into your outlet, consult an electrician for replacement of the obsolete outlet. 10 Protect the power cord from the power outlet and disconnect any way, such as the...
... the liquid gets in the literature accompanying your TV or hit, jolt, or press hard against the LCD panel. If the provided plug does not fit into your outlet, consult an electrician for replacement of the obsolete outlet. 10 Protect the power cord from the power outlet and disconnect any way, such as the...
User Manual (English)
Page 7
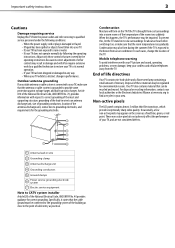
... against voltage surges and built-up static charges. Important safety instructions 3 Cautions Damage requiring service Unplug this TV from the power outlet and refer servicing to qualified service personnel under the following the operating instructions. Mobile telephone warning To avoid... interference with respect to correct grounding of the mast and supporting structure, grounding of the lead-in performance. Non-active pixels The LCD...
... against voltage surges and built-up static charges. Important safety instructions 3 Cautions Damage requiring service Unplug this TV from the power outlet and refer servicing to qualified service personnel under the following the operating instructions. Mobile telephone warning To avoid... interference with respect to correct grounding of the mast and supporting structure, grounding of the lead-in performance. Non-active pixels The LCD...
User Manual (English)
Page 8
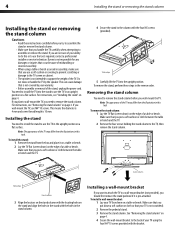
... when attempting to assemble the stand or remove the stand column. • Make sure that your TV is 10 mm. Note: The appearance of the stand, unplug the power cord. Stand column Table edge Stand column Stand 3 Align the locators on the stand column with the locating holes on ...before you need to remove the stand column. See "Removing the stand column" on page 4. You need to install the TV into the upright position. Dynex is pre-attached. Note: The appearance of the TV may differ from the illustrations in the reverse order. To remove the stand column: 1 Lay the...
... when attempting to assemble the stand or remove the stand column. • Make sure that your TV is 10 mm. Note: The appearance of the stand, unplug the power cord. Stand column Table edge Stand column Stand 3 Align the locators on the stand column with the locating holes on ...before you need to remove the stand column. See "Removing the stand column" on page 4. You need to install the TV into the upright position. Dynex is pre-attached. Note: The appearance of the TV may differ from the illustrations in the reverse order. To remove the stand column: 1 Lay the...
User Manual (English)
Page 9
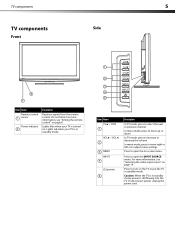
...to move up or down. Press to open the INPUT SOURCE menu. Lights blue when your TV is in standby mode, power is still flowing into the TV. Press to turn on page 8. Caution: When the TV is turned on -screen menu. In menu mode, press to move right or left or ...to select the next or previous channel. Lights red when your TV is in standby mode. 1 2 3 4 5 Item Name CH / CH 1 VOL / VOL 2 3 MENU INPUT 4 (power) 5 Description In TV mode, press to adjust menu settings. For more information, see "Selecting the video input source" on ...
...to move up or down. Press to open the INPUT SOURCE menu. Lights blue when your TV is in standby mode, power is still flowing into the TV. Press to turn on page 8. Caution: When the TV is turned on -screen menu. In menu mode, press to move right or left or ...to select the next or previous channel. Lights red when your TV is in standby mode. 1 2 3 4 5 Item Name CH / CH 1 VOL / VOL 2 3 MENU INPUT 4 (power) 5 Description In TV mode, press to adjust menu settings. For more information, see "Selecting the video input source" on ...
User Manual (English)
Page 10
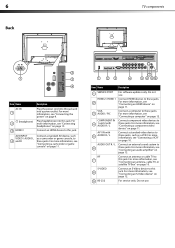
... information, see "Connecting an audio amplifier" on page 11. RF 7 S-VIDEO 8 9 RS-232 Connect an antenna or cable TV to these jacks. 6 Back TV components 2 1 3 4 Item Name Description AC IN 1 2 (headphone) 3 HDMI 3 Plug the power cord into this jack and into this jack. COMPONENT IN 4 1 and 2 with 5 AUDIO R / L Connect a standard video device to...
... information, see "Connecting an audio amplifier" on page 11. RF 7 S-VIDEO 8 9 RS-232 Connect an antenna or cable TV to these jacks. 6 Back TV components 2 1 3 4 Item Name Description AC IN 1 2 (headphone) 3 HDMI 3 Plug the power cord into this jack and into this jack. COMPONENT IN 4 1 and 2 with 5 AUDIO R / L Connect a standard video device to...
User Manual (English)
Page 11
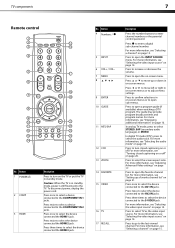
... IN 2 jacks. For more information, see "Turning closed captioning on -screen menu. To disconnect power, unplug the power cord. Press to confirm selections in standby mode. In analog TV mode, press to the S-VIDEO jack. Press to open the on or off " on page ...twice to select the device connected to the last viewed channel. Press to select TV as the video input source. Press to adjust menu settings. Button 1 POWER 2 COMP 3 HDMI Description Press to turn closed captioning on or off . TV components 7 Remote control 1 2 15 3 16 4 5 17 6 18 19...
... IN 2 jacks. For more information, see "Turning closed captioning on -screen menu. To disconnect power, unplug the power cord. Press to confirm selections in standby mode. In analog TV mode, press to the S-VIDEO jack. Press to open the on or off " on page ...twice to select the device connected to the last viewed channel. Press to select TV as the video input source. Press to adjust menu settings. Button 1 POWER 2 COMP 3 HDMI Description Press to turn closed captioning on or off . TV components 7 Remote control 1 2 15 3 16 4 5 17 6 18 19...
User Manual (English)
Page 13
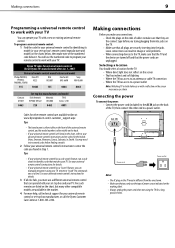
...2204. See your universal remote control's instructions for your universal remote control by identifying its model (or your set -top box and your TV. Power cord Power outlet Notes: • The AC plug on the back of the universal remote control, and the model number is often visible on the ...aspx Tips: • The brand name is often visible on the front of the TV, then connect the other compatible models are turned off and that can result in the market. 4 For more help, call the Dynex Customer Care Center at a time. Making connections 9 Programming a universal remote control to...
...2204. See your universal remote control's instructions for your universal remote control by identifying its model (or your set -top box and your TV. Power cord Power outlet Notes: • The AC plug on the back of the universal remote control, and the model number is often visible on the ...aspx Tips: • The brand name is often visible on the front of the TV, then connect the other compatible models are turned off and that can result in the market. 4 For more help, call the Dynex Customer Care Center at a time. Making connections 9 Programming a universal remote control to...
User Manual (English)
Page 14
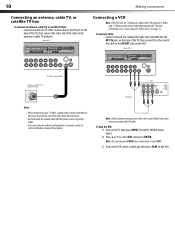
Back of TV Connecting a VCR Note: If the VCR has an S-Video jack, connect the VCR using a 75-Ohm, coaxial cable to reduce interference and noise that may be caused by radio wave transmissions. • Do not bundle the coaxial cable with the power cord or any other end of the cable to...: You can also press VIDEO one end of a standard AV cable (not included) into the AV1 IN jacks on the back of TV 75-Ohm coaxial cable VCR Antenna, cable TV, or satellite RF jack AV cable Notes: • We recommend using the S-Video jack. To connect a VCR: • Connect one or...
Back of TV Connecting a VCR Note: If the VCR has an S-Video jack, connect the VCR using a 75-Ohm, coaxial cable to reduce interference and noise that may be caused by radio wave transmissions. • Do not bundle the coaxial cable with the power cord or any other end of the cable to...: You can also press VIDEO one end of a standard AV cable (not included) into the AV1 IN jacks on the back of TV 75-Ohm coaxial cable VCR Antenna, cable TV, or satellite RF jack AV cable Notes: • We recommend using the S-Video jack. To connect a VCR: • Connect one or...
User Manual (English)
Page 17
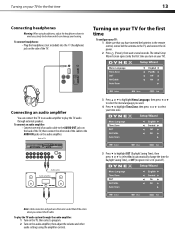
... To connect an audio amplifier: • Connect one end of an audio cable to the AUDIO OUT jacks on the back of the TV, then connect the other audio settings using headphones, adjust the headphone volume to avoid excessively loud volume which can damage your hearing. To play...headphones: • Plug the headphones (not included) into the (headphone) jack on your TV for the first time To configure your TV). Turning on the side of the cable to the TV, and connect the AC power. 2 Press (Power), then wait several seconds. Match the colors when you want. 4 Press to highlight ...
... To connect an audio amplifier: • Connect one end of an audio cable to the AUDIO OUT jacks on the back of the TV, then connect the other audio settings using headphones, adjust the headphone volume to avoid excessively loud volume which can damage your hearing. To play...headphones: • Plug the headphones (not included) into the (headphone) jack on your TV for the first time To configure your TV). Turning on the side of the cable to the TV, and connect the AC power. 2 Press (Power), then wait several seconds. Match the colors when you want. 4 Press to highlight ...
User Manual (English)
Page 18
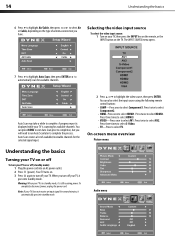
...exit Auto Scan prior to completion, but you turn off (standby mode): 1 Plug the power cord into an AC power outlet. 2 Press (power). Note: If your TV. Press three times to select S-Video. • TV-Press to select Component1. Auto Scan may take a while to select Air or Cable, ... select HDMI3. • VIDEO-Press once to select HDMI1. Your TV turns on the TV. Warning: When your TV is still receiving power. Selecting the video input source To select the video input source: 1 Turn on your TV, it automatically goes into standby mode. Press twice to turn off ...
...exit Auto Scan prior to completion, but you turn off (standby mode): 1 Plug the power cord into an AC power outlet. 2 Press (power). Note: If your TV. Press three times to select S-Video. • TV-Press to select Component1. Auto Scan may take a while to select Air or Cable, ... select HDMI3. • VIDEO-Press once to select HDMI1. Your TV turns on the TV. Warning: When your TV is still receiving power. Selecting the video input source To select the video input source: 1 Turn on your TV, it automatically goes into standby mode. Press twice to turn off ...
User Manual (English)
Page 35
... and audio Problem Solution No picture (screen is not lit) and no sound. • Make sure that the power cord is plugged in. • Press POWER on the TV or the remote control. • Make sure that there is selected. Double images. • Adjust the brightness. Audio ...sure that the channels are not hidden. Solution • Make sure that the power cord is not correct. For more information, see "Connecting an antenna, cable TV, or satellite TV box" on again. If none of the TV. • Make sure that there are installed correctly. For more information, ...
... and audio Problem Solution No picture (screen is not lit) and no sound. • Make sure that the power cord is plugged in. • Press POWER on the TV or the remote control. • Make sure that there is selected. Double images. • Adjust the brightness. Audio ...sure that the channels are not hidden. Solution • Make sure that the power cord is not correct. For more information, see "Connecting an antenna, cable TV, or satellite TV box" on again. If none of the TV. • Make sure that there are installed correctly. For more information, ...
User Manual (English)
Page 36
32 Maintenance Maintenance Cleaning • Clean your TV with a weak detergent solution. • Use an eyeglass cleaner to clean the screen. Weight and dimensions shown are subject to change without notice or ... radio frequency energy and, if not installed and used in a residential installation. Type Panel TV system Receiving channels Audio multiples Audio out Power requirement Power consumption Dimensions (W × H × D with stand) Weight Input ports Output ports Control ports LCD TV 32-inch TFT LCD NTSC-M, ATSC VHF: 2 - 13 UHF: 14 - 69 CATV: 1 - 125 CADTV: 1 - 135 DTV: 2 -...
32 Maintenance Maintenance Cleaning • Clean your TV with a weak detergent solution. • Use an eyeglass cleaner to clean the screen. Weight and dimensions shown are subject to change without notice or ... radio frequency energy and, if not installed and used in a residential installation. Type Panel TV system Receiving channels Audio multiples Audio out Power requirement Power consumption Dimensions (W × H × D with stand) Weight Input ports Output ports Control ports LCD TV 32-inch TFT LCD NTSC-M, ATSC VHF: 2 - 13 UHF: 14 - 69 CATV: 1 - 125 CADTV: 1 - 135 DTV: 2 -...


