Warranty (English)
Page 1
... instruction • Installation • Set up adjustments • Cosmetic damage • Damage due to acts of God, such as you own your Dynex product during the Warranty Period of a defect covered by an authorized Dynex repair center or store personnel, Dynex will have an Insignia-approved repair person dispatched to your home. If you notify Dynex during the Warranty Period. Products and parts replaced...
... instruction • Installation • Set up adjustments • Cosmetic damage • Damage due to acts of God, such as you own your Dynex product during the Warranty Period of a defect covered by an authorized Dynex repair center or store personnel, Dynex will have an Insignia-approved repair person dispatched to your home. If you notify Dynex during the Warranty Period. Products and parts replaced...
User Manual (English)
Page 2
... the stand or removing the stand column 4 Installing the stand 4 Removing the stand column 4 Installing a wall-mount bracket 4 TV components 5 Front 5 Side 5 Back 6 Remote control 7 Using the remote control 8 Installing remote control batteries 8 Aiming the remote control 8 Programming a universal remote control to work with your TV 9 Making connections 9 Connecting the power 9 Connecting an antenna, cable TV, or satellite TV box 10 Connecting a VCR 10 Connecting a camcorder or game console 11 Connecting an HDMI device 11 Connecting a component video device 11 Connecting an...
... the stand or removing the stand column 4 Installing the stand 4 Removing the stand column 4 Installing a wall-mount bracket 4 TV components 5 Front 5 Side 5 Back 6 Remote control 7 Using the remote control 8 Installing remote control batteries 8 Aiming the remote control 8 Programming a universal remote control to work with your TV 9 Making connections 9 Connecting the power 9 Connecting an antenna, cable TV, or satellite TV box 10 Connecting a VCR 10 Connecting a camcorder or game console 11 Connecting an HDMI device 11 Connecting a component video device 11 Connecting an...
User Manual (English)
Page 3
iii Using closed captioning 26 Turning closed captioning on or off 26 Selecting the closed captioning mode 26 Customizing DTV closed captioning styles 27 Adjusting time settings 28 Setting the clock 28 Setting the sleep timer 28 Adjusting menu settings 29 Selecting the menu language and transparency 29 Labeling an input source 30 Restoring default settings 30 Troubleshooting 31 Video and audio 31 Remote control 31 General 31 Maintenance 32 Cleaning 32 Specifications 32 Legal notices 32 One-year limited warranty 33
iii Using closed captioning 26 Turning closed captioning on or off 26 Selecting the closed captioning mode 26 Customizing DTV closed captioning styles 27 Adjusting time settings 28 Setting the clock 28 Setting the sleep timer 28 Adjusting menu settings 29 Selecting the menu language and transparency 29 Labeling an input source 30 Restoring default settings 30 Troubleshooting 31 Video and audio 31 Remote control 31 General 31 Maintenance 32 Cleaning 32 Specifications 32 Legal notices 32 One-year limited warranty 33
User Manual (English)
Page 5
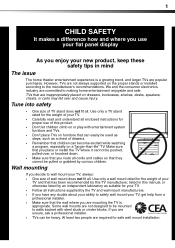
... instructions supplied by curious children. Make sure that you place or install the TV where it cannot be pushed, pulled over and cause injury. Some wall mounts are required for proper use your flat panel display As you decide to wall mount your TV, always: • One size of wall mount does not fit all. 1 f CHILD SAFETY It makes a difference how and where you use of this manual...
... instructions supplied by curious children. Make sure that you place or install the TV where it cannot be pushed, pulled over and cause injury. Some wall mounts are required for proper use your flat panel display As you decide to wall mount your TV, always: • One size of wall mount does not fit all. 1 f CHILD SAFETY It makes a difference how and where you use of this manual...

User Manual (English)
Page 6
... the power cord from the apparatus. 11 Only use caution when moving the cart/apparatus combination to rain or moisture, does not operate normally, or has been dropped. 15 The mains plug is the disconnecting device. If the screen breaks, be careful of broken glass. • If the LCD panel is broken, make sure that the service technician uses replacement parts specified...
... the power cord from the apparatus. 11 Only use caution when moving the cart/apparatus combination to rain or moisture, does not operate normally, or has been dropped. 15 The mains plug is the disconnecting device. If the screen breaks, be careful of broken glass. • If the LCD panel is broken, make sure that the service technician uses replacement parts specified...
User Manual (English)
Page 7
... your area. Adjust only those controls that can be impaired. Non-active pixels The LCD panel contains almost 3 million thin film transistors, which provide exceptionally sharp video quality. To prevent this, let the TV stand in its normal operation. • If your TV has been dropped or damaged in any way. • When your TV exhibits a distinct change the location of these...
... your area. Adjust only those controls that can be impaired. Non-active pixels The LCD panel contains almost 3 million thin film transistors, which provide exceptionally sharp video quality. To prevent this, let the TV stand in its normal operation. • If your TV has been dropped or damaged in any way. • When your TV exhibits a distinct change the location of these...
User Manual (English)
Page 8
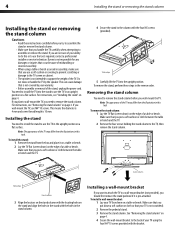
... a flat surface. Installing the stand You need to support the weight of the TV may differ from the illustration in the reverse order. Make sure that you wall-mount the TV. To remove the stand column: 1 Lay the TV flat (screen down ) on the edge of the stand, unplug the power cord. Dynex is not intended to install the TV into the upright position. You need to install the stand to use the TV in assembly, make...
... a flat surface. Installing the stand You need to support the weight of the TV may differ from the illustration in the reverse order. Make sure that you wall-mount the TV. To remove the stand column: 1 Lay the TV flat (screen down ) on the edge of the stand, unplug the power cord. Dynex is not intended to install the TV into the upright position. You need to install the stand to use the TV in assembly, make...
User Manual (English)
Page 11
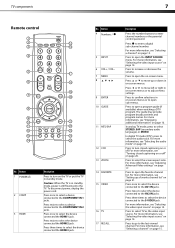
... FAVORITE 15 VIDEO 16 TV 17 RECALL Description Press the number buttons to open the favorite channel list. Press to enter channel numbers or the parental control password. Press twice to select the device connected to select TV as the video input source. Press to the AV2 IN jacks. Press to open sub-menus. Press to increase or decrease the volume. In digital TV mode (DTV), press to open a program guide (if available...
... FAVORITE 15 VIDEO 16 TV 17 RECALL Description Press the number buttons to open the favorite channel list. Press to enter channel numbers or the parental control password. Press twice to select the device connected to select TV as the video input source. Press to the AV2 IN jacks. Press to open sub-menus. Press to increase or decrease the volume. In digital TV mode (DTV), press to open a program guide (if available...
User Manual (English)
Page 12
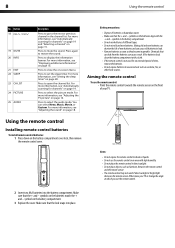
... to mute the sound. 8 Using the remote control No. For more information, see "Automatically scanning for channels" on the remote sensor. symbols on page 15. Press to select the audio mode. For more information, see "Setting the sleep timer" on page 16. Battery precautions: • Dispose of different types. • Do not mix old and new batteries. symbols in the battery compartment. 3 Replace the cover.
... to mute the sound. 8 Using the remote control No. For more information, see "Automatically scanning for channels" on the remote sensor. symbols on page 15. Press to select the audio mode. For more information, see "Setting the sleep timer" on page 16. Battery precautions: • Dispose of different types. • Do not mix old and new batteries. symbols in the battery compartment. 3 Replace the cover.
User Manual (English)
Page 13
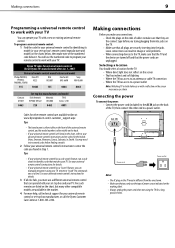
... numbered code to program your remote control to work with your TV You can result in total darkness or with a reflection on the TV. • Make sure that they are available in the market. 4 For more help, call the Dynex Customer Care Center at a time. Loose connections can operate your set -top box manufacturer, or call technical support for your universal remote control's instructions and try several codes before you trying plugging...
... numbered code to program your remote control to work with your TV You can result in total darkness or with a reflection on the TV. • Make sure that they are available in the market. 4 For more help, call the Dynex Customer Care Center at a time. Loose connections can operate your set -top box manufacturer, or call technical support for your universal remote control's instructions and try several codes before you trying plugging...
User Manual (English)
Page 15
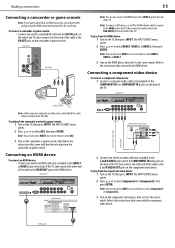
... using the HDMI connection instead of TV Game console Note: Cable connectors and jacks are often color-coded. To playback the camcorder or play from the camcorder or game console. The INPUT SOURCE menu opens. 2 Press or to select HDMI 1, HDMI 2, or HDMI 3, then press ENTER. HDMI cable The INPUT SOURCE menu opens. 2 Press or to select Component1 or Component2, then press ENTER. Back of TV HDMI device Component video cable Audio cable Component video device 2 Connect one or more times to play...
... using the HDMI connection instead of TV Game console Note: Cable connectors and jacks are often color-coded. To playback the camcorder or play from the camcorder or game console. The INPUT SOURCE menu opens. 2 Press or to select HDMI 1, HDMI 2, or HDMI 3, then press ENTER. HDMI cable The INPUT SOURCE menu opens. 2 Press or to select Component1 or Component2, then press ENTER. Back of TV HDMI device Component video cable Audio cable Component video device 2 Connect one or more times to play...

User Manual (English)
Page 16
... HDMI connection. To play video from the S-Video device: 1 Turn on the TV, then press INPUT. To connect a computer: 1 Connect one end of an audio cable (not included) to the S-VIDEO OUT jack on the computer. For more times to select S-Video, then press ENTER. Note: You can also press VIDEO one or more information, see "Connecting an HDMI device" on the computer, then adjust the computer display properties as needed...
... HDMI connection. To play video from the S-Video device: 1 Turn on the TV, then press INPUT. To connect a computer: 1 Connect one end of an audio cable (not included) to the S-VIDEO OUT jack on the computer. For more times to select S-Video, then press ENTER. Note: You can also press VIDEO one or more information, see "Connecting an HDMI device" on the computer, then adjust the computer display properties as needed...
User Manual (English)
Page 17
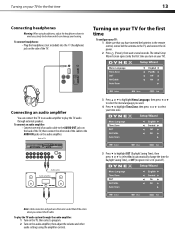
... using the amplifier controls. Back of the TV. Match the colors when you have inserted the batteries in the remote control, connected the antenna to select the menu language you turn on the audio amplifier. Turning on the side of TV Audio cable Audio amplifier 3 Press or to highlight Menu Language, then press or to the TV, and connect the AC power. 2 Press (Power), then wait several seconds. To connect headphones: • Plug...
... using the amplifier controls. Back of the TV. Match the colors when you have inserted the batteries in the remote control, connected the antenna to select the menu language you turn on the audio amplifier. Turning on the side of TV Audio cable Audio amplifier 3 Press or to highlight Menu Language, then press or to the TV, and connect the AC power. 2 Press (Power), then wait several seconds. To connect headphones: • Plug...
User Manual (English)
Page 18
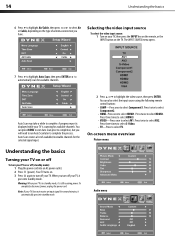
... into standby mode. Press three times to select S-Video. • TV-Press to select HDMI1. Auto Scan creates a list of antenna connection you turn off your TV does not receive an input signal for available channels. The INPUT SOURCE menu opens. 7 Press to highlight Auto Scan, then press ENTER or to automatically scan for the selected signal input. 2 Press or to highlight the video source, then press ENTER. You can also select the input source using the following remote control buttons: •...
... into standby mode. Press three times to select S-Video. • TV-Press to select HDMI1. Auto Scan creates a list of antenna connection you turn off your TV does not receive an input signal for available channels. The INPUT SOURCE menu opens. 7 Press to highlight Auto Scan, then press ENTER or to automatically scan for the selected signal input. 2 Press or to highlight the video source, then press ENTER. You can also select the input source using the following remote control buttons: •...

User Manual (English)
Page 20
...), broadcast program name, TV rating, signal type, audio information, resolution, CC mode, current time, and current program start and end times. • Analog mode information-Displays channel number, channel label (if preset), signal type, audio information, and resolution. 2 Press GUIDE to show the digital program guide, which programs/movies your TV's input jacks. • Restore Default-Lets you reset most TV settings for the current source to highlight Setup, then press . Adjusting the volume To adjust the volume: • Press VOL+ or VOL- Also lets you set closed captioning on...
...), broadcast program name, TV rating, signal type, audio information, resolution, CC mode, current time, and current program start and end times. • Analog mode information-Displays channel number, channel label (if preset), signal type, audio information, and resolution. 2 Press GUIDE to show the digital program guide, which programs/movies your TV's input jacks. • Restore Default-Lets you reset most TV settings for the current source to highlight Setup, then press . Adjusting the volume To adjust the volume: • Press VOL+ or VOL- Also lets you set closed captioning on...
User Manual (English)
Page 23
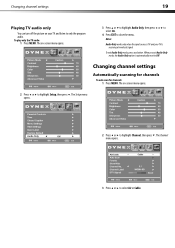
... works only when the input source is TV and your TV and listen to select Air or Cable. To exit Audio Only mode, press any button. To play only the TV audio: 1 Press MENU. The on-screen menu opens. 2 Press or to close the menu. The Channel menu opens. 3 Press or to only the program audio. Changing channel settings Automatically scanning for channels To auto scan for channels: 1 Press MENU. Changing channel settings 19 Playing TV audio only You can turn off the picture on your TV is automatically reset...
... works only when the input source is TV and your TV and listen to select Air or Cable. To exit Audio Only mode, press any button. To play only the TV audio: 1 Press MENU. The on-screen menu opens. 2 Press or to close the menu. The Channel menu opens. 3 Press or to only the program audio. Changing channel settings Automatically scanning for channels To auto scan for channels: 1 Press MENU. Changing channel settings 19 Playing TV audio only You can turn off the picture on your TV is automatically reset...

User Manual (English)
Page 30
... Off (turns off closed captioning). 5 Press EXIT to highlight Setup, then press . Using closed captioning Turning closed captioning on or off To turn closed captioning on or off . Selecting the closed captioning mode To select the closed captioning mode: 1 Press MENU. 26 Using closed captioning 5 Press or to highlight System Lock, then press or to select On. 3 Press or to clear the downloaded rating information, select Reset RRT. If rating information is cleared. Parental Controls Parental Controls The on -screen menu opens...
... Off (turns off closed captioning). 5 Press EXIT to highlight Setup, then press . Using closed captioning Turning closed captioning on or off To turn closed captioning on or off . Selecting the closed captioning mode To select the closed captioning mode: 1 Press MENU. 26 Using closed captioning 5 Press or to highlight System Lock, then press or to select On. 3 Press or to clear the downloaded rating information, select Reset RRT. If rating information is cleared. Parental Controls Parental Controls The on -screen menu opens...
User Manual (English)
Page 35
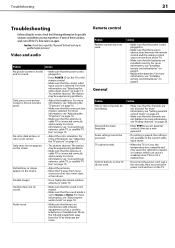
... work , turn off the TV, then turn on page 14. • Try another channel. Some settings cannot be experiencing problems. • Make sure that the batteries are no sound. • Make sure that the power cord is plugged in the current video input mode. • When the TV is connected correctly and securely. Video and audio Problem Solution No picture (screen is not lit) and no obstructions between the remote control and the remote control sensor...
... work , turn off the TV, then turn on page 14. • Try another channel. Some settings cannot be experiencing problems. • Make sure that the batteries are no sound. • Make sure that the power cord is plugged in the current video input mode. • When the TV is connected correctly and securely. Video and audio Problem Solution No picture (screen is not lit) and no obstructions between the remote control and the remote control sensor...
User Manual (English)
Page 36
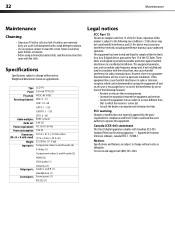
... guarantee that may cause harmful interference to which can radiate radio frequency energy and, if not installed and used in a particular installation. Standard Television Receiving Apparatus - Specifications Specifications subject to clean the screen. Type Panel TV system Receiving channels Audio multiples Audio out Power requirement Power consumption Dimensions (W × H × D with stand) Weight Input ports Output ports Control ports LCD TV 32-inch TFT LCD NTSC-M, ATSC VHF: 2 - 13 UHF: 14 - 69 CATV: 1 - 125 CADTV: 1 - 135 DTV: 2 - 69 BTSC system 6 W (2) AC...
... guarantee that may cause harmful interference to which can radiate radio frequency energy and, if not installed and used in a particular installation. Standard Television Receiving Apparatus - Specifications Specifications subject to clean the screen. Type Panel TV system Receiving channels Audio multiples Audio out Power requirement Power consumption Dimensions (W × H × D with stand) Weight Input ports Output ports Control ports LCD TV 32-inch TFT LCD NTSC-M, ATSC VHF: 2 - 13 UHF: 14 - 69 CATV: 1 - 125 CADTV: 1 - 135 DTV: 2 - 69 BTSC system 6 W (2) AC...
User Manual (English)
Page 37
... and correct the issue over the phone or will (at its sole option): (1) repair the Product with new or rebuilt parts; Contact Dynex: For customer service please call 1-888-BESTBUY. Legal notices 33 One-year limited warranty Dynex Products ("Dynex") warrants to you, the original purchaser of this new DX-L32-10A ("Product"), that the Product shall be free of defects in...
... and correct the issue over the phone or will (at its sole option): (1) repair the Product with new or rebuilt parts; Contact Dynex: For customer service please call 1-888-BESTBUY. Legal notices 33 One-year limited warranty Dynex Products ("Dynex") warrants to you, the original purchaser of this new DX-L32-10A ("Product"), that the Product shall be free of defects in...


