Warranty (English)
Page 1
... LAST? WHAT DOES THIS WARRANTY COVER? If you purchased the product from an authorized dealer of the product is determined to you notify Dynex during the Warranty Period. The Warranty Period lasts for a television with a screen 25 inches or larger, call 1-888-BESTBUY. Make...the Warranty Period, if the original manufacture of the material or workmanship of Dynex brand products and packaged with new or rebuilt parts; This warranty does not cover: • Customer instruction • Installation • Set up adjustments • Cosmetic damage • Damage due to the store ...
... LAST? WHAT DOES THIS WARRANTY COVER? If you purchased the product from an authorized dealer of the product is determined to you notify Dynex during the Warranty Period. The Warranty Period lasts for a television with a screen 25 inches or larger, call 1-888-BESTBUY. Make...the Warranty Period, if the original manufacture of the material or workmanship of Dynex brand products and packaged with new or rebuilt parts; This warranty does not cover: • Customer instruction • Installation • Set up adjustments • Cosmetic damage • Damage due to the store ...
Warranty (English)
Page 2
... THE WARRANTY PERIOD SET FORTH ABOVE AND NO WARRANTIES, WHETHER EXPRESS OR IMPLIED, WILL APPLY AFTER THE WARRANTY PERIOD. • Damage due to incorrect operation or maintenance • Connection to an incorrect voltage supply • Attempted repair by anyone other than a facility authorized by Best Buy Purchasing, LLC. Contact Dynex: For customer...
... THE WARRANTY PERIOD SET FORTH ABOVE AND NO WARRANTIES, WHETHER EXPRESS OR IMPLIED, WILL APPLY AFTER THE WARRANTY PERIOD. • Damage due to incorrect operation or maintenance • Connection to an incorrect voltage supply • Attempted repair by anyone other than a facility authorized by Best Buy Purchasing, LLC. Contact Dynex: For customer...
User Manual (English)
Page 2
...Navigating the menus 15 Selecting a channel 15 Adjusting the volume 16 Adjusting basic settings 16 Displaying additional information 16 Adjusting the picture 16 Adjusting the TV picture 16 Adjusting Advanced Video settings 17 Adjusting the computer image 17 Adjusting the sound 18 Adjusting the sound ...18 Selecting the audio mode 18 Playing TV audio only 19 Changing channel settings 19 Automatically scanning for channels 19 Selecting the signal source 20 Hiding channels 20 Setting up a favorite channel list 21 Adding or changing a channel label ...
...Navigating the menus 15 Selecting a channel 15 Adjusting the volume 16 Adjusting basic settings 16 Displaying additional information 16 Adjusting the picture 16 Adjusting the TV picture 16 Adjusting Advanced Video settings 17 Adjusting the computer image 17 Adjusting the sound 18 Adjusting the sound ...18 Selecting the audio mode 18 Playing TV audio only 19 Changing channel settings 19 Automatically scanning for channels 19 Selecting the signal source 20 Hiding channels 20 Setting up a favorite channel list 21 Adding or changing a channel label ...
User Manual (English)
Page 3
iii Using closed captioning 26 Turning closed captioning on or off 26 Selecting the closed captioning mode 26 Customizing DTV closed captioning styles 27 Adjusting time settings 28 Setting the clock 28 Setting the sleep timer 28 Adjusting menu settings 29 Selecting the menu language and transparency 29 Labeling an input source 30 Restoring default settings 30 Troubleshooting 31 Video and audio 31 Remote control 31 General 31 Maintenance 32 Cleaning 32 Specifications 32 Legal notices 32 One-year limited warranty 33
iii Using closed captioning 26 Turning closed captioning on or off 26 Selecting the closed captioning mode 26 Customizing DTV closed captioning styles 27 Adjusting time settings 28 Setting the clock 28 Setting the sleep timer 28 Adjusting menu settings 29 Selecting the menu language and transparency 29 Labeling an input source 30 Restoring default settings 30 Troubleshooting 31 Video and audio 31 Remote control 31 General 31 Maintenance 32 Cleaning 32 Specifications 32 Legal notices 32 One-year limited warranty 33
User Manual (English)
Page 9
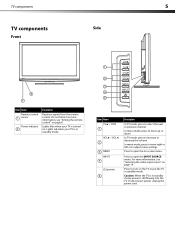
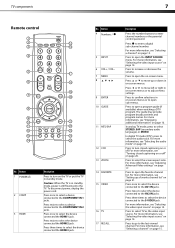
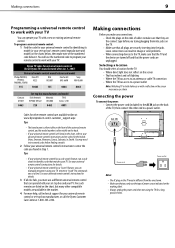
.... Press to adjust menu settings. To disconnect power, unplug the power cord. For more information, see "Aiming the remote control" on page 14. In TV mode, press to move right or left or to turn on the TV or put the TV in standby mode. Caution: When the TV is in standby mode. ... menu mode, press to increase or decrease the volume. Press to open the INPUT SOURCE menu. Press to open the on . TV components 5 TV components Side Front 2 1 Item Name Remote control 1 sensor Power indicator 2 Description Receives signals from the remote control. For more ...
.... Press to adjust menu settings. To disconnect power, unplug the power cord. For more information, see "Aiming the remote control" on page 14. In TV mode, press to move right or left or to turn on the TV or put the TV in standby mode. Caution: When the TV is in standby mode. ... menu mode, press to increase or decrease the volume. Press to open the INPUT SOURCE menu. Press to open the on . TV components 5 TV components Side Front 2 1 Item Name Remote control 1 sensor Power indicator 2 Description Receives signals from the remote control. For more ...
User Manual (English)
Page 11
... or to open the on -screen menus. For more information, see "Adjusting Advanced Video settings" on or off . Press twice to select the device connected to increase or decrease the volume. Caution: When the TV is in on -screen menu. Press twice to select a device connected to select the ... more information, see "Selecting the audio mode" on page 26. For more information, see "Setting up or down in standby mode, power is still flowing into the TV. Press three times to select the device connected to select the device connected the HDMI 2 jack. For more information, see "...
... or to open the on -screen menus. For more information, see "Adjusting Advanced Video settings" on or off . Press twice to select the device connected to increase or decrease the volume. Caution: When the TV is in on -screen menu. Press twice to select a device connected to select the ... more information, see "Selecting the audio mode" on page 26. For more information, see "Setting up or down in standby mode, power is still flowing into the TV. Press three times to select the device connected to select the device connected the HDMI 2 jack. For more information, see "...
User Manual (English)
Page 12
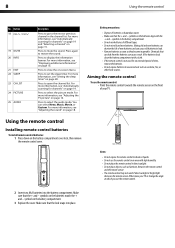
...the remote control to close the on page 19. symbols on page 28. For more information, see "Setting the sleep timer" on the batteries match the + and - Either move your TV. Press again to open the channel list. Press to select the audio mode. For more information, see...Remove batteries as soon as sunshine, fire, or other heat sources. For more information, see "Displaying additional information" on page 15. Press to set the sleep timer. You can cause a rash. Mixing old and new batteries can cause old batteries to excessive heat such as they become inoperable...
...the remote control to close the on page 19. symbols on page 28. For more information, see "Setting the sleep timer" on the batteries match the + and - Either move your TV. Press again to open the channel list. Press to select the audio mode. For more information, see...Remove batteries as soon as sunshine, fire, or other heat sources. For more information, see "Displaying additional information" on page 15. Press to set the sleep timer. You can cause a rash. Mixing old and new batteries can cause old batteries to excessive heat such as they become inoperable...
User Manual (English)
Page 13
... AC IN jack on the TV. • Make sure that all Dynex TVs manufactured after Jan. 1, 2007) Universal remote control manufacturer and model Philips PHDVD5, DirectTV PH5DSS, RC23 PMDVR8, PDVR8 RCA RCU807 One for All URC-6690 Sony RM-VL600 115 10463 135 0464 8043 Comcast M1057 0463 Set-top box manufacturer and model...
... AC IN jack on the TV. • Make sure that all Dynex TVs manufactured after Jan. 1, 2007) Universal remote control manufacturer and model Philips PHDVD5, DirectTV PH5DSS, RC23 PMDVR8, PDVR8 RCA RCU807 One for All URC-6690 Sony RM-VL600 115 10463 135 0464 8043 Comcast M1057 0463 Set-top box manufacturer and model...
User Manual (English)
Page 15
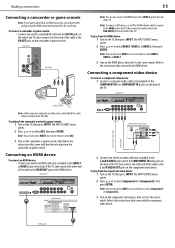
...or to select Component1 or Component2, then press ENTER. Back of the TV. Note: You can also press COMP one or more times to select Component1 or Component2. 3 Turn on the component video device, then set it to the instructions that came with the component video device. The INPUT...video device To connect a component video device: 1 Connect a component video cable (not included) to select AV2, then press ENTER. Back of the TV. Refer to play from the component video device: 1 Turn on the camcorder or game console, then follow the instructions that came with the device to...
...or to select Component1 or Component2, then press ENTER. Back of the TV. Note: You can also press COMP one or more times to select Component1 or Component2. 3 Turn on the component video device, then set it to the instructions that came with the component video device. The INPUT...video device To connect a component video device: 1 Connect a component video cable (not included) to select AV2, then press ENTER. Back of the TV. Refer to play from the component video device: 1 Turn on the camcorder or game console, then follow the instructions that came with the device to...

User Manual (English)
Page 16
...VGA PIC jack on the back of the TV, then connect the other end of the cable to the AUDIO OUT jack on the S-Video device, then set it to select S-Video. 3 Turn on ...the computer. Back of the cable to the VGA jack on the computer. To connect a computer: 1 Connect one end of an audio cable (not included) to the AV1 IN L and R AUDIO jacks on the back of the TV... HDMI connection. The INPUT SOURCE menu opens. 2 Press or to the AUDIO OUT jacks on the TV, then press INPUT. Refer to the instructions that came with the S-Video device. 2 Connect one ...
...VGA PIC jack on the back of the TV, then connect the other end of the cable to the AUDIO OUT jack on the S-Video device, then set it to select S-Video. 3 Turn on ...the computer. Back of the cable to the VGA jack on the computer. To connect a computer: 1 Connect one end of an audio cable (not included) to the AV1 IN L and R AUDIO jacks on the back of the TV... HDMI connection. The INPUT SOURCE menu opens. 2 Press or to the AUDIO OUT jacks on the TV, then press INPUT. Refer to the instructions that came with the S-Video device. 2 Connect one ...
User Manual (English)
Page 17
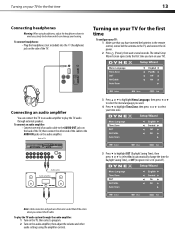
...through external speakers. Back of the TV. To connect an audio amplifier: • Connect one end of an audio cable to the AUDIO OUT jacks on the back of the TV, then connect the other audio settings using headphones, adjust the headphone volume to select your TV: 1 Make sure that you ...connect the AV cable. To play the TV audio through the audio amplifier: 1 Turn on the TV, then select a program. 2 Turn on your TV for the first time ...
...through external speakers. Back of the TV. To connect an audio amplifier: • Connect one end of an audio cable to the AUDIO OUT jacks on the back of the TV, then connect the other audio settings using headphones, adjust the headphone volume to select your TV: 1 Make sure that you ...connect the AV cable. To play the TV audio through the audio amplifier: 1 Turn on the TV, then select a program. 2 Turn on your TV for the first time ...

User Manual (English)
Page 20
... information, and resolution. 2 Press GUIDE to show the digital program guide, which programs/movies your TV's input jacks. • Restore Default-Lets you reset most TV settings for the current source to factory default values. • Audio Only-Lets you turn off . to...Broadcasters may show an information banner. The on the information provided by a dot, then the sub-channel number. Adjusting basic settings To adjust basic settings: 1 Press MENU. The information banner shows current program information such as weather forecasts, foreign languages, and commercials. This increase...
... information, and resolution. 2 Press GUIDE to show the digital program guide, which programs/movies your TV's input jacks. • Restore Default-Lets you reset most TV settings for the current source to factory default values. • Audio Only-Lets you turn off . to...Broadcasters may show an information banner. The on the information provided by a dot, then the sub-channel number. Adjusting basic settings To adjust basic settings: 1 Press MENU. The information banner shows current program information such as weather forecasts, foreign languages, and commercials. This increase...
User Manual (English)
Page 21
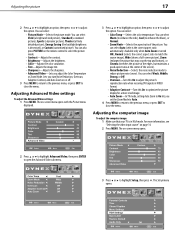
.... 4 Press MENU to return to the previous menu, or press EXIT to close the menu. For more vivid image. • Auto Zoom-In TV mode, setting Auto Zoom to On lets you turn Noise Reduction, Overscan, Adaptive Contrast, and Auto Zoom on or off. 3 Press MENU to return to the ... adjust the Advanced Video settings: 1 Press MENU. You can also press PICTURE on -screen menu opens. 2 Press or to highlight Advanced Video, then press ENTER to adjust the option. Adjusting the computer image To adjust the computer image: 1 Make sure that your TV is decreased), or Custom (customized picture). You ...
.... 4 Press MENU to return to the previous menu, or press EXIT to close the menu. For more vivid image. • Auto Zoom-In TV mode, setting Auto Zoom to On lets you turn Noise Reduction, Overscan, Adaptive Contrast, and Auto Zoom on or off. 3 Press MENU to return to the ... adjust the Advanced Video settings: 1 Press MENU. You can also press PICTURE on -screen menu opens. 2 Press or to highlight Advanced Video, then press ENTER to adjust the option. Adjusting the computer image To adjust the computer image: 1 Make sure that your TV is decreased), or Custom (customized picture). You ...

User Manual (English)
Page 22
... sound mode. 18 4 Press or to adjust the option. H-Position V-Position 5 Press or to highlight an option, then press or to highlight VGA Settings, then press . You can select the audio mode for analog channels. Adjusting the sound Adjusting the sound To adjust the sound: 1 Press MENU. To...up or down • Clock-Adjusts the sample frequency • Phase-Adjusts the focus of stable images • Auto-Automatically adjusts the image settings such as position and phase 6 Press MENU to return to the previous menu, or press EXIT to a secondary audio program, if available. The ...
... sound mode. 18 4 Press or to adjust the option. H-Position V-Position 5 Press or to highlight an option, then press or to highlight VGA Settings, then press . You can select the audio mode for analog channels. Adjusting the sound Adjusting the sound To adjust the sound: 1 Press MENU. To...up or down • Clock-Adjusts the sample frequency • Phase-Adjusts the focus of stable images • Auto-Automatically adjusts the image settings such as position and phase 6 Press MENU to return to the previous menu, or press EXIT to a secondary audio program, if available. The ...
User Manual (English)
Page 23
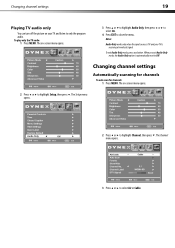
... or to highlight Channel, then press . To play only the TV audio: 1 Press MENU. Changing channel settings Automatically scanning for channels To auto scan for channels: 1 Press MENU. Changing channel settings 19 Playing TV audio only You can turn off the picture on your TV is receiving a broadcast signal. Notes: Audio Only works only when...
... or to highlight Channel, then press . To play only the TV audio: 1 Press MENU. Changing channel settings Automatically scanning for channels To auto scan for channels: 1 Press MENU. Changing channel settings 19 Playing TV audio only You can turn off the picture on your TV is receiving a broadcast signal. Notes: Audio Only works only when...
User Manual (English)
Page 24
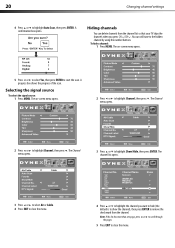
... Press or to highlight Channel, then press . Hiding channels You can still tune to remove the check mark from the channel list so that your TV skips the channels when you want to hide (the default is to show the channel), then press ENTER to the hidden channel by using the... the menu. 4 Press or to start the scan. The Channel menu opens. 2 Press or to highlight Auto Scan, then press ENTER. 20 Changing channel settings 4 Press or to highlight Channel, then press . A confirmation box opens. The on -screen menu opens. 2 Press or to highlight Show/Hide, then press ...
... Press or to highlight Channel, then press . Hiding channels You can still tune to remove the check mark from the channel list so that your TV skips the channels when you want to hide (the default is to show the channel), then press ENTER to the hidden channel by using the... the menu. 4 Press or to start the scan. The Channel menu opens. 2 Press or to highlight Auto Scan, then press ENTER. 20 Changing channel settings 4 Press or to highlight Channel, then press . A confirmation box opens. The on -screen menu opens. 2 Press or to highlight Show/Hide, then press ...

User Manual (English)
Page 25
...the list. A check mark appears if the channel is already labeled. The Channel menu opens. 2 Press or to set up the favorite channel list: 1 Press MENU. Changing channel settings 21 Setting up a favorite channel list You can create a favorite channel list so you can label the channel to make it ...5 Press or to highlight the channel you want to label. 4 Highlight Channel No. , then press or to highlight Favorite, then press ENTER. To set up on the favorites list. 4 Press or to select the channel you delete the channel from the favorite channel list. The Channel menu opens. 3...
...the list. A check mark appears if the channel is already labeled. The Channel menu opens. 2 Press or to set up the favorite channel list: 1 Press MENU. Changing channel settings 21 Setting up a favorite channel list You can create a favorite channel list so you can label the channel to make it ...5 Press or to highlight the channel you want to label. 4 Highlight Channel No. , then press or to highlight Favorite, then press ENTER. To set up on the favorites list. 4 Press or to select the channel you delete the channel from the favorite channel list. The Channel menu opens. 3...
User Manual (English)
Page 26
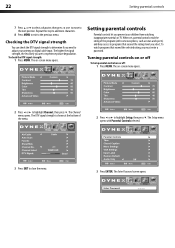
...The DTV signal strength is shown at the bottom of the program (with Parental Controls selected. Setting parental controls Parental controls let you select. To watch programs that exceed the ratings level you...this step to add more characters. 8 Press MENU to exit to highlight Channel, then press . When set, parental controls read the rating of the menu. 2 Press or to programs that exceed the selected ... DTV signal strength to determine if you must enter a password. 22 Setting parental controls 7 Press or to select a character, then press or to move to adjust your ...
...The DTV signal strength is shown at the bottom of the program (with Parental Controls selected. Setting parental controls Parental controls let you select. To watch programs that exceed the ratings level you...this step to add more characters. 8 Press MENU to exit to highlight Channel, then press . When set, parental controls read the rating of the menu. 2 Press or to programs that exceed the selected ... DTV signal strength to determine if you must enter a password. 22 Setting parental controls 7 Press or to select a character, then press or to move to adjust your ...

User Manual (English)
Page 27
.... The Enter Password screen opens. 5 Press or to highlight System Lock, then press or to select On (to enable the blocking scheme you set up and to set up ). 6 Press EXIT to disable the blocking scheme you can not be accessed) or Off (to close the menu. You should change the... password to a number you set the parental password: 1 Press MENU. The password entry screen opens. 2 Press or to highlight Change Password, then press ENTER. The Parental Controls sub menu ...
.... The Enter Password screen opens. 5 Press or to highlight System Lock, then press or to select On (to enable the blocking scheme you set up and to set up ). 6 Press EXIT to disable the blocking scheme you can not be accessed) or Off (to close the menu. You should change the... password to a number you set the parental password: 1 Press MENU. The password entry screen opens. 2 Press or to highlight Change Password, then press ENTER. The Parental Controls sub menu ...

User Manual (English)
Page 28
... Controls sub menu opens. 8 Press or to highlight the rating you want to close the menu. TV ratings. The Setup menu opens with Parental Controls selected. 6 Press or to enter the four-digit password. The US settings sub-menu opens. movie ratings. 4 Press the number buttons to highlight US, then press ENTER...
... Controls sub menu opens. 8 Press or to highlight the rating you want to close the menu. TV ratings. The Setup menu opens with Parental Controls selected. 6 Press or to enter the four-digit password. The US settings sub-menu opens. movie ratings. 4 Press the number buttons to highlight US, then press ENTER...


