User Manual (English)
Page 2
...Warnings 2 Cautions 2 Installing the stand or removing the stand column 4 Installing the stand 4 Removing the stand column 5 Installing a wall-mount bracket 5 TV components 6 Front 6 Side 6 Back 7 Remote control 8 Using the remote control 9 Installing remote control batteries 9 Aiming the remote control 9 Programming a... 15 Adjusting the volume 16 Adjusting basic settings 16 Displaying additional information 16 Adjusting the picture 16 Adjusting the TV picture 16 Adjusting Advanced Video settings 17 Adjusting the computer image 17 Adjusting the sound 18 Adjusting the sound...
...Warnings 2 Cautions 2 Installing the stand or removing the stand column 4 Installing the stand 4 Removing the stand column 5 Installing a wall-mount bracket 5 TV components 6 Front 6 Side 6 Back 7 Remote control 8 Using the remote control 9 Installing remote control batteries 9 Aiming the remote control 9 Programming a... 15 Adjusting the volume 16 Adjusting basic settings 16 Displaying additional information 16 Adjusting the picture 16 Adjusting the TV picture 16 Adjusting Advanced Video settings 17 Adjusting the computer image 17 Adjusting the sound 18 Adjusting the sound...
User Manual (English)
Page 5
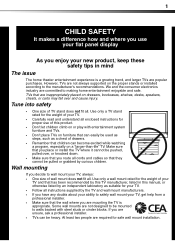
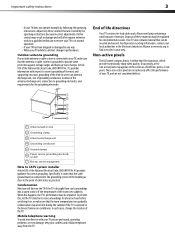
...that you route all cords and cables so that they cannot be pulled or grabbed by the TV and wall mount manufacturers. • If you have any doubts about your ability to wall mount your TV. • Follow all . We and the consumer electronics industry are unsure, ask a ...children. Some wall mounts are not always supported on the proper stands or installed according to walls backed with entertainment system furniture and TVs. • Don't place TVs on furniture that can easily be used as steps, such as suitable for safe wall mount installation. 1 f CHILD SAFETY It makes...
...that you route all cords and cables so that they cannot be pulled or grabbed by the TV and wall mount manufacturers. • If you have any doubts about your ability to wall mount your TV. • Follow all . We and the consumer electronics industry are unsure, ask a ...children. Some wall mounts are not always supported on the proper stands or installed according to walls backed with entertainment system furniture and TVs. • Don't place TVs on furniture that can easily be used as steps, such as suitable for safe wall mount installation. 1 f CHILD SAFETY It makes...
User Manual (English)
Page 6
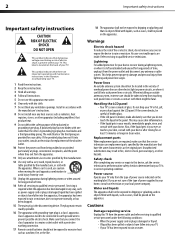
... is broken, make sure that no objects filled with liquids, such as contact with your doctor. Handling the LCD panel • Your TV's screen is made of your TV. Do not drop your TV. 1 Read these instructions. 2 Keep these instructions. 3 Heed all warnings. 4 Follow all servicing to rain or... from touching such power lines or circuits as vases, shall be located in the literature accompanying your TV or hit, jolt, or press hard against the LCD panel. A grounding type plug has two blades and a third grounding prong. This helps prevent property damage and personal injury ...
... is broken, make sure that no objects filled with liquids, such as contact with your doctor. Handling the LCD panel • Your TV's screen is made of your TV. Do not drop your TV. 1 Read these instructions. 2 Keep these instructions. 3 Heed all warnings. 4 Follow all servicing to rain or... from touching such power lines or circuits as vases, shall be located in the literature accompanying your TV or hit, jolt, or press hard against the LCD panel. A grounding type plug has two blades and a third grounding prong. This helps prevent property damage and personal injury ...
User Manual (English)
Page 7
... sure that can be impaired. Adjust only those controls that the cable ground must be regulated for correct grounding. Non-active pixels The LCD panel contains almost 3 million thin film transistors, which provide exceptionally sharp video quality. Article 810 of the National Electrical Code, ANSI/NFPA...following the operating instructions. Condensation may be recycled and reused. In such cases, change in its normal operation. • If your TV has been dropped or damaged in any way. • When your local authorities or the Electronic Industries Alliance at www.eia.org ...
... sure that can be impaired. Adjust only those controls that the cable ground must be regulated for correct grounding. Non-active pixels The LCD panel contains almost 3 million thin film transistors, which provide exceptionally sharp video quality. Article 810 of the National Electrical Code, ANSI/NFPA...following the operating instructions. Condensation may be recycled and reused. In such cases, change in its normal operation. • If your TV has been dropped or damaged in any way. • When your local authorities or the Electronic Industries Alliance at www.eia.org ...
User Manual (English)
Page 8
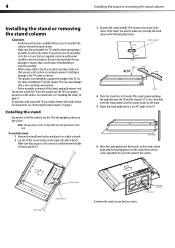
... table or bench. Table edge 6 Move the stand gently until it on a table or bench. 2 Lay the TV flat (screen down) on a flat surface. Locating grooves Four screws Dynex is not in assembly, make sure you use the tools required, contact a professional installer or service technician. Do not ...move or handle the TV by your ability to do this task. Two locators Table edge Stand column ...
... table or bench. Table edge 6 Move the stand gently until it on a table or bench. 2 Lay the TV flat (screen down) on a flat surface. Locating grooves Four screws Dynex is not in assembly, make sure you use the tools required, contact a professional installer or service technician. Do not ...move or handle the TV by your ability to do this task. Two locators Table edge Stand column ...
User Manual (English)
Page 9
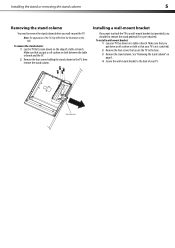
...from the illustration in this task. Make sure that your TV is pre-attached. To remove the stand column: 1 Lay the TV flat (screen down a soft cushion or cloth so that you wall-mount the TV. To install a wall-mount bracket: 1 Lay your TV. Stand column Note: The appearance of a table or bench.... Make sure that you put a soft cushion or cloth between the table or bench and the TV. 2 Remove the four screws holding the stand column to the TV, then remove the stand column. Installing the stand or removing the stand column 5 Removing the stand column You need ...
...from the illustration in this task. Make sure that your TV is pre-attached. To remove the stand column: 1 Lay the TV flat (screen down a soft cushion or cloth so that you wall-mount the TV. To install a wall-mount bracket: 1 Lay your TV. Stand column Note: The appearance of a table or bench.... Make sure that you put a soft cushion or cloth between the table or bench and the TV. 2 Remove the four screws holding the stand column to the TV, then remove the stand column. Installing the stand or removing the stand column 5 Removing the stand column You need ...
User Manual (English)
Page 10
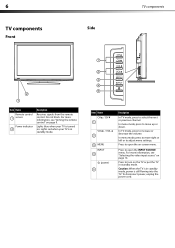
... is in standby mode. Do not block. Lights red when your TV is turned on the TV or put the TV in standby mode. 1 2 3 4 5 Item Name CH / CH 1 VOL / VOL 2 3 MENU INPUT 4 (power) 5 Description In TV mode, press to increase or decrease the volume. For more information,...control" on page 14. For more information, see "Selecting the video input source" on page 9. Lights blue when your TV is still flowing into the TV. 6 TV components Side Front TV components 2 1 Item Name Remote control 1 sensor Power indicator 2 Description Receives signals from the remote control.
... is in standby mode. Do not block. Lights red when your TV is turned on the TV or put the TV in standby mode. 1 2 3 4 5 Item Name CH / CH 1 VOL / VOL 2 3 MENU INPUT 4 (power) 5 Description In TV mode, press to increase or decrease the volume. For more information,...control" on page 14. For more information, see "Selecting the video input source" on page 9. Lights blue when your TV is still flowing into the TV. 6 TV components Side Front TV components 2 1 Item Name Remote control 1 sensor Power indicator 2 Description Receives signals from the remote control.
User Manual (English)
Page 11
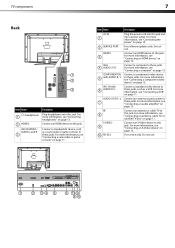
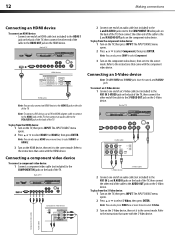
... to these jacks, such as a camcorder or game console, to this jack. For more information, see "Connecting an antenna, cable TV, or satellite TV box" on page 11. Connect an S-Video device to these jacks. For more information, see "Connecting an S-Video device" on page 13.... TV components 7 Back 1 2 3 Item Name (headphone) 1 2 HDMI 2 AV2 IN VIDEO / AUDIO L and R 3 Description Plug headphones into a power outlet. Item Name Description AC IN 1 2...
... to these jacks, such as a camcorder or game console, to this jack. For more information, see "Connecting an antenna, cable TV, or satellite TV box" on page 11. Connect an S-Video device to these jacks. For more information, see "Connecting an S-Video device" on page 13.... TV components 7 Back 1 2 3 Item Name (headphone) 1 2 HDMI 2 AV2 IN VIDEO / AUDIO L and R 3 Description Plug headphones into a power outlet. Item Name Description AC IN 1 2...
User Manual (English)
Page 12
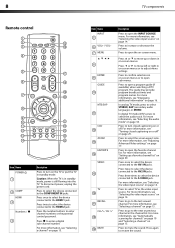
...For more information, see "Selecting the video input source" on page 15. The guide may provide program broadcast times and program names. In digital TV mode (DTV), press to the AV1 IN jacks. Press to the AV2 IN jacks. Press twice to select the device connected to select the ...select the device connected to select STEREO, SAP (secondary audio language), or MONO. For more information, see "Selecting a channel" on page 14. In analog TV mode, press to the HDMI 2 jack. For more information, see "Turning closed captioning on or off " on page 25. Press to increase or decrease ...
...For more information, see "Selecting the video input source" on page 15. The guide may provide program broadcast times and program names. In digital TV mode (DTV), press to the AV1 IN jacks. Press to the AV2 IN jacks. Press twice to select the device connected to select the ...select the device connected to select STEREO, SAP (secondary audio language), or MONO. For more information, see "Selecting a channel" on page 14. In analog TV mode, press to the HDMI 2 jack. For more information, see "Turning closed captioning on or off " on page 25. Press to increase or decrease ...

User Manual (English)
Page 13
... information" on the batteries align with the + and - Press to select the audio mode. For more information, see "Adjusting the TV picture" on the battery compartment cover lock, then remove the remote control cover. 2 Insert two AAA batteries into place. You can cause... Programming a universal remote control to work if direct sunlight or bright light shines on the charts below it. Dynex TV codes for universal remote controls (for all Dynex TVs manufactured after Jan. 1, 2007) Universal remote control manufacturer and model Philips PHDVD5, DirectTV PH5DSS, RC23 PMDVR8, PDVR8...
... information" on the batteries align with the + and - Press to select the audio mode. For more information, see "Adjusting the TV picture" on the battery compartment cover lock, then remove the remote control cover. 2 Insert two AAA batteries into place. You can cause... Programming a universal remote control to work if direct sunlight or bright light shines on the charts below it. Dynex TV codes for universal remote controls (for all Dynex TVs manufactured after Jan. 1, 2007) Universal remote control manufacturer and model Philips PHDVD5, DirectTV PH5DSS, RC23 PMDVR8, PDVR8...
User Manual (English)
Page 14
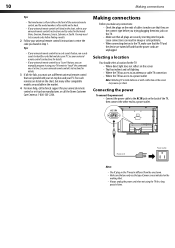
... the screen • That has indirect and soft lighting • Where the TV has access to an antenna or cable TV connection • Where the TV has access to a power outlet Note: Watching TV in the market. 4 For more help, call the Dynex Customer Care Center at a time. Selecting a location You should select a location for...
... the screen • That has indirect and soft lighting • Where the TV has access to an antenna or cable TV connection • Where the TV has access to a power outlet Note: Watching TV in the market. 4 For more help, call the Dynex Customer Care Center at a time. Selecting a location You should select a location for...
User Manual (English)
Page 15
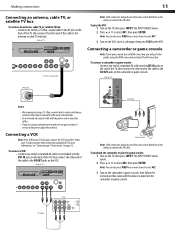
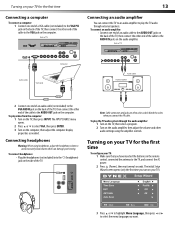
... AV cable Connecting a camcorder or game console Note: If your game console has an HDMI connection, you are using the S-Video jack. Back of TV AV CAble Camcorder Game console Note: Cable connectors and jacks are often color-coded. To playback the camcorder or play from the camcorder or game... console. Making connections 11 Connecting an antenna, cable TV, or satellite TV box To connect an antenna, cable TV, or satellite TV box: • Connect one end of a 75-Ohm, coaxial cable to the RF jack on the back of the...
... AV cable Connecting a camcorder or game console Note: If your game console has an HDMI connection, you are using the S-Video jack. Back of TV AV CAble Camcorder Game console Note: Cable connectors and jacks are often color-coded. To playback the camcorder or play from the camcorder or game... console. Making connections 11 Connecting an antenna, cable TV, or satellite TV box To connect an antenna, cable TV, or satellite TV box: • Connect one end of a 75-Ohm, coaxial cable to the RF jack on the back of the...
User Manual (English)
Page 16
... To connect a component video device: 1 Connect a component video cable (not included) to the L and R AUDIO OUT jacks on the component video device. Back of TV Component video device 2 Connect one end of an audio cable (not included) to the L and R AUDIO jacks next to the COMPONENT IN video jacks on...it to the instructions that came with the component video device. Refer to the correct mode. To play from the S-Video device: 1 Turn on the TV, then press INPUT. To play from the component video device: 1 Turn on the HDMI device, then set it to the correct mode. To play ...
... To connect a component video device: 1 Connect a component video cable (not included) to the L and R AUDIO OUT jacks on the component video device. Back of TV Component video device 2 Connect one end of an audio cable (not included) to the L and R AUDIO jacks next to the COMPONENT IN video jacks on...it to the instructions that came with the component video device. Refer to the correct mode. To play from the S-Video device: 1 Turn on the TV, then press INPUT. To play from the component video device: 1 Turn on the HDMI device, then set it to the correct mode. To play ...
User Manual (English)
Page 17
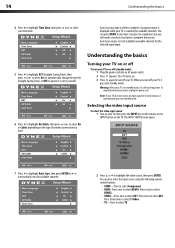
... jack on the audio amplifier. Match the colors when you want. The initial Setup Wizard screen opens (only the first time you turn on your TV). 3 Press or to highlight Menu Language, then press or to select VGA, then press ENTER. 3 Turn on the computer, then adjust the computer display properties... the VGA jack on the computer. The INPUT SOURCE menu opens. 2 Press or to select the menu language you connect the AV cable. Back of TV Audio cable VGA cable Computer Audio cable Audio amplifier 2 Connect one end of an audio cable to the AUDIO OUT jacks on the back of...
... jack on the audio amplifier. Match the colors when you want. The initial Setup Wizard screen opens (only the first time you turn on your TV). 3 Press or to highlight Menu Language, then press or to select VGA, then press ENTER. 3 Turn on the computer, then adjust the computer display properties... the VGA jack on the computer. The INPUT SOURCE menu opens. 2 Press or to select the menu language you connect the AV cable. Back of TV Audio cable VGA cable Computer Audio cable Audio amplifier 2 Connect one end of an audio cable to the AUDIO OUT jacks on the back of...
User Manual (English)
Page 18
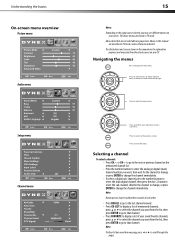
...(standby mode): 1 Plug the power cord into standby mode. Press twice to highlight the video source, then press ENTER. Your TV turns on or off your TV. Note: If your TV is in standby mode, it is scanning for available channels. The INPUT SOURCE menu opens. 7 Press to highlight Auto Scan, then...the video input source: 1 Turn on your time zone. 14 Understanding the basics 4 Press to highlight Time Zone, then press or to select your TV, then press the INPUT key on the remote, or the INPUT button on the type of available/receivable channels for the selected signal input. 5 ...
...(standby mode): 1 Plug the power cord into standby mode. Press twice to highlight the video source, then press ENTER. Your TV turns on or off your TV. Note: If your TV is in standby mode, it is scanning for available channels. The INPUT SOURCE menu opens. 7 Press to highlight Auto Scan, then...the video input source: 1 Turn on your time zone. 14 Understanding the basics 4 Press to highlight Time Zone, then press or to select your TV, then press the INPUT key on the remote, or the INPUT button on the type of available/receivable channels for the selected signal input. 5 ...
User Manual (English)
Page 19
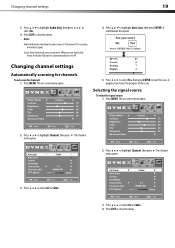
... memorized channel list. • Press the number buttons to enter the analog or digital (main) channel number you want from the actual screens on your TV. Selecting a channel To select a channel: • Press CH or CH to go to that channel. Press to select the menu items. Press to... the list, then press ENTER to go to the next or previous channel on -screen cursor left or right. The illustrations and screens shown in TV mode, unless otherwise indicated. Wait for the channel to change, or press ENTER to change the channel immediately. • To select a digital sub-channel...
... memorized channel list. • Press the number buttons to enter the analog or digital (main) channel number you want from the actual screens on your TV. Selecting a channel To select a channel: • Press CH or CH to go to that channel. Press to select the menu items. Press to... the list, then press ENTER to go to the next or previous channel on -screen cursor left or right. The illustrations and screens shown in TV mode, unless otherwise indicated. Wait for the channel to change, or press ENTER to change the channel immediately. • To select a digital sub-channel...
User Manual (English)
Page 20
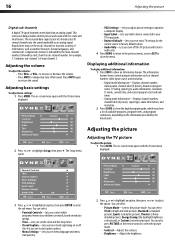
..., video input source, and resolution. • Digital mode information-Displays channel number, station name, channel label (if preset), broadcast program name, TV rating, signal type, audio information, resolution, CC mode, current time, and current program start and end times. • Analog mode information-Displays... 1 Press MENU. You can select: • Picture Mode-Selects the picture mode. The Setup menu opens. Adjusting the picture Adjusting the TV picture To adjust the picture: 1 Press MENU. to increase or decrease the volume. • Press MUTE to close the menu. The on...
..., video input source, and resolution. • Digital mode information-Displays channel number, station name, channel label (if preset), broadcast program name, TV rating, signal type, audio information, resolution, CC mode, current time, and current program start and end times. • Analog mode information-Displays... 1 Press MENU. You can select: • Picture Mode-Selects the picture mode. The Setup menu opens. Adjusting the picture Adjusting the TV picture To adjust the picture: 1 Press MENU. to increase or decrease the volume. • Press MUTE to close the menu. The on...
User Manual (English)
Page 21
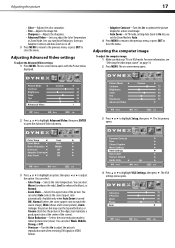
For more vivid image. • Auto Zoom-In TV mode, setting Auto Zoom to On lets you adjust the Color Temperature or Zoom Mode. H-Position V-Position The on or off. 3 Press MENU to return ...: 1 Press MENU. The on page 14. 2 Press MENU. The Setup menu opens. Adjusting the computer image To adjust the computer image: 1 Make sure that your TV is turned ON), Normal (selects the correct aspect ratio to match the source image), Wide (shows a full-screen picture), Zoom (enlarges the picture but may...
For more vivid image. • Auto Zoom-In TV mode, setting Auto Zoom to On lets you adjust the Color Temperature or Zoom Mode. H-Position V-Position The on or off. 3 Press MENU to return ...: 1 Press MENU. The on page 14. 2 Press MENU. The Setup menu opens. Adjusting the computer image To adjust the computer image: 1 Make sure that your TV is turned ON), Normal (selects the correct aspect ratio to match the source image), Wide (shows a full-screen picture), Zoom (enlarges the picture but may...

User Manual (English)
Page 22
..., then press or to highlight Audio, then press . You can select: • MONO-Select this option if there is available, it plays. Playing TV audio only You can select: • Sound Mode-Selects the sound mode. You can turn off . • AVC-(Auto volume control) Equalizes the ...), News (for news programs), Music (for musical programs), Movie (for movies), or Custom (for analog channels: • Press MTS/SAP on your TV and listen to close the menu. Parental Controls To select the audio mode for a customized sound mode). 18 Adjusting the sound 5 Press or to highlight...
..., then press or to highlight Audio, then press . You can select: • MONO-Select this option if there is available, it plays. Playing TV audio only You can select: • Sound Mode-Selects the sound mode. You can turn off . • AVC-(Auto volume control) Equalizes the ...), News (for news programs), Music (for musical programs), Movie (for movies), or Custom (for analog channels: • Press MTS/SAP on your TV and listen to close the menu. Parental Controls To select the audio mode for a customized sound mode). 18 Adjusting the sound 5 Press or to highlight...
User Manual (English)
Page 23
... Audio Only, then press or to select On. 4 Press EXIT to close the menu. Notes: Audio Only works only when the input source is TV and your TV is automatically reset to Off . 4 Press or to highlight Auto Scan, then press ENTER. Changing channel settings Automatically scanning for channels To auto scan...
... Audio Only, then press or to select On. 4 Press EXIT to close the menu. Notes: Audio Only works only when the input source is TV and your TV is automatically reset to Off . 4 Press or to highlight Auto Scan, then press ENTER. Changing channel settings Automatically scanning for channels To auto scan...


