Warranty (English)
Page 1
...; Customer instruction • Installation • Set up adjustments • Cosmetic damage • Damage due to the address listed on the receipt you received with this new product, that provides the same amount of one year (365 days) from the date you purchased the product. If you purchased the product at no charge with a screen 25 inches or larger...
...; Customer instruction • Installation • Set up adjustments • Cosmetic damage • Damage due to the address listed on the receipt you received with this new product, that provides the same amount of one year (365 days) from the date you purchased the product. If you purchased the product at no charge with a screen 25 inches or larger...
User Manual (English)
Page 2
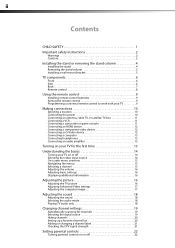
... stand or removing the stand column 4 Installing the stand 4 Removing the stand column 5 Installing a wall-mount bracket 5 TV components 6 Front 6 Side 6 Back 7 Remote control 8 Using the remote control 9 Installing remote control batteries 9 Aiming the remote control 9 Programming a universal remote control to work with your TV 9 Making connections 10 Selecting a location 10 Connecting the power 10 Connecting an antenna, cable TV, or satellite TV box 11 Connecting a VCR 11 Connecting a camcorder or game console 11 Connecting an HDMI device 12 Connecting a component video...
... stand or removing the stand column 4 Installing the stand 4 Removing the stand column 5 Installing a wall-mount bracket 5 TV components 6 Front 6 Side 6 Back 7 Remote control 8 Using the remote control 9 Installing remote control batteries 9 Aiming the remote control 9 Programming a universal remote control to work with your TV 9 Making connections 10 Selecting a location 10 Connecting the power 10 Connecting an antenna, cable TV, or satellite TV box 11 Connecting a VCR 11 Connecting a camcorder or game console 11 Connecting an HDMI device 12 Connecting a component video...
User Manual (English)
Page 3
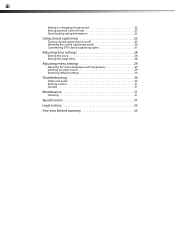
iii Setting or changing the password 22 Setting parental control levels 23 Downloading rating information 25 Using closed captioning 25 Turning closed captioning on or off 25 Selecting the closed captioning mode 26 Customizing DTV closed captioning styles 27 Adjusting time settings 28 Setting the clock 28 Setting the sleep timer 28 Adjusting menu settings 29 Selecting the menu language and transparency 29 Labeling an input source 29 Restoring default settings 30 Troubleshooting 30 Video and audio 30 Remote control 31 General 31 Maintenance 31 Cleaning 31 Specifications 31 ...
iii Setting or changing the password 22 Setting parental control levels 23 Downloading rating information 25 Using closed captioning 25 Turning closed captioning on or off 25 Selecting the closed captioning mode 26 Customizing DTV closed captioning styles 27 Adjusting time settings 28 Setting the clock 28 Setting the sleep timer 28 Adjusting menu settings 29 Selecting the menu language and transparency 29 Labeling an input source 29 Restoring default settings 30 Troubleshooting 30 Video and audio 30 Remote control 31 General 31 Maintenance 31 Cleaning 31 Specifications 31 ...
User Manual (English)
Page 5
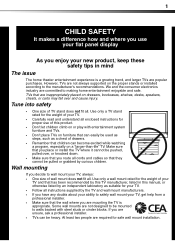
.... At least two people are popular purchases. Use only a wall mount rated for safe wall mount installation. Make sure that you place or install the TV where it cannot be mounted to the manufacturer's recommendations. Use only a TV stand rated for the weight of your TV and that has been recommended by this TV manufacturer, listed in mind The issue The home theater entertainment experience is appropriate.
.... At least two people are popular purchases. Use only a wall mount rated for safe wall mount installation. Make sure that you place or install the TV where it cannot be mounted to the manufacturer's recommendations. Use only a TV stand rated for the weight of your TV and that has been recommended by this TV manufacturer, listed in mind The issue The home theater entertainment experience is appropriate.
User Manual (English)
Page 6
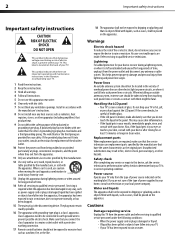
... all instructions. 5 Do not use attachments/accessories specified by the manufacturer. 12 Use only with a protective earthing connection. 17 Remote control batteries should not be careful of your TV or hit, jolt, or press hard against the LCD panel. Power lines An outside antenna system, extreme care should be taken to qualified service personnel under the following conditions: • When the power supply cord or plug is...
... all instructions. 5 Do not use attachments/accessories specified by the manufacturer. 12 Use only with a protective earthing connection. 17 Remote control batteries should not be careful of your TV or hit, jolt, or press hard against the LCD panel. Power lines An outside antenna system, extreme care should be taken to qualified service personnel under the following conditions: • When the power supply cord or plug is...
User Manual (English)
Page 7
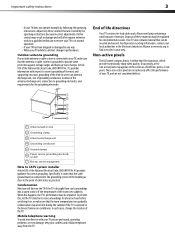
... connected to your TV, make sure that the antenna or cable system is grounded to CATV system installer Article 820 of the TV. Article 810 of the National Electrical Code, ANSI/NFPA No. 70, provides information with your TV picture and sound, operating problems, or even damage, keep your area. Important safety instructions 3 • If your TV does not operate normally by the operating instructions because incorrect adjustment...
... connected to your TV, make sure that the antenna or cable system is grounded to CATV system installer Article 820 of the TV. Article 810 of the National Electrical Code, ANSI/NFPA No. 70, provides information with your TV picture and sound, operating problems, or even damage, keep your area. Important safety instructions 3 • If your TV does not operate normally by the operating instructions because incorrect adjustment...
User Manual (English)
Page 8
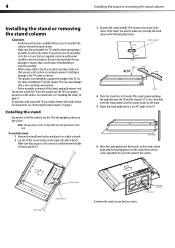
... stand to use the TV in the following illustration. Table edge 6 Move the stand gently until it on a table or bench. 2 Lay the TV flat (screen down) on page 5. If you plan to wall-mount the TV, you handle the TV carefully when attempting to assemble or remove the stand. To install the stand: 1 Remove the stand from the illustrations in the upright position on the stand. 5 Adjust the stand angle until the locators...
... stand to use the TV in the following illustration. Table edge 6 Move the stand gently until it on a table or bench. 2 Lay the TV flat (screen down) on page 5. If you plan to wall-mount the TV, you handle the TV carefully when attempting to assemble or remove the stand. To install the stand: 1 Remove the stand from the illustrations in the upright position on the stand. 5 Adjust the stand angle until the locators...
User Manual (English)
Page 12
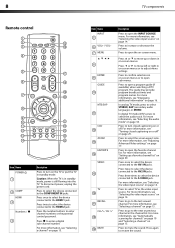
... device connected to select TV as the video input source. For more information, see "Displaying additional information" on page 16. For more information, see "Selecting the video input source" on page 14. Press the number buttons to adjust menu settings. Press or to move up a favorite channel list" on page 20. For more information, see "Selecting the video input source" on page 25. Press or to turn closed captioning on or off . 8 TV components Remote control...
... device connected to select TV as the video input source. For more information, see "Displaying additional information" on page 16. For more information, see "Selecting the video input source" on page 14. Press the number buttons to adjust menu settings. Press or to move up a favorite channel list" on page 20. For more information, see "Selecting the video input source" on page 25. Press or to turn closed captioning on or off . 8 TV components Remote control...

User Manual (English)
Page 13
... remote control to set -top box's remote control manufacturer and model) on the remote sensor. For more information, see "Displaying additional information" on the front of time, remove the batteries. • Do not expose batteries to work with high humidity. • Do not place the remote control in an area with your set the sleep timer. Make sure that the lock snaps into the battery compartment. Dynex TV codes for universal remote controls (for all Dynex TVs...
... remote control to set -top box's remote control manufacturer and model) on the remote sensor. For more information, see "Displaying additional information" on the front of time, remove the batteries. • Do not expose batteries to work with high humidity. • Do not place the remote control in an area with your set the sleep timer. Make sure that the lock snaps into the battery compartment. Dynex TV codes for universal remote controls (for all Dynex TVs...
User Manual (English)
Page 14
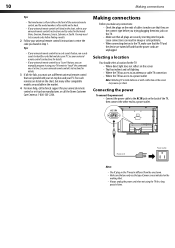
... TV. • Make sure that can result in Step 1. Making connections Before you trying plugging them into the jacks. Loose connections can operate both your set -top box manufacturer, or call technical support for a long period of cables to try codes for details. 3 If all else fails, you found in image or color problems. • When connecting devices to a power outlet. Five such remotes are listed...
... TV. • Make sure that can result in Step 1. Making connections Before you trying plugging them into the jacks. Loose connections can operate both your set -top box manufacturer, or call technical support for a long period of cables to try codes for details. 3 If all else fails, you found in image or color problems. • When connecting devices to a power outlet. Five such remotes are listed...
User Manual (English)
Page 15
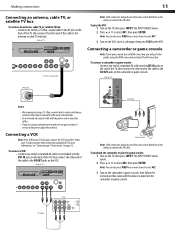
.... VCR AV cable Side of TV Wall jack Notes: • We recommend using the S-Video jack. To play the game console: 1 Turn on the TV, then press INPUT. Connecting a VCR Note: If the VCR has an S-Video jack, connect the VCR using a 75-Ohm, coaxial cable to reduce interference and noise that came with the power cord or any other end of the cable to adjust the antenna. To playback...
.... VCR AV cable Side of TV Wall jack Notes: • We recommend using the S-Video jack. To play the game console: 1 Turn on the TV, then press INPUT. Connecting a VCR Note: If the VCR has an S-Video jack, connect the VCR using a 75-Ohm, coaxial cable to reduce interference and noise that came with the power cord or any other end of the cable to adjust the antenna. To playback...
User Manual (English)
Page 17
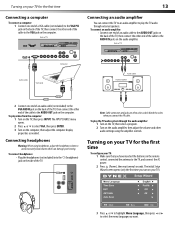
... play video from the computer: 1 Turn on the TV, then press INPUT. To connect headphones: • Plug the headphones (not included) into the (headphone) jack on the audio amplifier, then adjust the volume and other end of TV Connecting an audio amplifier You can damage your TV: 1 Make sure that you have inserted the batteries in the remote control, connected the antenna to the TV, and connect the AC power. 2 Press (Power...
... play video from the computer: 1 Turn on the TV, then press INPUT. To connect headphones: • Plug the headphones (not included) into the (headphone) jack on the audio amplifier, then adjust the volume and other end of TV Connecting an audio amplifier You can damage your TV: 1 Make sure that you have inserted the batteries in the remote control, connected the antenna to the TV, and connect the AC power. 2 Press (Power...
User Manual (English)
Page 18
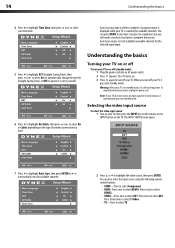
... remote control buttons: • COMP-Press to select Component. • HDMI-Press once to select HDMI1. Warning: When your TV, then press the INPUT key on the remote, or the INPUT button on or off your TV does not receive an input signal for several minutes, it goes into an AC power outlet. 2 Press (power). A progress report is displayed while your time zone. When you turn off (standby mode): 1 Plug the power cord into standby mode...
... remote control buttons: • COMP-Press to select Component. • HDMI-Press once to select HDMI1. Warning: When your TV, then press the INPUT key on the remote, or the INPUT button on or off your TV does not receive an input signal for several minutes, it goes into an AC power outlet. 2 Press (power). A progress report is displayed while your time zone. When you turn off (standby mode): 1 Plug the power cord into standby mode...
User Manual (English)
Page 19
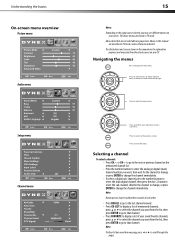
... TV mode. Understanding the basics On-screen menu overview Picture menu Audio menu Setup menu Parental Controls Channel menu 15 Notes: Depending on the signal source selected, you want, then wait for the channel to change, or press ENTER to change the channel immediately. Navigating the menus Press to close the menu. Note: Button presses must be within three seconds of each other. • Press RECALL to go to the last channel viewed. • Press CH-LIST...
... TV mode. Understanding the basics On-screen menu overview Picture menu Audio menu Setup menu Parental Controls Channel menu 15 Notes: Depending on the signal source selected, you want, then wait for the channel to change, or press ENTER to change the channel immediately. Navigating the menus Press to close the menu. Note: Button presses must be within three seconds of each other. • Press RECALL to go to the last channel viewed. • Press CH-LIST...
User Manual (English)
Page 20
...: • Parental Controls-Lets you control which may use these sub-channels to transmit a variety of information, such as channel number, video input source, and resolution. • Digital mode information-Displays channel number, station name, channel label (if preset), broadcast program name, TV rating, signal type, audio information, resolution, CC mode, current time, and current program start and end times. • Analog mode information-Displays channel number, channel label (if preset), signal type, audio information, and resolution. 2 Press GUIDE to close the menu. For example...
...: • Parental Controls-Lets you control which may use these sub-channels to transmit a variety of information, such as channel number, video input source, and resolution. • Digital mode information-Displays channel number, station name, channel label (if preset), broadcast program name, TV rating, signal type, audio information, resolution, CC mode, current time, and current program start and end times. • Analog mode information-Displays channel number, channel label (if preset), signal type, audio information, and resolution. 2 Press GUIDE to close the menu. For example...

User Manual (English)
Page 27
Setting parental controls 23 3 Press ENTER. You use similar steps for U.S. Note: If you can set parental controls for the U.S. The Parental Controls sub menu reopens. The following procedure shows how to enter the four-digit password. The Setup menu opens with Parental Controls selected. and Canada. TV ratings. You should change the password to a number you forget your password, enter 9999. 7 Press EXIT to close the menu. 4 Press the number buttons to set parental controls: 1 Press MENU. The default password is...
Setting parental controls 23 3 Press ENTER. You use similar steps for U.S. Note: If you can set parental controls for the U.S. The Parental Controls sub menu reopens. The following procedure shows how to enter the four-digit password. The Setup menu opens with Parental Controls selected. and Canada. TV ratings. You should change the password to a number you forget your password, enter 9999. 7 Press EXIT to close the menu. 4 Press the number buttons to set parental controls: 1 Press MENU. The default password is...
User Manual (English)
Page 29
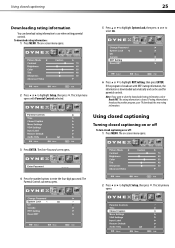
... the number buttons to clear the downloaded rating information, select Reset RRT. Note: If you want to enter the four-digit password. The on or off To turn closed captioning on -screen menu opens. 3 Press ENTER. The Setup menu opens with RRT5 rating information, the information is downloaded automatically and can download rating information to highlight Setup, then press . The Setup menu opens. If the program is broadcast with Parental Controls...
... the number buttons to clear the downloaded rating information, select Reset RRT. Note: If you want to enter the four-digit password. The on or off To turn closed captioning on -screen menu opens. 3 Press ENTER. The Setup menu opens with RRT5 rating information, the information is downloaded automatically and can download rating information to highlight Setup, then press . The Setup menu opens. If the program is broadcast with Parental Controls...
User Manual (English)
Page 34
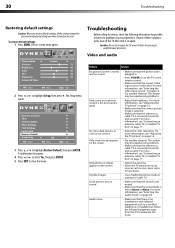
... another channel. The Setup menu opens. Parental Controls 3 Press or to close the menu. Problem Solution No picture (screen is connected correctly and securely. For more information, see "Connecting an antenna, cable TV, or satellite TV box" on page 11. • Adjust the antenna. • Move the TV away from the TV to repair the TV yourself. For more information, see "Selecting the video input source" on page 16. • Make sure that the correct picture mode is...
... another channel. The Setup menu opens. Parental Controls 3 Press or to close the menu. Problem Solution No picture (screen is connected correctly and securely. For more information, see "Connecting an antenna, cable TV, or satellite TV box" on page 11. • Adjust the antenna. • Move the TV away from the TV to repair the TV yourself. For more information, see "Selecting the video input source" on page 16. • Make sure that the correct picture mode is...
User Manual (English)
Page 35
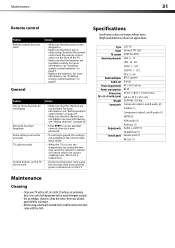
...a creaking noise. Solution • Make sure that the power cord is plugged in use a soft cloth dampened with a weak detergent solution. • Use an eyeglass cleaner to clean the screen. TV cabinet creaks. Specifications Specifications subject to access parental controls, then set a new password. Some settings cannot be accessed. Type Panel TV system Receiving channels Audio multiples Audio out Power requirement Power consumption Dimensions (W × H × D with stand) Weight Input ports Output ports Control ports LCD TV 26-inch TFT LCD NTSC-M, ATSC VHF: 2 - 13 UHF: 14 - 69 CATV...
...a creaking noise. Solution • Make sure that the power cord is plugged in use a soft cloth dampened with a weak detergent solution. • Use an eyeglass cleaner to clean the screen. TV cabinet creaks. Specifications Specifications subject to access parental controls, then set a new password. Some settings cannot be accessed. Type Panel TV system Receiving channels Audio multiples Audio out Power requirement Power consumption Dimensions (W × H × D with stand) Weight Input ports Output ports Control ports LCD TV 26-inch TFT LCD NTSC-M, ATSC VHF: 2 - 13 UHF: 14 - 69 CATV...

User Manual (English)
Page 37
...; Customer instruction • Installation • Set up adjustments • Cosmetic damage • Damage due to acts of God, such as the original packaging. Contact Dynex: For customer service please call 1-888-BESTBUY. This warranty also does not cover: • Damage due to incorrect operation or maintenance • Connection to an incorrect voltage supply • Attempted repair by this warranty that requires service, terms...
...; Customer instruction • Installation • Set up adjustments • Cosmetic damage • Damage due to acts of God, such as the original packaging. Contact Dynex: For customer service please call 1-888-BESTBUY. This warranty also does not cover: • Damage due to incorrect operation or maintenance • Connection to an incorrect voltage supply • Attempted repair by this warranty that requires service, terms...


