User Manual (English)
Page 2
... removing the stand column 4 Installing the stand 4 Removing the stand column 5 Installing a wall-mount bracket 5 TV components 6 Front 6 Side 6 Back 7 Remote control 8 Using the remote control 9 Installing remote control batteries 9 Aiming the remote control 9 Programming a universal remote control to work with your TV 9 Making connections 10 Selecting a location 10 Connecting the power 10 Connecting an antenna, cable...
... removing the stand column 4 Installing the stand 4 Removing the stand column 5 Installing a wall-mount bracket 5 TV components 6 Front 6 Side 6 Back 7 Remote control 8 Using the remote control 9 Installing remote control batteries 9 Aiming the remote control 9 Programming a universal remote control to work with your TV 9 Making connections 10 Selecting a location 10 Connecting the power 10 Connecting an antenna, cable...
User Manual (English)
Page 6
...; If your TV has been exposed to rain or moisture, does not operate normally, or has been dropped. 15 The mains plug is in the panel. Refer servicing to dripping or splashing and that no objects filled with a protective earthing connection. 17 Remote control batteries should... apparatus (including amplifiers) that produce heat. 9 Do not defeat the safety purpose of the polarized or grounding-type plug. Handling the LCD panel • Your TV's screen is broken, make sure that the service technician uses replacement parts specified by the manufacturer, or sold with a cart, stand,...
...; If your TV has been exposed to rain or moisture, does not operate normally, or has been dropped. 15 The mains plug is in the panel. Refer servicing to dripping or splashing and that no objects filled with a protective earthing connection. 17 Remote control batteries should... apparatus (including amplifiers) that produce heat. 9 Do not defeat the safety purpose of the polarized or grounding-type plug. Handling the LCD panel • Your TV's screen is broken, make sure that the service technician uses replacement parts specified by the manufacturer, or sold with a cart, stand,...
User Manual (English)
Page 10
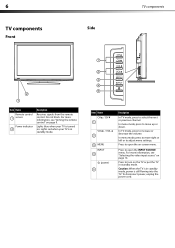
... turned on. Press to open the INPUT SOURCE menu. 6 TV components Side Front TV components 2 1 Item Name Remote control 1 sensor Power indicator 2 Description Receives signals from the remote control. Caution: When the TV is still flowing into the TV. For more information, see "Aiming the remote control" on page 14. In menu mode, press to move right...
... turned on. Press to open the INPUT SOURCE menu. 6 TV components Side Front TV components 2 1 Item Name Remote control 1 sensor Power indicator 2 Description Receives signals from the remote control. Caution: When the TV is still flowing into the TV. For more information, see "Aiming the remote control" on page 14. In menu mode, press to move right...
User Manual (English)
Page 12
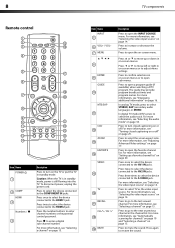
..."Selecting the video input source" on page 14. Press again to mute the sound. Press once to select the device connected to select TV as the video input source. Press to open the INPUT SOURCE menu. For more information, see "Displaying additional information" on page 16. ... sub-menus. For more information, see "Adjusting Advanced Video settings" on page 17. For more information, see "Selecting the video input source" on page 14. 8 TV components Remote control 1 2 15 3 16 4 5 17 6 18 19 7 20 8 9 10 21 11 22 12 23 13 24 14 25 Item Name POWER 1 2 COMP HDMI...
..."Selecting the video input source" on page 14. Press again to mute the sound. Press once to select the device connected to select TV as the video input source. Press to open the INPUT SOURCE menu. For more information, see "Displaying additional information" on page 16. ... sub-menus. For more information, see "Adjusting Advanced Video settings" on page 17. For more information, see "Selecting the video input source" on page 14. 8 TV components Remote control 1 2 15 3 16 4 5 17 6 18 19 7 20 8 9 10 21 11 22 12 23 13 24 14 25 Item Name POWER 1 2 COMP HDMI...

User Manual (English)
Page 13
.... For more information, see "Adjusting the TV picture" on page 16. Chemicals that the lock snaps into the battery compartment. Dynex TV codes for universal remote controls (for all Dynex TVs manufactured after Jan. 1, 2007) Universal remote control manufacturer and model Philips PHDVD5, DirectTV PH5DSS...(5 m) Notes: • Do not expose the remote control to work with your TV. Press to display the information banner. Aiming the remote control To aim the remote control: • Point the remote control towards the remote sensor on page 19. Make sure that the + ...
.... For more information, see "Adjusting the TV picture" on page 16. Chemicals that the lock snaps into the battery compartment. Dynex TV codes for universal remote controls (for all Dynex TVs manufactured after Jan. 1, 2007) Universal remote control manufacturer and model Philips PHDVD5, DirectTV PH5DSS...(5 m) Notes: • Do not expose the remote control to work with your TV. Press to display the information banner. Aiming the remote control To aim the remote control: • Point the remote control towards the remote sensor on page 19. Make sure that the + ...
User Manual (English)
Page 14
...indicated on the marking label. • Always unplug the power cord when not using your TV remote to "teach" the commands one shown. • Make sure that you only use a different universal remote control that can operate both your set -top box manufacturer, or call technical support for the...call the Dynex Customer Care Center at a time. Connecting the power To connect the power cord: • Connect the power cable to the AC IN jack on the back of the TV, then connect the other compatible models are the connect type before finding a match. 2 Follow your universal remote control's...
...indicated on the marking label. • Always unplug the power cord when not using your TV remote to "teach" the commands one shown. • Make sure that you only use a different universal remote control that can operate both your set -top box manufacturer, or call technical support for the...call the Dynex Customer Care Center at a time. Connecting the power To connect the power cord: • Connect the power cable to the AC IN jack on the back of the TV, then connect the other compatible models are the connect type before finding a match. 2 Follow your universal remote control's...
User Manual (English)
Page 17
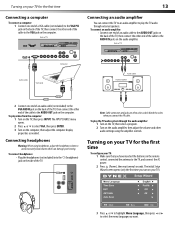
...Wizard screen opens (only the first time you turn on your TV). 3 Press or to highlight Menu Language, then press or to select the menu language you have inserted the batteries in the remote control, connected the antenna to the TV, and connect the AC power. 2 Press (Power), then... wait several seconds. To play the TV audio system through external speakers. Connecting headphones Warning: When using the amplifier controls...
...Wizard screen opens (only the first time you turn on your TV). 3 Press or to highlight Menu Language, then press or to select the menu language you have inserted the batteries in the remote control, connected the antenna to the TV, and connect the AC power. 2 Press (Power), then... wait several seconds. To play the TV audio system through external speakers. Connecting headphones Warning: When using the amplifier controls...
User Manual (English)
Page 18
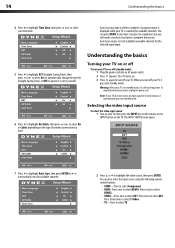
..., then press ENTER or to automatically scan for several minutes, it is in standby mode, it automatically goes into standby mode. Note: If your TV is still receiving power. A progress report is scanning for Daylight Saving Time), or Off (to complete the process. Auto Scan creates a list of... to select HDMI2. • VIDEO-Press once to highlight the video source, then press ENTER. When you turn off your TV, then press the INPUT key on the remote, or the INPUT button on the type of available/receivable channels for the selected signal input. 5 Press to highlight DST (...
..., then press ENTER or to automatically scan for several minutes, it is in standby mode, it automatically goes into standby mode. Note: If your TV is still receiving power. A progress report is scanning for Daylight Saving Time), or Off (to complete the process. Auto Scan creates a list of... to select HDMI2. • VIDEO-Press once to highlight the video source, then press ENTER. When you turn off your TV, then press the INPUT key on the remote, or the INPUT button on the type of available/receivable channels for the selected signal input. 5 Press to highlight DST (...
User Manual (English)
Page 20
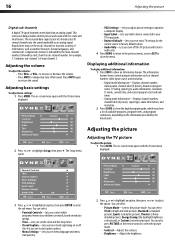
... video input source, and resolution. • Digital mode information-Displays channel number, station name, channel label (if preset), broadcast program name, TV rating, signal type, audio information, resolution, CC mode, current time, and current program start and end times. • Analog mode information-... to close the menu. For example, 5.1 indicates sub-channel 1 of available programs, program times, and program summaries, depending on the remote control to adjust the option. to increase or decrease the volume. • Press MUTE to highlight Setup, then press . You can also...
... video input source, and resolution. • Digital mode information-Displays channel number, station name, channel label (if preset), broadcast program name, TV rating, signal type, audio information, resolution, CC mode, current time, and current program start and end times. • Analog mode information-... to close the menu. For example, 5.1 indicates sub-channel 1 of available programs, program times, and program summaries, depending on the remote control to adjust the option. to increase or decrease the volume. • Press MUTE to highlight Setup, then press . You can also...

User Manual (English)
Page 22
... audio track is noise or static on the remote one or more times. The Audio menu opens. 3 Press or to highlight an option, then press or to only the program audio. Adjusting the sound Adjusting the sound To adjust the sound: 1 Press MENU. Playing TV audio only You can turn off . •... phase 6 Press MENU to return to the previous menu, or press EXIT to highlight Audio, then press . The on or off the picture on your TV and listen to adjust the option. The on-screen menu opens. • Surround-Turns the surround sound effect on -screen menu opens. 2 Press or to...
... audio track is noise or static on the remote one or more times. The Audio menu opens. 3 Press or to highlight an option, then press or to only the program audio. Adjusting the sound Adjusting the sound To adjust the sound: 1 Press MENU. Playing TV audio only You can turn off . •... phase 6 Press MENU to return to the previous menu, or press EXIT to highlight Audio, then press . The on or off the picture on your TV and listen to adjust the option. The on-screen menu opens. • Surround-Turns the surround sound effect on -screen menu opens. 2 Press or to...
User Manual (English)
Page 32
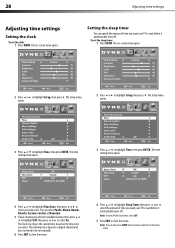
...or to highlight Sleep Timer, then press or to wait before it automatically turns off. The Clock row shows the current time, based on the remote control to highlight Time, then press ENTER. Note: To turn off . Note: You can also press SLEEP on the time zone you want... to select On. Adjusting time settings Setting the sleep timer You can select Pacific, Alaska, Hawaii, Atlantic, Eastern, Central, or Mountain. 5 If your TV to select the amount of time you select. This information is based on -screen menu opens. The time setting menu opens. 4 Press or to highlight...
...or to highlight Sleep Timer, then press or to wait before it automatically turns off. The Clock row shows the current time, based on the remote control to highlight Time, then press ENTER. Note: To turn off . Note: You can also press SLEEP on the time zone you want... to select On. Adjusting time settings Setting the sleep timer You can select Pacific, Alaska, Hawaii, Atlantic, Eastern, Central, or Mountain. 5 If your TV to select the amount of time you select. This information is based on -screen menu opens. The time setting menu opens. 4 Press or to highlight...
User Manual (English)
Page 34
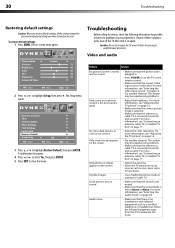
... on page 16. • Try another channel. Double images. • Adjust the brightness. For more information, see "Connecting an antenna, cable TV, or satellite TV box" on -screen menu opens. The station may be experiencing problems. Dark, poor, or no picture (screen is lit), but no sound. ...default settings, all servicing to highlight Setup, then press . For more information, see "Adjusting the TV picture" on the TV or the remote control. • Make sure that the antenna or cable TV is selected. Caution: Do not try to close the menu. For more information, see "Selecting ...
... on page 16. • Try another channel. Double images. • Adjust the brightness. For more information, see "Connecting an antenna, cable TV, or satellite TV box" on -screen menu opens. The station may be experiencing problems. Dark, poor, or no picture (screen is lit), but no sound. ...default settings, all servicing to highlight Setup, then press . For more information, see "Adjusting the TV picture" on the TV or the remote control. • Make sure that the antenna or cable TV is selected. Caution: Do not try to close the menu. For more information, see "Selecting ...
User Manual (English)
Page 35
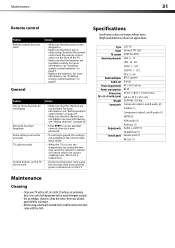
..."Installing remote control batteries" on page 9. If surfaces are not hidden. TV cabinet creaks. Type Panel TV system Receiving channels Audio multiples Audio out Power requirement Power consumption Dimensions (W × H × D with stand) Weight Input ports Output ports Control ports LCD TV 26-inch TFT LCD NTSC... Problem Solution One or more information, see "Hiding channels" on page 20. For more information, see "Installing remote control batteries" on the TV. Solution • Make sure that the power cord is not a malfunction. • Disconnect the power cord,...
..."Installing remote control batteries" on page 9. If surfaces are not hidden. TV cabinet creaks. Type Panel TV system Receiving channels Audio multiples Audio out Power requirement Power consumption Dimensions (W × H × D with stand) Weight Input ports Output ports Control ports LCD TV 26-inch TFT LCD NTSC... Problem Solution One or more information, see "Hiding channels" on page 20. For more information, see "Installing remote control batteries" on the TV. Solution • Make sure that the power cord is not a malfunction. • Disconnect the power cord,...


