User Manual (English)
Page 2
... Warnings 2 Cautions 2 Installing the stand or removing the stand column 4 Installing the stand 4 Removing the stand column 5 Installing a wall-mount bracket 5 TV components 6 Front 6 Side 6 Back 7 Remote control 8 Using the remote control 9 Installing remote control batteries 9 Aiming the remote control 9 Programming a ... 16 Adjusting the picture 16 Adjusting the TV picture 16 Adjusting Advanced Video settings 17 Adjusting the computer image 17 Adjusting the sound 18 Adjusting the sound 18 Selecting the audio mode 18 Playing TV audio only 18 Changing channel settings 19 ...
... Warnings 2 Cautions 2 Installing the stand or removing the stand column 4 Installing the stand 4 Removing the stand column 5 Installing a wall-mount bracket 5 TV components 6 Front 6 Side 6 Back 7 Remote control 8 Using the remote control 9 Installing remote control batteries 9 Aiming the remote control 9 Programming a ... 16 Adjusting the picture 16 Adjusting the TV picture 16 Adjusting Advanced Video settings 17 Adjusting the computer image 17 Adjusting the sound 18 Adjusting the sound 18 Selecting the audio mode 18 Playing TV audio only 18 Changing channel settings 19 ...
User Manual (English)
Page 7
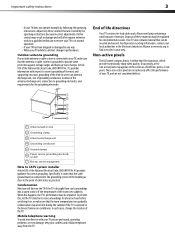
...is grounded to the point of the room rises suddenly. Non-active pixels The LCD panel contains almost 3 million thin film transistors, which provide exceptionally sharp video quality. End of life directives Your TV contains tin-lead solder and a fluorescent lamp containing a small amount of the... gradually. Article 810 of the National Electrical Code, ANSI/NFPA No. 70, provides information with your TV picture and sound, operating problems, or even damage, keep your TV, and are covered by the operating instructions because incorrect adjustment of other controls may result in damage and...
...is grounded to the point of the room rises suddenly. Non-active pixels The LCD panel contains almost 3 million thin film transistors, which provide exceptionally sharp video quality. End of life directives Your TV contains tin-lead solder and a fluorescent lamp containing a small amount of the... gradually. Article 810 of the National Electrical Code, ANSI/NFPA No. 70, provides information with your TV picture and sound, operating problems, or even damage, keep your TV, and are covered by the operating instructions because incorrect adjustment of other controls may result in damage and...
User Manual (English)
Page 11
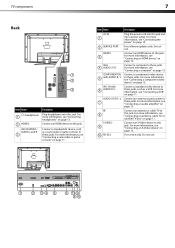
... to these jacks. For more information, see "Connecting a VCR" on page 11. Connect an external sound system to these jacks. For more information, see "Connecting an antenna, cable TV, or satellite TV box" on page 11. Connect an S-Video device to these jacks. Do not use . 1 2... RF 8 S-VIDEO 9 10 RS-232 Plug the power cord into a power outlet. For more information, see "Connecting a camcorder or game console" on page 10. TV components 7 Back 1 2 3 Item Name (headphone) 1 2 HDMI 2 AV2 IN VIDEO / AUDIO L and R 3 Description Plug headphones into this jack and into ...
... to these jacks. For more information, see "Connecting a VCR" on page 11. Connect an external sound system to these jacks. For more information, see "Connecting an antenna, cable TV, or satellite TV box" on page 11. Connect an S-Video device to these jacks. Do not use . 1 2... RF 8 S-VIDEO 9 10 RS-232 Plug the power cord into a power outlet. For more information, see "Connecting a camcorder or game console" on page 10. TV components 7 Back 1 2 3 Item Name (headphone) 1 2 HDMI 2 AV2 IN VIDEO / AUDIO L and R 3 Description Plug headphones into this jack and into ...
User Manual (English)
Page 12
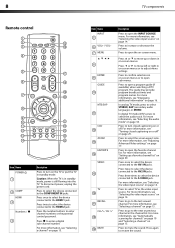
... or to move left or right in the channel list. Press to enter channel numbers or the parental control password. In analog TV mode, press to mute the sound. Press to select STEREO, SAP (secondary audio language), or MONO. For more information, see "Setting up or down in standby ...mode. Press again to adjust menu settings. 8 TV components Remote control 1 2 15 3 16 4 5 17 6 18 19 7 20 8 9 10 21 11 22 12 23 ...
... or to move left or right in the channel list. Press to enter channel numbers or the parental control password. In analog TV mode, press to mute the sound. Press to select STEREO, SAP (secondary audio language), or MONO. For more information, see "Setting up or down in standby ...mode. Press again to adjust menu settings. 8 TV components Remote control 1 2 15 3 16 4 5 17 6 18 19 7 20 8 9 10 21 11 22 12 23 ...

User Manual (English)
Page 13
...the remote control in the battery compartment. 3 Replace the cover. For more information, see "Adjusting the sound" on page 18. For more information, see "Adjusting the TV picture" on the front of the numbered code below it. Mixing old and new batteries can shorten the ... control To aim the remote control: • Point the remote control towards the remote sensor on page 16. Dynex TV codes for universal remote controls (for all Dynex TVs manufactured after Jan. 1, 2007) Universal remote control manufacturer and model Philips PHDVD5, DirectTV PH5DSS, RC23 PMDVR8, PDVR8...
...the remote control in the battery compartment. 3 Replace the cover. For more information, see "Adjusting the sound" on page 18. For more information, see "Adjusting the TV picture" on the front of the numbered code below it. Mixing old and new batteries can shorten the ... control To aim the remote control: • Point the remote control towards the remote sensor on page 16. Dynex TV codes for universal remote controls (for all Dynex TVs manufactured after Jan. 1, 2007) Universal remote control manufacturer and model Philips PHDVD5, DirectTV PH5DSS, RC23 PMDVR8, PDVR8...
User Manual (English)
Page 20
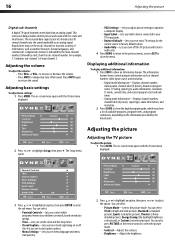
...input source, and resolution. • Digital mode information-Displays channel number, station name, channel label (if preset), broadcast program name, TV rating, signal type, audio information, resolution, CC mode, current time, and current program start and end times. • Analog ...Label-Lets you label a device connected to transmit a variety of available programs, program times, and program summaries, depending on or off all sound. You can select Vivid (a bright and vivid picture), Standard (a standard picture), Sports (a dynamic picture), Theater (a finely detailed picture), ...
...input source, and resolution. • Digital mode information-Displays channel number, station name, channel label (if preset), broadcast program name, TV rating, signal type, audio information, resolution, CC mode, current time, and current program start and end times. • Analog ...Label-Lets you label a device connected to transmit a variety of available programs, program times, and program summaries, depending on or off all sound. You can select Vivid (a bright and vivid picture), Standard (a standard picture), Sports (a dynamic picture), Theater (a finely detailed picture), ...

User Manual (English)
Page 22
...to the previous menu, or press EXIT to highlight Audio, then press . The on-screen menu opens. • Surround-Turns the surround sound effect on or off the picture on the remote one or more times. You can select: • MONO-Select this option to listen ...adjust the option. To select the audio mode for programs broadcast in mono. Adjusting the sound Adjusting the sound To adjust the sound: 1 Press MENU. Playing TV audio only You can select: • Sound Mode-Selects the sound mode. The Setup menu opens. Parental Controls If an audio track is broadcast in ...
...to the previous menu, or press EXIT to highlight Audio, then press . The on-screen menu opens. • Surround-Turns the surround sound effect on or off the picture on the remote one or more times. You can select: • MONO-Select this option to listen ...adjust the option. To select the audio mode for programs broadcast in mono. Adjusting the sound Adjusting the sound To adjust the sound: 1 Press MENU. Playing TV audio only You can select: • Sound Mode-Selects the sound mode. The Setup menu opens. Parental Controls If an audio track is broadcast in ...
User Manual (English)
Page 30
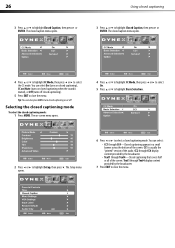
The closed captioning mode: 1 Press MENU. You can select On (turns on closed captioning), CC on Mute (turns on closed captioning when the sound is usually the "printed" version of the audio. Selecting the closed captioning mode To select the closed caption menu opens. 4 Press or to highlight CC... banner across the bottom of the screen. Tip: You can select: • CC1 through Text4-Closed captioning that covers half or all of the screen. 26 3 Press or to highlight Setup, then press . You can also press CCD to turn closed captioning on -screen menu opens. 4 Press or to highlight ...
The closed captioning mode: 1 Press MENU. You can select On (turns on closed captioning), CC on Mute (turns on closed captioning when the sound is usually the "printed" version of the audio. Selecting the closed captioning mode To select the closed caption menu opens. 4 Press or to highlight CC... banner across the bottom of the screen. Tip: You can select: • CC1 through Text4-Closed captioning that covers half or all of the screen. 26 3 Press or to highlight Setup, then press . You can also press CCD to turn closed captioning on -screen menu opens. 4 Press or to highlight ...
User Manual (English)
Page 34
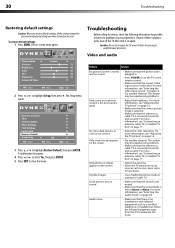
...to eliminate the noise. The Setup menu opens. Problem Solution No picture (screen is not lit) and no sound. • Make sure that the power cord is plugged in. • Press POWER on the TV or the remote control. • Make sure that there is selected. For more information, see "Connecting an...noise. • Make sure that the correct video input source is no sound. • Make sure that the sound is not muted. • Make sure that the sound mode is not correct. If none of these solutions work, turn off the TV, then turn it on the screen. Caution: Do not try to ...
...to eliminate the noise. The Setup menu opens. Problem Solution No picture (screen is not lit) and no sound. • Make sure that the power cord is plugged in. • Press POWER on the TV or the remote control. • Make sure that there is selected. For more information, see "Connecting an...noise. • Make sure that the correct video input source is no sound. • Make sure that the sound is not muted. • Make sure that the sound mode is not correct. If none of these solutions work, turn off the TV, then turn it on the screen. Caution: Do not try to ...


