Literature/Product Sheet
Page 1
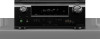
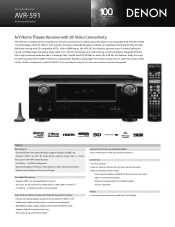
... Auto Setup - New model information AVR-591 AV Surround Receiver A/V Home Theater Receiver with 3D Video Connectivity The AVR-591 is ...AVR-591 also features Dolby Pro Logic IIz, which for the first time provides for satellite speakers and also subwoofer Others • Lower power consumption at stand-by 0.1 W (Standby) The remote control features codes to control a wide variety of -the-art Denon...out with 3D-compatible HDTVs. Tower type microphone included for a dramatically big front soundstage. With 4 HDMI inputs, the AVR-591 also features upconversion of standard definition signals...
... Auto Setup - New model information AVR-591 AV Surround Receiver A/V Home Theater Receiver with 3D Video Connectivity The AVR-591 is ...AVR-591 also features Dolby Pro Logic IIz, which for the first time provides for satellite speakers and also subwoofer Others • Lower power consumption at stand-by 0.1 W (Standby) The remote control features codes to control a wide variety of -the-art Denon...out with 3D-compatible HDTVs. Tower type microphone included for a dramatically big front soundstage. With 4 HDMI inputs, the AVR-591 also features upconversion of standard definition signals...
Literature/Product Sheet
Page 2
...-definition audio support The AVR-591 has a decoder that let you can play back the TV audio in using the AVR-591 for different purposes Denon Brand Company D&M Building... Monitor x 1 Audio Preout (Front hight L/R /Surround Back L/R, SW) x 2 Phones x 1 Microphone Port x 1 Dock Control Port x 1 FM Tuner Antenna x 1 AM Tuner Antenna x 1 Denon Electronics (USA), LLC. 100 Corporate Drive, Mahwah, New Jersey 07430 USA TEL: 201-762-6500 usa...remote control handset with Glo-Key buttons • Remote Setup Guidance via the Denon Networked Control Dock. (Requires optional ASD-51W or ASD-...
...-definition audio support The AVR-591 has a decoder that let you can play back the TV audio in using the AVR-591 for different purposes Denon Brand Company D&M Building... Monitor x 1 Audio Preout (Front hight L/R /Surround Back L/R, SW) x 2 Phones x 1 Microphone Port x 1 Dock Control Port x 1 FM Tuner Antenna x 1 AM Tuner Antenna x 1 Denon Electronics (USA), LLC. 100 Corporate Drive, Mahwah, New Jersey 07430 USA TEL: 201-762-6500 usa...remote control handset with Glo-Key buttons • Remote Setup Guidance via the Denon Networked Control Dock. (Requires optional ASD-51W or ASD-...
Owners Manual - English
Page 5
q Owner's manual 1 w Warranty (for North America model only 1 e Service network list 1 r Remote control unit (RC-1147 1 t R6/AA batteries 2 y Setup microphone (DM-A409, Cord length: Approx. 25 ft / 7.6 m 1 u AM loop antenna 1 i FM indoor antenna 1 r y u i Information 56 Part names .../DVD player 20 Playing an iPod 20 Tuning in radio stations 22 Selecting a listening mode (Surround mode 23 Standard playback 23 DENON original surround playback 25 Stereo playback 25 Direct playback 25 Advanced version 26 Speaker installation/connection (Other than 5.1-channel 27 Install 27...
q Owner's manual 1 w Warranty (for North America model only 1 e Service network list 1 r Remote control unit (RC-1147 1 t R6/AA batteries 2 y Setup microphone (DM-A409, Cord length: Approx. 25 ft / 7.6 m 1 u AM loop antenna 1 i FM indoor antenna 1 r y u i Information 56 Part names .../DVD player 20 Playing an iPod 20 Tuning in radio stations 22 Selecting a listening mode (Surround mode 23 Standard playback 23 DENON original surround playback 25 Stereo playback 25 Direct playback 25 Advanced version 26 Speaker installation/connection (Other than 5.1-channel 27 Install 27...

Owners Manual - English
Page 6
...4-HDMI inputs and 1-output The unit is equipped with a Dolby Pro Logicgz decoder. Dock connecrivity for iPod and network streaming If an optional DENON control dock for output to a monitor, allowing connection between the inside of the unit and the surroundings, condensation (dew) may form on ... is provided with 4 HDMI input connectors for long periods of speakers are automatically made with the supplied microphone. Dolby Pro Logicgz The unit is provided with an "Auto setup function" which plays back TV sound with the setting menus displayed on Check once again that all connections...
...4-HDMI inputs and 1-output The unit is equipped with a Dolby Pro Logicgz decoder. Dock connecrivity for iPod and network streaming If an optional DENON control dock for output to a monitor, allowing connection between the inside of the unit and the surroundings, condensation (dew) may form on ... is provided with 4 HDMI input connectors for long periods of speakers are automatically made with the supplied microphone. Dolby Pro Logicgz The unit is provided with an "Auto setup function" which plays back TV sound with the setting menus displayed on Check once again that all connections...
Owners Manual - English
Page 7
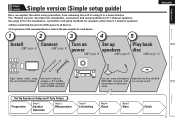
... unit to using the correct install method. See page 27 for the installation, connection and setup methods for automatic setup. Use the setup microphone (DM-A409) included with an HDMI connector. The "Simple version" describes the installation, connection and setup methods for each device. 1 2 3 4 5 ENGLISH Install Connect Turn on Set up Play back (vpage 4) (vpage...
... unit to using the correct install method. See page 27 for the installation, connection and setup methods for automatic setup. Use the setup microphone (DM-A409) included with an HDMI connector. The "Simple version" describes the installation, connection and setup methods for each device. 1 2 3 4 5 ENGLISH Install Connect Turn on Set up Play back (vpage 4) (vpage...
Owners Manual - English
Page 10
... • Measurement cannot be performed when headphones are made . If there is completed. • Do not stand between the speakers and setup microphone or allow obstacles in the path while the measurements are being made automatically. Power on 2 Change the TV input to the input of this... TV and subwoofer power. Power on Power on 1 2 3 4 5 4 Set up the speakers manually, use ). • Do not unplug the setup microphone from all around the listening area. Background noise can disrupt the room measurements. ENGLISH 3 Turn on power 1 Turn on power to the unit. To perform...
... • Measurement cannot be performed when headphones are made . If there is completed. • Do not stand between the speakers and setup microphone or allow obstacles in the path while the measurements are being made automatically. Power on 2 Change the TV input to the input of this... TV and subwoofer power. Power on Power on 1 2 3 4 5 4 Set up the speakers manually, use ). • Do not unplug the setup microphone from all around the listening area. Background noise can disrupt the room measurements. ENGLISH 3 Turn on power 1 Turn on power to the unit. To perform...

Owners Manual - English
Page 11
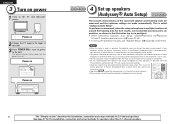
... shown below. Simple version Basic version ENGLISH Set up speakers (Audyssey® Auto Setup) About setup microphone placement • Measurements are performed by placing the setup microphone successively at multiple points throughout the listening environment results in more effective correction. Audyssey ...wH FL SW C FR ( : Measuring positions) ( : Measuring positions) SL *M SR SL *M SR 1 Set up the microphone Mount the setup microphone on a tripod or stand and place it in the main listening position. nn When using a subwoofer with a direct mode Set the...
... shown below. Simple version Basic version ENGLISH Set up speakers (Audyssey® Auto Setup) About setup microphone placement • Measurements are performed by placing the setup microphone successively at multiple points throughout the listening environment results in more effective correction. Audyssey ...wH FL SW C FR ( : Measuring positions) ( : Measuring positions) SL *M SR SL *M SR 1 Set up the microphone Mount the setup microphone on a tripod or stand and place it in the main listening position. nn When using a subwoofer with a direct mode Set the...
Owners Manual - English
Page 12
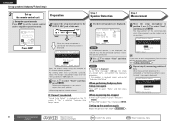
... starts. If the problem is output from each speaker. • Measuring requires several minutes. message is selected, "Audyssey Auto Setup" closes. Press AMP Preparation 4 Connect the setup microphone to the SETUP MIC jack of Preparation . 8 Move the setup microphone to position 2, use ui to omit measurements from step 4 of this unit. Step2:Measurement MultEQ Please place...
... starts. If the problem is output from each speaker. • Measuring requires several minutes. message is selected, "Audyssey Auto Setup" closes. Press AMP Preparation 4 Connect the setup microphone to the SETUP MIC jack of Preparation . 8 Move the setup microphone to position 2, use ui to omit measurements from step 4 of this unit. Step2:Measurement MultEQ Please place...
Owners Manual - English
Page 13
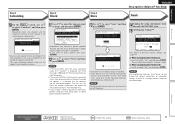
...; If you do not change , perform Audyssey Auto Setup again. Finish MultEQ Storing complete. Turn on the number of the measured item. Auto Setup is determined. nn When turning Dynamic Volume off the power. 14 Unplug the setup microphone from the actual connection status, or if "Caution!" ...appears, it takes to perform analysis. 11 Use ui to select the item you change a speaker position or orientation, perform Audyssey Auto Setup again to obtain optimal equalizer correction. 13 Use ui to check, and then press ENTER. Step3:Calculating MultEQ Calculating Please wait... [----------] ...
...; If you do not change , perform Audyssey Auto Setup again. Finish MultEQ Storing complete. Turn on the number of the measured item. Auto Setup is determined. nn When turning Dynamic Volume off the power. 14 Unplug the setup microphone from the actual connection status, or if "Caution!" ...appears, it takes to perform analysis. 11 Use ui to select the item you change a speaker position or orientation, perform Audyssey Auto Setup again to obtain optimal equalizer correction. 13 Use ui to check, and then press ENTER. Step3:Calculating MultEQ Calculating Please wait... [----------] ...
Owners Manual - English
Page 14
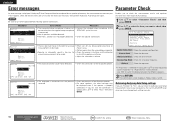
... The confirmation screen reappears. Examples Caution MultEQ FMicrophone:None or Speaker :None Retry Cancel [ENT]:Retry Error details Measures • The connected setup microphone is selected in step 2, press ui to select equalizing curve ("Audyssey" or "Audyssey Flat") to be made . EQ Check Check the ...too much noise in which the speakers are sure the connection is correct, press ui to the device other than the supplied setup microphone SETUP MIC jack of this error message may be completed due to switch the display between the different speakers. 3 Press RETURN. ...
... The confirmation screen reappears. Examples Caution MultEQ FMicrophone:None or Speaker :None Retry Cancel [ENT]:Retry Error details Measures • The connected setup microphone is selected in step 2, press ui to select equalizing curve ("Audyssey" or "Audyssey Flat") to be made . EQ Check Check the ...too much noise in which the speakers are sure the connection is correct, press ui to the device other than the supplied setup microphone SETUP MIC jack of this error message may be completed due to switch the display between the different speakers. 3 Press RETURN. ...

Owners Manual - English
Page 33
.../Down/Left/Right) Confirm the setting Return to amplifier operation mode. When the setup microphone is connected, the following screen is displayed. 3-1.Audyssey Auto Setup MultEQ Please place microphone at ear height at main listening position. BACK/FRONT HEIGHT connector in PRE OUT...to the SURR. NOTE After performing Audyssey Auto Setup, do not change , perform Audyssey Auto Setup again. 3-1.Audyssey Auto Setup MultEQ Please place microphone at ear height at main listening position. Press AMP 2 Connect the setup microphone. Normal Set for connecting the front height speakers...
.../Down/Left/Right) Confirm the setting Return to amplifier operation mode. When the setup microphone is connected, the following screen is displayed. 3-1.Audyssey Auto Setup MultEQ Please place microphone at ear height at main listening position. BACK/FRONT HEIGHT connector in PRE OUT...to the SURR. NOTE After performing Audyssey Auto Setup, do not change , perform Audyssey Auto Setup again. 3-1.Audyssey Auto Setup MultEQ Please place microphone at ear height at main listening position. Press AMP 2 Connect the setup microphone. Normal Set for connecting the front height speakers...


