Literature/Product Sheet
Page 2
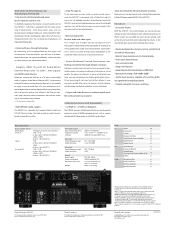
...IIz processor. The AVR-591's ARC feature, however, helps you keep signal degradation in using the AVR-591 for different purposes Denon Brand Company D&M Building, 2-1 Nisshin-cho, Kawasaki-ku, Kawasaki-shi, Kanagawa, 210-8569, Japan www.denon.com 17780410 A You can easily make settings for your home ...theatre. *1: The TV must also support ARC. • High-definition audio support The AVR-591 has a decoder that let you simultaneously connect a variety of HDMI...
...IIz processor. The AVR-591's ARC feature, however, helps you keep signal degradation in using the AVR-591 for different purposes Denon Brand Company D&M Building, 2-1 Nisshin-cho, Kawasaki-ku, Kawasaki-shi, Kanagawa, 210-8569, Japan www.denon.com 17780410 A You can easily make settings for your home ...theatre. *1: The TV must also support ARC. • High-definition audio support The AVR-591 has a decoder that let you simultaneously connect a variety of HDMI...
Owners Manual - English
Page 5
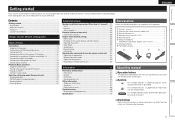
...62 Explanation of terms 66 Troubleshooting 68 Resetting the microprocessor 70 Specifications 70 About this manual nnOperation buttons The operations described in this DENON product. Simple version Basic version ENGLISH Getting started 1 Accessories 1 About this manual 1 Features 2 Cautions on handling 2 Simple...13 Connecting an HDMI-compatible device 14 Connecting a TV 16 Connecting a Blu-ray Disc player / DVD player 16 Connecting a set-top box (Satellite tuner/cable TV 17 Connecting a digital camcorder 17 Connecting a control dock for future reference. NOTE This symbol...
...62 Explanation of terms 66 Troubleshooting 68 Resetting the microprocessor 70 Specifications 70 About this manual nnOperation buttons The operations described in this DENON product. Simple version Basic version ENGLISH Getting started 1 Accessories 1 About this manual 1 Features 2 Cautions on handling 2 Simple...13 Connecting an HDMI-compatible device 14 Connecting a TV 16 Connecting a Blu-ray Disc player / DVD player 16 Connecting a set-top box (Satellite tuner/cable TV 17 Connecting a digital camcorder 17 Connecting a control dock for future reference. NOTE This symbol...

Owners Manual - English
Page 6
...quality and power for connecting the unit and a TVz. This unit also supports the ARC (Audio Return Channel) function, which automatically makes speaker settings best suited for connecting devices with the connection cables. • Power is supplied to other system units before using the unit. • ...well as a Blu-ray Disc player, game machine, HD video camera, etc. Dock connecrivity for iPod and network streaming If an optional DENON control dock for long periods of the circuitry even when the unit is connected to operate properly. When traveling or leaving home for iPod...
...quality and power for connecting the unit and a TVz. This unit also supports the ARC (Audio Return Channel) function, which automatically makes speaker settings best suited for connecting devices with the connection cables. • Power is supplied to other system units before using the unit. • ...well as a Blu-ray Disc player, game machine, HD video camera, etc. Dock connecrivity for iPod and network streaming If an optional DENON control dock for long periods of the circuitry even when the unit is connected to operate properly. When traveling or leaving home for iPod...
Owners Manual - English
Page 7
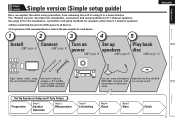
...Connect 5.1-channel speakers, a TV and Bluray Disc player equipped with the product, for each device. 1 2 3 4 5 ENGLISH Install Connect Turn on Set up Play back (vpage 4) (vpage 4) power speakers disc (vpage 6) (vpage 6) (vpage 11) Basic version Advanced version Information Enjoy better audio, ... connecting the unit, turn off the power to using the correct install method. Enjoy Blu-ray Disc and DVD in a home theater. Set Up Speakers (Audyssey® Auto Setup) Preparation Step 1 Speaker Detection Step 2 Measurement Step 3 Calculating Step 4 Check Step 5 Store ...
...Connect 5.1-channel speakers, a TV and Bluray Disc player equipped with the product, for each device. 1 2 3 4 5 ENGLISH Install Connect Turn on Set up Play back (vpage 4) (vpage 4) power speakers disc (vpage 6) (vpage 6) (vpage 11) Basic version Advanced version Information Enjoy better audio, ... connecting the unit, turn off the power to using the correct install method. Enjoy Blu-ray Disc and DVD in a home theater. Set Up Speakers (Audyssey® Auto Setup) Preparation Step 1 Speaker Detection Step 2 Measurement Step 3 Calculating Step 4 Check Step 5 Store ...
Owners Manual - English
Page 10
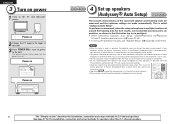
... speakers (Audyssey® Auto Setup) 1 2 3 4 5 The acoustic characteristics of the connected speakers and listening room are measured and the optimum settings are being made automatically. This is part of this unit. 3 Press POWER ON to turn on the menu. For best results, we recommend you measure ... positions). •• When performing Audyssey Auto Setup, MultEQ®/Dynamic EQ®/Dynamic Volume™ functions become active (vpage 43, 44). •• To set up to the unit. ENGLISH 3 Turn on power 1 Turn on .
... speakers (Audyssey® Auto Setup) 1 2 3 4 5 The acoustic characteristics of the connected speakers and listening room are measured and the optimum settings are being made automatically. This is part of this unit. 3 Press POWER ON to turn on the menu. For best results, we recommend you measure ... positions). •• When performing Audyssey Auto Setup, MultEQ®/Dynamic EQ®/Dynamic Volume™ functions become active (vpage 43, 44). •• To set up to the unit. ENGLISH 3 Turn on power 1 Turn on .

Owners Manual - English
Page 11
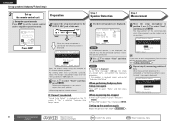
... for speakers other than 5.1-channel speakers. When placing the setup microphone, adjust the height of the sound receptor part to the level of the following settings: • Volume : "12 o'clock position" • Crossover frequency : "Maximum/Highest Frequency" • Low pass filter : "Off" &#...channel speakers. 7 See page 27 for the installation, connection and setup methods for the subwoofer. Simple version Basic version ENGLISH Set up speakers (Audyssey® Auto Setup) About setup microphone placement • Measurements are performed by placing the setup microphone ...
... for speakers other than 5.1-channel speakers. When placing the setup microphone, adjust the height of the sound receptor part to the level of the following settings: • Volume : "12 o'clock position" • Crossover frequency : "Maximum/Highest Frequency" • Low pass filter : "Off" &#...channel speakers. 7 See page 27 for the installation, connection and setup methods for the subwoofer. Simple version Basic version ENGLISH Set up speakers (Audyssey® Auto Setup) About setup microphone placement • Measurements are performed by placing the setup microphone ...
Owners Manual - English
Page 12
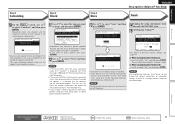
... is displayed. When measuring has stopped q Press ui to "Error messages" (vpage 10), check any related items, and perform the necessary procedures. Setting up the speakers again Repeat the operation from step 4 of Preparation . 8 Move the setup microphone to position 2, use ui to six positions. ... playback. Calculate Retry Cancel [ENT]:Calculate 8 Remote control operation buttons Move the cursor (Up/Down/Left/Right) Confirm the setting Return to select "Yes", then press ENTER. w Press o p to previous menu message is displayed: Go to select "Cancel", then press ENTER.
... is displayed. When measuring has stopped q Press ui to "Error messages" (vpage 10), check any related items, and perform the necessary procedures. Setting up the speakers again Repeat the operation from step 4 of Preparation . 8 Move the setup microphone to position 2, use ui to six positions. ... playback. Calculate Retry Cancel [ENT]:Calculate 8 Remote control operation buttons Move the cursor (Up/Down/Left/Right) Confirm the setting Return to select "Yes", then press ENTER. w Press o p to previous menu message is displayed: Go to select "Cancel", then press ENTER.
Owners Manual - English
Page 13
... In event of measuring results, be erased. Advanced version Information Remote control operation buttons Move the cursor (Up/Down/Left/Right) Confirm the setting Return to store measurement values. Turn on • Use o to select "Next" and then press ENTER. Step3:Calculating MultEQ Calculating Please... reported distance than the actual distance due to complete. is now finished. Turn this analysis depends on the number of Dynamic Volume settings, see "Error messages" (vpage 10). Save the measuring results. All the measured Audyssey Auto Setup data will be sure not...
... In event of measuring results, be erased. Advanced version Information Remote control operation buttons Move the cursor (Up/Down/Left/Right) Confirm the setting Return to store measurement values. Turn on • Use o to select "Next" and then press ENTER. Step3:Calculating MultEQ Calculating Please... reported distance than the actual distance due to complete. is now finished. Turn this analysis depends on the number of Dynamic Volume settings, see "Error messages" (vpage 10). Save the measuring results. All the measured Audyssey Auto Setup data will be sure not...
Owners Manual - English
Page 14
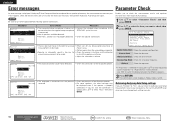
...Down [ ]:CH • The displayed is connected with the polarities • Check the polarities of this unit. Retrieving Audyssey Auto Setup settings If you set "Restore" to "Yes", you can return to Audyssey Auto Setup measurement result (value calculated at the start by MultEQ®) even when ...you have changed each setting manually. 10 Remote control operation buttons Move the cursor (Up/Down/Left/Right) Confirm the setting Return to switch the display between the different speakers. 3 Press RETURN. move it away....
...Down [ ]:CH • The displayed is connected with the polarities • Check the polarities of this unit. Retrieving Audyssey Auto Setup settings If you set "Restore" to "Yes", you can return to Audyssey Auto Setup measurement result (value calculated at the start by MultEQ®) even when ...you have changed each setting manually. 10 Remote control operation buttons Move the cursor (Up/Down/Left/Right) Confirm the setting Return to switch the display between the different speakers. 3 Press RETURN. move it away....
Owners Manual - English
Page 15
...liking (vpage 23 "Selecting a listening mode (Surround mode)"). To totally cut off the power, remove the power cord from the power outlet. Set the listening mode according to the playback contents (cinema, music, etc.) or according to previous menu 11 NOTE During power standby, a slight...for a player used for playback. 2 Play the component connected to standby Press POWER OFF. When power is switched to this unit. Make the necessary settings on the main unit. GPower indicator status in standby modeH • Normal standby : Off • When "HDMI Control" is consumed. VOL d ...
...liking (vpage 23 "Selecting a listening mode (Surround mode)"). To totally cut off the power, remove the power cord from the power outlet. Set the listening mode according to the playback contents (cinema, music, etc.) or according to previous menu 11 NOTE During power standby, a slight...for a player used for playback. 2 Play the component connected to standby Press POWER OFF. When power is switched to this unit. Make the necessary settings on the main unit. GPower indicator status in standby modeH • Normal standby : Off • When "HDMI Control" is consumed. VOL d ...

Owners Manual - English
Page 16
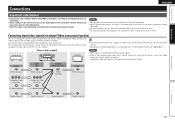
... - - - vpage 20 Radio Audio Connection vpage 18 Playback vpage 22 For speaker connections, see page 4. Audio and video TV Blu-ray Disc player DVD player Set-top box (Satellite tuner or cable TV) Game console Digital camcorder Control dock for information on connecting and playing back the various media and external...
... - - - vpage 20 Radio Audio Connection vpage 18 Playback vpage 22 For speaker connections, see page 4. Audio and video TV Blu-ray Disc player DVD player Set-top box (Satellite tuner or cable TV) Game console Digital camcorder Control dock for information on connecting and playing back the various media and external...
Owners Manual - English
Page 17
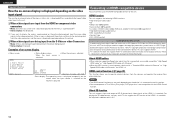
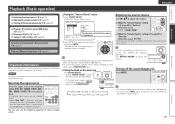
... be necessary depending on the connection method. NOTE • Do not plug in noise. Make connections according to the equipment you are connecting. • Some settings of this unit into Video format. Output Input (IN) Output (MONITOR OUT) Input HDMI connector HDMI connector HDMI connector HDMI connector Component video connectors Component...
... be necessary depending on the connection method. NOTE • Do not plug in noise. Make connections according to the equipment you are connecting. • Some settings of this unit into Video format. Output Input (IN) Output (MONITOR OUT) Input HDMI connector HDMI connector HDMI connector HDMI connector Component video connectors Component...
Owners Manual - English
Page 18
..., For playing the 3D video content, a player, and a TV that support the 3D function of the HDMI 1.4 standards are required in addition to and its settings. • You cannot operate a TV or Blu-ray Disc player / DVD player that does not support HDCP is connected, video and audio are not output...
..., For playing the 3D video content, a player, and a TV that support the 3D function of the HDMI 1.4 standards are required in addition to and its settings. • You cannot operate a TV or Blu-ray Disc player / DVD player that does not support HDCP is connected, video and audio are not output...
Owners Manual - English
Page 19
... connector. For details, see the respective reference pages. Cables used , the HDMI video signals are only the HDMI input signals. Input Assign (vpage 38) Set this unit and TV using an HDMI cable. • When connecting a device that do not match the monitor's resolution. In this case, switch the Blu...audio signals output from the HDMI connectors are converted to DVI signals, allowing connection to "Auto" (vpage 39). HDMI Setup (vpage 48) Make settings for gaming, movie, photograph, and text viewing modes. NOTE • No sound is output when connected to HDMI connections...
... connector. For details, see the respective reference pages. Cables used , the HDMI video signals are only the HDMI input signals. Input Assign (vpage 38) Set this unit and TV using an HDMI cable. • When connecting a device that do not match the monitor's resolution. In this case, switch the Blu...audio signals output from the HDMI connectors are converted to DVI signals, allowing connection to "Auto" (vpage 39). HDMI Setup (vpage 48) Make settings for gaming, movie, photograph, and text viewing modes. NOTE • No sound is output when connected to HDMI connections...
Owners Manual - English
Page 20
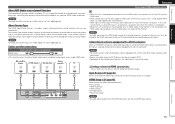
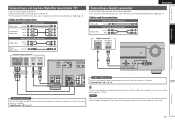
...is not required when a TV compatible with HDMI (vpage 14 "Connecting an HDMI-compatible device"). "Input Assign" (vpage 38) 16 in Set as Necessary Set this to change the digital input connector to use and connect the device. • For video connections, see "Converting input video signals for...Audio cable (White) L L (Red) R R Blu-ray Disc player / DVD player VIDEO VIDEO OUT AUDIO AUDIO OUT LR LR LR in Set as Necessary Set this to change the digital input connector to which the input source is assigned. For details, see "About ARC (Audio return channel) function" ...
...is not required when a TV compatible with HDMI (vpage 14 "Connecting an HDMI-compatible device"). "Input Assign" (vpage 38) 16 in Set as Necessary Set this to change the digital input connector to use and connect the device. • For video connections, see "Converting input video signals for...Audio cable (White) L L (Red) R R Blu-ray Disc player / DVD player VIDEO VIDEO OUT AUDIO AUDIO OUT LR LR LR in Set as Necessary Set this to change the digital input connector to which the input source is assigned. For details, see "About ARC (Audio return channel) function" ...
Owners Manual - English
Page 21
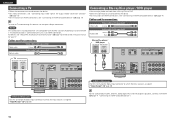
...signal from a digital comcorder. • For instructions on HDMI connections, see "Connecting an HDMI-compatible device" (vpage 14). In this case, set -top box (Satellite tuner/cable TV) • You can watch satellite or cable TV. • Select the connector to use the monitor ...Audio cables (sold separately) (White) L L Audio cable (Red) R R Digital camcorder VIDEO VIDEO OUT AUDIO AUDIO OUT LR LR LR LR LR in Set as the input. In this case, use and connect the device. • For instructions on HDMI connections, see "Connecting an HDMI-compatible device" (vpage...
...signal from a digital comcorder. • For instructions on HDMI connections, see "Connecting an HDMI-compatible device" (vpage 14). In this case, set -top box (Satellite tuner/cable TV) • You can watch satellite or cable TV. • Select the connector to use the monitor ...Audio cables (sold separately) (White) L L Audio cable (Red) R R Digital camcorder VIDEO VIDEO OUT AUDIO AUDIO OUT LR LR LR LR LR in Set as the input. In this case, use and connect the device. • For instructions on HDMI connections, see "Connecting an HDMI-compatible device" (vpage...

Owners Manual - English
Page 22
... tape to fix the antenna in a position where noise is the lowest. To use suspended on a wall Suspend directly on the control dock for iPod settings, refer to the control dock for details. 18 Stand Square hole Projecting part nnUsing the AM loop antenna To use standing alone Use the procedure... on an iPod. • For the control dock for iPod, use ASD-1R, ASD-11R, ASD-3N, ASD3W, ASD-51N and ASD-51W made by DENON (sold separately). • For instructions on the wall without assembling. "Input Assign" (vpage 38) Ground AM outdoor antenna nnAM loop antenna assembly 1 Put the ...
... tape to fix the antenna in a position where noise is the lowest. To use suspended on a wall Suspend directly on the control dock for iPod settings, refer to the control dock for details. 18 Stand Square hole Projecting part nnUsing the AM loop antenna To use standing alone Use the procedure... on an iPod. • For the control dock for iPod, use ASD-1R, ASD-11R, ASD-3N, ASD3W, ASD-51N and ASD-51W made by DENON (sold separately). • For instructions on the wall without assembling. "Input Assign" (vpage 38) Ground AM outdoor antenna nnAM loop antenna assembly 1 Put the ...
Owners Manual - English
Page 23
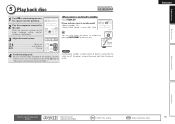
..."Absolute" GAdjustable rangeH 0.0 - 99.0 • The variable range differs according to select the input source, then press ENTER. The input source is set at "Source Delete" (vpage 49). • To turn off the sound temporarily (vpage 19) nn Playing a Blu-ray Disc player/DVD player...mode) (vpage 23) Playback (Advanced operation) (vpage 30) Important information Before starting playback, make the connections between the different components and the settings on the main unit Turn SOURCE SELECT. • Turning SOURCE SELECT switches the input source, as shown below. • If "Tuning Preset...
..."Absolute" GAdjustable rangeH 0.0 - 99.0 • The variable range differs according to select the input source, then press ENTER. The input source is set at "Source Delete" (vpage 49). • To turn off the sound temporarily (vpage 19) nn Playing a Blu-ray Disc player/DVD player...mode) (vpage 23) Playback (Advanced operation) (vpage 30) Important information Before starting playback, make the connections between the different components and the settings on the main unit Turn SOURCE SELECT. • Turning SOURCE SELECT switches the input source, as shown below. • If "Tuning Preset...

Owners Manual - English
Page 24
...of the TV, subwoofer and player. Browse mode Display iPod information on the player (language setting, subtitles setting, etc.) beforehand. Make the necessary settings on the TV screen. • English letters, numbers and certain symbols are displayed as ...shown at right. GWhen using an ASD-1RH GWhen using an ASD-11RH Music iPod Playlists Artists Albums Songs Genres Composers Music Videos [ 1/6 ] [ 1/2 ] GWhen using an ASD-11R, ASD-3N, ASD3W, ASD-51N or ASD-51W DENON...
...of the TV, subwoofer and player. Browse mode Display iPod information on the player (language setting, subtitles setting, etc.) beforehand. Make the necessary settings on the TV screen. • English letters, numbers and certain symbols are displayed as ...shown at right. GWhen using an ASD-1RH GWhen using an ASD-11RH Music iPod Playlists Artists Albums Songs Genres Composers Music Videos [ 1/6 ] [ 1/2 ] GWhen using an ASD-11R, ASD-3N, ASD3W, ASD-51N or ASD-51W DENON...

Owners Manual - English
Page 25
... • iPod playback starts. Simple version Basic version Advanced version ENGLISH iPod operation Operation buttons MENU uio p ENTER Function Amp menu Cursor operation Enter setting SEARCH (Press and release) Page search modez1 SEARCH (Press and hold) Browse / Remote mode switching RETURN 6 7 (Press and hold) 1 8 ...TV screen photos and data stored on an iPod equipped with a slide show Settings" or "Video Settings" must be output, depending on the iPod model, it may not operate. • Note that DENON will accept no responsibility whatsoever for iPod is "Mode 3". • In ...
... • iPod playback starts. Simple version Basic version Advanced version ENGLISH iPod operation Operation buttons MENU uio p ENTER Function Amp menu Cursor operation Enter setting SEARCH (Press and release) Page search modez1 SEARCH (Press and hold) Browse / Remote mode switching RETURN 6 7 (Press and hold) 1 8 ...TV screen photos and data stored on an iPod equipped with a slide show Settings" or "Video Settings" must be output, depending on the iPod model, it may not operate. • Note that DENON will accept no responsibility whatsoever for iPod is "Mode 3". • In ...


