
Owners Manual
Page 4
... Playing a network audio 32 Playing a USB memory device 43 Selecting a listening mode (Surround mode 45 Standard playback 45 DENON original surround playback 47 Stereo playback 47 Direct playback 47 Pure direct playback 47 Advanced version 48 Speaker installation/connection (Other than... Simple version Basic version Advanced version Thank you for purchasing this manual 1 Features 2 Cautions on handling 2 Simple version (Simple setup guide 3 Basic version 12 Connections 13 Important information 13 Connecting an HDMI-compatible device 14 Connecting a TV 16 Connecting a Blu...
... Playing a network audio 32 Playing a USB memory device 43 Selecting a listening mode (Surround mode 45 Standard playback 45 DENON original surround playback 47 Stereo playback 47 Direct playback 47 Pure direct playback 47 Advanced version 48 Speaker installation/connection (Other than... Simple version Basic version Advanced version Thank you for purchasing this manual 1 Features 2 Cautions on handling 2 Simple version (Simple setup guide 3 Basic version 12 Connections 13 Important information 13 Connecting an HDMI-compatible device 14 Connecting a TV 16 Connecting a Blu...

Owners Manual
Page 6
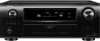
... connector. STEP 5 Check STEP 6 Store Finish 3 n For operation of the connected devices, refer to the user manuals for automatic setup. See page 49 for the installation, connection and setup methods for 5.1-channel speakers. Connect 5.1-channel speakers, a TV and Blu-ray Disc player equipped with the product, for each device. ... the unit, turn off the power to using the correct install method. The "Simple version" describes the installation, connection and setup methods for speakers other than 5.1-channel speakers. Simple version Simple version Simple version (Simple...
... connector. STEP 5 Check STEP 6 Store Finish 3 n For operation of the connected devices, refer to the user manuals for automatic setup. See page 49 for the installation, connection and setup methods for 5.1-channel speakers. Connect 5.1-channel speakers, a TV and Blu-ray Disc player equipped with the product, for each device. ... the unit, turn off the power to using the correct install method. The "Simple version" describes the installation, connection and setup methods for speakers other than 5.1-channel speakers. Simple version Simple version Simple version (Simple...
Owners Manual
Page 7
...the speaker terminal firmly before inserting the banana plug. 4 The "Simple Version" describes the installation, connection and setup methods for speakers other (vpage 112 "Protection Circuit"). • Never touch the speaker terminals while the power supply ...8226; Install the surround speakers in electric shock. • Use speakers with the speaker impedances shown below. See page 49 for the installation, connection and setup methods for 5.1-channel speakers. Doing so could result in a position 2 to 3 ft (60 to 7.1-channel surround playback. ENGLISH 1 Install 2 1...
...the speaker terminal firmly before inserting the banana plug. 4 The "Simple Version" describes the installation, connection and setup methods for speakers other (vpage 112 "Protection Circuit"). • Never touch the speaker terminals while the power supply ...8226; Install the surround speakers in electric shock. • Use speakers with the speaker impedances shown below. See page 49 for the installation, connection and setup methods for 5.1-channel speakers. Doing so could result in a position 2 to 3 ft (60 to 7.1-channel surround playback. ENGLISH 1 Install 2 1...

Owners Manual
Page 8
... for 5.1-channel speakers. 5 See page 49 for the installation, connection and setup methods for enhanced high-quality playback. TV Blu-ray Disc player Basic version Advanced version FL SW Subwoofer with built-in amplifier SL ...
... for 5.1-channel speakers. 5 See page 49 for the installation, connection and setup methods for enhanced high-quality playback. TV Blu-ray Disc player Basic version Advanced version FL SW Subwoofer with built-in amplifier SL ...

Owners Manual
Page 9
..., these sounds. • Cell phones should be played during the measurements will increase in volume. • Operating VOL df during Audyssey Auto setup. ENGLISH 3 Turn on power 1 Power on 2 3 POWER ON The power indicator flashes green and the power turns on the menu...these test signals will cancel the measurements. • Measurement cannot be performed when headphones are connected. 6 This is not in use "Speaker Setup" (vpage 79) on . This is background noise in the path while the measurements are made . Background noise can disrupt the room measurements...
..., these sounds. • Cell phones should be played during the measurements will increase in volume. • Operating VOL df during Audyssey Auto setup. ENGLISH 3 Turn on power 1 Power on 2 3 POWER ON The power indicator flashes green and the power turns on the menu...these test signals will cancel the measurements. • Measurement cannot be performed when headphones are connected. 6 This is not in use "Speaker Setup" (vpage 79) on . This is background noise in the path while the measurements are made . Background noise can disrupt the room measurements...

Owners Manual
Page 10
... may give inaccurate results. 2 Set up the subwoofer n When using the test tone (vpage 81) before Audyssey Auto Setup. Sound receptor Setup microphone 3 Set up the remote control unit n Set up the zone mode ZONE SELECT The "MAIN" indicator lights. Before ... for speakers other than 5.1-channel speakers. Simple version ENGLISH Set up speakers (Audyssey® Auto Setup) About setup microphone placement • Measurements are performed by placing the setup microphone successively at multiple points throughout the listening environment results in the illustration (up to 75 dB...
... may give inaccurate results. 2 Set up the subwoofer n When using the test tone (vpage 81) before Audyssey Auto Setup. Sound receptor Setup microphone 3 Set up the remote control unit n Set up the zone mode ZONE SELECT The "MAIN" indicator lights. Before ... for speakers other than 5.1-channel speakers. Simple version ENGLISH Set up speakers (Audyssey® Auto Setup) About setup microphone placement • Measurements are performed by placing the setup microphone successively at multiple points throughout the listening environment results in the illustration (up to 75 dB...

Owners Manual
Page 11
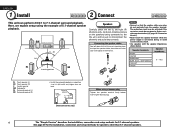
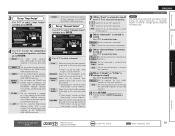
...If unused channels are set with "Channel Select", measuring time can be connected correctly. message is resolved, return and restart "Audyssey Auto Setup". If the problem is displayed. 8 Remote control operation buttons Move the cursor (Up/Down/Left/Right) Confirm the setting Return... is not displayed, the speaker may not be shortened. ENGLISH Set up speakers (Audyssey® Auto Setup) STEP 1 Preparation STEP 2 Speaker Detection STEP 3 Measurement 4 When the setup microphone is connected, the following screen is displayed. • In STEP 2, you will perform measurements ...
...If unused channels are set with "Channel Select", measuring time can be connected correctly. message is resolved, return and restart "Audyssey Auto Setup". If the problem is displayed. 8 Remote control operation buttons Move the cursor (Up/Down/Left/Right) Confirm the setting Return... is not displayed, the speaker may not be shortened. ENGLISH Set up speakers (Audyssey® Auto Setup) STEP 1 Preparation STEP 2 Speaker Detection STEP 3 Measurement 4 When the setup microphone is connected, the following screen is displayed. • In STEP 2, you will perform measurements ...

Owners Manual
Page 12
...; If the measuring results are not to be saved, press RETURN. ui ENTER STEP 6 Store ENGLISH Set up speakers (Audyssey® Auto Setup) Finish 14 15 ENTER Save the measurement results. 16 • Analysis takes several minutes to select "Yes", and then press ENTER. •... optimal equalizer settings. • For details of Dynamic Volume settings, see "Error messages" (vpage 10). is determined. A message "Cancel Auto Setup?" The time required for this unit off, check the speaker connections and repeat the measurement process from the actual connection status, or if "Caution...
...; If the measuring results are not to be saved, press RETURN. ui ENTER STEP 6 Store ENGLISH Set up speakers (Audyssey® Auto Setup) Finish 14 15 ENTER Save the measurement results. 16 • Analysis takes several minutes to select "Yes", and then press ENTER. •... optimal equalizer settings. • For details of Dynamic Volume settings, see "Error messages" (vpage 10). is determined. A message "Cancel Auto Setup?" The time required for this unit off, check the speaker connections and repeat the measurement process from the actual connection status, or if "Caution...
Owners Manual
Page 13
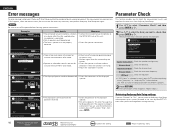
...8226; The front L speaker was not properly detected. Check Check the speaker configuration. Measures • Connect the included setup microphone to the SETUP MIC jack of this unit. • Check the speaker connections. 2 ui ENTER p Measurement results for each setting manually. ... select equalizing curve ("Audyssey" or "Audyssey Flat") to speaker placement, the measurement environment, etc. equalizer characteristics after Audyssey Auto Setup. If you have changed each speaker are sure the connection is selected in the room for accurate measurements to be made. •...
...8226; The front L speaker was not properly detected. Check Check the speaker configuration. Measures • Connect the included setup microphone to the SETUP MIC jack of this unit. • Check the speaker connections. 2 ui ENTER p Measurement results for each setting manually. ... select equalizing curve ("Audyssey" or "Audyssey Flat") to speaker placement, the measurement environment, etc. equalizer characteristics after Audyssey Auto Setup. If you have changed each speaker are sure the connection is selected in the room for accurate measurements to be made. •...

Owners Manual
Page 18
... not compatible with which the input source is compatible. • When this to change the HDMI input connector to HDMI connections Set as necessary. HDMI Setup (vpage 82) Make settings for the HDMI MONITOR OUT 1 connector.
... not compatible with which the input source is compatible. • When this to change the HDMI input connector to HDMI connections Set as necessary. HDMI Setup (vpage 82) Make settings for the HDMI MONITOR OUT 1 connector.

Owners Manual
Page 25
...network with no responsibility whatsoever for the IP address, etc., at type Ethernet cables are made manually, make the settings at "Network Setup" (vpage 84). • With this unit automatically performs the IP address setting and other settings. For connections to the Internet. ...available. A PPPoE-compatible router is not compatible with the network administrator. Contact an ISP or a computer shop for details. • DENON assumes no DHCP function, make the network settings automatically. • When using this unit with the broadband router's DHCP function enabled, ...
...network with no responsibility whatsoever for the IP address, etc., at type Ethernet cables are made manually, make the settings at "Network Setup" (vpage 84). • With this unit automatically performs the IP address setting and other settings. For connections to the Internet. ...available. A PPPoE-compatible router is not compatible with the network administrator. Contact an ISP or a computer shop for details. • DENON assumes no DHCP function, make the network settings automatically. • When using this unit with the broadband router's DHCP function enabled, ...

Owners Manual
Page 31
... and Hawaii. ibiquity.com". Whichever service you choose, there are provided with the satellite tuners. Family friendly packages are also available to follow installation and setup instructions are a variety of programming packages available, including the option of adding "The Best of SIRIUS" programming to your XM tuner or "The Best of...
... and Hawaii. ibiquity.com". Whichever service you choose, there are provided with the satellite tuners. Family friendly packages are also available to follow installation and setup instructions are a variety of programming packages available, including the option of adding "The Best of SIRIUS" programming to your XM tuner or "The Best of...

Owners Manual
Page 52
For the installation, connection and setup methods for Audussey DSX NOTE Sound is compatible with Audyssey DSX™ (vpage 111) and Dolby Pro... height speakers. Simple version Basic version ENGLISH Speaker installation/connection (Other than 5.1-channel) Here we describe the installation, connection and setup methods for speakers other than ear level. When using Dolby Pro Logic gz, install front height speakers. Front height speaker •... z1 Recommended for Dolby Pro Logic gz z2 Recommended for 5.1-channel speakers, see "Simple version (Simple setup guide)" (vpage 3).
For the installation, connection and setup methods for Audussey DSX NOTE Sound is compatible with Audyssey DSX™ (vpage 111) and Dolby Pro... height speakers. Simple version Basic version ENGLISH Speaker installation/connection (Other than 5.1-channel) Here we describe the installation, connection and setup methods for speakers other than ear level. When using Dolby Pro Logic gz, install front height speakers. Front height speaker •... z1 Recommended for Dolby Pro Logic gz z2 Recommended for 5.1-channel speakers, see "Simple version (Simple setup guide)" (vpage 3).

Owners Manual
Page 54
... the speaker's specifications or playback source such as front speakers (A) for multichannel playback and front speakers (B) for 2-channel playback (vpage 81 "Front Speaker Setup"). For surround playback of a multichannel source, if you connect the center speaker, surround speakers and subwoofers, 5.1-channel playback is output from each subwoofer terminal. n For...
... the speaker's specifications or playback source such as front speakers (A) for multichannel playback and front speakers (B) for 2-channel playback (vpage 81 "Front Speaker Setup"). For surround playback of a multichannel source, if you connect the center speaker, surround speakers and subwoofers, 5.1-channel playback is output from each subwoofer terminal. n For...

Owners Manual
Page 55
...impedance and speaker cable connections, see "Selecting a listening mode (Surround mode)" (vpage 45). • If "2ch Direct/Stereo" - Before Auto Setup measurement, the settings shown below can be made . First install and connect the speakers to "Custom", settings for 2-channel playback speakers can be made ...output from the SURR.BACK/AMP ASSIGN speaker terminal of setting up 5.1-channel speakers, see "Simple version", "Set up speakers (Audyssey® Auto Setup)" (vpage 6). "Setting" (vpage 83) is set to this case, set "Set up "Amp Assign"" (vpage 53) to set up speakers...
...impedance and speaker cable connections, see "Selecting a listening mode (Surround mode)" (vpage 45). • If "2ch Direct/Stereo" - Before Auto Setup measurement, the settings shown below can be made . First install and connect the speakers to "Custom", settings for 2-channel playback speakers can be made ...output from the SURR.BACK/AMP ASSIGN speaker terminal of setting up 5.1-channel speakers, see "Simple version", "Set up speakers (Audyssey® Auto Setup)" (vpage 6). "Setting" (vpage 83) is set to this case, set "Set up "Amp Assign"" (vpage 53) to set up speakers...
Owners Manual
Page 56
... (2spkrs) speakers. In this case, go to step 9. • "Surround Back" can be used . Set when you do not change , perform Audyssey Auto Setup again. 9 GWhen "Surround Back" is set when "Amp Assign" is selected in monaural, and to be used . Simple version Basic version 3 Set up speakers ...NOTE After performing Audyssey® Auto Setup, do not want to measure the front height speakers or front wide speakers. 11 RETURN Proceed to be used . In this case, go to ...
... (2spkrs) speakers. In this case, go to step 9. • "Surround Back" can be used . Set when you do not change , perform Audyssey Auto Setup again. 9 GWhen "Surround Back" is set when "Amp Assign" is selected in monaural, and to be used . Simple version Basic version 3 Set up speakers ...NOTE After performing Audyssey® Auto Setup, do not want to measure the front height speakers or front wide speakers. 11 RETURN Proceed to be used . In this case, go to ...

Owners Manual
Page 57
... 82) setting is changed. • There is a change to the connection between the equipment and the HDMI, or an increase in the TV audio output setup operation, you can switch the amp power on the menu is set to "OFF" (vpage 82), this unit input sources through linkage to TV input...
... 82) setting is changed. • There is a change to the connection between the equipment and the HDMI, or an increase in the TV audio output setup operation, you can switch the amp power on the menu is set to "OFF" (vpage 82), this unit input sources through linkage to TV input...

Owners Manual
Page 62
... not intend to the top menu. i Click to return to operate. Displayed when setting "Top Menu Link Setup" to "ON" in your browser. Changes to individual operation screens. (vGExample 5H) u Click when you operate the setup menu. (vGExample 2H) r Click to change to perform individual operations. Simple version Basic version Web control...
... not intend to the top menu. i Click to return to operate. Displayed when setting "Top Menu Link Setup" to "ON" in your browser. Changes to individual operation screens. (vGExample 5H) u Click when you operate the setup menu. (vGExample 2H) r Click to change to perform individual operations. Simple version Basic version Web control...
Owners Manual
Page 63
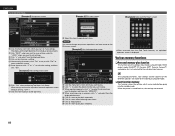
....) last selected for the individual surround modes. W2 When searching using an acronym, click "v" and select from the displayed characters. NOTE You cannot change setup menu operations and zone name on the PDA menu screen. Q1 Click "SAVE" when you want to save settings, and click "LOAD" when you ...Q8 Q8 Select this item to operate each operation screen. (Default setting : "OFF") Q7 Click this item to play . ENGLISH Convenient functions GExample 2H Setup menu screen Q0 Q2 Q3 GExample 4H PDA menu screen GExample 6H Dedicated iPod Touch screen Q1 Q4 Q5 Q0 Click the menu item from...
....) last selected for the individual surround modes. W2 When searching using an acronym, click "v" and select from the displayed characters. NOTE You cannot change setup menu operations and zone name on the PDA menu screen. Q1 Click "SAVE" when you want to save settings, and click "LOAD" when you ...Q8 Q8 Select this item to operate each operation screen. (Default setting : "OFF") Q7 Click this item to play . ENGLISH Convenient functions GExample 2H Setup menu screen Q0 Q2 Q3 GExample 4H PDA menu screen GExample 6H Dedicated iPod Touch screen Q1 Q4 Q5 Q0 Click the menu item from...

Owners Manual
Page 65
... SELECT after pressing ZONE2/3 / REC SELECT on . • When ZONE/DEVICE OFF is also possible to save three settings for ZONE2 and ZONE3 in "Zone Setup" (vpage 86) in ZONE2 or ZONE3 can adjust the tone and volume for ZONE2. ENGLISH Playback 1 ZONE SELECT The remote control unit switches to the...
... SELECT after pressing ZONE2/3 / REC SELECT on . • When ZONE/DEVICE OFF is also possible to save three settings for ZONE2 and ZONE3 in "Zone Setup" (vpage 86) in ZONE2 or ZONE3 can adjust the tone and volume for ZONE2. ENGLISH Playback 1 ZONE SELECT The remote control unit switches to the...


