Literature/Product Sheet
Page 2
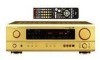
The most frequently used for selected DENON models, along with remote control codes from digital sources such as CD. • Front Panel Inputs The AVR-1603's front panel includes 1 set of remote control codes to operate other manufacturers. Front 80 W + 80 W (8 ohms, 20 Hz - 20 kHz, 0.08 % THD) 110W ... provided for all of DENON's high-grade A/V receiver, the AVR-1603 lets you can easily connect your video camera, game machine or other parameters so that program. ■ Multi-Function Preset Memory Remote Controller The supplied system remote controller features a large ...
The most frequently used for selected DENON models, along with remote control codes from digital sources such as CD. • Front Panel Inputs The AVR-1603's front panel includes 1 set of remote control codes to operate other manufacturers. Front 80 W + 80 W (8 ohms, 20 Hz - 20 kHz, 0.08 % THD) 110W ... provided for all of DENON's high-grade A/V receiver, the AVR-1603 lets you can easily connect your video camera, game machine or other parameters so that program. ■ Multi-Function Preset Memory Remote Controller The supplied system remote controller features a large ...
Owners Manual
Page 3
...set automatically memorizes the surround mode, channel volume, surround parameters, etc., for choosing the DENON A/V Surround receiver. DTS (Digital Theater Systems) decoder DTS provides up to occur particularly when using outdoor ... you review the contents of source and the contents, so you leave home for DENON remote controllable AV components as well as possible from the tuner or TV. • Set the... Plus function Personal Memory Plus is equipped with a pre-memory function. AUX terminal The AVR-1603's front panel is an advanced version of this First 5 m Setting up during this...
...set automatically memorizes the surround mode, channel volume, surround parameters, etc., for choosing the DENON A/V Surround receiver. DTS (Digital Theater Systems) decoder DTS provides up to occur particularly when using outdoor ... you review the contents of source and the contents, so you leave home for DENON remote controllable AV components as well as possible from the tuner or TV. • Set the... Plus function Personal Memory Plus is equipped with a pre-memory function. AUX terminal The AVR-1603's front panel is an advanced version of this First 5 m Setting up during this...
Owners Manual
Page 4
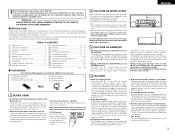
... 9, 14, 18) RETURN button 14) SPEAKER select button ........(15) DIMMER button 17) NOTE: • The shaded buttons do not function with the AVR-1603. (Nothing happens when they are pressed.) AUX terminals 3, 7) !3 SURROUND MODE button 16, 22) !4 SURROUND PARAMETER button 19, 22) !5 SELECT knob...Panel • For details on the functions of these parts, refer to the pages given in parentheses ( ). #0 @9 @8 @7 @6 @5 @4 @3 @2 @1 @0 !9 !8 !7 Remote control unit • For details on the functions of these parts, refer to the pages given in parentheses ( ). LED (indicator 13, 15...
... 9, 14, 18) RETURN button 14) SPEAKER select button ........(15) DIMMER button 17) NOTE: • The shaded buttons do not function with the AVR-1603. (Nothing happens when they are pressed.) AUX terminals 3, 7) !3 SURROUND MODE button 16, 22) !4 SURROUND PARAMETER button 19, 22) !5 SELECT knob...Panel • For details on the functions of these parts, refer to the pages given in parentheses ( ). #0 @9 @8 @7 @6 @5 @4 @3 @2 @1 @0 !9 !8 !7 Remote control unit • For details on the functions of these parts, refer to the pages given in parentheses ( ). LED (indicator 13, 15...
Owners Manual
Page 5
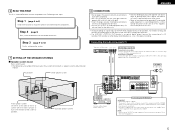
... of the screen as flush with power cords or placing them for digital recording. ENGLISH 6 READ THIS FIRST This A / V surround Receiver must be generated if a connected audio equipment is used independently without turning the power of this unit's power is at the sides of...power of signals input to the AVR-1603 in the power cord until all connections have been completed. • Be sure to the AVR-1603's analog input terminals. • The AVR-1603's OPTICAL OUT terminal is above 100 W. Step 2 (page 9) Next, insert the batteries into the remote control unit. 8 CONNECTIONS •...
... of the screen as flush with power cords or placing them for digital recording. ENGLISH 6 READ THIS FIRST This A / V surround Receiver must be generated if a connected audio equipment is used independently without turning the power of this unit's power is at the sides of...power of signals input to the AVR-1603 in the power cord until all connections have been completed. • Be sure to the AVR-1603's analog input terminals. • The AVR-1603's OPTICAL OUT terminal is above 100 W. Step 2 (page 9) Next, insert the batteries into the remote control unit. 8 CONNECTIONS •...
Owners Manual
Page 9
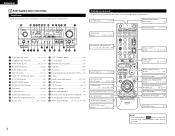
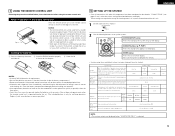
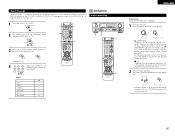
...of approximately 7 meters, but this distance will shorten or operation will become difficult if there are required to set up the listening room's AV system centered around the this unit. 1 Set the slide switch to "AUDIO". 2 Use the following buttons to the listening position. ...switch the display. Surround Sp. Also use this to display the system setup on the diagram. e Close the lid. ENGLISH 9 USING THE REMOTE CONTROL UNIT Following the procedure outlined below, insert the batteries before installing new batteries. • Have replacement batteries on the display. Small Small ...
...of approximately 7 meters, but this distance will shorten or operation will become difficult if there are required to set up the listening room's AV system centered around the this unit. 1 Set the slide switch to "AUDIO". 2 Use the following buttons to the listening position. ...switch the display. Surround Sp. Also use this to display the system setup on the diagram. e Close the lid. ENGLISH 9 USING THE REMOTE CONTROL UNIT Following the procedure outlined below, insert the batteries before installing new batteries. • Have replacement batteries on the display. Small Small ...
Owners Manual
Page 10
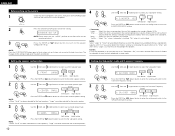
... to the bass reproduction capacity at a level that point are correct, then press the POWER operation switch on the main unit to turn on the remote control unit. ENGLISH Before setting up the system 1 Check that cannot reproduce low sounds of below 80 Hz with sufficient volume. Press the ENTER or...
... to the bass reproduction capacity at a level that point are correct, then press the POWER operation switch on the main unit to turn on the remote control unit. ENGLISH Before setting up the system 1 Check that cannot reproduce low sounds of below 80 Hz with sufficient volume. Press the ENTER or...
Owners Manual
Page 13
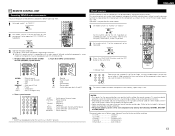
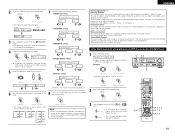
ENGLISH 11 REMOTE CONTROL UNIT Operating DENON audio components • Turn on the power of the different components before operating them. 1 Set mode switch 1 to "AUDIO". 2 Set mode switch 2 to the position for the component to be operated. (CD, CDR/MD or Tape deck) 3 1 2 3 Preset memory DENON and other manufacturers without using the learning...
ENGLISH 11 REMOTE CONTROL UNIT Operating DENON audio components • Turn on the power of the different components before operating them. 1 Set mode switch 1 to "AUDIO". 2 Set mode switch 2 to the position for the component to be operated. (CD, CDR/MD or Tape deck) 3 1 2 3 Preset memory DENON and other manufacturers without using the learning...
Owners Manual
Page 14
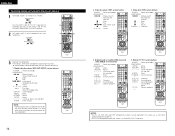
... : Setup D, H, F, G : Cursor up /down , left and right ENTER : Enter setting NOTE: • Some manufacturers use different names for the DVD remote control buttons, so also refer to the component's operating instructions. Video deck (VCR) system buttons POWER : Power on /standby (ON/SOURCE) 6,7 : Manual search ... is at DVD/VDP, VCR, TV position. ENGLISH Operating component stored in the same way as for Denon audio components (page 13). • The TV can be operated with this remote control unit. 1. Digital video disc player (DVD, DVD SETUP) system buttons POWER : Power on /...
... : Setup D, H, F, G : Cursor up /down , left and right ENTER : Enter setting NOTE: • Some manufacturers use different names for the DVD remote control buttons, so also refer to the component's operating instructions. Video deck (VCR) system buttons POWER : Power on /standby (ON/SOURCE) 6,7 : Manual search ... is at DVD/VDP, VCR, TV position. ENGLISH Operating component stored in the same way as for Denon audio components (page 13). • The TV can be operated with this remote control unit. 1. Digital video disc player (DVD, DVD SETUP) system buttons POWER : Power on /...
Owners Manual
Page 15
... 5 6 (See Table 1) 7 8 9 0 2 Table 1 No. In this position to operate the PLAY, STOP, MANUAL SEARCH and AUTO SEARCH buttons on the remote control unit. 15 CD 1 TAPE 2 CDR/MD 3 DVD/VDP 4 VCR 5 No setting 0 ENGLISH Preparations: Check that prevents noise when the power switch is off ...from the remote control unit. 2 Select the front speakers. Set the power operation switch to this position, the power cannot be turned on and off from ...
... 5 6 (See Table 1) 7 8 9 0 2 Table 1 No. In this position to operate the PLAY, STOP, MANUAL SEARCH and AUTO SEARCH buttons on the remote control unit. 15 CD 1 TAPE 2 CDR/MD 3 DVD/VDP 4 VCR 5 No setting 0 ENGLISH Preparations: Check that prevents noise when the power switch is off ...from the remote control unit. 2 Select the front speakers. Set the power operation switch to this position, the power cannot be turned on and off from ...
Owners Manual
Page 16
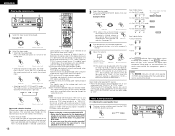
... (exclusive analog audio signal playback mode) The signals input to the analog input jacks are being input. Example: Stereo (Main unit) (Remote control unit) To select the surround mode while adjusting the surround parameters, channel volume or tone control, press the surround mode button then ... this case the maximum volume is selected automatically upon playback. Note that noise will be played. AUTO PCM DTS (Main unit) (Remote control unit) Input mode selection function Different input modes can be generated when you preform the operation to stop playback of these lights...
... (exclusive analog audio signal playback mode) The signals input to the analog input jacks are being input. Example: Stereo (Main unit) (Remote control unit) To select the surround mode while adjusting the surround parameters, channel volume or tone control, press the surround mode button then ... this case the maximum volume is selected automatically upon playback. Note that noise will be played. AUTO PCM DTS (Main unit) (Remote control unit) Input mode selection function Different input modes can be generated when you preform the operation to stop playback of these lights...
Owners Manual
Page 17
... any input source. In addition, signals cannot be output from channels not connected to EXT. Press the MUTING button. Press the MUTING button again. (Remote control unit) 1 Muting will also be played. IN) setting, press the INPUT MODE (AUTO, PCM, DTS) or ANALOG button to switch to... the desired input mode. (See page 16.) (Main unit) (Remote control unit) • When the input mode is automatically turned off when headphones are connected. Playback using the VIDEO SELECT button. • Switch the ...
... any input source. In addition, signals cannot be output from channels not connected to EXT. Press the MUTING button. Press the MUTING button again. (Remote control unit) 1 Muting will also be played. IN) setting, press the INPUT MODE (AUTO, PCM, DTS) or ANALOG button to switch to... the desired input mode. (See page 16.) (Main unit) (Remote control unit) • When the input mode is automatically turned off when headphones are connected. Playback using the VIDEO SELECT button. • Switch the ...
Owners Manual
Page 18
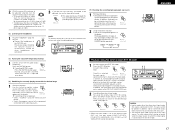
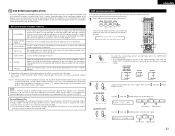
... Dolby Surround Pro Logic II mode. 4, 6 5, 7 SW channel level can be turned off by pressing the CINEMA or MUSIC button on the main unit. (Remote control unit) 21 2 1 2 Default setting of channel level is 0 dB. If a total of each speakers. FL CNTR FR SR SL SW NOTE: Please...slide switch on the tape or video deck. Test tones are output simultaneously to adjust the playback level from -12 dB. Example: (Main unit) (Remote control unit) 8 5, 7 The Dolby Surround Pro Logic II Cinema or Music mode can be adjusted within the range of the source selected with the...
... Dolby Surround Pro Logic II mode. 4, 6 5, 7 SW channel level can be turned off by pressing the CINEMA or MUSIC button on the main unit. (Remote control unit) 21 2 1 2 Default setting of channel level is 0 dB. If a total of each speakers. FL CNTR FR SR SL SW NOTE: Please...slide switch on the tape or video deck. Test tones are output simultaneously to adjust the playback level from -12 dB. Example: (Main unit) (Remote control unit) 8 5, 7 The Dolby Surround Pro Logic II Cinema or Music mode can be adjusted within the range of the source selected with the...
Owners Manual
Page 19
... the source. 0 3 6 or or • CENTER WIDTH setting CENTER WIDTH O 0 4 7 or or • DEFAULT setting DEFAULT Y/N (Main unit) (Remote control unit) MODE emulation MODE cinema MODE music or or YES Y/N NO or or Select "Yes" to reset to the factory defaults. 6 8 Set the surround...Press the ENTER button to varying degrees. Center Width Control: This control adjust the center image so it may be completed. (Main unit) (Remote control unit) 3 Play a program source with digital input) 1 Select the input source. The control can be set to 6. MODE EMULATION ...
... the source. 0 3 6 or or • CENTER WIDTH setting CENTER WIDTH O 0 4 7 or or • DEFAULT setting DEFAULT Y/N (Main unit) (Remote control unit) MODE emulation MODE cinema MODE music or or YES Y/N NO or or Select "Yes" to reset to the factory defaults. 6 8 Set the surround...Press the ENTER button to varying degrees. Center Width Control: This control adjust the center image so it may be completed. (Main unit) (Remote control unit) 3 Play a program source with digital input) 1 Select the input source. The control can be set to 6. MODE EMULATION ...
Owners Manual
Page 20
... recommended that the LFE LEVEL be set to set the D. ENGLISH 4 (Remote control unit) 5 (Remote control unit) (Remote control unit) 6 (Remote control unit) (Remote control unit) 7 (Remote control unit) (Remote control unit) 8 (Remote control unit) (Remote control unit) 9 Set the surround parameter according to 0 dB 2. First,...EQ. Press the SURROUND PARAMETER or default setting. (down ) button to switch to 0 dB for correct DTS playback. (Remote control unit) 20 Surround parameters w CINEMA EQ. (Cinema Equalizer): The Cinema EQ function gently decreases the level of 1 dB...
... recommended that the LFE LEVEL be set to set the D. ENGLISH 4 (Remote control unit) 5 (Remote control unit) (Remote control unit) 6 (Remote control unit) (Remote control unit) 7 (Remote control unit) (Remote control unit) 8 (Remote control unit) (Remote control unit) 9 Set the surround parameter according to 0 dB 2. First,...EQ. Press the SURROUND PARAMETER or default setting. (down ) button to switch to 0 dB for correct DTS playback. (Remote control unit) 20 Surround parameters w CINEMA EQ. (Cinema Equalizer): The Cinema EQ function gently decreases the level of 1 dB...
Owners Manual
Page 21
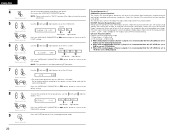
...different sources. If you want to adjust, then use the buttons to set it was used are memorized for each surround mode. (Remote control unit) The surround mode switches in the following order each time the DSP SIMULATION button is pressed: MONO MOVIE ROCK ARENA MATRIX... VIDEO GAME JAZZ CLUB 4 2 3 3 2 (Remote control unit) 3 To enter the surround parameter setting mode, press the SURROUND PARAMETER button. • The surround parameter switches in stereo. When the input...
...different sources. If you want to adjust, then use the buttons to set it was used are memorized for each surround mode. (Remote control unit) The surround mode switches in the following order each time the DSP SIMULATION button is pressed: MONO MOVIE ROCK ARENA MATRIX... VIDEO GAME JAZZ CLUB 4 2 3 3 2 (Remote control unit) 3 To enter the surround parameter setting mode, press the SURROUND PARAMETER button. • The surround parameter switches in stereo. When the input...
Owners Manual
Page 22
COMP. (Remote control unit) (5) LFE (Remote control unit) (6) DEFAULT (Remote control unit) 4 (Remote control unit) Use the (left) and (right) buttons to set the delay time. (Initial) DELAY 30ms 0ms 30ms 110ms (left) button (right) button Use the (... LFE level. (Initial) 0dB -10dB 0dB (left ) and LFE (right) buttons to 15. "small" recreates a small sound field, "large" a large sound field. ENGLISH (3) DELAY TIME (Remote control unit) (4) D. COMP. (Initial) D.COMP.
COMP. (Remote control unit) (5) LFE (Remote control unit) (6) DEFAULT (Remote control unit) 4 (Remote control unit) Use the (left) and (right) buttons to set the delay time. (Initial) DELAY 30ms 0ms 30ms 110ms (left) button (right) button Use the (... LFE level. (Initial) 0dB -10dB 0dB (left ) and LFE (right) buttons to 15. "small" recreates a small sound field, "large" a large sound field. ENGLISH (3) DELAY TIME (Remote control unit) (4) D. COMP. (Initial) D.COMP.
Owners Manual
Page 24
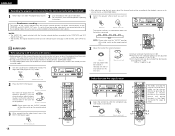
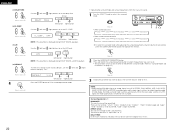
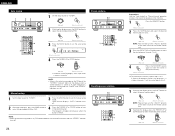
...FM band, the "STEREO" indicator lights on the display when a stereo broadcast is tuned in . Lit (Remote control unit) 4 Press the TUNING UP or DOWN button. 3 1, 4 2 (Main unit) (Remote control unit) • Automatic searching begins, then stops when a station is held in the desired station. Recalling... unit) 4 Press the MEMORY button again to 4. At open frequencies, the noise is set, FM stereo broadcasts are received in the preset memory. (Remote control unit) To preset other channels, repeat steps 1 to store the station in monaural and the "STEREO" indicator turns off....
...FM band, the "STEREO" indicator lights on the display when a stereo broadcast is tuned in . Lit (Remote control unit) 4 Press the TUNING UP or DOWN button. 3 1, 4 2 (Main unit) (Remote control unit) • Automatic searching begins, then stops when a station is held in the desired station. Recalling... unit) 4 Press the MEMORY button again to 4. At open frequencies, the noise is set, FM stereo broadcasts are received in the preset memory. (Remote control unit) To preset other channels, repeat steps 1 to store the station in monaural and the "STEREO" indicator turns off....

Owners Manual
Page 25
.... 1, 2 2 3 Check that the entire display is also equipped with an interval of about 1 second, and release your fingers from the standby mode without using the remote control unit • Press the power switch on the main unit while pressing the INPUT MODE button on the main unit's panel to the default...
.... 1, 2 2 3 Check that the entire display is also equipped with an interval of about 1 second, and release your fingers from the standby mode without using the remote control unit • Press the power switch on the main unit while pressing the INPUT MODE button on the main unit's panel to the default...
Owners Manual
Page 27
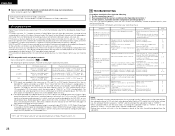
...input jacks to the speakers. Are the connections correct ? 2. Have you operated the receiver according to the CD, records, tapes, and FM broadcasts, etc. Should the problem...-circuited. • Block the ventilation holes of the front channel being input. Recent DENON DVD player models feature DTScompatible digital output - DISPLAY not displayed and the power indicator ... 3, 8 3, 8 8 5 ~ 8 8 9 9 9 - 9 Remote control unit. With LDs and DVDs, there is a multi-channel digital signal format developed by the AVR-1603, or may be sure to switch the input mode to "AUTO" or "...
...input jacks to the speakers. Are the connections correct ? 2. Have you operated the receiver according to the CD, records, tapes, and FM broadcasts, etc. Should the problem...-circuited. • Block the ventilation holes of the front channel being input. Recent DENON DVD player models feature DTScompatible digital output - DISPLAY not displayed and the power indicator ... 3, 8 3, 8 8 5 ~ 8 8 9 9 9 - 9 Remote control unit. With LDs and DVDs, there is a multi-channel digital signal format developed by the AVR-1603, or may be sure to switch the input mode to "AUTO" or "...
Owners Manual
Page 28
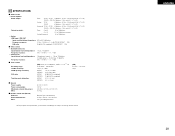
... Y (brightness) signal - 1 Vp-p, 75 Ω/ohms C (color) signal - 0.286 Vp-p, 75 Ω/ohms 5 Hz ~ 10 MHz - +1, -3 dB 2 Tuner section Receiving range: Usable sensitivity: 50 dB quieting sensitivity: S/N ratio: Total harmonic distortion: [FM] (note: µV at 75 Ω/ohms, 0 dBf = 1 x 10-15 W) 87.50...General Power supply: Power consumption: Maximum external dimensions: Mass: AC 230 V, 50 Hz 210 W 434 (W) x 147 (H) x 417 (D) mm 10.4 kg 2 Remote control unit (RC-920) Batteries: External dimensions: Mass: R6P/AA Type (two batteries) 55 (W) x 225 (H) x 34.5 (D) mm 165 g (including ...
... Y (brightness) signal - 1 Vp-p, 75 Ω/ohms C (color) signal - 0.286 Vp-p, 75 Ω/ohms 5 Hz ~ 10 MHz - +1, -3 dB 2 Tuner section Receiving range: Usable sensitivity: 50 dB quieting sensitivity: S/N ratio: Total harmonic distortion: [FM] (note: µV at 75 Ω/ohms, 0 dBf = 1 x 10-15 W) 87.50...General Power supply: Power consumption: Maximum external dimensions: Mass: AC 230 V, 50 Hz 210 W 434 (W) x 147 (H) x 417 (D) mm 10.4 kg 2 Remote control unit (RC-920) Batteries: External dimensions: Mass: R6P/AA Type (two batteries) 55 (W) x 225 (H) x 34.5 (D) mm 165 g (including ...


