Literature/Product Sheet
Page 2
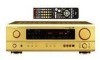
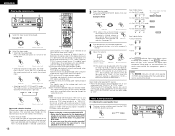
...; High-grade Speaker Terminals (for speakers A): Large binding post speaker terminals has been provided for all of DENON's high-grade A/V receiver, the AVR-1603 lets you adjust delay times and other components in Personal Memory Plus so constant readjustments are not required. &#... CDR/TAPE, V.AUX(FRONT) 6 Analog EXT. NEW MODEL I N F O R M AT I O N AVR-1603 ■ Versatile Input & Output Terminals • Digital Optical Output The AVR-1603 provides 1 digital optical output terminal where you can connect a CD recorder or other digital recording device to make via a dialog format on the...
...; High-grade Speaker Terminals (for speakers A): Large binding post speaker terminals has been provided for all of DENON's high-grade A/V receiver, the AVR-1603 lets you adjust delay times and other components in Personal Memory Plus so constant readjustments are not required. &#... CDR/TAPE, V.AUX(FRONT) 6 Analog EXT. NEW MODEL I N F O R M AT I O N AVR-1603 ■ Versatile Input & Output Terminals • Digital Optical Output The AVR-1603 provides 1 digital optical output terminal where you can connect a CD recorder or other digital recording device to make via a dialog format on the...
Owners Manual
Page 5
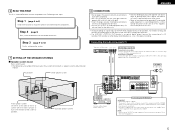
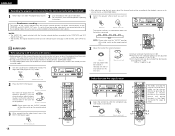
...RLRL Connecting a tape deck Connections for recording: Connect the tape deck's recording input jacks (LINE IN or REC) to the AVR-1603's analog input terminals. • The AVR-1603's OPTICAL OUT terminal is switched between on . Step 2 (page 9) Next, insert the batteries into the remote control unit. 8 ...Noise or humming may be setup before use the AC OUTLET for audio equipment. ENGLISH 6 READ THIS FIRST This A / V surround Receiver must be generated if a connected audio equipment is used independently without turning the power of the screen as possible. Do not use them...
...RLRL Connecting a tape deck Connections for recording: Connect the tape deck's recording input jacks (LINE IN or REC) to the AVR-1603's analog input terminals. • The AVR-1603's OPTICAL OUT terminal is switched between on . Step 2 (page 9) Next, insert the batteries into the remote control unit. 8 ...Noise or humming may be setup before use the AC OUTLET for audio equipment. ENGLISH 6 READ THIS FIRST This A / V surround Receiver must be generated if a connected audio equipment is used independently without turning the power of the screen as possible. Do not use them...

Owners Manual
Page 6
Refer to page 12 for instructions on setting this unit's CD jacks using pin plug cords. AUDIO VIDEO DIGITAL OUT OUT R L OUT OPTICAL DVD player or video disc player (VDP) B Connecting a DVD player or a video disc player VDP • Connect the DVD player's (video disc player's) video ... input/output jacks AUDIO OUT AUDIO IN Connecting the video equipments TV or DBS tuner Connecting a TV/DBS tuner AUDIO VIDEO DIGITAL B OUT OUT R L OUT OPTICAL RL TV/DBS • Connect the TV's or DBS tuner's video output jack (VIDEO OUTPUT) to the VIDEO (yellow) TV/DBS IN jack using a ...
Refer to page 12 for instructions on setting this unit's CD jacks using pin plug cords. AUDIO VIDEO DIGITAL OUT OUT R L OUT OPTICAL DVD player or video disc player (VDP) B Connecting a DVD player or a video disc player VDP • Connect the DVD player's (video disc player's) video ... input/output jacks AUDIO OUT AUDIO IN Connecting the video equipments TV or DBS tuner Connecting a TV/DBS tuner AUDIO VIDEO DIGITAL B OUT OUT R L OUT OPTICAL RL TV/DBS • Connect the TV's or DBS tuner's video output jack (VIDEO OUTPUT) to the VIDEO (yellow) TV/DBS IN jack using a ...

Owners Manual
Page 7
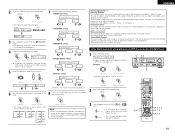
Video game RL OUTPUT OPTICAL VIDEO OUT RL Connecting a Video game equipment • Connect the Video game equipment's output jacks to the equipment's instruction manuals. AUX terminal is covered with S-...
Video game RL OUTPUT OPTICAL VIDEO OUT RL Connecting a Video game equipment • Connect the Video game equipment's output jacks to the equipment's instruction manuals. AUX terminal is covered with S-...
Owners Manual
Page 9
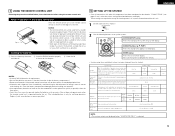
... described below on the diagram at the left. Front Sp. Digital Inputs Input source Auto Surround Auto surround mode function setting. COAXIAL CD OPTICAL-1 OPTICAL-2 DVD/VDP TV/DBS Auto Surround Mode = ON Ext. Clean the battery compartment thoroughly before using the remote control unit. ENTER button... compartment.) • Remove the batteries if the remote control transmitter will become difficult if there are required to set up the listening room's AV system centered around the this unit. 1 Set the slide switch to "AUDIO". 2 Use the following buttons to set up the system: ...
... described below on the diagram at the left. Front Sp. Digital Inputs Input source Auto Surround Auto surround mode function setting. COAXIAL CD OPTICAL-1 OPTICAL-2 DVD/VDP TV/DBS Auto Surround Mode = ON Ext. Clean the battery compartment thoroughly before using the remote control unit. ENTER button... compartment.) • Remove the batteries if the remote control transmitter will become difficult if there are required to set up the listening room's AV system centered around the this unit. 1 Set the slide switch to "AUDIO". 2 Use the following buttons to set up the system: ...

Owners Manual
Page 12
...) OFF ON 13 AUTOSURR. This completes the system setup operations. ON Press the ENTER or (left) button (right) button (down ) button to switch the OPTICAL input 2 (OPT 2) 3 Use the (left) and (right) buttons to assign the input function connected to switch the Ext. Press the ENTER or setting.... (down ) button to the OPTICAL input 2 (OPT 2) terminal. (Initial) 12 OPT2 TV CD AUX DVD TV VCR CDR OFF (left) button (right) button • Select "OFF" if...
...) OFF ON 13 AUTOSURR. This completes the system setup operations. ON Press the ENTER or (left) button (right) button (down ) button to switch the OPTICAL input 2 (OPT 2) 3 Use the (left) and (right) buttons to assign the input function connected to switch the Ext. Press the ENTER or setting.... (down ) button to the OPTICAL input 2 (OPT 2) terminal. (Initial) 12 OPT2 TV CD AUX DVD TV VCR CDR OFF (left) button (right) button • Select "OFF" if...
Owners Manual
Page 16
... the surround circuitry. ENGLISH Playing the input source 1 2 5 3 1 3 5 1 Select the input source to be sure to connect the source component to the digital input jacks (OPTICAL/COAXIAL) and set the input mode to "DTS". This mode can be adjusted up to the external decoder input jacks are decoded and played. The...
... the surround circuitry. ENGLISH Playing the input source 1 2 5 3 1 3 5 1 Select the input source to be sure to connect the source component to the digital input jacks (OPTICAL/COAXIAL) and set the input mode to "DTS". This mode can be adjusted up to the external decoder input jacks are decoded and played. The...
Owners Manual
Page 18
... the CDR/TAPE and VCR AUDIO OUT jacks. • The DIGITAL IN's signal selected with the function selector button are output to the DIGITAL OUT (OPTICAL) jack. 13 SURROUND Before playing with the surround function • Before playing with the function selector button are connected and set to play is pressed...
... the CDR/TAPE and VCR AUDIO OUT jacks. • The DIGITAL IN's signal selected with the function selector button are output to the DIGITAL OUT (OPTICAL) jack. 13 SURROUND Before playing with the surround function • Before playing with the function selector button are connected and set to play is pressed...
Owners Manual
Page 19
... EQ DEFAULT MODE MUSIC PANORAMA DIMENSION CENTER WIDTH DEFAULT (Remote control unit) NOTE: • When making parameter settings, the display will return to digital (COAXIAL/ OPTICAL) (see page 12). Display MODE cinema (Main unit) (Remote control unit) To perform this operation from all programs encoded in case the source contents is...
... EQ DEFAULT MODE MUSIC PANORAMA DIMENSION CENTER WIDTH DEFAULT (Remote control unit) NOTE: • When making parameter settings, the display will return to digital (COAXIAL/ OPTICAL) (see page 12). Display MODE cinema (Main unit) (Remote control unit) To perform this operation from all programs encoded in case the source contents is...

Owners Manual
Page 26
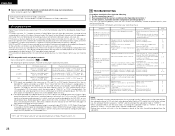
...stream" and "(convert to) PCM". Media Dolby Digital output jacks Playback method (reference page) LD (VDP) DVD Coaxial Dolby Digital RF output jack 1 Optical or coaxial digital output (same as for PCM) 2 Set the input mode to "AUTO". (Page 16) Set the input mode to "AUTO". (... containing bass frequencies of speaker settings for additional deep bass sound effects (the Low Frequency Effects - The signals can be played on the AVR-1603, switch the DVD player's output mode to 20 kHz or greater). In addition, the surround channels were monaural (the surround left and right...
...stream" and "(convert to) PCM". Media Dolby Digital output jacks Playback method (reference page) LD (VDP) DVD Coaxial Dolby Digital RF output jack 1 Optical or coaxial digital output (same as for PCM) 2 Set the input mode to "AUTO". (Page 16) Set the input mode to "AUTO". (... containing bass frequencies of speaker settings for additional deep bass sound effects (the Low Frequency Effects - The signals can be played on the AVR-1603, switch the DVD player's output mode to 20 kHz or greater). In addition, the surround channels were monaural (the surround left and right...
Owners Manual
Page 27
... (only when playing Dolby Digital or DTS signals) for an extra disc; Recent DENON DVD player models feature DTScompatible digital output - Are the connections correct ? 2. Common...Optical or coaxial digital output (same as for PCM) 2 Set the input mode to "AUTO" or "DTS" (page 16). Never set . • The unit is required to "AUTO" or "DTS" (page 16). 1 DTS signals are recorded in the same way on the AVR-1603... possibly cause damage to cool it well to the speakers. Have you operated the receiver according to "SMALL" in the System setup "Speaker Configuration" settings. Should the...
... (only when playing Dolby Digital or DTS signals) for an extra disc; Recent DENON DVD player models feature DTScompatible digital output - Are the connections correct ? 2. Common...Optical or coaxial digital output (same as for PCM) 2 Set the input mode to "AUTO" or "DTS" (page 16). Never set . • The unit is required to "AUTO" or "DTS" (page 16). 1 DTS signals are recorded in the same way on the AVR-1603... possibly cause damage to cool it well to the speakers. Have you operated the receiver according to "SMALL" in the System setup "Speaker Configuration" settings. Should the...


