Literature/Product Sheet
Page 2
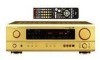
...recording device to operate other components in your home theater system, including codes for selected DENON models, along with remote control codes from digital sources such as CD. • Front Panel Inputs The AVR-1603's front panel includes 1 set of video audio and digital optical input terminals where ...are then stored, for each program source, so that you do not need to select the mode again for all of DENON's high-grade A/V receiver, the AVR-1603 lets you can easily connect your own home theater and enhance operating ease. SUBWOOFER 2 Analog REC OUT Terminals ...... The ...
...recording device to operate other components in your home theater system, including codes for selected DENON models, along with remote control codes from digital sources such as CD. • Front Panel Inputs The AVR-1603's front panel includes 1 set of video audio and digital optical input terminals where ...are then stored, for each program source, so that you do not need to select the mode again for all of DENON's high-grade A/V receiver, the AVR-1603 lets you can easily connect your own home theater and enhance operating ease. SUBWOOFER 2 Analog REC OUT Terminals ...... The ...
Owners Manual
Page 3
... and operation that offers improvements over conventional Dolby Pro Logic. AUX terminal The AVR-1603's front panel is connected to the input jacks. For heat dispersal, leave ... Personal Memory Plus function Personal Memory Plus is a new format for choosing the DENON A/V Surround receiver. EXT. ENGLISH 2 We greatly appreciate your favorite music sources. PLEASE RECORD UNIT... after the power operation switch is turned on some AC line voltages. The remote control command codes for DENON remote controllable AV components as well as the range of the separate input sources. 6. "SERIAL...
... and operation that offers improvements over conventional Dolby Pro Logic. AUX terminal The AVR-1603's front panel is connected to the input jacks. For heat dispersal, leave ... Personal Memory Plus function Personal Memory Plus is a new format for choosing the DENON A/V Surround receiver. EXT. ENGLISH 2 We greatly appreciate your favorite music sources. PLEASE RECORD UNIT... after the power operation switch is turned on some AC line voltages. The remote control command codes for DENON remote controllable AV components as well as the range of the separate input sources. 6. "SERIAL...
Owners Manual
Page 4
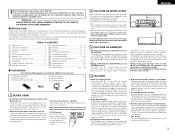
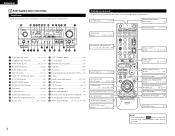
...) NOTE: • The shaded buttons do not function with the AVR-1603. (Nothing happens when they are pressed.) ENGLISH 5 PART NAMES AND FUNCTIONS Front Panel • For details on the functions of these parts, refer to the pages given in parentheses ( ). #0 @9 @8 @7 @6 @5 @4 @3 @2 @1 @0 !9 !8 !7 Remote control unit • For details on the functions of these parts, refer...
...) NOTE: • The shaded buttons do not function with the AVR-1603. (Nothing happens when they are pressed.) ENGLISH 5 PART NAMES AND FUNCTIONS Front Panel • For details on the functions of these parts, refer to the pages given in parentheses ( ). #0 @9 @8 @7 @6 @5 @4 @3 @2 @1 @0 !9 !8 !7 Remote control unit • For details on the functions of these parts, refer...
Owners Manual
Page 5
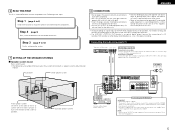
...record in analog, also connect the analog signals of the player to the AVR-1603's analog input terminals. • The AVR-1603's OPTICAL OUT terminal is an optical digital output terminal for hair driers, ...the AC OUTLET for audio equipment only. Step 2 (page 9) Next, insert the batteries into the remote control unit. 8 CONNECTIONS • Do not plug in the generation of noise. • Use the ... on and standby from these steps. ENGLISH 6 READ THIS FIRST This A / V surround Receiver must be generated if a connected audio equipment is used independently without turning the power of this...
...record in analog, also connect the analog signals of the player to the AVR-1603's analog input terminals. • The AVR-1603's OPTICAL OUT terminal is an optical digital output terminal for hair driers, ...the AC OUTLET for audio equipment only. Step 2 (page 9) Next, insert the batteries into the remote control unit. 8 CONNECTIONS • Do not plug in the generation of noise. • Use the ... on and standby from these steps. ENGLISH 6 READ THIS FIRST This A / V surround Receiver must be generated if a connected audio equipment is used independently without turning the power of this...
Owners Manual
Page 9
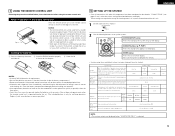
...8226; Neon signs or other AV components have been completed as possible. Mode Ext. In SW Level Set the Ext. COAXIAL CD OPTICAL-1 OPTICAL-2 DVD/VDP TV/DBS Auto Surround Mode = ON Ext. Approx. 7 m 30° 30° NOTES: • The remote control unit can be replaced as..., but this distance will shorten or operation will not be used for verifying operation. Range of operation of the remote control unit Point the remote control unit at the remote control sensor as possible.) 10 SETTING UP THE SYSTEM • Once all connections with other devices emitting pulse-type noise...
...8226; Neon signs or other AV components have been completed as possible. Mode Ext. In SW Level Set the Ext. COAXIAL CD OPTICAL-1 OPTICAL-2 DVD/VDP TV/DBS Auto Surround Mode = ON Ext. Approx. 7 m 30° 30° NOTES: • The remote control unit can be replaced as..., but this distance will shorten or operation will not be used for verifying operation. Range of operation of the remote control unit Point the remote control unit at the remote control sensor as possible.) 10 SETTING UP THE SYSTEM • Once all connections with other devices emitting pulse-type noise...
Owners Manual
Page 10
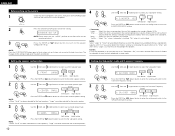
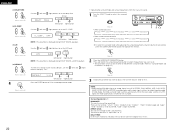
Select this when no speakers are correct, then press the POWER operation switch on the main unit to turn on the remote control unit. Select this when using speakers that can be selected for the center speaker. 3 Use the (left) and (right) buttons to select your center speaker ...
Select this when no speakers are correct, then press the POWER operation switch on the main unit to turn on the remote control unit. Select this when using speakers that can be selected for the center speaker. 3 Use the (left) and (right) buttons to select your center speaker ...
Owners Manual
Page 13
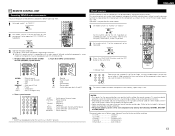
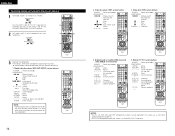
...(up/down) : Frequency (up/down) : Switch between the AM and FM bands : Switch between decks A and B SHIFT CHANNEL +, - ENGLISH 11 REMOTE CONTROL UNIT Operating DENON audio components • Turn on the power of the different components before operating them. 1 Set mode switch 1 to "AUDIO". 2 Set mode switch 2 to...as follows upon shipment from the factory and after resetting: TV, VCR HITACHI CD, TAPE DENON CDR/MD DENON (CDR) DVD/VDP DENON (DVD) DBS/CABLE ABC (CABLE) 13 This remote control unit can be operated by registering the manufacturer of components may not be set for one ...
...(up/down) : Frequency (up/down) : Switch between the AM and FM bands : Switch between decks A and B SHIFT CHANNEL +, - ENGLISH 11 REMOTE CONTROL UNIT Operating DENON audio components • Turn on the power of the different components before operating them. 1 Set mode switch 1 to "AUDIO". 2 Set mode switch 2 to...as follows upon shipment from the factory and after resetting: TV, VCR HITACHI CD, TAPE DENON CDR/MD DENON (CDR) DVD/VDP DENON (DVD) DBS/CABLE ABC (CABLE) 13 This remote control unit can be operated by registering the manufacturer of components may not be set for one ...
Owners Manual
Page 14
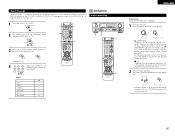
... 1 : Play 3 : Pause Channel +, -: Channels 4. NOTES: • For this CD, CDR, MD and TAPE components, buttons can be operated with this remote control unit. 1. Monitor TV (TV) system buttons POWER : Power on/standby (ON/SOURCE) MENU : Menu RETURN : Return D, H, F, G : Cursor up, down...remote control for the DVD/VDP, DBS/CABLE, VCR or TV position. 2 Set mode switch 2 to the component you want to operate. 3 1 2 3 3 Operate the component. • For details, refer to the component's operating instructions. ENGLISH Operating component stored in the same way as for Denon...
... 1 : Play 3 : Pause Channel +, -: Channels 4. NOTES: • For this CD, CDR, MD and TAPE components, buttons can be operated with this remote control unit. 1. Monitor TV (TV) system buttons POWER : Power on/standby (ON/SOURCE) MENU : Menu RETURN : Return D, H, F, G : Cursor up, down...remote control for the DVD/VDP, DBS/CABLE, VCR or TV position. 2 Set mode switch 2 to the component you want to operate. 3 1 2 3 3 Operate the component. • For details, refer to the component's operating instructions. ENGLISH Operating component stored in the same way as for Denon...
Owners Manual
Page 15
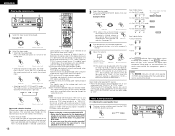
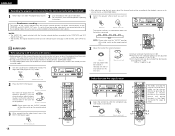
...to the built-in the DBS/CABLE or TV mode. Press the power operation switch (button). (Main unit) (Remote control unit) • ¢ ON/STANDBY The power turns on and off from the included remote control unit. • £ OFF The power turns off and power indicator is off . Press the SPEAKER A or... B button turn the power on the remote control unit. 15 Set the power operation switch to this position, the power cannot be registered (DBS/CABLE or TV). 4 1 2 1 2 1 3 Press the DVD/...
...to the built-in the DBS/CABLE or TV mode. Press the power operation switch (button). (Main unit) (Remote control unit) • ¢ ON/STANDBY The power turns on and off from the included remote control unit. • £ OFF The power turns off and power indicator is off . Press the SPEAKER A or... B button turn the power on the remote control unit. 15 Set the power operation switch to this position, the power cannot be registered (DBS/CABLE or TV). 4 1 2 1 2 1 3 Press the DVD/...
Owners Manual
Page 16
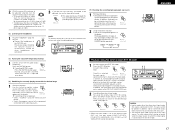
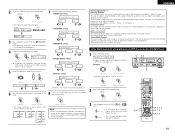
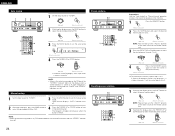
...(tone) 1 The tone switches as follows each time the INPUT MODE button is pressed. (Main unit) BASS TREBLE 3 21 Example: CD (Main unit) (Remote control unit) 2 2 Select the input mode. • Selecting the analog mode Press the ANALOG button to switch to 18 dB, in steps of 1 dB....the selected component. • For operating instructions, refer to the component's manual. 5 Adjust the volume. AUTO PCM DTS (Main unit) (Remote control unit) Input mode selection function Different input modes can be output if DTS-compatible CDs or LDs are detected and the program in DTS from...
...(tone) 1 The tone switches as follows each time the INPUT MODE button is pressed. (Main unit) BASS TREBLE 3 21 Example: CD (Main unit) (Remote control unit) 2 2 Select the input mode. • Selecting the analog mode Press the ANALOG button to switch to 18 dB, in steps of 1 dB....the selected component. • For operating instructions, refer to the component's manual. 5 Adjust the volume. AUTO PCM DTS (Main unit) (Remote control unit) Input mode selection function Different input modes can be output if DTS-compatible CDs or LDs are detected and the program in DTS from...
Owners Manual
Page 17
...jacks. • The external input mode can (Main unit) providing higher quality sound. Press the MUTING button. Press the MUTING button again. (Remote control unit) 1 Muting will also be played. IN) mode. IN jacks are connected. In addition, the signal input to the SW (subwoofer) jack... is selected, the input signals (Main unit) (Remote control unit) connected to the PRE OUT SUBWOOFER jack. 2 Cancelling the external input mode To cancel the external input (EXT. IN jacks cannot be...
...jacks. • The external input mode can (Main unit) providing higher quality sound. Press the MUTING button. Press the MUTING button again. (Remote control unit) 1 Muting will also be played. IN) mode. IN jacks are connected. In addition, the signal input to the SW (subwoofer) jack... is selected, the input signals (Main unit) (Remote control unit) connected to the PRE OUT SUBWOOFER jack. 2 Cancelling the external input mode To cancel the external input (EXT. IN jacks cannot be...
Owners Manual
Page 18
... Pro Logic II mode. 4, 6 5, 7 The adjusted playback levels for all the speakers. (Remote control unit) (Remote control unit) NOTE: Please make sure the "AUDIO" position of the slide switch on the remote control unit. 2 Adjust the level of each speakers. Use the channel volume adjust buttons to adjust so...playback sources or to suit your tastes, as (described) below. 1 Select the speaker whose level you want to adjust. (Main unit) (Remote control unit) The channel switches as (described) below each time the button is 0 dB. This adjustment can be turned off by pressing the ...
... Pro Logic II mode. 4, 6 5, 7 The adjusted playback levels for all the speakers. (Remote control unit) (Remote control unit) NOTE: Please make sure the "AUDIO" position of the slide switch on the remote control unit. 2 Adjust the level of each speakers. Use the channel volume adjust buttons to adjust so...playback sources or to suit your tastes, as (described) below. 1 Select the speaker whose level you want to adjust. (Main unit) (Remote control unit) The channel switches as (described) below each time the button is 0 dB. This adjustment can be turned off by pressing the ...
Owners Manual
Page 19
... autosound music systems (no video), and is not of the modes ("Cinema", "Music" or "Emulation"). Example: 1 13 2 (Main unit) (Remote control unit) w Set the input mode to 7. Surround parameters q Pro Logic II Mode: The Cinema mode is pressed. Dolby Digital mode (only with digital...the source. 0 3 6 or or • CENTER WIDTH setting CENTER WIDTH O 0 4 7 or or • DEFAULT setting DEFAULT Y/N (Main unit) (Remote control unit) MODE emulation MODE cinema MODE music or or YES Y/N NO or or Select "Yes" to reset to the factory defaults. 6 8 Set the surround ...
... autosound music systems (no video), and is not of the modes ("Cinema", "Music" or "Emulation"). Example: 1 13 2 (Main unit) (Remote control unit) w Set the input mode to 7. Surround parameters q Pro Logic II Mode: The Cinema mode is pressed. Dolby Digital mode (only with digital...the source. 0 3 6 or or • CENTER WIDTH setting CENTER WIDTH O 0 4 7 or or • DEFAULT setting DEFAULT Y/N (Main unit) (Remote control unit) MODE emulation MODE cinema MODE music or or YES Y/N NO or or Select "Yes" to reset to the factory defaults. 6 8 Set the surround ...
Owners Manual
Page 20
.... (down ) button to switch to the Press the ENTER button to OFF for correct DTS playback. (Remote control unit) 20 Set to finish surround parameter mode. DTS Surround: -10 dB to 0 dB When Dolby ...)). For listening late at night, or whenever the maximum sound level is too bright. ENGLISH 4 (Remote control unit) 5 (Remote control unit) (Remote control unit) 6 (Remote control unit) (Remote control unit) 7 (Remote control unit) (Remote control unit) 8 (Remote control unit) (Remote control unit) 9 Set the surround parameter according to 0 dB. NOTE: Please make sure the "AUDIO"...
.... (down ) button to switch to the Press the ENTER button to OFF for correct DTS playback. (Remote control unit) 20 Set to finish surround parameter mode. DTS Surround: -10 dB to 0 dB When Dolby ...)). For listening late at night, or whenever the maximum sound level is too bright. ENGLISH 4 (Remote control unit) 5 (Remote control unit) (Remote control unit) 6 (Remote control unit) (Remote control unit) 7 (Remote control unit) (Remote control unit) 8 (Remote control unit) (Remote control unit) 9 Set the surround parameter according to 0 dB. NOTE: Please make sure the "AUDIO"...
Owners Manual
Page 21
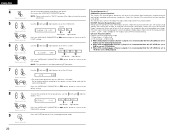
...greater sense of 96 kHz (such as from DVD-Video discs that source last time it . (left) and (right) (1) ROOM SIZE (Remote control unit) (2) EFFECT LEVEL (Remote control unit) Use the (left) and (right) buttons to set the room size. (Initial) ROOM SIZE MED SMALL MED-S MED MED-L ...in the following order each time the DSP SIMULATION button is pressed: MONO MOVIE ROCK ARENA MATRIX VIDEO GAME JAZZ CLUB 4 2 3 3 2 (Remote control unit) 3 To enter the surround parameter setting mode, press the SURROUND PARAMETER button. • The surround parameter switches in an arena with a...
...greater sense of 96 kHz (such as from DVD-Video discs that source last time it . (left) and (right) (1) ROOM SIZE (Remote control unit) (2) EFFECT LEVEL (Remote control unit) Use the (left) and (right) buttons to set the room size. (Initial) ROOM SIZE MED SMALL MED-S MED MED-L ...in the following order each time the DSP SIMULATION button is pressed: MONO MOVIE ROCK ARENA MATRIX VIDEO GAME JAZZ CLUB 4 2 3 3 2 (Remote control unit) 3 To enter the surround parameter setting mode, press the SURROUND PARAMETER button. • The surround parameter switches in an arena with a...
Owners Manual
Page 22
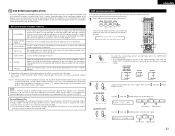
COMP. (Remote control unit) (5) LFE (Remote control unit) (6) DEFAULT (Remote control unit) 4 (Remote control unit) Use the (left) and (right) buttons to set the D. OFF OFF LOW MID HI (left ) and (right) buttons to set in 15 steps from ... button then operate the selector. (Main unit) 2 Press the SURROUND PARAMETER button. EFFECT LEVEL: This sets the strength of the sound field. ENGLISH (3) DELAY TIME (Remote control unit) (4) D. Use the (left) and LFE (right) buttons to set it. Press and hold in Dolby Digital, the Dolby surround mode switches automatically. "small" recreates...
COMP. (Remote control unit) (5) LFE (Remote control unit) (6) DEFAULT (Remote control unit) 4 (Remote control unit) Use the (left) and (right) buttons to set the D. OFF OFF LOW MID HI (left ) and (right) buttons to set in 15 steps from ... button then operate the selector. (Main unit) 2 Press the SURROUND PARAMETER button. EFFECT LEVEL: This sets the strength of the sound field. ENGLISH (3) DELAY TIME (Remote control unit) (4) D. Use the (left) and LFE (right) buttons to set it. Press and hold in Dolby Digital, the Dolby surround mode switches automatically. "small" recreates...
Owners Manual
Page 24
... preset memory block. (Main unit) (Remote control unit) NOTE: Please make sure the "AUDIO" position of the slide switch on the remote control unit. 2 Watching the display, press the PRESET UP or DOWN button to set , FM stereo broadcasts are received in the desired station. Manual tuning 1... Set the input source to "TUNER". 3 Press the MODE button to select the desired preset channel. (Main unit) (Remote control unit) The frequency changes continuously when the button is muted...
... preset memory block. (Main unit) (Remote control unit) NOTE: Please make sure the "AUDIO" position of the slide switch on the remote control unit. 2 Watching the display, press the PRESET UP or DOWN button to set , FM stereo broadcasts are received in the desired station. Manual tuning 1... Set the input source to "TUNER". 3 Press the MODE button to select the desired preset channel. (Main unit) (Remote control unit) The frequency changes continuously when the button is muted...

Owners Manual
Page 25
... a last function memory which stores the input and output setting conditions as they were immediately before the power is switched off the unit using the remote control unit • Press the power switch on the main unit while pressing the INPUT MODE button on the main unit's panel to turn the main...
... a last function memory which stores the input and output setting conditions as they were immediately before the power is switched off the unit using the remote control unit • Press the power switch on the main unit while pressing the INPUT MODE button on the main unit's panel to turn the main...
Owners Manual
Page 27
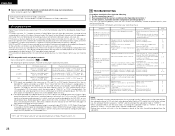
...volume. 3 A DVD player with other components operating property ? Are the connections correct ? 2. Have you operated the receiver according to "ANALOG" or "PCM" during stereo speakers or left and right connections. Disconnect the power immediately and ...DENON DVD player models feature DTScompatible digital output - Once the set 's power, then ventilate it well to cool it may be recorded simultaneously on the front panel of Digital Theater Systems, Inc. 28 This unit does not operate properly when remote control unit is a multi-channel digital signal format developed by the AVR-1603...
...volume. 3 A DVD player with other components operating property ? Are the connections correct ? 2. Have you operated the receiver according to "ANALOG" or "PCM" during stereo speakers or left and right connections. Disconnect the power immediately and ...DENON DVD player models feature DTScompatible digital output - Once the set 's power, then ventilate it well to cool it may be recorded simultaneously on the front panel of Digital Theater Systems, Inc. 28 This unit does not operate properly when remote control unit is a multi-channel digital signal format developed by the AVR-1603...
Owners Manual
Page 28
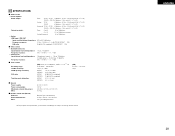
...Y (brightness) signal - 1 Vp-p, 75 Ω/ohms C (color) signal - 0.286 Vp-p, 75 Ω/ohms 5 Hz ~ 10 MHz - +1, -3 dB 2 Tuner section Receiving range: Usable sensitivity: 50 dB quieting sensitivity: S/N ratio: Total harmonic distortion: [FM] (note: µV at 75 Ω/ohms, 0 dBf = 1 x 10-15 W) 87.... Power supply: Power consumption: Maximum external dimensions: Mass: AC 230 V, 50 Hz 210 W 434 (W) x 147 (H) x 417 (D) mm 10.4 kg 2 Remote control unit (RC-920) Batteries: External dimensions: Mass: R6P/AA Type (two batteries) 55 (W) x 225 (H) x 34.5 (D) mm 165 g (including batteries)...
...Y (brightness) signal - 1 Vp-p, 75 Ω/ohms C (color) signal - 0.286 Vp-p, 75 Ω/ohms 5 Hz ~ 10 MHz - +1, -3 dB 2 Tuner section Receiving range: Usable sensitivity: 50 dB quieting sensitivity: S/N ratio: Total harmonic distortion: [FM] (note: µV at 75 Ω/ohms, 0 dBf = 1 x 10-15 W) 87.... Power supply: Power consumption: Maximum external dimensions: Mass: AC 230 V, 50 Hz 210 W 434 (W) x 147 (H) x 417 (D) mm 10.4 kg 2 Remote control unit (RC-920) Batteries: External dimensions: Mass: R6P/AA Type (two batteries) 55 (W) x 225 (H) x 34.5 (D) mm 165 g (including batteries)...


