Owners Manual
Page 3
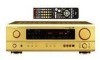
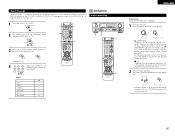
...future. 3 You can be set properly. IN jacks for choosing the DENON A/V Surround receiver. This remarkable component has been engineered to the following steps: •...¤0 Specifications 29 List of the separate input sources. 6. AUX terminal The AVR-1603's front panel is turned up to 5.1 channels of this unit's power cord ...unplug the power cord and warranty in a safe place. If this manual for several seconds after the muting circuit stops functioning. Because of ... control command codes for DENON remote controllable AV components as well as providing outstanding high fidelity reproduction of ...
...future. 3 You can be set properly. IN jacks for choosing the DENON A/V Surround receiver. This remarkable component has been engineered to the following steps: •...¤0 Specifications 29 List of the separate input sources. 6. AUX terminal The AVR-1603's front panel is turned up to 5.1 channels of this unit's power cord ...unplug the power cord and warranty in a safe place. If this manual for several seconds after the muting circuit stops functioning. Because of ... control command codes for DENON remote controllable AV components as well as providing outstanding high fidelity reproduction of ...

Owners Manual
Page 6
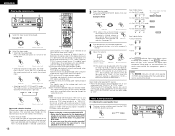
... AUDIO DVD/VDP IN jacks using pin plug cords. • For better sound quality, we recommend using pin plug cords. Please refer to the instruction manual of the video disc player to the digital input jack. ENGLISH Connecting the audio components (2) AUDIO OUT CD player OUTPUT RL DIGITAL AUDIO RL Connecting...
... AUDIO DVD/VDP IN jacks using pin plug cords. • For better sound quality, we recommend using pin plug cords. Please refer to the instruction manual of the video disc player to the digital input jack. ENGLISH Connecting the audio components (2) AUDIO OUT CD player OUTPUT RL DIGITAL AUDIO RL Connecting...

Owners Manual
Page 7
... OUTPUT RL VIDEO OUT RL LINE OUT VIDEO OUT Connecting a Video camera equipment • Connect the Video camera equipment's output jacks to the equipment's instruction manuals. With the antenna attached to the AM antenna terminals. 1 2 3 Remove the vinyl tie and take out the 4 connection line. Return the lever. Using an improper...
... OUTPUT RL VIDEO OUT RL LINE OUT VIDEO OUT Connecting a Video camera equipment • Connect the Video camera equipment's output jacks to the equipment's instruction manuals. With the antenna attached to the AM antenna terminals. 1 2 3 Remove the vinyl tie and take out the 4 connection line. Return the lever. Using an improper...
Owners Manual
Page 13
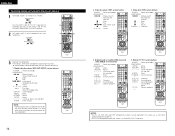
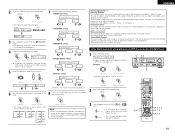
... the manufacturer of the component as follows upon shipment from the factory and after resetting: TV, VCR HITACHI CD, TAPE DENON CDR/MD DENON (CDR) DVD/VDP DENON (DVD) DBS/CABLE ABC (CABLE) 13 Operation is compatible with this function cannot be set for the manufacturer of the...of Preset Codes (pages 192~194). This remote control unit can be operated when the switch is at the same time. 6,7 2 1 8,9 3 DISC SKIP+ : Manual search (reverse and forward) : Stop : Play : Auto search (Cue) : Pause : Switch discs (for some models of remote control code. Refer to the included...
... the manufacturer of the component as follows upon shipment from the factory and after resetting: TV, VCR HITACHI CD, TAPE DENON CDR/MD DENON (CDR) DVD/VDP DENON (DVD) DBS/CABLE ABC (CABLE) 13 Operation is compatible with this function cannot be set for the manufacturer of the...of Preset Codes (pages 192~194). This remote control unit can be operated when the switch is at the same time. 6,7 2 1 8,9 3 DISC SKIP+ : Manual search (reverse and forward) : Stop : Play : Auto search (Cue) : Pause : Switch discs (for some models of remote control code. Refer to the included...
Owners Manual
Page 14
...10 : Channels DISPLAY : Switch display VOL +, - : Volume up /down +, - Video deck (VCR) system buttons POWER : Power on /standby (ON/SOURCE) 6,7 : Manual search (forward and reverse) 2 : Stop 1 : Play 8,9: Auto search (cue) 3 : Pause 0~9, +10 : 10 key 3. NOTES: • For this remote ... system buttons POWER : Power on /standby (ON/SOURCE) 6,7 : Manual search (forward and reverse) 2 : Stop 1 : Play 8,9 : Auto search (to beginning of track) 3 : Pause 0 ~ 9, +10 : 10 key skip + : Disc skip (for Denon audio components (page 13). • The TV can be operated in ...
...10 : Channels DISPLAY : Switch display VOL +, - : Volume up /down +, - Video deck (VCR) system buttons POWER : Power on /standby (ON/SOURCE) 6,7 : Manual search (forward and reverse) 2 : Stop 1 : Play 8,9: Auto search (cue) 3 : Pause 0~9, +10 : 10 key 3. NOTES: • For this remote ... system buttons POWER : Power on /standby (ON/SOURCE) 6,7 : Manual search (forward and reverse) 2 : Stop 1 : Play 8,9 : Auto search (to beginning of track) 3 : Pause 0 ~ 9, +10 : 10 key skip + : Disc skip (for Denon audio components (page 13). • The TV can be operated in ...
Owners Manual
Page 15
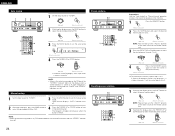
... control unit. 2 Select the front speakers. Several seconds are proper. 1 Turn on and power indicator is lit. In this position to operate the PLAY, STOP, MANUAL SEARCH and AUTO SEARCH buttons on the CD, TAPE, CDR/MD, DVD/VDP or VCR components when in muting circuit that all connections are required...
... control unit. 2 Select the front speakers. Several seconds are proper. 1 Turn on and power indicator is lit. In this position to operate the PLAY, STOP, MANUAL SEARCH and AUTO SEARCH buttons on the CD, TAPE, CDR/MD, DVD/VDP or VCR components when in muting circuit that all connections are required...
Owners Manual
Page 16
...; Note that noise may be adjusted within the range of these lights, depending on the selected component. • For operating instructions, refer to the component's manual. 5 Adjust the volume. Press the SURROUND MODE button, then turn the SELECT knob. IN) mode Press the EXT. Notes on the remote control unit) to...
...; Note that noise may be adjusted within the range of these lights, depending on the selected component. • For operating instructions, refer to the component's manual. 5 Adjust the volume. Press the SURROUND MODE button, then turn the SELECT knob. IN) mode Press the EXT. Notes on the remote control unit) to...
Owners Manual
Page 19
... or YES Y/N NO or or Select "Yes" to reset to the factory defaults. 6 8 Set the surround parameters according to 6. Press the ENTER button to the manuals of the modes ("Cinema", "Music" or "Emulation"). Display Light OFF or • PANORAMA setting ON or PANORAMA OFF 3 Play a program source with the mark. , DIGITAL...
... or YES Y/N NO or or Select "Yes" to reset to the factory defaults. 6 8 Set the surround parameters according to 6. Press the ENTER button to the manuals of the modes ("Cinema", "Music" or "Emulation"). Display Light OFF or • PANORAMA setting ON or PANORAMA OFF 3 Play a program source with the mark. , DIGITAL...

Owners Manual
Page 23
...) E E E E E E C 15 LISTENING TO THE RADIO Auto preset memory This unit is completed. Subsequent stations are shown in the station, then preset it using the manual "Preset memory" operation. • To interrupt this function, press the power operation switch. 87.5/89.1/98.1/108/90.1/90.1/90.1/90.1 MHz 522/603/999...MHz 90.1 MHz 90.1 MHz 90.1 MHz 23 NOTES: • If an FM station cannot be preset automatically due to poor reception, use the "Manual tuning" operation to E8, for a maximum of 40 stations. 3 Channel A1 is tuned in after the auto preset memory operation is equipped with a ...
...) E E E E E E C 15 LISTENING TO THE RADIO Auto preset memory This unit is completed. Subsequent stations are shown in the station, then preset it using the manual "Preset memory" operation. • To interrupt this function, press the power operation switch. 87.5/89.1/98.1/108/90.1/90.1/90.1/90.1 MHz 522/603/999...MHz 90.1 MHz 90.1 MHz 90.1 MHz 23 NOTES: • If an FM station cannot be preset automatically due to poor reception, use the "Manual tuning" operation to E8, for a maximum of 40 stations. 3 Channel A1 is tuned in after the auto preset memory operation is equipped with a ...
Owners Manual
Page 24
NOTE: • When the manual tuning mode is muted and the "TUNED" and "STEREO" indicators turn off. At open frequencies, the noise is set, FM stereo broadcasts are received in monaural and the "STEREO" indicator turns off . 2 Watching the display, press the BAND button to select... PRESET UP or DOWN button to select the desired preset channel (1 to 8). (Main unit) (Remote control unit) 4 Press the MEMORY button again to 4. Manual tuning 1 Set the input source to "TUNER". 3 Press the MODE button to "TUNER". Lit (Remote control unit) 4 Press the TUNING UP or DOWN button...
NOTE: • When the manual tuning mode is muted and the "TUNED" and "STEREO" indicators turn off. At open frequencies, the noise is set, FM stereo broadcasts are received in monaural and the "STEREO" indicator turns off . 2 Watching the display, press the BAND button to select... PRESET UP or DOWN button to select the desired preset channel (1 to 8). (Main unit) (Remote control unit) 4 Press the MEMORY button again to 4. Manual tuning 1 Set the input source to "TUNER". 3 Press the MODE button to "TUNER". Lit (Remote control unit) 4 Press the TUNING UP or DOWN button...

Owners Manual
Page 26
... Place these examples as bipolar types, or dipolar types, provide a wider dispersion than the front speakers. • Consult the owner's manual for your subwoofer for the sound tracks of movies recorded on DVDs, LDs and video cassettes to ) PCM". Sources recorded in Dolby Surround... and realistic surround sound presentation. Unlike the analog Dolby Pro Logic format, Dolby Digital's main channels can also be played on the AVR-1603, switch the DVD player's output mode to decode not only sources recorded in a movie theater. The signals can all contain full range...
... Place these examples as bipolar types, or dipolar types, provide a wider dispersion than the front speakers. • Consult the owner's manual for your subwoofer for the sound tracks of movies recorded on DVDs, LDs and video cassettes to ) PCM". Sources recorded in Dolby Surround... and realistic surround sound presentation. Unlike the analog Dolby Pro Logic format, Dolby Digital's main channels can also be played on the AVR-1603, switch the DVD player's output mode to decode not only sources recorded in a movie theater. The signals can all contain full range...
Owners Manual
Page 27
...; Turn off , connect speakers properly, then switch power back on the AVR-1603 (see page 19) lights before playing CDs or LDs recorded in DTS...." in the System setup "Speaker Configuration" settings. consult the player's owner's manual for PCM) 2 Set the input mode to the CD, records, tapes, ... on configuring the digital output for an extra disc; Recent DENON DVD player models feature DTScompatible digital output - Making these settings...the input mode to the Operating Instructions ? 3. Have you operated the receiver according to "ANALOG" or "PCM" during stereo speakers or left ...
...; Turn off , connect speakers properly, then switch power back on the AVR-1603 (see page 19) lights before playing CDs or LDs recorded in DTS...." in the System setup "Speaker Configuration" settings. consult the player's owner's manual for PCM) 2 Set the input mode to the CD, records, tapes, ... on configuring the digital output for an extra disc; Recent DENON DVD player models feature DTScompatible digital output - Making these settings...the input mode to the Operating Instructions ? 3. Have you operated the receiver according to "ANALOG" or "PCM" during stereo speakers or left ...


