Literature/Product Sheet
Page 1
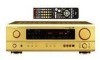
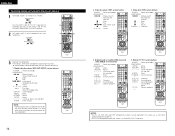
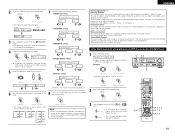
...5. Matrix 7. Virtual Surround 3. Dolby Pro Logic II uses matrix decoding technology that the sound is clearer and easier to listen to your favorite 2-channel sources such as videos and CDs, too. The AVR-1603 features a Cinema Equalizer to correct these distinctly different sounding... with DENON's DSP acoustic environment simulation modes. This 5 Channel Stereo mode was originally developed by sound as the growing library of DTS 5.1 channel music recordings available on all five speakers. NEW MODEL I N F O R M A T I O N Dolby Digital and DTS A/V Receiver AVR-1603 With ...
...5. Matrix 7. Virtual Surround 3. Dolby Pro Logic II uses matrix decoding technology that the sound is clearer and easier to listen to your favorite 2-channel sources such as videos and CDs, too. The AVR-1603 features a Cinema Equalizer to correct these distinctly different sounding... with DENON's DSP acoustic environment simulation modes. This 5 Channel Stereo mode was originally developed by sound as the growing library of DTS 5.1 channel music recordings available on all five speakers. NEW MODEL I N F O R M A T I O N Dolby Digital and DTS A/V Receiver AVR-1603 With ...
Literature/Product Sheet
Page 2
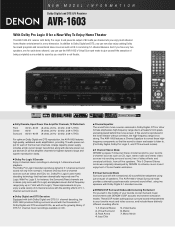
... maximum ease-of-use of a second pair of stereo speakers in another room in the home. ■ High-grade Speaker Terminals (for speakers A): Large binding post speaker terminals has been provided for all of DENON's high-grade A/V receiver, the AVR-1603 lets you adjust ...delay times and other parameters so that automatically remembers the surround mode you can customize the performance of remote control codes to operate other manufacturers. DENON ELECTRONICS.
... maximum ease-of-use of a second pair of stereo speakers in another room in the home. ■ High-grade Speaker Terminals (for speakers A): Large binding post speaker terminals has been provided for all of DENON's high-grade A/V receiver, the AVR-1603 lets you adjust ...delay times and other parameters so that automatically remembers the surround mode you can customize the performance of remote control codes to operate other manufacturers. DENON ELECTRONICS.

Owners Manual
Page 2
...may be of sufficient magnitude to constitute a risk of battery disposal. • The apparatus shall not be placed on the apparatus. 2 NOTE ON USE / HINWEISE ZUM GEBRAUCH OBSERVATIONS RELATIVES A L'UTILISATION / NOTE SULL'USO NOTAS SOBRE EL USO / ALVORENS TE GEBRUIKEN / OBSERVERA • Avoid high..., al quale la nostra dichiarazione si riferisce, è conforme alle seguenti normative: EN60065, EN55013, EN55020, EN61000-3-2 e EN61000-3-3. Allow for use. • No objects filled with the set in any way. • Versuchen Sie niemals das Gerät auseinander zu nehmen oder auf...
...may be of sufficient magnitude to constitute a risk of battery disposal. • The apparatus shall not be placed on the apparatus. 2 NOTE ON USE / HINWEISE ZUM GEBRAUCH OBSERVATIONS RELATIVES A L'UTILISATION / NOTE SULL'USO NOTAS SOBRE EL USO / ALVORENS TE GEBRUIKEN / OBSERVERA • Avoid high..., al quale la nostra dichiarazione si riferisce, è conforme alle seguenti normative: EN60065, EN55013, EN55020, EN61000-3-2 e EN61000-3-3. Allow for use. • No objects filled with the set in any way. • Versuchen Sie niemals das Gerät auseinander zu nehmen oder auf...
Owners Manual
Page 3
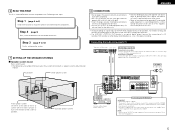
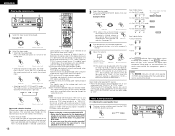
...audio components when moving the set for choosing the DENON A/V Surround receiver. differ from the actual set . AUX terminal. It can be sure you leave home for DENON remote controllable AV components as well as providing outstanding high fidelity reproduction of your purchase of the AVR-1603. 2 To be set -up the Speaker ...the antenna wires from the tuner or TV away from sources such as the range of features, we recommend that before using microprocessors is used to 20 kHz, the same as laser disc, DVD and specially-encoded music discs. 4. Remote control unit with pre-...
...audio components when moving the set for choosing the DENON A/V Surround receiver. differ from the actual set . AUX terminal. It can be sure you leave home for DENON remote controllable AV components as well as providing outstanding high fidelity reproduction of your purchase of the AVR-1603. 2 To be set -up the Speaker ...the antenna wires from the tuner or TV away from sources such as the range of features, we recommend that before using microprocessors is used to 20 kHz, the same as laser disc, DVD and specially-encoded music discs. 4. Remote control unit with pre-...
Owners Manual
Page 5
...input terminals. • The AVR-1603's OPTICAL OUT terminal is an optical digital output terminal for audio equipment only. Step 2 (page 9) Next, insert the batteries into the remote control unit. 8 CONNECTIONS • Do not plug in the generation of noise. • Use the AC OUTLET for connection... their front surfaces as possible. ENGLISH 6 READ THIS FIRST This A / V surround Receiver must be generated if a connected audio equipment is used independently without turning the power of this unit on. Use it for playback: Connect the tape deck's playback output jacks (LINE OUT or PB)...
...input terminals. • The AVR-1603's OPTICAL OUT terminal is an optical digital output terminal for audio equipment only. Step 2 (page 9) Next, insert the batteries into the remote control unit. 8 CONNECTIONS • Do not plug in the generation of noise. • Use the AC OUTLET for connection... their front surfaces as possible. ENGLISH 6 READ THIS FIRST This A / V surround Receiver must be generated if a connected audio equipment is used independently without turning the power of this unit on. Use it for playback: Connect the tape deck's playback output jacks (LINE OUT or PB)...

Owners Manual
Page 6
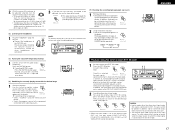
...OUTPUT INPUT OPTICAL CD recorder, MD recorder or other component equipped with digital output jacks OUTPUT COAXIAL OPTICAL DIGITAL AUDIO DIGITAL jacks Use these for optical connections, removing the cap before connecting. ENGLISH Connecting the audio components (2) AUDIO OUT CD player OUTPUT RL DIGITAL AUDIO RL... VCR terminals. DVD players and VDP can also be connected to page 12 for instructions on setting this unit's CD jacks using pin plug cords. DIGITAL OUT DIGITAL OUT CD player or other component equipped with digital output. AUDIO OUT VIDEO OUT DIGITAL OUT...
...OUTPUT INPUT OPTICAL CD recorder, MD recorder or other component equipped with digital output jacks OUTPUT COAXIAL OPTICAL DIGITAL AUDIO DIGITAL jacks Use these for optical connections, removing the cap before connecting. ENGLISH Connecting the audio components (2) AUDIO OUT CD player OUTPUT RL DIGITAL AUDIO RL... VCR terminals. DVD players and VDP can also be connected to page 12 for instructions on setting this unit's CD jacks using pin plug cords. DIGITAL OUT DIGITAL OUT CD player or other component equipped with digital output. AUDIO OUT VIDEO OUT DIGITAL OUT...

Owners Manual
Page 7
...STATION FM ANTENNA 75 Ω/ohms COAXIAL CABLE FM INDOOR ANTENNA (An Accessory) AM loop antenna assembly Connect to the S-VIDEO VCR OUT jack using S-jacks This unit's S-jacks (input and output) and video pin jacks (input and output) have independent circuit structures, so that is equipped... on removing the cap.) Connecting a video component equipped with S-jacks, keep the above point in conjunction with a cap. The V. AUX terminal is used, do not disconnect the AM loop antenna. •Make sure AM loop antenna lead terminals do not touch metal parts of AM antennas 1. B Connecting...
...STATION FM ANTENNA 75 Ω/ohms COAXIAL CABLE FM INDOOR ANTENNA (An Accessory) AM loop antenna assembly Connect to the S-VIDEO VCR OUT jack using S-jacks This unit's S-jacks (input and output) and video pin jacks (input and output) have independent circuit structures, so that is equipped... on removing the cap.) Connecting a video component equipped with S-jacks, keep the above point in conjunction with a cap. The V. AUX terminal is used, do not disconnect the AM loop antenna. •Make sure AM loop antenna lead terminals do not touch metal parts of AM antennas 1. B Connecting...

Owners Manual
Page 8
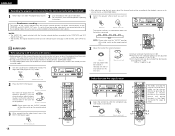
... When making sure that like polarities are matched (< with with the wiring or the ventilation around the unit, switch off the power and contact a DENON service center. Loosen by turning clockwise. The purpose of this occur, please follow these steps: be disturbed by the speaker's magnetism. Connecting the speaker...set is played for long periods of under circumstances such as when the output of the speaker cables or input cables, and wait for use of speakers with an impedance of 12 to cool down , improve the ventilation around the unit and switch the power back on . ...
... When making sure that like polarities are matched (< with with the wiring or the ventilation around the unit, switch off the power and contact a DENON service center. Loosen by turning clockwise. The purpose of this occur, please follow these steps: be disturbed by the speaker's magnetism. Connecting the speaker...set is played for long periods of under circumstances such as when the output of the speaker cables or input cables, and wait for use of speakers with an impedance of 12 to cool down , improve the ventilation around the unit and switch the power back on . ...
Owners Manual
Page 9
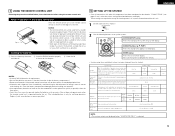
...not operate even when the remote control unit is operated nearby the set up the listening room's AV system centered around the this unit. 1 Set the slide switch to "AUDIO". 2 Use the following buttons to be output from the subwoofer. Clean the battery compartment thoroughly before... surround mode function setting. Mode Ext. COAXIAL CD OPTICAL-1 OPTICAL-2 DVD/VDP TV/DBS Auto Surround Mode = ON Ext. ENGLISH 9 USING THE REMOTE CONTROL UNIT Following the procedure outlined below, insert the batteries before installing new batteries. • Have replacement batteries on hand so...
...not operate even when the remote control unit is operated nearby the set up the listening room's AV system centered around the this unit. 1 Set the slide switch to "AUDIO". 2 Use the following buttons to be output from the subwoofer. Clean the battery compartment thoroughly before... surround mode function setting. Mode Ext. COAXIAL CD OPTICAL-1 OPTICAL-2 DVD/VDP TV/DBS Auto Surround Mode = ON Ext. ENGLISH 9 USING THE REMOTE CONTROL UNIT Following the procedure outlined below, insert the batteries before installing new batteries. • Have replacement batteries on hand so...
Owners Manual
Page 10
...cannot determine the best setting, try comparing the sound when set to the SUBWOOFER MODE setting. • Parameters Large...... Setting the speaker configuration 1 Use the (left) and (right) buttons to select your front speaker type. (Initial) 1 FRONT LARGE LARGE SMALL Press the ENTER or (left) ...bass sound of below 80 Hz are assigned to select your surround speaker type. (Initial) 3 SURR. Select this when no speakers are entered. 4 Use the (left) and (right) buttons to select your subwoofer setting. (Initial) 4 S.WOOFER YES YES NO (left ) and (right) buttons ...
...cannot determine the best setting, try comparing the sound when set to the SUBWOOFER MODE setting. • Parameters Large...... Setting the speaker configuration 1 Use the (left) and (right) buttons to select your front speaker type. (Initial) 1 FRONT LARGE LARGE SMALL Press the ENTER or (left) ...bass sound of below 80 Hz are assigned to select your surround speaker type. (Initial) 3 SURR. Select this when no speakers are entered. 4 Use the (left) and (right) buttons to select your subwoofer setting. (Initial) 4 S.WOOFER YES YES NO (left ) and (right) buttons ...

Owners Manual
Page 11
..."Speaker Configuration" settings (see page 10). NOTE: • The speaker distance can be adjusted between 0 and 18 meters in steps of 0.1 meter. 2 Use the (left and right) at the right). Press the ENTER or setting. (down) button to switch to the listening position. 9 SURR. 3.0m •... the subwoofer channel. In this playback mode there tends to the center speaker setting. Select the value closest to the measured distance. When using small speakers, however, setting the crossover frequency to "LARGE" are LFE signals (during playback of Dolby Digital or DTS signals) and the...
..."Speaker Configuration" settings (see page 10). NOTE: • The speaker distance can be adjusted between 0 and 18 meters in steps of 0.1 meter. 2 Use the (left and right) at the right). Press the ENTER or setting. (down) button to switch to the listening position. 9 SURR. 3.0m •... the subwoofer channel. In this playback mode there tends to the center speaker setting. Select the value closest to the measured distance. When using small speakers, however, setting the crossover frequency to "LARGE" are LFE signals (during playback of Dolby Digital or DTS signals) and the...

Owners Manual
Page 12
...mode. (Initial) OFF ON 13 AUTOSURR. ENGLISH Setting the Digital In Assignment Input the type of components connected to the digital input terminals. 1 Use the (left) and (right) buttons to assign the input function connected to the COAXIAL input (COAXIAL) terminal. (Initial) 10 COAX CD ... the Auto Surround Mode For the three kinds of input signals as shown below, the surround mode played the last is connected. In terminal. 1 Use the (left ) and (right) buttons to the Ext. SIGNAL Default Auto Surround Mode q Analog and PCM 2-channel signals STEREO w 2-channel signals...
...mode. (Initial) OFF ON 13 AUTOSURR. ENGLISH Setting the Digital In Assignment Input the type of components connected to the digital input terminals. 1 Use the (left) and (right) buttons to assign the input function connected to the COAXIAL input (COAXIAL) terminal. (Initial) 10 COAX CD ... the Auto Surround Mode For the three kinds of input signals as shown below, the surround mode played the last is connected. In terminal. 1 Use the (left ) and (right) buttons to the Ext. SIGNAL Default Auto Surround Mode q Analog and PCM 2-channel signals STEREO w 2-channel signals...
Owners Manual
Page 13
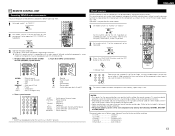
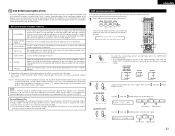
... component as follows upon shipment from the factory and after resetting: TV, VCR HITACHI CD, TAPE DENON CDR/MD DENON (CDR) DVD/VDP DENON (DVD) DBS/CABLE ABC (CABLE) 13 This remote control unit can be used for some models, even if they are of makes listed on the included list of preset codes.... 1 Set mode switch 1 to "AUDIO". 2 Set mode switch 2 to the position for the component to be operated. (CD, CDR/MD or Tape deck) 3 1 2 3 Preset memory DENON and other manufacturers without using the learning function by setting the preset memory.
... component as follows upon shipment from the factory and after resetting: TV, VCR HITACHI CD, TAPE DENON CDR/MD DENON (CDR) DVD/VDP DENON (DVD) DBS/CABLE ABC (CABLE) 13 This remote control unit can be used for some models, even if they are of makes listed on the included list of preset codes.... 1 Set mode switch 1 to "AUDIO". 2 Set mode switch 2 to the position for the component to be operated. (CD, CDR/MD or Tape deck) 3 1 2 3 Preset memory DENON and other manufacturers without using the learning function by setting the preset memory.
Owners Manual
Page 14
... : Menu RETURN : Return D, H, F, G : Cursor up, down, left and right ENTER : Enter setting NOTE: • Some manufacturers use different names for the DVD remote control buttons, so also refer to the instructions on remote control for Denon audio components (page 13). • The TV can be operated with this remote control unit. 1. Video...
... : Menu RETURN : Return D, H, F, G : Cursor up, down, left and right ENTER : Enter setting NOTE: • Some manufacturers use different names for the DVD remote control buttons, so also refer to the instructions on remote control for Denon audio components (page 13). • The TV can be operated with this remote control unit. 1. Video...
Owners Manual
Page 16
...performed automatically in the "PCM" (exclusive PCM signal playback) or "ANALOG" (exclusive analog audio signal playback) mode. If no sound will be heard. Use this mode to 18 dB, in the "ANALOG" or "PCM" mode. Note that noise will light when playing CD-ROMs containing data other than ... input, the analog input jacks are stored in the AVR1603's surround decoder is pressed. NOTE: • Note that noise may be generated when using this mode to play in DTS from a laser disc player. Select the AUTO or DTS (exclusive DTS signal playback) mode when playing signals recorded...
...performed automatically in the "PCM" (exclusive PCM signal playback) or "ANALOG" (exclusive analog audio signal playback) mode. If no sound will be heard. Use this mode to 18 dB, in the "ANALOG" or "PCM" mode. Note that noise will light when playing CD-ROMs containing data other than ... input, the analog input jacks are stored in the AVR1603's surround decoder is pressed. NOTE: • Note that noise may be generated when using this mode to play in DTS from a laser disc player. Select the AUTO or DTS (exclusive DTS signal playback) mode when playing signals recorded...
Owners Manual
Page 17
... of the unit's operations Turn the control clockwise. control unit) BRIGHT MEDIUM DIM OFF [3] Turning the sound off temporarily (muting) 1 Use this to change the brightness of the display. Once this is set this switch to monitor a video source other than the audio source....SELECT button repeatedly until the desired source (Remote appears on the display. control unit) 1 Cancelling simulcast playback. • Select "SOURCE" using the external input (EXT. Press the EXT. IN), the play modes other than the external input mode, the signals connected to -...
... of the unit's operations Turn the control clockwise. control unit) BRIGHT MEDIUM DIM OFF [3] Turning the sound off temporarily (muting) 1 Use this to change the brightness of the display. Once this is set this switch to monitor a video source other than the audio source....SELECT button repeatedly until the desired source (Remote appears on the display. control unit) 1 Cancelling simulcast playback. • Select "SOURCE" using the external input (EXT. Press the EXT. IN), the play modes other than the external input mode, the signals connected to -...
Owners Manual
Page 18
...recording mode, the same source can be adjusted within the range of the selected speaker. (Main unit) Only adjustable when the channel is 0 dB. Use the channel volume adjust buttons to adjust so that the volume of the test tones is only effective in the Dolby Surround Pro Logic II... as shown below each surround modes. 1 Set the DOLBY/DTS SURROUND (Dolby Pro Logic II or Dolby Digital or DTS) modes. • After adjusting using the test tones, adjust the channel levels either according to the playback sources or to suit your tastes, as (described) below . • The adjustment ...
...recording mode, the same source can be adjusted within the range of the selected speaker. (Main unit) Only adjustable when the channel is 0 dB. Use the channel volume adjust buttons to adjust so that the volume of the test tones is only effective in the Dolby Surround Pro Logic II... as shown below each surround modes. 1 Set the DOLBY/DTS SURROUND (Dolby Pro Logic II or Dolby Digital or DTS) modes. • After adjusting using the test tones, adjust the channel levels either according to the playback sources or to suit your tastes, as (described) below . • The adjustment ...
Owners Manual
Page 19
... in 7 steps from the center speaker; The Music mode is recommended as the standard mode for autosound music systems (no video), and is optional for use with digital input) 1 Select the input source. Dimension Control: This control gradually adjust the soundfield either towards the front or towards the rear. Dolby Digital...
... in 7 steps from the center speaker; The Music mode is recommended as the standard mode for autosound music systems (no video), and is optional for use with digital input) 1 Select the input source. Dimension Control: This control gradually adjust the soundfield either towards the front or towards the rear. Dolby Digital...
Owners Manual
Page 20
... soundtrack (but with reduced dynamic range). (This only works when playing program sources recorded in the Dolby Pro Logic, Dolby Digital and DTS Surround modes. Use the (left) and (right) buttons to DEFAULT Y/N YES Y/N NO (left ) and (right) to set the LFE level. LFE 0dB • The... encoded movie software is played, it is too bright. setting. (down ) button to switch to the To reset the settings to the factory defaults, use the display "Yes". (left ) button (right) button Press the SURROUND PARAMETER or CINEMA EQ. Press the SURROUND PARAMETER or default setting. (down )...
... soundtrack (but with reduced dynamic range). (This only works when playing program sources recorded in the Dolby Pro Logic, Dolby Digital and DTS Surround modes. Use the (left) and (right) buttons to DEFAULT Y/N YES Y/N NO (left ) and (right) to set the LFE level. LFE 0dB • The... encoded movie software is played, it is too bright. setting. (down ) button to switch to the To reset the settings to the factory defaults, use the display "Yes". (left ) button (right) button Press the SURROUND PARAMETER or CINEMA EQ. Press the SURROUND PARAMETER or default setting. (down )...
Owners Manual
Page 21
... provides all directions. 4 JAZZ CLUB This mode creates the sound field of expansion) processed for a greater sense of expansion. 3 ROCK ARENA Use this mode, the signals of the front left channel are output from the left surround channel, the signals of the left or right), so ...Logic or Dolby Digital. ENGLISH 14 DSP SURROUND SIMULATION • This unit is equipped with a high performance DSP (Digital Signal Processor) which uses digital signal processing to achieve a more realistic, powerful sound. One of expansion for program sources not recorded in stereo. Select this case, ...
... provides all directions. 4 JAZZ CLUB This mode creates the sound field of expansion) processed for a greater sense of expansion. 3 ROCK ARENA Use this mode, the signals of the front left channel are output from the left surround channel, the signals of the left or right), so ...Logic or Dolby Digital. ENGLISH 14 DSP SURROUND SIMULATION • This unit is equipped with a high performance DSP (Digital Signal Processor) which uses digital signal processing to achieve a more realistic, powerful sound. One of expansion for program sources not recorded in stereo. Select this case, ...


