User Guide
Page 3
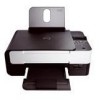
...carrier Carrier that holds the paper as it . 5 Paper exit tray Tray that holds two ink cartridges, one color and the other black or photo. About Your Printer Understanding the Printer Parts Number: Part: Description: 1 Paper support Part that supports loaded paper. 2 Paper guide Guide that ... digital photos. 10 Express Service Code Identify your printer when you lift to gain access to direct your document or photo flat while you scan it exits the printer. 6 Scanner base unit Unit you use support.dell.com or contact and Service Tag technical support. For...
...carrier Carrier that holds the paper as it . 5 Paper exit tray Tray that holds two ink cartridges, one color and the other black or photo. About Your Printer Understanding the Printer Parts Number: Part: Description: 1 Paper support Part that supports loaded paper. 2 Paper guide Guide that ... digital photos. 10 Express Service Code Identify your printer when you lift to gain access to direct your document or photo flat while you scan it exits the printer. 6 Scanner base unit Unit you use support.dell.com or contact and Service Tag technical support. For...
User Guide
Page 4
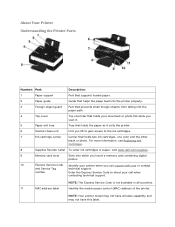
...a PictBridge-enabled digital camera, Bluetooth™ adapter, or a USB key. Number: Part: 12 Dell Internal Network Adapter 13 Power connector 14 USB connector Description: A networking device to set up your printer on which you place your computer. CAUTION: Insert the power cable into the... printer before connecting the power cable into your document or photo face down to control copying, scanning, and printing. Number: Part: 15 PictBridge port...
...a PictBridge-enabled digital camera, Bluetooth™ adapter, or a USB key. Number: Part: 12 Dell Internal Network Adapter 13 Power connector 14 USB connector Description: A networking device to set up your printer on which you place your computer. CAUTION: Insert the power cable into the... printer before connecting the power cable into your document or photo face down to control copying, scanning, and printing. Number: Part: 15 PictBridge port...
User Guide
Page 5
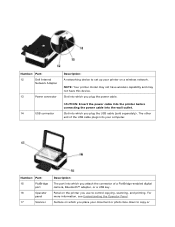
... the button for three seconds. Return to the previous menu. NOTE: Pressing the power button does not turn off your printer on a memory card or digital camera. Turn your printer if a PictBridge camera with an active session is inserted into the PictBridge port. Scroll through modes, menus, and menu items... Office files on or off. Understanding the Operator Panel Number Use the: 1 Display 2 Arrow buttons 3 Back button 4 Select button 5 Power button To: View scanning, copying, and printing options as well as status and error messages. Number: Part: glass Description...
... the button for three seconds. Return to the previous menu. NOTE: Pressing the power button does not turn off your printer on a memory card or digital camera. Turn your printer if a PictBridge camera with an active session is inserted into the PictBridge port. Scroll through modes, menus, and menu items... Office files on or off. Understanding the Operator Panel Number Use the: 1 Display 2 Arrow buttons 3 Back button 4 Select button 5 Power button To: View scanning, copying, and printing options as well as status and error messages. Number: Part: glass Description...
User Guide
Page 6
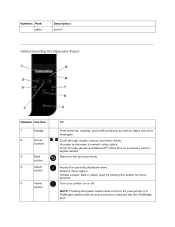
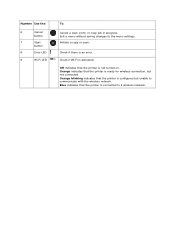
Number Use the: 6 Cancel button 7 Start button 8 Error LED 9 Wi-Fi LED To: Cancel a scan, print, or copy job in progress. Orange indicates that the printer is an error. Exit a menu without saving changes to a wireless network. Check if there is not turned on. Check if ...Wi-Fi is activated: Off indicates that the printer is ready for wireless connection, but unable to communicate with the wireless network. Initiate a copy or scan. Orange blinking indicates that the printer is configured but not connected. Blue indicates that the...
Number Use the: 6 Cancel button 7 Start button 8 Error LED 9 Wi-Fi LED To: Cancel a scan, print, or copy job in progress. Orange indicates that the printer is an error. Exit a menu without saving changes to a wireless network. Check if there is not turned on. Check if ...Wi-Fi is activated: Off indicates that the printer is ready for wireless connection, but unable to communicate with the wireless network. Initiate a copy or scan. Orange blinking indicates that the printer is configured but not connected. Blue indicates that the...
User Guide
Page 9
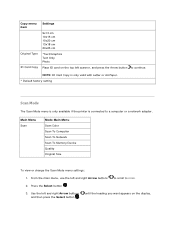
Main Menu Scan Mode Main Menu Scan Color Scan To Computer Scan To Network Scan To Memory Device Quality Original Size To view or change the Scan Mode menu settings: 1. until the heading you want appears on the top left scanner, and press the Arrow button to continue. From the main ... computer or a network adapter. NOTE: ID Card Copy is only valid with Letter or A4 Paper. * Default factory setting Scan Mode The Scan Mode menu is only available if the printer is connected to SCAN. 2. Copy menu item Original Type ID Card Copy Settings 9x13 cm 10x15 cm 10x20 cm 13x18 cm 20x25 cm...
Main Menu Scan Mode Main Menu Scan Color Scan To Computer Scan To Network Scan To Memory Device Quality Original Size To view or change the Scan Mode menu settings: 1. until the heading you want appears on the top left scanner, and press the Arrow button to continue. From the main ... computer or a network adapter. NOTE: ID Card Copy is only valid with Letter or A4 Paper. * Default factory setting Scan Mode The Scan Mode menu is only available if the printer is connected to SCAN. 2. Copy menu item Original Type ID Card Copy Settings 9x13 cm 10x15 cm 10x20 cm 13x18 cm 20x25 cm...
User Guide
Page 11
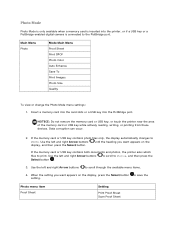
...scroll to the PictBridge port. Main Menu Photo Mode Main Menu Proof Sheet Print DPOF Photo Color Auto Enhance Save To Print Images Photo Size Quality To view or change the Photo Mode menu...display, and then press the Select button. Photo menu item Proof Sheet Setting Print Proof Sheet Scan Proof Sheet until the heading you want appears on the display, press the Select button to PHOTO...want appears on the If the memory card or USB key contains both documents and photos, the printer asks which files to scroll through the available menu items. 4. Use the left and right Arrow...
...scroll to the PictBridge port. Main Menu Photo Mode Main Menu Proof Sheet Print DPOF Photo Color Auto Enhance Save To Print Images Photo Size Quality To view or change the Photo Mode menu...display, and then press the Select button. Photo menu item Proof Sheet Setting Print Proof Sheet Scan Proof Sheet until the heading you want appears on the display, press the Select button to PHOTO...want appears on the If the memory card or USB key contains both documents and photos, the printer asks which files to scroll through the available menu items. 4. Use the left and right Arrow...
User Guide
Page 48
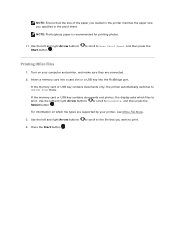
... to print. 4. If the memory card or USB key contains documents and photos, the display asks which file types are supported by your computer and printer, and make sure they are connected. 2. Use the left and right Arrow buttons to scroll to Documents, and then press the Select button . NOTE: Ensure... the paper size you want to print. If the memory card or USB key contains documents only, the printer automatically switches to Scan Proof Sheet, and then press the Printing Office Files 1. Use the left and right Arrow buttons to scroll to the file that the size of ...
... to print. 4. If the memory card or USB key contains documents and photos, the display asks which file types are supported by your computer and printer, and make sure they are connected. 2. Use the left and right Arrow buttons to scroll to Documents, and then press the Select button . NOTE: Ensure... the paper size you want to print. If the memory card or USB key contains documents only, the printer automatically switches to Scan Proof Sheet, and then press the Printing Office Files 1. Use the left and right Arrow buttons to scroll to the file that the size of ...
User Guide
Page 50
... of the Copy dialog box. 10. In Windows® XP or Windows 2000: Click Start Programs or All Programs Dell Printers Dell V305. 5. The What are you want to adjust how your original document. b. The document appears in the right pane of the Copy ...dialog box, select the copy settings that you scanning? Copying Photos Using the Operator Panel 1. Click Custom Settings if you want . 11. Click Dell Printers. From ...
... of the Copy dialog box. 10. In Windows® XP or Windows 2000: Click Start Programs or All Programs Dell Printers Dell V305. 5. The What are you want to adjust how your original document. b. The document appears in the right pane of the Copy ...dialog box, select the copy settings that you scanning? Copying Photos Using the Operator Panel 1. Click Custom Settings if you want . 11. Click Dell Printers. From ...
User Guide
Page 51
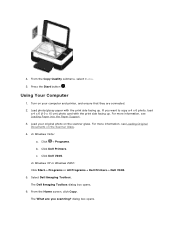
... Computer 1. If you scanning? In Windows Vista: a. Select Dell Imaging Toolbox. From the Home screen, click Copy. dialog box opens. For more information, see Loading Original Documents on the scanner glass. Click Dell Printers. In Windows XP or Windows 2000: Click Start Programs or All Programs Dell Printers Dell V305. 5. The Dell Imaging Toolbox dialog box...
... Computer 1. If you scanning? In Windows Vista: a. Select Dell Imaging Toolbox. From the Home screen, click Copy. dialog box opens. For more information, see Loading Original Documents on the scanner glass. Click Dell Printers. In Windows XP or Windows 2000: Click Start Programs or All Programs Dell Printers Dell V305. 5. The Dell Imaging Toolbox dialog box...

User Guide
Page 53
...Loading Original Documents on your computer and printer, and ensure that your printer is connected to Scan To Computer, and then press the 5. to scroll to has a PIN set. Use the left and right Arrow buttons which you want to scan over the network, ensure that they...to scroll to the network. 2. Load your printer is not required by default; f. When the application you want to send your scan can be sent. Use the left and right Arrow buttons which your scan. If your original document. Scanning Scanning Single-Page Documents and Single Photos Using the...
...Loading Original Documents on your computer and printer, and ensure that your printer is connected to Scan To Computer, and then press the 5. to scroll to has a PIN set. Use the left and right Arrow buttons which you want to scan over the network, ensure that they...to scroll to the network. 2. Load your printer is not required by default; f. When the application you want to send your scan can be sent. Use the left and right Arrow buttons which your scan. If your original document. Scanning Scanning Single-Page Documents and Single Photos Using the...
User Guide
Page 54
.... b. In Windows® XP or Windows 2000: Click Start Programs or All Programs Dell Printers Dell V305. 4. If you do not want to restrict users from sending a scanned document to make a PDF, selecting the Photo option scans the document as an image and sends it on the Scanner Glass. 3. In Windows Vista: a. Click...
.... b. In Windows® XP or Windows 2000: Click Start Programs or All Programs Dell Printers Dell V305. 4. If you do not want to restrict users from sending a scanned document to make a PDF, selecting the Photo option scans the document as an image and sends it on the Scanner Glass. 3. In Windows Vista: a. Click...
User Guide
Page 55
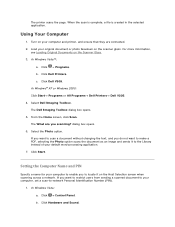
... Start Programs or All Programs Dell Printers Dell V305. 4. Click Programs. b. Click Dell V305. In Windows XP, click Start Settings Control Panel Printers and Other Hardware Printers and Faxes. The Dell Networking Options dialog box opens. 4. After you specify a computer name or a PIN, click OK. c. Scanning Multiple Photos Into a Single File NOTE...
... Start Programs or All Programs Dell Printers Dell V305. 4. Click Programs. b. Click Dell V305. In Windows XP, click Start Settings Control Panel Printers and Other Hardware Printers and Faxes. The Dell Networking Options dialog box opens. 4. After you specify a computer name or a PIN, click OK. c. Scanning Multiple Photos Into a Single File NOTE...
User Guide
Page 56
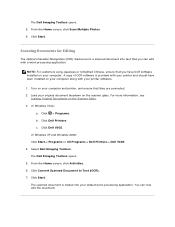
... Programs or All Programs Dell Printers Dell V305. 4. Click Dell V305. From the Home screen, click Activities. 6. You can edit with your computer along with a word-processing application. c. Select Dell Imaging Toolbox. The Dell Imaging Toolbox opens. 5. Click Convert Scanned Document to Text (OCR). 7. The scanned document is provided with your printer and should have OCR software installed...
... Programs or All Programs Dell Printers Dell V305. 4. Click Dell V305. From the Home screen, click Activities. 6. You can edit with your computer along with a word-processing application. c. Select Dell Imaging Toolbox. The Dell Imaging Toolbox opens. 5. Click Convert Scanned Document to Text (OCR). 7. The scanned document is provided with your printer and should have OCR software installed...

User Guide
Page 57
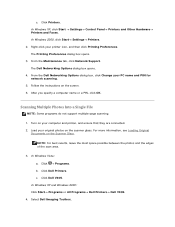
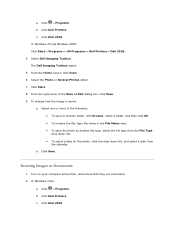
..., see Loading Original Documents on the scanner glass. Click Dell Printers. Click Dell V305. Select the Photo or Several Photos option. 8. Click Start. Turn on the Scanner Glass. 3. NOTE: For best results, leave the most space possible between the photos and the edges of the scan area. 3. For more information, see Loading Original Documents on...
..., see Loading Original Documents on the scanner glass. Click Dell Printers. Click Dell V305. Select the Photo or Several Photos option. 8. Click Start. Turn on the Scanner Glass. 3. NOTE: For best results, leave the most space possible between the photos and the edges of the scan area. 3. For more information, see Loading Original Documents on...
User Guide
Page 58
Click Dell V305. In Windows Vista: a. Click Dell Printers. The Dell Imaging Toolbox opens. 5. From the Home screen, click Scan. 6. Select the Photo or Several Photos option. 7. Click Dell Printers. Click Dell V305. To change how the image is saved: a. ...Dell Imaging Toolbox. c. Turn on your computer and printer, and ensure that they are connected. 2. Click Programs. b. Select one or more of the Save or Edit dialog box, click Save. 9. b. In Windows XP and Windows 2000: Click Start Programs or All Programs Dell Printers Dell V305...
Click Dell V305. In Windows Vista: a. Click Dell Printers. The Dell Imaging Toolbox opens. 5. From the Home screen, click Scan. 6. Select the Photo or Several Photos option. 7. Click Dell Printers. Click Dell V305. To change how the image is saved: a. ...Dell Imaging Toolbox. c. Turn on your computer and printer, and ensure that they are connected. 2. Click Programs. b. Select one or more of the Save or Edit dialog box, click Save. 9. b. In Windows XP and Windows 2000: Click Start Programs or All Programs Dell Printers Dell V305...
User Guide
Page 59
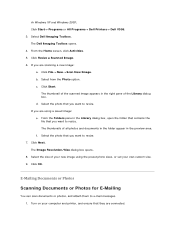
... in the Library dialog box, open the folder that contains the file that they are connected. If you are scanning a new image: a. From the Folders pane in the preview area. f. Click Next. The Image Resolution/Size dialog box opens. ... Click OK. The Dell Imaging Toolbox opens. 4. Turn on your own custom size. 9. Select Dell Imaging Toolbox. From the Home screen, click Activities. 5. d. The thumbnails of the Library dialog box. In Windows XP and Windows 2000: Click Start Programs or All Programs Dell Printers Dell V305. 3. Select from the...
... in the Library dialog box, open the folder that contains the file that they are connected. If you are scanning a new image: a. From the Folders pane in the preview area. f. Click Next. The Image Resolution/Size dialog box opens. ... Click OK. The Dell Imaging Toolbox opens. 4. Turn on your own custom size. 9. Select Dell Imaging Toolbox. From the Home screen, click Activities. 5. d. The thumbnails of the Library dialog box. In Windows XP and Windows 2000: Click Start Programs or All Programs Dell Printers Dell V305. 3. Select from the...
User Guide
Page 60
...Dell Printers Dell V305. 4. If you select Document, the scan opens in the right pane of the Save or Edit dialog. 8. In Windows Vista: a. Click Programs. b. From the Home screen, click Scan. 6. NOTE: When scanning a document for e-mailing, choose Photo or Several Photos. Click Dell V305. The Dell... Imaging Toolbox opens. 5. Click Create E-mail to attach your scanned image. 10. Save your document or ...
...Dell Printers Dell V305. 4. If you select Document, the scan opens in the right pane of the Save or Edit dialog. 8. In Windows Vista: a. Click Programs. b. From the Home screen, click Scan. 6. NOTE: When scanning a document for e-mailing, choose Photo or Several Photos. Click Dell V305. The Dell... Imaging Toolbox opens. 5. Click Create E-mail to attach your scanned image. 10. Save your document or ...
User Guide
Page 61
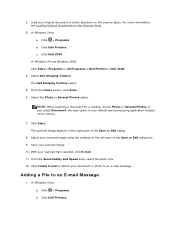
...All Programs Dell Printers Dell V305. 3. In Windows XP and Windows 2000: Click Start Programs or All Programs Dell Printers Dell V305. 2. From the Home screen, click My Photo Album. 4. Click Create E-mail to select each photo or document that contains the files you are sending one or more photos... area. 5. Click to create an e-mail message with your file attached. Click Add, and then click Add New Scan. Click Dell V305. From the Home screen, click My Photo Album. 5. c. The Dell Imaging Toolbox dialog box opens. 3. In Windows Vista: a. Select...
...All Programs Dell Printers Dell V305. 3. In Windows XP and Windows 2000: Click Start Programs or All Programs Dell Printers Dell V305. 2. From the Home screen, click My Photo Album. 4. Click Create E-mail to select each photo or document that contains the files you are sending one or more photos... area. 5. Click to create an e-mail message with your file attached. Click Add, and then click Add New Scan. Click Dell V305. From the Home screen, click My Photo Album. 5. c. The Dell Imaging Toolbox dialog box opens. 3. In Windows Vista: a. Select...

User Guide
Page 62
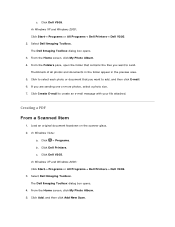
...the Library. 10. Select Save all images as one of the following: Select Add New Scan, and then select Photo, Several Photos, or Document. Select Dell Imaging Toolbox. Click Add Another to scan additional images or to PDF. 9. Click Add...scanning. 8. Do one PDF file or Save each image as individual PDF file. 12. Click Create PDF. From a Saved Item 1. b. With your PDF, and select a storage location. 14. Click Dell Printers. In Windows XP and Windows 2000: Click Start Programs or All Programs Dell Printers Dell V305. 2. Click Dell V305...
...the Library. 10. Select Save all images as one of the following: Select Add New Scan, and then select Photo, Several Photos, or Document. Select Dell Imaging Toolbox. Click Add Another to scan additional images or to PDF. 9. Click Add...scanning. 8. Do one PDF file or Save each image as individual PDF file. 12. Click Create PDF. From a Saved Item 1. b. With your PDF, and select a storage location. 14. Click Dell Printers. In Windows XP and Windows 2000: Click Start Programs or All Programs Dell Printers Dell V305. 2. Click Dell V305...

User Guide
Page 63
... on them in the preview pane. Click Dell Printers. Click Dell V305. The Dell Imaging Toolbox dialog box opens. 3. In Windows XP and Windows 2000: Click Start Programs or All Programs Dell Printers Dell V305. 2. From the Home screen, click Scan. Click Start. Select Add Photo... from the Library. 7. Click Create PDF. Enter a file name for your PDF and opens a Save dialog box. 10. Select Save all images as individual PDF file. 9. Do one PDF...
... on them in the preview pane. Click Dell Printers. Click Dell V305. The Dell Imaging Toolbox dialog box opens. 3. In Windows XP and Windows 2000: Click Start Programs or All Programs Dell Printers Dell V305. 2. From the Home screen, click Scan. Click Start. Select Add Photo... from the Library. 7. Click Create PDF. Enter a file name for your PDF and opens a Save dialog box. 10. Select Save all images as individual PDF file. 9. Do one PDF...


