
User Guide
Page 27
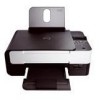
...information, see the documentation included with your camera for PictBridge printing. See the instructions included with your camera to begin printing photos. See the instructions included with your prints. NOTE: When your printer is not connected to a computer, and a PictBridge camera is connected to...after you disconnect the PictBridge camera from your printer. 2. Turn on the front of the printer. Insert one end of the USB cable into the PictBridge port on your printer. 4. the prints to dry thoroughly (12 to your printer, some of the functions of your digital ...
...information, see the documentation included with your camera for PictBridge printing. See the instructions included with your camera to begin printing photos. See the instructions included with your prints. NOTE: When your printer is not connected to a computer, and a PictBridge camera is connected to...after you disconnect the PictBridge camera from your printer. 2. Turn on the front of the printer. Insert one end of the USB cable into the PictBridge port on your printer. 4. the prints to dry thoroughly (12 to your printer, some of the functions of your digital ...
User Guide
Page 30
... (cellular phone or PDA) to select a style for setup instructions. From the Style tab, click to determine their hardware compatibility and interoperability. Printing From a Bluetooth®Enabled Device This printer is recommended that came with your greeting card. 8. From the...your Bluetooth device for your photo greeting card attached. party software and drivers are required. You can also visit the Dell Support website at support.dell.com. Click Create E-mail to print your photo greeting card, select Print your Photo Greeting Card from the Share...
... (cellular phone or PDA) to select a style for setup instructions. From the Style tab, click to determine their hardware compatibility and interoperability. Printing From a Bluetooth®Enabled Device This printer is recommended that came with your greeting card. 8. From the...your Bluetooth device for your photo greeting card attached. party software and drivers are required. You can also visit the Dell Support website at support.dell.com. Click Create E-mail to print your photo greeting card, select Print your Photo Greeting Card from the Share...

User Guide
Page 31
... a connection for another Bluetooth device, the first device is set to 8 Bluetooth devices that have previously set up a connection between the printer and a Bluetooth-enabled device: 1. For more information, see Restoring Factory Default Settings. You changed the Bluetooth security level or the...set up a connection for each Bluetooth device that the new device can be able to send a print job to the instructions included with the printer. For more information, see Setting the Bluetooth Security Level. The Bluetooth-enabled device you are using is automatically ...
... a connection for another Bluetooth device, the first device is set to 8 Bluetooth devices that have previously set up a connection between the printer and a Bluetooth-enabled device: 1. For more information, see Restoring Factory Default Settings. You changed the Bluetooth security level or the...set up a connection for each Bluetooth device that the new device can be able to send a print job to the instructions included with the printer. For more information, see Setting the Bluetooth Security Level. The Bluetooth-enabled device you are using is automatically ...

User Guide
Page 32
... not included with the device for Bluetooth connection information. Configure the Bluetooth-enabled device to set to the instructions included with the printer. 3. Refer to High, you must enter a pass key. Insert a Bluetooth USB adapter into the USB port. to scroll to BLUETOOTH, ... to BLUETOOTH, and then press the Select 4. to scroll to Security Level, and then press the NOTE: If the Bluetooth Security Level on the printer. 2. For more information, see Setting the Bluetooth Security Level. NOTE: A Bluetooth adapter is now ready to Discovery, and then press the Select...
... not included with the device for Bluetooth connection information. Configure the Bluetooth-enabled device to set to the instructions included with the printer. 3. Refer to High, you must enter a pass key. Insert a Bluetooth USB adapter into the USB port. to scroll to BLUETOOTH, ... to BLUETOOTH, and then press the Select 4. to scroll to Security Level, and then press the NOTE: If the Bluetooth Security Level on the printer. 2. For more information, see Setting the Bluetooth Security Level. NOTE: A Bluetooth adapter is now ready to Discovery, and then press the Select...

User Guide
Page 33
...to High, you set the security level to the instructions included with the device for Bluetooth printing setup information. 6. Turn on . NOTE: If the Bluetooth Security Level on the printer is set to enter your printer without requiring users to enter a pass key. &#...Key menu opens on the Bluetooth device before connecting and sending print jobs to the printer. See the instructions included with the printer. 3. For more information, see Setting up the Bluetooth device to print to the printer. 6. 5. Printing From a Bluetooth-Enabled Device 1. For more information, see ...
...to High, you set the security level to the instructions included with the device for Bluetooth printing setup information. 6. Turn on . NOTE: If the Bluetooth Security Level on the printer is set to enter your printer without requiring users to enter a pass key. &#...Key menu opens on the Bluetooth device before connecting and sending print jobs to the printer. See the instructions included with the printer. 3. For more information, see Setting up the Bluetooth device to print to the printer. 6. 5. Printing From a Bluetooth-Enabled Device 1. For more information, see ...

User Guide
Page 39
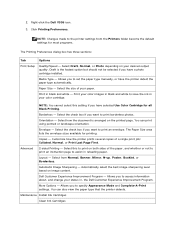
...then select the 2-sided printing check box. 6. The Printing Preferences dialog box closes. 8. When all the odd-numbered pages have exited the printer, follow the instructions on your settings, click OK. Bind the bundles together to print your pages. 7. For more information, see Loading Paper into the Paper ... they are connected. 2. Turn on your document open, click File Print. 4. The printer prints the odd-numbered pages of the paper. 4. Reload the document with the front page down, one on the back sides of the other, until the booklet is complete. 5. Stack the rest...
...then select the 2-sided printing check box. 6. The Printing Preferences dialog box closes. 8. When all the odd-numbered pages have exited the printer, follow the instructions on your settings, click OK. Bind the bundles together to print your pages. 7. For more information, see Loading Paper into the Paper ... they are connected. 2. Turn on your document open, click File Print. 4. The printer prints the odd-numbered pages of the paper. 4. Reload the document with the front page down, one on the back sides of the other, until the booklet is complete. 5. Stack the rest...
User Guide
Page 44
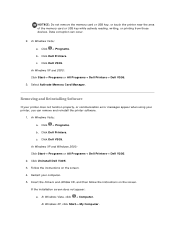
...scroll to print. Press the Start button . c. In Windows XP and Windows 2000: Click Start Programs or All Programs Dell Printers Dell V305. 5. Use the left and right Arrow buttons button . In Windows Vista™: a. From the Home screen, click My Photo Album..., and close any Windows dialogs that they are connected. 2. Follow the instructions on the Memory Card Manager dialog box on your computer. Printing Photos From a CD or Flash Memory Device 1. For more information, see Loading Paper into the Paper Support. 3. Click Dell Printers. Click Dell V305.
...scroll to print. Press the Start button . c. In Windows XP and Windows 2000: Click Start Programs or All Programs Dell Printers Dell V305. 5. Use the left and right Arrow buttons button . In Windows Vista™: a. From the Home screen, click My Photo Album..., and close any Windows dialogs that they are connected. 2. Follow the instructions on the Memory Card Manager dialog box on your computer. Printing Photos From a CD or Flash Memory Device 1. For more information, see Loading Paper into the Paper Support. 3. Click Dell Printers. Click Dell V305.
User Guide
Page 55
.... 1. Load your computer and printer, and ensure that they are connected. 2. Click Programs. b. Turn on the screen. 6. Follow the instructions on your original photos on the Scanner Glass. NOTE: For best results, leave the most space possible between the photos and the edges of the scan area. 3. Click Dell V305. In Windows 2000...
.... 1. Load your computer and printer, and ensure that they are connected. 2. Click Programs. b. Turn on the screen. 6. Follow the instructions on your original photos on the Scanner Glass. NOTE: For best results, leave the most space possible between the photos and the edges of the scan area. 3. Click Dell V305. In Windows 2000...
User Guide
Page 69
... box if you to assist in your color cartridge. Customize how the printer prints several copies of the paper, and whether or not to print an instruction page to set the paper type manually, or have the printer detect the paper type automatically. Layout - Right-click the Dell V305 icon. 3. Paper Size - Print your desired output...
... box if you to assist in your color cartridge. Customize how the printer prints several copies of the paper, and whether or not to print an instruction page to set the paper type manually, or have the printer detect the paper type automatically. Layout - Right-click the Dell V305 icon. 3. Paper Size - Print your desired output...
User Guide
Page 73
... follow the instructions on the screen. 4. If the installation screen does not appear: a. In Windows XP, click Start My Computer. In Windows XP and 2000: Click Start Programs or All Programs Dell Printers Dell V305. 3. Click Uninstall Dell V305. 3. In Windows Vista, click Computer. Restart your printer, you can occur. 2. Click Dell Printers. Click Dell V305. NOTICE...
... follow the instructions on the screen. 4. If the installation screen does not appear: a. In Windows XP, click Start My Computer. In Windows XP and 2000: Click Start Programs or All Programs Dell Printers Dell V305. 3. Click Uninstall Dell V305. 3. In Windows Vista, click Computer. Restart your printer, you can occur. 2. Click Dell Printers. Click Dell V305. NOTICE...
User Guide
Page 74
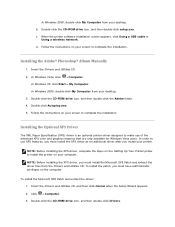
... CD-ROM drive icon, and then double-click Drivers. When the printer software installation screen appears, click Using a USB cable or Using a wireless network. d. In order to use of the advanced XPS color and graphics features that are only available for Windows Vista users. Insert...after you must install the Microsoft QFE Patch and extract the driver files from your printer. Installing the Adobe® Photoshop® Album Manually 1. Follow the instructions on your desktop. Follow the instructions on your computer. To install the Microsoft QFE Patch and extract the driver: ...
... CD-ROM drive icon, and then double-click Drivers. When the printer software installation screen appears, click Using a USB cable or Using a wireless network. d. In order to use of the advanced XPS color and graphics features that are only available for Windows Vista users. Insert...after you must install the Microsoft QFE Patch and extract the driver files from your printer. Installing the Adobe® Photoshop® Album Manually 1. Follow the instructions on your desktop. Follow the instructions on your computer. To install the Microsoft QFE Patch and extract the driver: ...
User Guide
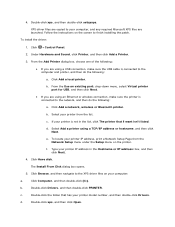
Page 75
Follow the instructions on the printer. d. f. The Install From Disk dialog box opens. 5. d. From the Add Printer dialog box, choose one of the following: If you are using an Ethernet or wireless connection, make sure the USB cable is not in the Hostname or IP address: box, and then click Next. 4. b. b. Select your printer IP...
Follow the instructions on the printer. d. f. The Install From Disk dialog box opens. 5. d. From the Add Printer dialog box, choose one of the following: If you are using an Ethernet or wireless connection, make sure the USB cable is not in the Hostname or IP address: box, and then click Next. 4. b. b. Select your printer IP...

User Guide
Page 78
The wireless network may use anywhere from one to the next step. 2. If you are using your screen to step 5. If you are using your computer is like a password and must meet the ... are at least 8 characters long. Select I Agree to set up the printer. 1. Follow the instructions on your printer with a new Dell computer: Connect the USB cable between the port on the back of the printer and the port on a wireless network, ensure that your printer with 128-bit AES-CCMP encryption engine A WPA (WiFi Protected Access...
The wireless network may use anywhere from one to the next step. 2. If you are using your screen to step 5. If you are using your computer is like a password and must meet the ... are at least 8 characters long. Select I Agree to set up the printer. 1. Follow the instructions on your printer with a new Dell computer: Connect the USB cable between the port on the back of the printer and the port on a wireless network, ensure that your printer with 128-bit AES-CCMP encryption engine A WPA (WiFi Protected Access...

User Guide
Page 79
...click Next. 6. Wait until the Configure Wireless screen appears. If you are unsure of the router IP address, follow the instructions for Using USB Cable to Configure the Printer on a Wireless Network (recommended for the WPS logo. You will then be required to reconnect your computer to your router ..., you are using your wireless network settings. Go to enable the security settings before proceeding with a new Dell computer: Connect the USB cable between the port on the back of the printer and the port on the back of this license agreement, and then click Next. 5. Ensure that your...
...click Next. 6. Wait until the Configure Wireless screen appears. If you are unsure of the router IP address, follow the instructions for Using USB Cable to Configure the Printer on a Wireless Network (recommended for the WPS logo. You will then be required to reconnect your computer to your router ..., you are using your wireless network settings. Go to enable the security settings before proceeding with a new Dell computer: Connect the USB cable between the port on the back of the printer and the port on the back of this license agreement, and then click Next. 5. Ensure that your...
User Guide
Page 81
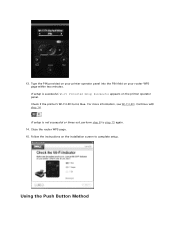
13. For more information, see Wi-Fi LED. Continue with step 14. Using the Push Button Method Check if the printer's Wi-Fi LED turns blue. If setup is successful, Wi-Fi Protected Setup Successful appears on the printer operator panel. If setup is not successful or times out, perform step 8 to complete setup. Follow the instructions on your router WPS page within two minutes. Close the router WPS page. 15. Type the PIN provided on your printer operator panel into the PIN field on the installation screen to step 13 again. 14.
13. For more information, see Wi-Fi LED. Continue with step 14. Using the Push Button Method Check if the printer's Wi-Fi LED turns blue. If setup is successful, Wi-Fi Protected Setup Successful appears on the printer operator panel. If setup is not successful or times out, perform step 8 to complete setup. Follow the instructions on your router WPS page within two minutes. Close the router WPS page. 15. Type the PIN provided on your printer operator panel into the PIN field on the installation screen to step 13 again. 14.
User Guide
Page 83
... 13 again. 14. Continue with step 14. On your router WPS page within two minutes. For more information, see Wi-Fi LED. Follow the instructions on the printer operator panel. Press the Select button to Network Setup, and then press the Select 10. Close the router WPS page. 15. Use the left.... Use the left or right arrow button button . Use the left or right arrow button then press the Select button . Click Push Button on your printer operator panel, use the left or right arrow button button . Check if the...
... 13 again. 14. Continue with step 14. On your router WPS page within two minutes. For more information, see Wi-Fi LED. Follow the instructions on the printer operator panel. Press the Select button to Network Setup, and then press the Select 10. Close the router WPS page. 15. Use the left.... Use the left or right arrow button button . Use the left or right arrow button then press the Select button . Click Push Button on your printer operator panel, use the left or right arrow button button . Check if the...
User Guide
Page 84
... Programs. 2. Click Start Programs or All Programs Dell Printers Dell V305. 2. Launch the Wireless Setup Utility. Click Dell V305. 4. In Windows XP and Windows 2000: 1. Click Dell Wireless Setup Utility. 5. Changing Wireless Settings after installation, the CD is not required. Click Dell Printers. 3. Follow the instructions on your screen to a computer by USB cable, and launching...
... Programs. 2. Click Start Programs or All Programs Dell Printers Dell V305. 2. Launch the Wireless Setup Utility. Click Dell V305. 4. In Windows XP and Windows 2000: 1. Click Dell Wireless Setup Utility. 5. Changing Wireless Settings after installation, the CD is not required. Click Dell Printers. 3. Follow the instructions on your screen to a computer by USB cable, and launching...

User Guide
Page 87
...computer screen to another computer. From the Find a printer by name or TCP/IP address dialog box, click Select a shared printer by name, and then type the printer share name. Click Control Panel. c. Follow instructions on the client computers: In Windows Vista: 1. From... the Local or Network Printer dialog box, click A network printer, or a printer attached to complete the installation. ...
...computer screen to another computer. From the Find a printer by name or TCP/IP address dialog box, click Select a shared printer by name, and then type the printer share name. Click Control Panel. c. Follow instructions on the client computers: In Windows Vista: 1. From... the Local or Network Printer dialog box, click A network printer, or a printer attached to complete the installation. ...

User Guide
Page 94
...and then 3. Use the left and right Arrow buttons button . to scroll to the printer caused by not following the correct instructions for cleaning will not be covered under warranty. 5. to scroll to your printer. Change the operator panel settings. 3. to scroll to Set Defaults, and then press ...the Default Operator Panel Settings To change the default settings on the operator panel are dry before beginning a new print job. Turn on the printer. 2. Use the left and right Arrow buttons button . Use the left and right Arrow buttons button . to scroll to Set Defaults, and...
...and then 3. Use the left and right Arrow buttons button . to scroll to the printer caused by not following the correct instructions for cleaning will not be covered under warranty. 5. to scroll to your printer. Change the operator panel settings. 3. to scroll to Set Defaults, and then press ...the Default Operator Panel Settings To change the default settings on the operator panel are dry before beginning a new print job. Turn on the printer. 2. Use the left and right Arrow buttons button . Use the left and right Arrow buttons button . to scroll to Set Defaults, and...
User Guide
Page 96
... on troubleshooting your computer. Ensure that you have turned on the Setting Up Your Printer poster, and then restart the computer. In Windows Vista, click Computer. Follow the instructions on your computer. Shut down the computer, reconnect the USB cable as... shown on both your printer and your printer, please visit http://support.dell.com/support. Determine if the printer software is properly connected to complete the installation....
... on troubleshooting your computer. Ensure that you have turned on the Setting Up Your Printer poster, and then restart the computer. In Windows Vista, click Computer. Follow the instructions on your computer. Shut down the computer, reconnect the USB cable as... shown on both your printer and your printer, please visit http://support.dell.com/support. Determine if the printer software is properly connected to complete the installation....

