User Guide
Page 3
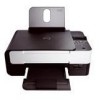
...in all countries. 11 MAC address label Identify the media access control (MAC) address of printer that holds the paper as it exits the printer. 6 Scanner base unit Unit you use support.dell.com or contact and Service Tag technical support. number Enter the Express Service Code to ...the ink cartridges. 7 Ink cartridge carrier Carrier that holds two ink cartridges, one color and the other black or photo...
...in all countries. 11 MAC address label Identify the media access control (MAC) address of printer that holds the paper as it exits the printer. 6 Scanner base unit Unit you use support.dell.com or contact and Service Tag technical support. number Enter the Express Service Code to ...the ink cartridges. 7 Ink cartridge carrier Carrier that holds two ink cartridges, one color and the other black or photo...
User Guide
Page 4
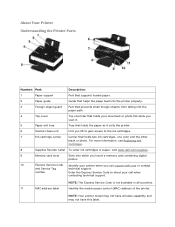
...digital camera, Bluetooth™ adapter, or a USB key. NOTE: Your printer model may not have wireless capability and may not have this device. Number: Part: 15 PictBridge port 16 Operator panel 17 Scanner Description: The port into your document or photo face down to copy or... Slot into the wall outlet. Panel on a wireless network. Number: Part: 12 Dell Internal Network Adapter 13 Power connector 14 USB connector Description: A networking device to set up your printer on the printer...
...digital camera, Bluetooth™ adapter, or a USB key. NOTE: Your printer model may not have wireless capability and may not have this device. Number: Part: 15 PictBridge port 16 Operator panel 17 Scanner Description: The port into your document or photo face down to copy or... Slot into the wall outlet. Panel on a wireless network. Number: Part: 12 Dell Internal Network Adapter 13 Power connector 14 USB connector Description: A networking device to set up your printer on the printer...
User Guide
Page 9
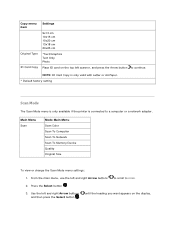
... Arrow buttons to scroll to SCAN. 2. until the heading you want appears on the top left scanner, and press the Arrow button to a computer or a network adapter. Main Menu Scan Mode Main Menu Scan Color Scan To Computer Scan To Network Scan To Memory Device Quality Original Size To view or change...: ID Card Copy is only valid with Letter or A4 Paper. * Default factory setting Scan Mode The Scan Mode menu is only available if the printer is connected to continue. Press the Select button . 3.
... Arrow buttons to scroll to SCAN. 2. until the heading you want appears on the top left scanner, and press the Arrow button to a computer or a network adapter. Main Menu Scan Mode Main Menu Scan Color Scan To Computer Scan To Network Scan To Memory Device Quality Original Size To view or change...: ID Card Copy is only valid with Letter or A4 Paper. * Default factory setting Scan Mode The Scan Mode menu is only available if the printer is connected to continue. Press the Select button . 3.

User Guide
Page 10
4. When the setting you want appears on scanner, and press the right Arrow button . *Automatic 75 dpi 150 dpi 300 dpi 600 dpi 1200 dpi *Automatic 8.5 x 11 in. 2.25 x 3.25 3 x 5 in. 3.5 x 5 in. 4 x 6 in. 4 x 8 ... A4 60x80 mm 9x13 cm 10x15 cm 10x20 cm 13x18 cm 20x25 cm Scan menu item Scan Color Scan To Computer Scan To Network Scan To Memory Device Quality Original Size *Default factory setting Settings *Color Black App List PC Name Place document on the display, press the Select button to scroll...
4. When the setting you want appears on scanner, and press the right Arrow button . *Automatic 75 dpi 150 dpi 300 dpi 600 dpi 1200 dpi *Automatic 8.5 x 11 in. 2.25 x 3.25 3 x 5 in. 3.5 x 5 in. 4 x 6 in. 4 x 8 ... A4 60x80 mm 9x13 cm 10x15 cm 10x20 cm 13x18 cm 20x25 cm Scan menu item Scan Color Scan To Computer Scan To Network Scan To Memory Device Quality Original Size *Default factory setting Settings *Color Black App List PC Name Place document on the display, press the Select button to scroll...
User Guide
Page 24
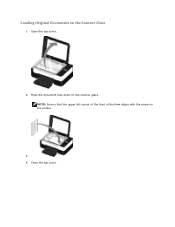
Close the top cover. NOTE: Ensure that the upper left corner of the front of the item aligns with the arrow on the scanner glass. Open the top cover. 2. Place the document face down on the printer. 3. 4. Loading Original Documents on the Scanner Glass 1.
Close the top cover. NOTE: Ensure that the upper left corner of the front of the item aligns with the arrow on the scanner glass. Open the top cover. 2. Place the document face down on the printer. 3. 4. Loading Original Documents on the Scanner Glass 1.
User Guide
Page 47
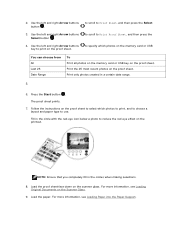
... card or USB You can choose from All Last 25 Date Range To Print all photos on the memory card or USB key on the scanner glass. Use the left and right Arrow buttons Select button . 4. Follow the instructions on the proof sheet. Print only photos created in the circle with... below a photo to use. NOTE: Ensure that you completely fill in the circles when making selections. 8. For more information, see Loading Original Documents on the Scanner Glass. 9. Use the left and right Arrow buttons button . 3.
... card or USB You can choose from All Last 25 Date Range To Print all photos on the memory card or USB key on the scanner glass. Use the left and right Arrow buttons Select button . 4. Follow the instructions on the proof sheet. Print only photos created in the circle with... below a photo to use. NOTE: Ensure that you completely fill in the circles when making selections. 8. For more information, see Loading Original Documents on the Scanner Glass. 9. Use the left and right Arrow buttons button . 3.
User Guide
Page 49
Turn on your computer and printer, and ensure that they are connected. 2. Load your original document. For more information, see Copy Mode. 6. NOTE: If you press the Start button without changing ... submenus and change the copy settings. For more information, see Loading Paper into the Paper Support. 3. For more information, see Loading Original Documents on the Scanner Glass. 4. Turn on the printer. 2. In Windows Vista™: a. Use the Arrow buttons to the COPY mode, and then press the Select button . 5.
Turn on your computer and printer, and ensure that they are connected. 2. Load your original document. For more information, see Copy Mode. 6. NOTE: If you press the Start button without changing ... submenus and change the copy settings. For more information, see Loading Paper into the Paper Support. 3. For more information, see Loading Original Documents on the Scanner Glass. 4. Turn on the printer. 2. In Windows Vista™: a. Use the Arrow buttons to the COPY mode, and then press the Select button . 5.
User Guide
Page 51
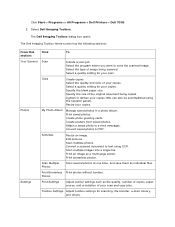
If you scanning? For more information, see Loading Original Documents on the scanner glass. Click Dell Printers. Select Dell Imaging Toolbox. Turn on your original photo on the Scanner Glass. 4. Load your computer and printer, and ensure that they are you want to copy a 4 x 6 photo, ...3. From the Copy Quality submenu, select Photo. 5. Using Your Computer 1. Click Dell V305. In Windows XP or Windows 2000: Click Start Programs or All Programs Dell Printers Dell V305. 5. From the Home screen, click Copy. c. Press the Start button . ...
If you scanning? For more information, see Loading Original Documents on the scanner glass. Click Dell Printers. Select Dell Imaging Toolbox. Turn on your original photo on the Scanner Glass. 4. Load your computer and printer, and ensure that they are you want to copy a 4 x 6 photo, ...3. From the Copy Quality submenu, select Photo. 5. Using Your Computer 1. Click Dell V305. In Windows XP or Windows 2000: Click Start Programs or All Programs Dell Printers Dell V305. 5. From the Home screen, click Copy. c. Press the Start button . ...

User Guide
Page 53
...or the name of the computer to b. If you want to d. to scroll to Scan To Computer, and then press the 5. The printer downloads the application list from the computer. to scroll through the available computers to send your scan. Scanning Scanning Single-Page Documents and Single ... by default; Use the left and right Arrow buttons which you want to has a PIN set. e. Press the Select button . 6. Turn on the Scanner Glass. 3. it , use the keypad to scan over the network, ensure that they are connected. f. Press the Start button . Use the left and...
...or the name of the computer to b. If you want to d. to scroll to Scan To Computer, and then press the 5. The printer downloads the application list from the computer. to scroll through the available computers to send your scan. Scanning Scanning Single-Page Documents and Single ... by default; Use the left and right Arrow buttons which you want to has a PIN set. e. Press the Select button . 6. Turn on the Scanner Glass. 3. it , use the keypad to scan over the network, ensure that they are connected. f. Press the Start button . Use the left and...
User Guide
Page 54
...-processing application. 7. In Windows Vista: a. b. Using Your Computer 1. Click Dell V305. From the Home screen, click Scan. Click Control Panel. Click Hardware and Sound. Turn on the Scanner Glass. 3. dialog box opens. 6. Select the Photo option. Select Dell Imaging Toolbox. Click Programs. b. The printer scans the page. For more information, see Loading Original...
...-processing application. 7. In Windows Vista: a. b. Using Your Computer 1. Click Dell V305. From the Home screen, click Scan. Click Control Panel. Click Hardware and Sound. Turn on the Scanner Glass. 3. dialog box opens. 6. Select the Photo option. Select Dell Imaging Toolbox. Click Programs. b. The printer scans the page. For more information, see Loading Original...
User Guide
Page 55
...programs do not support multiple-page scanning. 1. Turn on your original photos on the scanner glass. In Windows Vista: a. From the Maintenance tab, click Network Support. Load your computer and printer, and ensure that they are connected. 2. For more information, see Loading Original ...a computer name or a PIN, click OK. In Windows XP and Windows 2000: Click Start Programs or All Programs Dell Printers Dell V305. 4. Right-click your PC name and PIN for network scanning. 5. NOTE: For best results, leave the most space possible between the...
...programs do not support multiple-page scanning. 1. Turn on your original photos on the scanner glass. In Windows Vista: a. From the Maintenance tab, click Network Support. Load your computer and printer, and ensure that they are connected. 2. For more information, see Loading Original ...a computer name or a PIN, click OK. In Windows XP and Windows 2000: Click Start Programs or All Programs Dell Printers Dell V305. 4. Right-click your PC name and PIN for network scanning. 5. NOTE: For best results, leave the most space possible between the...
User Guide
Page 56
... OCR software is loaded into text that they are connected. 2. Turn on your printer and should have OCR software installed on the Scanner Glass. 3. In Windows XP and Windows 2000: Click Start Programs or All Programs Dell Printers Dell V305. 4. The scanned document is provided with your computer along with a word-processing application...
... OCR software is loaded into text that they are connected. 2. Turn on your printer and should have OCR software installed on the Scanner Glass. 3. In Windows XP and Windows 2000: Click Start Programs or All Programs Dell Printers Dell V305. 4. The scanned document is provided with your computer along with a word-processing application...

User Guide
Page 57
... Original Documents on Your Computer 1. c. Click Dell V305. From the Home screen, click Activities. 6. Select the Photo or Several Photos option. 8. Select editing options from the left pane to edit your computer and printer, and ensure that they are connected. 2. Saving Photos on the Scanner Glass. 3. Click Dell Printers. Click Start. Load your original photo facedown...
... Original Documents on Your Computer 1. c. Click Dell V305. From the Home screen, click Activities. 6. Select the Photo or Several Photos option. 8. Select editing options from the left pane to edit your computer and printer, and ensure that they are connected. 2. Saving Photos on the Scanner Glass. 3. Click Dell Printers. Click Start. Load your original photo facedown...
User Guide
Page 60
... and Windows 2000: Click Start Programs or All Programs Dell Printers Dell V305. 4. Select Dell Imaging Toolbox. With your scanned image. 10. From the Send Quality and Speed area, select the photo size. 12. Click Programs. b. In Windows Vista: a. The Dell Imaging Toolbox opens. 5. Save your scanned item selected, click E-mail. 11...
... and Windows 2000: Click Start Programs or All Programs Dell Printers Dell V305. 4. Select Dell Imaging Toolbox. With your scanned image. 10. From the Send Quality and Speed area, select the photo size. 12. Click Programs. b. In Windows Vista: a. The Dell Imaging Toolbox opens. 5. Save your scanned item selected, click E-mail. 11...
User Guide
Page 61
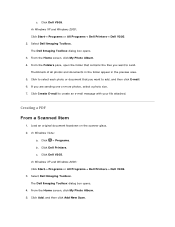
...Album. 4. Load an original document facedown on the scanner glass. 2. Click Dell Printers. c. In Windows XP and Windows 2000: Click Start Programs or All Programs Dell Printers Dell V305. 3. Click Create E-mail to send. Click Dell V305. Click Add, and then click Add New Scan. ... in the preview area. 5. Creating a PDF From a Scanned Item 1. Click Dell V305. In Windows XP and Windows 2000: Click Start Programs or All Programs Dell Printers Dell V305. 2. Click to select each photo or document that contains the files you want to...
...Album. 4. Load an original document facedown on the scanner glass. 2. Click Dell Printers. c. In Windows XP and Windows 2000: Click Start Programs or All Programs Dell Printers Dell V305. 3. Click Create E-mail to send. Click Dell V305. Click Add, and then click Add New Scan. ... in the preview area. 5. Creating a PDF From a Scanned Item 1. Click Dell V305. In Windows XP and Windows 2000: Click Start Programs or All Programs Dell Printers Dell V305. 2. Click to select each photo or document that contains the files you want to...
User Guide
Page 67
...; Programs or All Programs Dell Printers Dell V305. 2. Select Dell Imaging Toolbox. Select the type of the original document being scanned. Resize your copies. Create photo greeting cards. Scan multiple photos. The Dell Imaging Toolbox Home screen has the ...one time, and save them as a multi-page poster. Specify the blank paper size. My Photo Album Manage saved photos in a photo album. Create posters from saved photos. Scan multiple images into a single file. Toolbox Settings Adjust toolbox settings for your copies (this section: Your Scanner...
...; Programs or All Programs Dell Printers Dell V305. 2. Select Dell Imaging Toolbox. Select the type of the original document being scanned. Resize your copies. Create photo greeting cards. Scan multiple photos. The Dell Imaging Toolbox Home screen has the ...one time, and save them as a multi-page poster. Specify the blank paper size. My Photo Album Manage saved photos in a photo album. Create posters from saved photos. Scan multiple images into a single file. Toolbox Settings Adjust toolbox settings for your copies (this section: Your Scanner...
User Guide
Page 89
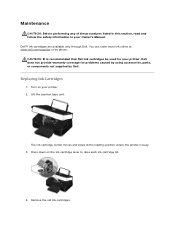
... procedures listed in this section, read and follow the safety information in your printer. 2. Press down on your Owner's Manual. Lift the scanner base unit. You can order more ink online at the loading position unless the printer is recommended that Dell ink cartridges be used for problems caused by using accessories, parts, or...
... procedures listed in this section, read and follow the safety information in your printer. 2. Press down on your Owner's Manual. Lift the scanner base unit. You can order more ink online at the loading position unless the printer is recommended that Dell ink cartridges be used for problems caused by using accessories, parts, or...

User Guide
Page 91
You may discard the alignment page when the alignment is completely closed. To align the ink cartridges from the printer software: 1. Load plain paper. Use the left and right Arrow buttons Select button . Use the left and right Arrow buttons button . You may ...also need to MAINTENANCE, and then press the Select 3. Load plain paper. 2. Lower the scanner base unit until it is complete. In Windows Vista™: Aligning Ink Cartridges Your printer automatically prompts you to Align Cartridges, and then press the An alignment page prints. to scroll to align...
You may discard the alignment page when the alignment is completely closed. To align the ink cartridges from the printer software: 1. Load plain paper. Use the left and right Arrow buttons Select button . Use the left and right Arrow buttons button . You may ...also need to MAINTENANCE, and then press the Select 3. Load plain paper. 2. Lower the scanner base unit until it is complete. In Windows Vista™: Aligning Ink Cartridges Your printer automatically prompts you to Align Cartridges, and then press the An alignment page prints. to scroll to align...
User Guide
Page 100
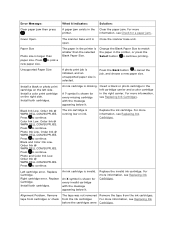
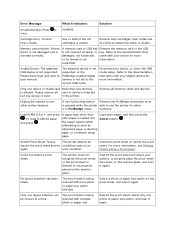
.... Close the scanner base unit. Unsupported Paper Size A photo print job is initiated, and an unsupported paper size is larger than the selected Blank Paper Size. Insert a black or photo cartridge in the printer. Black Ink Low. Order Ink @ WWW.DELL.COM/SUPPLIES. Black and Color Ink Low. ...Order Ink @ WWW.DELL.COM/SUPPLIES. Press to continue. Left cartridge error. Replace the invalid ink cartridge. Remove...
.... Close the scanner base unit. Unsupported Paper Size A photo print job is initiated, and an unsupported paper size is larger than the selected Blank Paper Size. Insert a black or photo cartridge in the printer. Black Ink Low. Order Ink @ WWW.DELL.COM/SUPPLIES. Black and Color Ink Low. ...Order Ink @ WWW.DELL.COM/SUPPLIES. Press to continue. Left cartridge error. Replace the invalid ink cartridge. Remove...
User Guide
Page 101
...attached device is not supported, or the PictBridge-enabled digital camera is skewed or not properly placed on the scanner glass, and scan it again. Only one device or media card More than plain paper is loaded into the paper support when attempting to the documentation ...proof sheet or reprint the proof sheet. functions. Or Load PLAIN A4 paper and press . Cartridge Error. Unplug the camera to use the printer for more information, see Printing Photos Using a Proof Sheet. A non-functioning button Remove the PictBridge connection to be chosen at a time to...
...attached device is not supported, or the PictBridge-enabled digital camera is skewed or not properly placed on the scanner glass, and scan it again. Only one device or media card More than plain paper is loaded into the paper support when attempting to the documentation ...proof sheet or reprint the proof sheet. functions. Or Load PLAIN A4 paper and press . Cartridge Error. Unplug the camera to use the printer for more information, see Printing Photos Using a Proof Sheet. A non-functioning button Remove the PictBridge connection to be chosen at a time to...


