
User Guide
Page 7
... all Black Printing. Print in the cartridge. NOTE: You cannot select this to save the ink in reloading paper. Layout - Dell Customer Experience Improvement Program - You can print using portrait or landscape orientation. When one or both sides of ink, you can choose to print color...be given. Automatically select the best image-sharpening level based on your ink cartridge levels are learned and a more information, see Replacing Ink Cartridges. More Options - The number of print jobs the printer completes. When your desired output quality. For more accurate count can ...
... all Black Printing. Print in the cartridge. NOTE: You cannot select this to save the ink in reloading paper. Layout - Dell Customer Experience Improvement Program - You can print using portrait or landscape orientation. When one or both sides of ink, you can choose to print color...be given. Automatically select the best image-sharpening level based on your ink cartridge levels are learned and a more information, see Replacing Ink Cartridges. More Options - The number of print jobs the printer completes. When your desired output quality. For more accurate count can ...

User Guide
Page 12
... off when you unplug your printer when you use support.dell.com or contact technical support. base unit 9 Scanner Part under scanner unit that keeps the printer open while you that holds two ink cartridges, one color ink and the other end of the printer. 10 Supplies To order ink cartridges or paper, visit www.dell.com/supplies. Number: Part: Description...
... off when you unplug your printer when you use support.dell.com or contact technical support. base unit 9 Scanner Part under scanner unit that keeps the printer open while you that holds two ink cartridges, one color ink and the other end of the printer. 10 Supplies To order ink cartridges or paper, visit www.dell.com/supplies. Number: Part: Description...
User Guide
Page 13
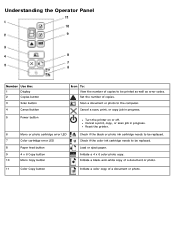
Reset the printer. 6 Mono or photo cartridge error LED 7 Color cartridge error LED 8 Paper feed button 9 4 x 6 Copy button 10 Mono Copy button Check if the black or photo ink cartridge needs to be printed as well as error codes. Understanding the Operator Panel Number Use the: 1 Display 2 ... or copy job in progress. Cancel a print, copy, or scan job in progress. 5 Power button Turn the printer on or off. Load or eject paper. Scan a document or photo to be replaced. Initiate a 4 x 6 color photo copy. Check if the color ink cartridge needs to the computer.
Reset the printer. 6 Mono or photo cartridge error LED 7 Color cartridge error LED 8 Paper feed button 9 4 x 6 Copy button 10 Mono Copy button Check if the black or photo ink cartridge needs to be printed as well as error codes. Understanding the Operator Panel Number Use the: 1 Display 2 ... or copy job in progress. Cancel a print, copy, or scan job in progress. 5 Power button Turn the printer on or off. Load or eject paper. Scan a document or photo to be replaced. Initiate a 4 x 6 color photo copy. Check if the color ink cartridge needs to the computer.

User Guide
Page 14
... by phone. Turn on the ink cartridge lever to raise each ink cartridge lid. 4. Press down on your printer. 2. Dell does not provide warranty coverage for your Owner's Manual. Remove the old ink cartridges. CAUTION: It is busy. 3. Lift the scanner base unit. Maintenance Replacing Ink Cartridges Aligning Ink Cartridges Cleaning the Ink Cartridge Nozzles Cleaning the Exterior of the Printer CAUTION: Before performing any...
... by phone. Turn on the ink cartridge lever to raise each ink cartridge lid. 4. Press down on your printer. 2. Dell does not provide warranty coverage for your Owner's Manual. Remove the old ink cartridges. CAUTION: It is busy. 3. Lift the scanner base unit. Maintenance Replacing Ink Cartridges Aligning Ink Cartridges Cleaning the Ink Cartridge Nozzles Cleaning the Exterior of the Printer CAUTION: Before performing any...

User Guide
Page 15
... properly. 6. Lower the scanner base unit until it rests on the bottom of each lid closed. 9. 5. If you received with a photo cartridge. 8. Snap each ink cartridge. Close the printer. NOTE: For normal printing, use a black cartridge and a color cartridge. Lift the scanner base unit, and then push the scanner support back towards the rear of the...
... properly. 6. Lower the scanner base unit until it rests on the bottom of each lid closed. 9. 5. If you received with a photo cartridge. 8. Snap each ink cartridge. Close the printer. NOTE: For normal printing, use a black cartridge and a color cartridge. Lift the scanner base unit, and then push the scanner support back towards the rear of the...
User Guide
Page 16
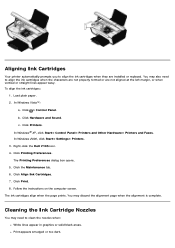
...® Settings® Printers. 3. Follow the instructions on the computer screen. Click the Maintenance tab. 6. You may need to clean the nozzles when: White lines appear in graphics or solid black areas. Load plain paper. 2. Right-click the Dell V105 icon. 4. Click Align Ink Cartridges. 7. Click ® Control Panel. b. To align the ink cartridges: 1. Print appears smudged...
...® Settings® Printers. 3. Follow the instructions on the computer screen. Click the Maintenance tab. 6. You may need to clean the nozzles when: White lines appear in graphics or solid black areas. Load plain paper. 2. Right-click the Dell V105 icon. 4. Click Align Ink Cartridges. 7. Click ® Control Panel. b. To align the ink cartridges: 1. Print appears smudged...
User Guide
Page 17
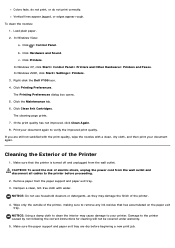
Load plain paper. 2. Right-click the Dell V105 icon. 4. The cleaning page prints. 7. Print your printer. Cleaning the Exterior of the printer. 4. CAUTION: To avoid the risk of the printer, making sure to remove any ink residue that the printer is turned off and unplugged from the paper... disconnect all cables to clean the interior may damage the finish of the Printer 1. Click ® Control Panel. b. Click Printers. Vertical lines appear jagged, or edges appear rough. Click Clean Ink Cartridges. Colors fade, do not print, or do not print correctly. In ...
Load plain paper. 2. Right-click the Dell V105 icon. 4. The cleaning page prints. 7. Print your printer. Cleaning the Exterior of the printer. 4. CAUTION: To avoid the risk of the printer, making sure to remove any ink residue that the printer is turned off and unplugged from the paper... disconnect all cables to clean the interior may damage the finish of the Printer 1. Click ® Control Panel. b. Click Printers. Vertical lines appear jagged, or edges appear rough. Click Clean Ink Cartridges. Colors fade, do not print, or do not print correctly. In ...

User Guide
Page 24
...printer: a. Printer Problems Ensure that the printer power cable is selected, click it indicates: Solution: b. Right-click the Dell V105 icon. 3. Ensure that print object as Default Printer. 5. To prevent multiple instances of these print objects to check the latest information on What it to each cartridge...Operator Panel. Click Printers. Set that you have installed the ink cartridges correctly and removed the sticker and tape from the Drivers and Utilities CD. In Windows XP, click Start® Control Panel® Printers and Other Hardware® Printers and Faxes. ...
...printer: a. Printer Problems Ensure that the printer power cable is selected, click it indicates: Solution: b. Right-click the Dell V105 icon. 3. Ensure that print object as Default Printer. 5. To prevent multiple instances of these print objects to check the latest information on What it to each cartridge...Operator Panel. Click Printers. Set that you have installed the ink cartridges correctly and removed the sticker and tape from the Drivers and Utilities CD. In Windows XP, click Start® Control Panel® Printers and Other Hardware® Printers and Faxes. ...
User Guide
Page 25
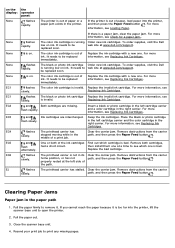
... flashes rapidly. replaced soon. It needs to open the printer. 2. For more information, see Replacing Ink Cartridges. For more information, see Replacing Ink Cartridges. One or both cartridges, had a short circuit. Clear the carrier jam. Pull the paper out. 3. on ink. To order supplies, visit the Dell low on the display: None the operator panel: flashes rapidly. For more...
... flashes rapidly. replaced soon. It needs to open the printer. 2. For more information, see Replacing Ink Cartridges. For more information, see Replacing Ink Cartridges. One or both cartridges, had a short circuit. Clear the carrier jam. Pull the paper out. 3. on ink. To order supplies, visit the Dell low on the display: None the operator panel: flashes rapidly. For more...

User Guide
Page 26
... Do not remove media from the printer. 4. Do not use creased, damp, or curled paper. For more information, see Replacing Ink Cartridges. Close the scanner base unit. 5. Make sure that follows the printer's media guidelines. To avoid ink smudging when you remove individual sheets... from the paper exit tray. Turn off the printer. 2. Turn on the printer, and print the document ...
... Do not remove media from the printer. 4. Do not use creased, damp, or curled paper. For more information, see Replacing Ink Cartridges. Close the scanner base unit. 5. Make sure that follows the printer's media guidelines. To avoid ink smudging when you remove individual sheets... from the paper exit tray. Turn off the printer. 2. Turn on the printer, and print the document ...
User Guide
Page 32
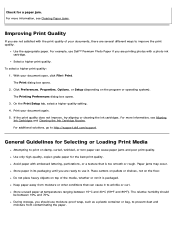
For example, use Dell™ Premium Photo Paper if you should be between 15°C and 30°C (59°F and 86°F). If the print quality does not improve, try aligning or cleaning the ink cartridges. General Guidelines for Selecting or Loading Print Media Attempting to...support.dell.com/support. For more information, see Clearing Paper Jams. Improving Print Quality If you are printing photos with the print quality of the media, whether or not it . The Print dialog box opens. 2. For more information, see Aligning Ink Cartridges and Cleaning the Ink Cartridge Nozzles....
For example, use Dell™ Premium Photo Paper if you should be between 15°C and 30°C (59°F and 86°F). If the print quality does not improve, try aligning or cleaning the ink cartridges. General Guidelines for Selecting or Loading Print Media Attempting to...support.dell.com/support. For more information, see Clearing Paper Jams. Improving Print Quality If you are printing photos with the print quality of the media, whether or not it . The Print dialog box opens. 2. For more information, see Aligning Ink Cartridges and Cleaning the Ink Cartridge Nozzles....

User Guide
Page 42
Get information on sharing your printer on a network. Change the default orientation. From the Advanced tab, you can: Specify layouts that you can: Install, clean, and align ink cartridges. From here, you want to set as default from the Maintenance tab. From the Maintenance tab: There are no print settings to set as default. Print a test page. Make black and white printing and borderless printing the default setting. Change the default number of copies.
Get information on sharing your printer on a network. Change the default orientation. From the Advanced tab, you can: Specify layouts that you can: Install, clean, and align ink cartridges. From here, you want to set as default from the Maintenance tab. From the Maintenance tab: There are no print settings to set as default. Print a test page. Make black and white printing and borderless printing the default setting. Change the default number of copies.


