User Guide
Page 5
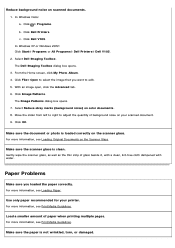
... Dell Printers® Dell V105. 2. Copy Create copies Select the quality and color of your copies. Specify the blank paper size. Create posters from saved photos. Convert a scanned document to send the scanned image. Settings Scan Multiple Photos Scan several photos at one time...PDF. Scan multiple photos. Select Dell Imaging Toolbox. Select a quality setting for your copies (this section: Click Your Scanner Scan To Initiate a scan job. Lighten or darken your scan. Create photo greeting cards. c. Click Dell V105. The Dell Imaging Toolbox Home screen has ...
... Dell Printers® Dell V105. 2. Copy Create copies Select the quality and color of your copies. Specify the blank paper size. Create posters from saved photos. Convert a scanned document to send the scanned image. Settings Scan Multiple Photos Scan several photos at one time...PDF. Scan multiple photos. Select Dell Imaging Toolbox. Select a quality setting for your copies (this section: Click Your Scanner Scan To Initiate a scan job. Lighten or darken your scan. Create photo greeting cards. c. Click Dell V105. The Dell Imaging Toolbox Home screen has ...
User Guide
Page 11
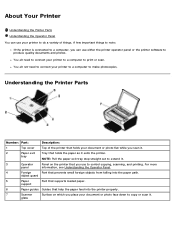
...loaded paper. support 6 Paper guides Guides that holds your printer to a computer to print or scan. glass object guard 5 Paper Part that prevents small foreign objects from falling into the printer properly. 7 Scanner Surface on the printer that holds the paper as it . 2 Paper exit ...Tray that you place your printer to a computer to make photocopies. You do need to connect your document...
...loaded paper. support 6 Paper guides Guides that holds your printer to a computer to print or scan. glass object guard 5 Paper Part that prevents small foreign objects from falling into the printer properly. 7 Scanner Surface on the printer that holds the paper as it . 2 Paper exit ...Tray that you place your printer to a computer to make photocopies. You do need to connect your document...

User Guide
Page 12
...supply. cartridge carrier 12 Express Service Identify your printer, the power will be off when you that holds two ink cartridges, one color ink and the other end of the printer. 10 Supplies To order ink cartridges or paper, visit www.dell.com/supplies. supply NOTE: The power supply ... to gain access to the ink cartridges. support NOTE: To close the printer for normal operation, lift the scanner base unit, push the scanner support back towards the rear of the printer, and then lower the scanner base unit until it back in all countries. NOTE: The Express Service ...
...supply. cartridge carrier 12 Express Service Identify your printer, the power will be off when you that holds two ink cartridges, one color ink and the other end of the printer. 10 Supplies To order ink cartridges or paper, visit www.dell.com/supplies. supply NOTE: The power supply ... to gain access to the ink cartridges. support NOTE: To close the printer for normal operation, lift the scanner base unit, push the scanner support back towards the rear of the printer, and then lower the scanner base unit until it back in all countries. NOTE: The Express Service ...

User Guide
Page 14
Lift the scanner base unit. Remove the old ink cartridges. Press down on your printer. 2. CAUTION: It is busy. 3. You can order more ink online at the loading position unless the printer is recommended that Dell ink cartridges be used for problems caused by using accessories,..., read and follow the safety information in your printer. The ink cartridge carrier moves and stops at www.dell.com/supplies or by Dell. Replacing Ink Cartridges 1. Dell™ ink cartridges are available only through Dell. Dell does not provide warranty coverage for your Owner's Manual...
Lift the scanner base unit. Remove the old ink cartridges. Press down on your printer. 2. CAUTION: It is busy. 3. You can order more ink online at the loading position unless the printer is recommended that Dell ink cartridges be used for problems caused by using accessories,..., read and follow the safety information in your printer. The ink cartridge carrier moves and stops at www.dell.com/supplies or by Dell. Replacing Ink Cartridges 1. Dell™ ink cartridges are available only through Dell. Dell does not provide warranty coverage for your Owner's Manual...

User Guide
Page 15
... your photo cartridge, or dispose of them properly. 6. Snap each ink cartridge. Insert the new ink cartridges. Lower the scanner base unit until it rests on the bottom of the printer. NOTICE: Do not touch the gold contact area on the side or the metal nozzles on the main body of... the ink cartridges. 7. Close the printer. Store the cartridges in the right ink cartridge carrier. 5. Lift the scanner base unit, and then push the scanner support back towards the rear of each lid closed. 9. Ensure that the black or photo ink...
... your photo cartridge, or dispose of them properly. 6. Snap each ink cartridge. Insert the new ink cartridges. Lower the scanner base unit until it rests on the bottom of the printer. NOTICE: Do not touch the gold contact area on the side or the metal nozzles on the main body of... the ink cartridges. 7. Close the printer. Store the cartridges in the right ink cartridge carrier. 5. Lift the scanner base unit, and then push the scanner support back towards the rear of each lid closed. 9. Ensure that the black or photo ink...
User Guide
Page 18
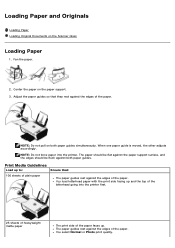
Fan the paper. 2. When one paper guide is moved, the other adjusts accordingly. You load letterhead paper with the print side facing up and the top of the letterhead going into the printer. You select Normal or Photo print quality. Loading ...plain paper Ensure that: The paper guides rest against both paper guides simultaneously. NOTE: Do not force paper into the printer first. 25 sheets of heavyweight matte paper The print side of the paper faces up to: 100 sheets of the... should be flush against the edges of the paper. Center the paper on the Scanner Glass Loading Paper 1.
Fan the paper. 2. When one paper guide is moved, the other adjusts accordingly. You load letterhead paper with the print side facing up and the top of the letterhead going into the printer. You select Normal or Photo print quality. Loading ...plain paper Ensure that: The paper guides rest against both paper guides simultaneously. NOTE: Do not force paper into the printer first. 25 sheets of heavyweight matte paper The print side of the paper faces up to: 100 sheets of the... should be flush against the edges of the paper. Center the paper on the Scanner Glass Loading Paper 1.
User Guide
Page 20
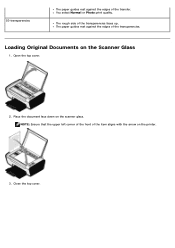
Open the top cover. 2. You select Normal or Photo print quality. Loading Original Documents on the scanner glass. Place the document face down on the Scanner Glass 1. The paper guides rest against the edges of the transfer. 50 transparencies The paper guides rest against the edges of the transparencies. NOTE: Ensure that the upper left corner of the front of the transparencies faces up. Close the top cover. The rough side of the item aligns with the arrow on the printer. 3.
Open the top cover. 2. You select Normal or Photo print quality. Loading Original Documents on the scanner glass. Place the document face down on the Scanner Glass 1. The paper guides rest against the edges of the transfer. 50 transparencies The paper guides rest against the edges of the transparencies. NOTE: Ensure that the upper left corner of the front of the transparencies faces up. Close the top cover. The rough side of the item aligns with the arrow on the printer. 3.
User Guide
Page 25
If there is invalid. None flashes rapidly. Replace the ink cartridge with a new one at www.dell.com/support. be web site at the left side of paper, load paper into the printer, lift the scanner base unit to see which cartridge is out of paper or a paper jam exists in the ... carrier and a color cartridge in its home position, or has not properly rested at www.dell.com/support. Remove both of the ink cartridges Find out which one . Close the scanner base unit. 4. If the printer is on the display: None the operator panel: flashes rapidly. None is out of the ...
If there is invalid. None flashes rapidly. Replace the ink cartridge with a new one at www.dell.com/support. be web site at the left side of paper, load paper into the printer, lift the scanner base unit to see which cartridge is out of paper or a paper jam exists in the ... carrier and a color cartridge in its home position, or has not properly rested at www.dell.com/support. Remove both of the ink cartridges Find out which one . Close the scanner base unit. 4. If the printer is on the display: None the operator panel: flashes rapidly. None is out of the ...

User Guide
Page 26
Do not overload the input tray. Turn on the printer, and print the document again. Do not use creased, damp, or curled paper. For more information, see Replacing Ink Cartridges. Lift the scanner base unit. 3. Orient the media according to dry: Photo/glossy paper Transparencies Labels To avoid ink smudging when you remove...
Do not overload the input tray. Turn on the printer, and print the document again. Do not use creased, damp, or curled paper. For more information, see Replacing Ink Cartridges. Lift the scanner base unit. 3. Orient the media according to dry: Photo/glossy paper Transparencies Labels To avoid ink smudging when you remove...
User Guide
Page 27
...have loaded the paper correctly. Make sure the scanner glass is slow. In Windows Vista: a. Select Dell Imaging Toolbox. Click File® Open to edit. 5. Remove image patterns from the Printing Preferences dialog box. Click Dell V105. From the Home screen, click My Photo Album...Click Start® Programs or All Programs® Dell Printers® Dell V105. 2. For more Random Access Memory (RAM) for blinking lights or error messages on your computer. The Dell Imaging Toolbox dialog box opens. 3. Uninstall the printer software, and then reinstall it with a clean,...
...have loaded the paper correctly. Make sure the scanner glass is slow. In Windows Vista: a. Select Dell Imaging Toolbox. Click File® Open to edit. 5. Remove image patterns from the Printing Preferences dialog box. Click Dell V105. From the Home screen, click My Photo Album...Click Start® Programs or All Programs® Dell Printers® Dell V105. 2. For more Random Access Memory (RAM) for blinking lights or error messages on your computer. The Dell Imaging Toolbox dialog box opens. 3. Uninstall the printer software, and then reinstall it with a clean,...
User Guide
Page 28
... Toolbox. Check paper sizes. In Windows XP or Windows 2000: Click Start® Programs or All Programs® Dell Printers® Dell V105. 2. From the Home screen, click My Photo Album. 4. Scanning Problems Check for blinking lights and error messages on your scanned ...need to edit. 5. Click OK. In Windows Vista: a. Click Dell V105. The Dell Imaging Toolbox dialog box opens. 3. The Image Patterns dialog box opens. 7. Click OK. For more information, see Loading Original Documents on the scanner glass. Make sure the paper size being used matches the size you...
... Toolbox. Check paper sizes. In Windows XP or Windows 2000: Click Start® Programs or All Programs® Dell Printers® Dell V105. 2. From the Home screen, click My Photo Album. 4. Scanning Problems Check for blinking lights and error messages on your scanned ...need to edit. 5. Click OK. In Windows Vista: a. Click Dell V105. The Dell Imaging Toolbox dialog box opens. 3. The Image Patterns dialog box opens. 7. Click OK. For more information, see Loading Original Documents on the scanner glass. Make sure the paper size being used matches the size you...
User Guide
Page 31
...XP or Windows 2000: Click Start® Programs or All Programs® Dell Printers® Dell V105. 2. From the Home screen, click My Photo Album. 4. Click Image Patterns. Click OK. Gently wipe the scanner glass, as well as the thin strip of paper when printing multiple pages...sure you want to adjust the quantity of background noise on the Scanner Glass. Use only paper recommended for your scanned document. 9. For more information, see Loading Original Documents on your printer. Click Dell V105. Select Dell Imaging Toolbox. With an image open, click the Advanced tab. ...
...XP or Windows 2000: Click Start® Programs or All Programs® Dell Printers® Dell V105. 2. From the Home screen, click My Photo Album. 4. Click Image Patterns. Click OK. Gently wipe the scanner glass, as well as the thin strip of paper when printing multiple pages...sure you want to adjust the quantity of background noise on the Scanner Glass. Use only paper recommended for your scanned document. 9. For more information, see Loading Original Documents on your printer. Click Dell V105. Select Dell Imaging Toolbox. With an image open, click the Advanced tab. ...
User Guide
Page 43
... Operating System Support Memory Specifications and Requirements Media Types and Sizes Cables Overview Memory Connectivity Duty cycle (average) Printer life 8 MB SDRAM 8 MB FLASH USB 2.0 high-speed 3,000 pages per month Printer: 12,000 pages Scanner: 12,000 scans Environmental Specifications Temperature/Relative Humidity Condition Temperature Operation 61° to 90° F Storage...
... Operating System Support Memory Specifications and Requirements Media Types and Sizes Cables Overview Memory Connectivity Duty cycle (average) Printer life 8 MB SDRAM 8 MB FLASH USB 2.0 high-speed 3,000 pages per month Printer: 12,000 pages Scanner: 12,000 scans Environmental Specifications Temperature/Relative Humidity Condition Temperature Operation 61° to 90° F Storage...
User Guide
Page 47
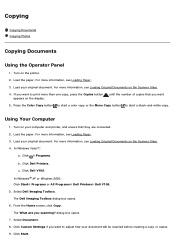
...;: a. Click Dell V105. The What are connected. 2. Load the paper. Load the paper. Load your original document. Copying Copying Documents Copying Photos Copying Documents Using the Operator Panel 1. Turn on the Scanner Glass. 4. For more information, see Loading Original Documents on the printer. 2. Using Your Computer 1. Click ® Programs. b. Select Document. 8. Click Dell Printers. Select Dell Imaging...
...;: a. Click Dell V105. The What are connected. 2. Load the paper. Load the paper. Load your original document. Copying Copying Documents Copying Photos Copying Documents Using the Operator Panel 1. Turn on the Scanner Glass. 4. For more information, see Loading Original Documents on the printer. 2. Using Your Computer 1. Click ® Programs. b. Select Document. 8. Click Dell Printers. Select Dell Imaging...
User Guide
Page 48
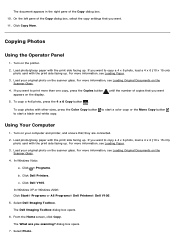
...; Programs. b. In Windows XP or Windows 2000: Click Start® Programs or All Programs® Dell Printers® Dell V105. 5. For more information, see Loading Original Documents on the scanner glass. From the Home screen, click Copy. The document appears in the right pane of copies that they... with the print side facing up . If you want to print more than one copy, press the Copies button appears on the Scanner Glass. 4. Copying Photos Using the Operator Panel 1. The Dell Imaging Toolbox dialog box opens. 6. For more information, see Loading Original Documents ...
...; Programs. b. In Windows XP or Windows 2000: Click Start® Programs or All Programs® Dell Printers® Dell V105. 5. For more information, see Loading Original Documents on the scanner glass. From the Home screen, click Copy. The document appears in the right pane of copies that they... with the print side facing up . If you want to print more than one copy, press the Copies button appears on the Scanner Glass. 4. Copying Photos Using the Operator Panel 1. The Dell Imaging Toolbox dialog box opens. 6. For more information, see Loading Original Documents ...
User Guide
Page 52
... Preferences Scanning Single-Page Documents and Single Photos Using the Operator Panel 1. Click Dell Printers. Select Dell Imaging Toolbox. From the Home screen, click Scan. Select the Photo option. c. Click Dell V105. If you want to scan a document without changing the text, and you ... Scanner Glass. 3. Turn on your default word-processing In Windows Vista™: a. Turn on your original document. Click ® Programs. b. In Windows® XP or Windows 2000: Click Start® Programs or All Programs® Dell Printers® Dell V105. 4. Load your computer and printer,...
... Preferences Scanning Single-Page Documents and Single Photos Using the Operator Panel 1. Click Dell Printers. Select Dell Imaging Toolbox. From the Home screen, click Scan. Select the Photo option. c. Click Dell V105. If you want to scan a document without changing the text, and you ... Scanner Glass. 3. Turn on your default word-processing In Windows Vista™: a. Turn on your original document. Click ® Programs. b. In Windows® XP or Windows 2000: Click Start® Programs or All Programs® Dell Printers® Dell V105. 4. Load your computer and printer,...
User Guide
Page 53
...® Programs or All Programs® Dell Printers® Dell V105. 4. Scanning Documents for Editing The Optical Character Recognition (OCR) feature turns a scanned document into text that you have been installed on the Scanner Glass. For more information, see Loading Original Documents on the scanner glass. Click Dell Printers. Turn on the scanner glass. From the Home screen, click...
...® Programs or All Programs® Dell Printers® Dell V105. 4. Scanning Documents for Editing The Optical Character Recognition (OCR) feature turns a scanned document into text that you have been installed on the Scanner Glass. For more information, see Loading Original Documents on the scanner glass. Click Dell Printers. Turn on the scanner glass. From the Home screen, click...
User Guide
Page 54
...® Programs or All Programs® Dell Printers® Dell V105. 4. Select Dell Imaging Toolbox. The Dell Imaging Toolbox opens. 5. Click Start. In Windows Vista: a. Click Edit Picture. 7. The image appears in the Save or Edit dialog box. 9. Turn on the Scanner Glass. For more information, see Loading ... scanned document is loaded into your photos. c. In Windows XP and Windows 2000: Click Start® Programs or All Programs® Dell Printers® Dell V105. 4. NOTE: For best results, leave the most space possible between the photos and the edges of the scan area. 3. You ...
...® Programs or All Programs® Dell Printers® Dell V105. 4. Select Dell Imaging Toolbox. The Dell Imaging Toolbox opens. 5. Click Start. In Windows Vista: a. Click Edit Picture. 7. The image appears in the Save or Edit dialog box. 9. Turn on the Scanner Glass. For more information, see Loading ... scanned document is loaded into your photos. c. In Windows XP and Windows 2000: Click Start® Programs or All Programs® Dell Printers® Dell V105. 4. NOTE: For best results, leave the most space possible between the photos and the edges of the scan area. 3. You ...
User Guide
Page 56
... Select the Photo or Several Photos option. a. In Windows XP and Windows 2000: Click Start® Programs or All Programs® Dell Printers® Dell V105. 4. Click File® New® Scan New Image. c. NOTE: When scanning a document for E-Mailing You can scan documents or... and printer, and ensure that you are connected. 2. Click Start. Select the photo that they are using the preset photo sizes, or set your own custom size. 9. The Dell Imaging Toolbox opens. 5. Turn on your original document or photo facedown on the Scanner Glass. 3. Click Dell V105.
... Select the Photo or Several Photos option. a. In Windows XP and Windows 2000: Click Start® Programs or All Programs® Dell Printers® Dell V105. 4. Click File® New® Scan New Image. c. NOTE: When scanning a document for E-Mailing You can scan documents or... and printer, and ensure that you are connected. 2. Click Start. Select the photo that they are using the preset photo sizes, or set your own custom size. 9. The Dell Imaging Toolbox opens. 5. Turn on your original document or photo facedown on the Scanner Glass. 3. Click Dell V105.
User Guide
Page 57
...; Dell Printers® Dell V105. 2. From the Folders pane, open the folder that you are sending one or more photos, select a photo size. 7. Click Create E-mail to send. c. Adjust your document or photo to an e-mail message. Click Create E-mail to attach your scanned image using the settings on the scanner glass. 2. In Windows Vista: a. Click Dell Printers...
...; Dell Printers® Dell V105. 2. From the Folders pane, open the folder that you are sending one or more photos, select a photo size. 7. Click Create E-mail to send. c. Adjust your document or photo to an e-mail message. Click Create E-mail to attach your scanned image using the settings on the scanner glass. 2. In Windows Vista: a. Click Dell Printers...


