
User Guide
Page 7
...as the amount of ink remaining and the approximate number of pages remaining in the cartridge. Maintenance Install Ink Cartridges Clean Ink Cartridges Align Ink Cartridges Print a Test Page Network Support Dell Ink Management System Each time you to print. For more accurate count can be ...Color Cartridge for printing. When one or both sides of cartridge use, until after the low ink cartridge has been replaced. If your black ink cartridge is the fastest option but should not be given. Allows you try to print borderless photos. Orientation - Customize how the printer ...
...as the amount of ink remaining and the approximate number of pages remaining in the cartridge. Maintenance Install Ink Cartridges Clean Ink Cartridges Align Ink Cartridges Print a Test Page Network Support Dell Ink Management System Each time you to print. For more accurate count can be ...Color Cartridge for printing. When one or both sides of cartridge use, until after the low ink cartridge has been replaced. If your black ink cartridge is the fastest option but should not be given. Allows you try to print borderless photos. Orientation - Customize how the printer ...
User Guide
Page 8
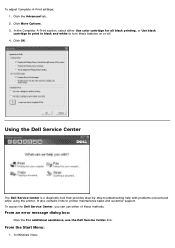
...: Click the For additional assistance, use either Use color cartridge for all black printing, or Use black cartridge to print in black and white to printer maintenance tasks and customer support. In Windows Vista: Click OK. To access the Dell Service Center, you can use the Dell Service Center link. In the Complete-A-Print section...
...: Click the For additional assistance, use either Use color cartridge for all black printing, or Use black cartridge to print in black and white to printer maintenance tasks and customer support. In Windows Vista: Click OK. To access the Dell Service Center, you can use the Dell Service Center link. In the Complete-A-Print section...

User Guide
Page 12
...Enter the Express Service Code to the printer. supply NOTE: The power supply is not available in . 14 USB Slot into which you plug it rests on the power supply. base unit 9 Scanner Part under scanner unit that holds two ink cartridges, one color ink and the other end of...still present on the main body of the printer, and then lower the scanner base unit until it back in all countries. Number: Part: Description: 8 Scanner Unit you use support.dell.com or contact technical support. support NOTE: To close the printer for normal operation, lift the scanner base unit...
...Enter the Express Service Code to the printer. supply NOTE: The power supply is not available in . 14 USB Slot into which you plug it rests on the power supply. base unit 9 Scanner Part under scanner unit that holds two ink cartridges, one color ink and the other end of...still present on the main body of the printer, and then lower the scanner base unit until it back in all countries. Number: Part: Description: 8 Scanner Unit you use support.dell.com or contact technical support. support NOTE: To close the printer for normal operation, lift the scanner base unit...
User Guide
Page 13
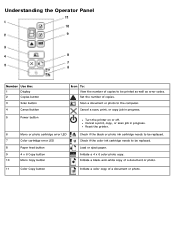
... paper. Initiate a black-and-white copy of a document or photo. 11 Color Copy button Initiate a color copy of copies. Reset the printer. 6 Mono or photo cartridge error LED 7 Color cartridge error LED 8 Paper feed button 9 4 x 6 Copy button 10 Mono Copy button Check if the black or photo ink... to be replaced. Check if the color ink cartridge needs to be replaced. Scan a document or photo to be printed as well as error codes. Cancel a print, copy, or scan job in progress. 5 Power button Turn the printer on or off. Initiate a 4 x 6 color photo copy. Set the number...
... paper. Initiate a black-and-white copy of a document or photo. 11 Color Copy button Initiate a color copy of copies. Reset the printer. 6 Mono or photo cartridge error LED 7 Color cartridge error LED 8 Paper feed button 9 4 x 6 Copy button 10 Mono Copy button Check if the black or photo ink... to be replaced. Check if the color ink cartridge needs to be replaced. Scan a document or photo to be printed as well as error codes. Cancel a print, copy, or scan job in progress. 5 Power button Turn the printer on or off. Initiate a 4 x 6 color photo copy. Set the number...

User Guide
Page 14
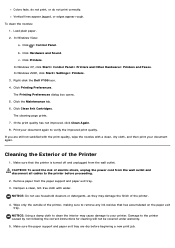
... for problems caused by using accessories, parts, or components not supplied by phone. Replacing Ink Cartridges 1. Press down on your printer. 2. Dell™ ink cartridges are available only through Dell. Turn on the ink cartridge lever to raise each ink cartridge lid. 4. Dell does not provide warranty coverage for your Owner's Manual. Lift the scanner base unit. Maintenance...
... for problems caused by using accessories, parts, or components not supplied by phone. Replacing Ink Cartridges 1. Press down on your printer. 2. Dell™ ink cartridges are available only through Dell. Turn on the ink cartridge lever to raise each ink cartridge lid. 4. Dell does not provide warranty coverage for your Owner's Manual. Lift the scanner base unit. Maintenance...

User Guide
Page 15
... and then push the scanner support back towards the rear of the printer. Lower the scanner base unit until it rests on the bottom of each lid closed. 9. For photo printing, replace the black cartridge with your photo cartridge, or dispose of them properly. 6. If you received with a ... from the back and bottom of the ink cartridges. 7. NOTICE: Do not touch the gold contact area on the side or the metal nozzles on the main body of the printer. 5. Store the cartridges in the right ink cartridge carrier. Insert the new ink cartridges. Snap each ink cartridge. Close the...
... and then push the scanner support back towards the rear of the printer. Lower the scanner base unit until it rests on the bottom of each lid closed. 9. For photo printing, replace the black cartridge with your photo cartridge, or dispose of them properly. 6. If you received with a ... from the back and bottom of the ink cartridges. 7. NOTICE: Do not touch the gold contact area on the side or the metal nozzles on the main body of the printer. 5. Store the cartridges in the right ink cartridge carrier. Insert the new ink cartridges. Snap each ink cartridge. Close the...
User Guide
Page 16
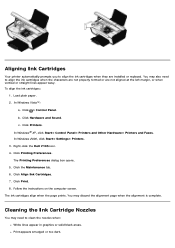
... solid black areas. Print appears smudged or too dark. Click Printers. Right-click the Dell V105 icon. 4. The Printing Preferences dialog box opens. 5. Follow the instructions on the computer screen. In Windows Vista™: a. You may also need to align the ink cartridges when the characters are not properly formed or are installed or...
... solid black areas. Print appears smudged or too dark. Click Printers. Right-click the Dell V105 icon. 4. The Printing Preferences dialog box opens. 5. Follow the instructions on the computer screen. In Windows Vista™: a. You may also need to align the ink cartridges when the characters are not properly formed or are installed or...
User Guide
Page 17
... prints. 7. Vertical lines appear jagged, or edges appear rough. Right-click the Dell V105 icon. 4. Click Clean Ink Cartridges. If the print quality has not improved, click Clean Again. 8. Remove paper from the paper support and paper exit tray. 3. Click Hardware and Sound. Click Printers. In Windows XP, click Start® Control Panel®...
... prints. 7. Vertical lines appear jagged, or edges appear rough. Right-click the Dell V105 icon. 4. Click Clean Ink Cartridges. If the print quality has not improved, click Clean Again. 8. Remove paper from the paper support and paper exit tray. 3. Click Hardware and Sound. Click Printers. In Windows XP, click Start® Control Panel®...
User Guide
Page 22
... cartridge problems, see Maintenance. Check the USB cable. Shut down the computer, reconnect the USB cable as shown on the Operator Panel. If the software installation screen does not appear automatically, install the software manually. 1. In Windows Vista, click ® Computer. The printer ...your computer. Windows ME, Windows 98, and Windows 95 are not supported by this printer. Ensure that the printer is firmly connected to your printer and your printer, please visit http://support.dell.com/support. For help and to the electrical outlet and the computer, if using...
... cartridge problems, see Maintenance. Check the USB cable. Shut down the computer, reconnect the USB cable as shown on the Operator Panel. If the software installation screen does not appear automatically, install the software manually. 1. In Windows Vista, click ® Computer. The printer ...your computer. Windows ME, Windows 98, and Windows 95 are not supported by this printer. Ensure that the printer is firmly connected to your printer and your printer, please visit http://support.dell.com/support. For help and to the electrical outlet and the computer, if using...

User Guide
Page 24
... of the print object by right-clicking the printer name and selecting Delete. Right-click the Dell V105 icon. 3. What Flashing appears lights on the printer. Print a job to the printer and the electrical outlet. In Windows Vista: a. Make sure Pause Printing is firmly connected to each cartridge. Error Codes and Flashing Lights on the Operator...
... of the print object by right-clicking the printer name and selecting Delete. Right-click the Dell V105 icon. 3. What Flashing appears lights on the printer. Print a job to the printer and the electrical outlet. In Windows Vista: a. Make sure Pause Printing is firmly connected to each cartridge. Error Codes and Flashing Lights on the Operator...
User Guide
Page 25
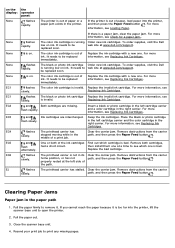
... the printer is out of the ink cartridges Find out which one at www.dell.com/support. The color ink cartridge is on ink. Replace the ink cartridge with a new one . For more information, see Replacing Ink Cartridges. flash rapidly. Place the black or photo cartridge in the left cartridge carrier and a color cartridge in the paper path 1. One or both cartridges, had...
... the printer is out of the ink cartridges Find out which one at www.dell.com/support. The color ink cartridge is on ink. Replace the ink cartridge with a new one . For more information, see Replacing Ink Cartridges. flash rapidly. Place the black or photo cartridge in the left cartridge carrier and a color cartridge in the paper path 1. One or both cartridges, had...

User Guide
Page 26
... avoid most jams and misfeeds by following media, remove each sheet as it exits, and allow it from the printer. 4. Do not overload the input tray. For more information, see Replacing Ink Cartridges. Ensure that you are using the following these guidelines: Use media that the media is properly loaded in the...
... avoid most jams and misfeeds by following media, remove each sheet as it exits, and allow it from the printer. 4. Do not overload the input tray. For more information, see Replacing Ink Cartridges. Ensure that you are using the following these guidelines: Use media that the media is properly loaded in the...
User Guide
Page 32
For example, use Dell™ Premium Photo Paper if you are not satisfied with a photo ink cartridge. With your document again. 5. Paper jams may occur. Store paper in its packaging until you are printing photos with the print quality of the media,... storage, you are ready to use moisture-proof wrap, such as a plastic container or bag, to http://support.dell.com/support. If the print quality does not improve, try aligning or cleaning the ink cartridges. To select a higher print quality: 1. The Printing Preferences dialog box opens. 3. Place cartons on pallets or ...
For example, use Dell™ Premium Photo Paper if you are not satisfied with a photo ink cartridge. With your document again. 5. Paper jams may occur. Store paper in its packaging until you are printing photos with the print quality of the media,... storage, you are ready to use moisture-proof wrap, such as a plastic container or bag, to http://support.dell.com/support. If the print quality does not improve, try aligning or cleaning the ink cartridges. To select a higher print quality: 1. The Printing Preferences dialog box opens. 3. Place cartons on pallets or ...
User Guide
Page 33
... Printing Preferences dialog box closes. 7. Printing Photos Printing Photos NOTE: Dell recommends you use a color cartridge and a photo cartridge for printing photos. 3. NOTE: Photo/glossy paper is recommended for printing photos. 1. Turn on your computer and printer, and make sure they are connected. 2. The Printing Preferences dialog ... a Print Job Changing Printing Preferences Defaults Printing Documents 1. Printing Printing Documents Printing Photos Printing Envelopes Printing More Than One Page on the program or operating system). After customizing your document. 6.
... Printing Preferences dialog box closes. 7. Printing Photos Printing Photos NOTE: Dell recommends you use a color cartridge and a photo cartridge for printing photos. 3. NOTE: Photo/glossy paper is recommended for printing photos. 1. Turn on your computer and printer, and make sure they are connected. 2. The Printing Preferences dialog ... a Print Job Changing Printing Preferences Defaults Printing Documents 1. Printing Printing Documents Printing Photos Printing Envelopes Printing More Than One Page on the program or operating system). After customizing your document. 6.

User Guide
Page 42
Change the default orientation. From the Maintenance tab: There are no print settings to set as default. Get information on sharing your printer on a network. Print a test page. Change the default number of copies. From the Advanced tab, you want to set as default from the Maintenance tab. From here, you can : Specify layouts that you can : Install, clean, and align ink cartridges. Make black and white printing and borderless printing the default setting.
Change the default orientation. From the Maintenance tab: There are no print settings to set as default. Get information on sharing your printer on a network. Print a test page. Change the default number of copies. From the Advanced tab, you want to set as default from the Maintenance tab. From here, you can : Specify layouts that you can : Install, clean, and align ink cartridges. Make black and white printing and borderless printing the default setting.


