Setup Guide
Page 5
... 6 Connect the Network Cable (optional 7 Press the Power Button 7 Windows Vista® Setup 8 Connect to the Internet (Optional 8 Using Your Inspiron Laptop 12 Device Status Lights 12 Right Side Features 14 Left Side Features 16 Front Side Features 17 Computer Base and Keyboard Features 18 Media... Controls 19 Display Features 20 Removing and Replacing the Battery 21 Using the Optical Disc Drive 22 Software Features 23 Network Problems 25 Solving Problems 25 Power Problems 26 Memory Problems 28...
... 6 Connect the Network Cable (optional 7 Press the Power Button 7 Windows Vista® Setup 8 Connect to the Internet (Optional 8 Using Your Inspiron Laptop 12 Device Status Lights 12 Right Side Features 14 Left Side Features 16 Front Side Features 17 Computer Base and Keyboard Features 18 Media... Controls 19 Display Features 20 Removing and Replacing the Battery 21 Using the Optical Disc Drive 22 Software Features 23 Network Problems 25 Solving Problems 25 Power Problems 26 Memory Problems 28...
Setup Guide
Page 18
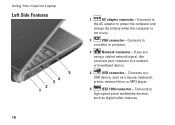
Connects to power the computer and charge the battery when the computer is not in use. 2 VGA connector - Connects to a USB device, such as digital video cameras. Connects to a network or broadband device. 4 USB ..., this connects your computer to high-speed serial multimedia devices, such as a mouse, keyboard, printer, external drive, or MP3 player. 5 IEEE 1394 connector - Using Your Inspiron Laptop Left Side Features 5 4 3 2 1 16 1 AC adapter connector -
Connects to power the computer and charge the battery when the computer is not in use. 2 VGA connector - Connects to a USB device, such as digital video cameras. Connects to a network or broadband device. 4 USB ..., this connects your computer to high-speed serial multimedia devices, such as a mouse, keyboard, printer, external drive, or MP3 player. 5 IEEE 1394 connector - Using Your Inspiron Laptop Left Side Features 5 4 3 2 1 16 1 AC adapter connector -
Setup Guide
Page 23
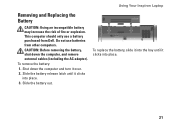
... only use batteries from Dell. Do not use a battery purchased from other computers. To replace the battery, slide it into the bay until it clicks into place. 21 Slide the battery out. To remove the battery: 1. CAUTION: Before removing the battery, shut down... the computer and turn it clicks into place. 3. Shut down the computer, and remove external cables (including the AC adapter). Using Your Inspiron Laptop Removing and Replacing the Battery CAUTION: Using an incompatible battery...
... only use batteries from Dell. Do not use a battery purchased from other computers. To replace the battery, slide it into the bay until it clicks into place. 21 Slide the battery out. To remove the battery: 1. CAUTION: Before removing the battery, shut down... the computer and turn it clicks into place. 3. Shut down the computer, and remove external cables (including the AC adapter). Using Your Inspiron Laptop Removing and Replacing the Battery CAUTION: Using an incompatible battery...

Setup Guide
Page 34
...the Service Manual on the Dell Support website at support.dell.com or see "Contacting Dell" on the Dell Support website at support.dell.com). Replace the battery. CPU fan has failed. Possible hard disk drive failure during HDD boot test see "Contacting Dell" on hard disk drive...Previous attempts at booting this checkpoint and contact Dell Technical Support - The computer failed to resolve the issue. Hard-disk drive read failure - CMOS checksum error - Keyboard failure or loose cable. Possible motherboard failure or RTC battery low. See the Service Manual on page...
...the Service Manual on the Dell Support website at support.dell.com or see "Contacting Dell" on the Dell Support website at support.dell.com). Replace the battery. CPU fan has failed. Possible hard disk drive failure during HDD boot test see "Contacting Dell" on hard disk drive...Previous attempts at booting this checkpoint and contact Dell Technical Support - The computer failed to resolve the issue. Hard-disk drive read failure - CMOS checksum error - Keyboard failure or loose cable. Possible motherboard failure or RTC battery low. See the Service Manual on page...

Setup Guide
Page 57
...Width Height 240 cpi 63.1 mm (2.48 in) sensor-active area 37.1 mm (1.46 in) rectangle Battery Type Depth Height 4-cell/6-cell/9-cell "smart" lithium ion 64.2 mm (2.52 inches) (9 cell) ... (2.03 inches) (4, 6 cell) 41.9 mm (1.64 in) (9 cell) 29.5 mm (1.16 in) (4/6 cell) Basic Specifications Battery Width 276.5 mm (10.8 in) (9 cell) 206.4 mm (8.12 in) (4/6 cell) Weight 0.53 kg (1.17 lb) (9... time 4 hours (approximate): Computer off Operating time Battery operating time varies depending on operating conditions and can be significantly reduced under certain powerintensive conditions. See...
...Width Height 240 cpi 63.1 mm (2.48 in) sensor-active area 37.1 mm (1.46 in) rectangle Battery Type Depth Height 4-cell/6-cell/9-cell "smart" lithium ion 64.2 mm (2.52 inches) (9 cell) ... (2.03 inches) (4, 6 cell) 41.9 mm (1.64 in) (9 cell) 29.5 mm (1.16 in) (4/6 cell) Basic Specifications Battery Width 276.5 mm (10.8 in) (9 cell) 206.4 mm (8.12 in) (4/6 cell) Weight 0.53 kg (1.17 lb) (9... time 4 hours (approximate): Computer off Operating time Battery operating time varies depending on operating conditions and can be significantly reduced under certain powerintensive conditions. See...
Setup Guide
Page 58
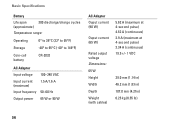
...) Temperature range: Operating 0° to 35°C (32° to 95°F) Storage -40° to 65°C (-40° to 149°F) Coin-cell battery CR-2032 AC Adapter Input voltage 100-240 VAC Input current (maximum) Input frequency 1.5 A/1.6 A 50-60 Hz Output power 65 W or 90 W AC Adapter Ouput...
...) Temperature range: Operating 0° to 35°C (32° to 95°F) Storage -40° to 65°C (-40° to 149°F) Coin-cell battery CR-2032 AC Adapter Input voltage 100-240 VAC Input current (maximum) Input frequency 1.5 A/1.6 A 50-60 Hz Output power 65 W or 90 W AC Adapter Ouput...

Setup Guide
Page 59
... Height 25.4 mm to 38.37 mm (1 in to 1.51 in) Width 318 mm (12.55 in) Depth 238 mm (9.37 in) Weight (with 4-cell battery): Configurable to less than 2.14 kg (4.72 lb) Computer Environment Temperature range: Operating Storage 0° to 35°C (32° to 95°F) -40°...
... Height 25.4 mm to 38.37 mm (1 in to 1.51 in) Width 318 mm (12.55 in) Depth 238 mm (9.37 in) Weight (with 4-cell battery): Configurable to less than 2.14 kg (4.72 lb) Computer Environment Temperature range: Operating Storage 0° to 35°C (32° to 95°F) -40°...

