User's Guide
Page 2
... 11 Ordering ink cartridges...11 Replacing ink cartridges...11 Recycling Dell products...13 Using the printer control panel buttons and menus 14 Using the printer control panel...14 Changing temporary settings into new default settings 16 Changing the Power Saver timeout...17 Saving paper and energy with Eco-Mode...17 Resetting to factory settings...
... 11 Ordering ink cartridges...11 Replacing ink cartridges...11 Recycling Dell products...13 Using the printer control panel buttons and menus 14 Using the printer control panel...14 Changing temporary settings into new default settings 16 Changing the Power Saver timeout...17 Saving paper and energy with Eco-Mode...17 Resetting to factory settings...
User's Guide
Page 3
... the paper (duplexing)...42 Managing print jobs...45 Copying 49 Tips for copying...49 Making copies...49 Copying photos...49 Copying a two-sided document...50 Enlarging or reducing images...50 Adjusting copy quality...51 Making a copy lighter or darker...51 Collating copies using the printer control panel...51 Repeating an image on one page...
... the paper (duplexing)...42 Managing print jobs...45 Copying 49 Tips for copying...49 Making copies...49 Copying photos...49 Copying a two-sided document...50 Enlarging or reducing images...50 Adjusting copy quality...51 Making a copy lighter or darker...51 Collating copies using the printer control panel...51 Repeating an image on one page...
User's Guide
Page 5
...or use this product or the manufacturer's authorized replacements. This product is not responsible for clearing a paper jam. Do not set up this area for the use of the printer, unplug the power cord from the wall outlet and disconnect all cables from the electrical outlet before ...CAUTION-POTENTIAL INJURY: The area behind the duplex cover has protruding ribs as part of such problems. Remove the power cord from the printer before inspecting it. The safety features of fire or electrical shock results. If any electrical or cabling connections, such as furniture and ...
...or use this product or the manufacturer's authorized replacements. This product is not responsible for clearing a paper jam. Do not set up this area for the use of the printer, unplug the power cord from the wall outlet and disconnect all cables from the electrical outlet before ...CAUTION-POTENTIAL INJURY: The area behind the duplex cover has protruding ribs as part of such problems. Remove the power cord from the printer before inspecting it. The safety features of fire or electrical shock results. If any electrical or cabling connections, such as furniture and ...
User's Guide
Page 6
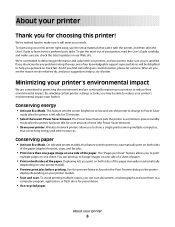
...to make sure you're satisfied. About your printer Thank you for choosing this feature sets the printer to automatically print on both sides of the paper (duplex) for print, copy, and fax jobs. • Print more than one page image on one side of your printer, read the User's Guide carefully, and ... updates on our Web site. To get back on track fast. If you can print up to 8 page images on one side of a sheet of paper. • Print on your printer model). • Preview print jobs before printing. You can scan documents or photographs and save . To avoid printing multiple ...
...to make sure you're satisfied. About your printer Thank you for choosing this feature sets the printer to automatically print on both sides of the paper (duplex) for print, copy, and fax jobs. • Print more than one page image on one side of your printer, read the User's Guide carefully, and ... updates on our Web site. To get back on track fast. If you can print up to 8 page images on one side of a sheet of paper. • Print on your printer model). • Preview print jobs before printing. You can scan documents or photographs and save . To avoid printing multiple ...
User's Guide
Page 7
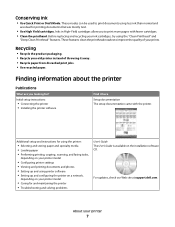
... pages with the printer. Before replacing and recycling your prints. For updates, check our Web site at support.dell.com. Inks in High-Yield cartridges allow you looking for and maintaining the printer • Troubleshooting ...printer: • Selecting and storing paper and specialty media • Loading paper • Performing printing, copying, scanning, and faxing tasks, depending on your printer model • Configuring printer settings • Viewing and printing documents and photos • Setting up and configuring the printer on a network, depending on your printer...
... pages with the printer. Before replacing and recycling your prints. For updates, check our Web site at support.dell.com. Inks in High-Yield cartridges allow you looking for and maintaining the printer • Troubleshooting ...printer: • Selecting and storing paper and specialty media • Loading paper • Performing printing, copying, scanning, and faxing tasks, depending on your printer model • Configuring printer settings • Viewing and printing documents and photos • Setting up and configuring the printer on a network, depending on your printer...
User's Guide
Page 9
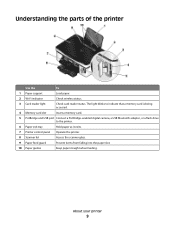
... a flash drive to the printer. 6 Paper exit tray Hold paper as it exits. 7 Printer control panel Operate the printer. 8 Scanner lid Access the scanner glass. 9 Paper feed guard Prevent items from falling into the paper slot. 10 Paper guides Keep paper straight when feeding. About your printer 9 Understanding the parts of the printer Use the To 1 Paper support Load paper. 2 Wi-Fi indicator...
... a flash drive to the printer. 6 Paper exit tray Hold paper as it exits. 7 Printer control panel Operate the printer. 8 Scanner lid Access the scanner glass. 9 Paper feed guard Prevent items from falling into the paper slot. 10 Paper guides Keep paper straight when feeding. About your printer 9 Understanding the parts of the printer Use the To 1 Paper support Load paper. 2 Wi-Fi indicator...
User's Guide
Page 10
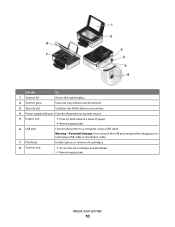
...; Access the ink cartridges and printhead. • Remove paper jams. About your printer. 4 Power supply with port Connect the printer to a power source. 5 Duplex unit • Print on your printer 10 Use the To 1 Scanner lid Access the scanner glass. 2 Scanner glass Scan and copy photos and documents. 3 Security slot Install an anti-theft cable...
...; Access the ink cartridges and printhead. • Remove paper jams. About your printer. 4 Power supply with port Connect the printer to a power source. 5 Duplex unit • Print on your printer 10 Use the To 1 Scanner lid Access the scanner glass. 2 Scanner glass Scan and copy photos and documents. 3 Security slot Install an anti-theft cable...
User's Guide
Page 15
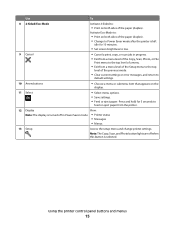
... • Cancel a print, copy, or scan job in progress. • Exit from a menu level of the Copy, Scan, Photo, or File Print menu to the top level of the paper (duplex). Using the printer control panel buttons and menus 15 Use To 8 2-Sided/Eco-Mode Activate 2-Sided to feed or eject...and return to default settings. 10 Arrow buttons • Choose a menu or submenu item that appears on both sides of the paper (duplex). • Change to Power Saver mode after the printer is left idle for 3 seconds to : • Print on the display. 11 Select • Select menu options. •...
... • Cancel a print, copy, or scan job in progress. • Exit from a menu level of the Copy, Scan, Photo, or File Print menu to the top level of the paper (duplex). Using the printer control panel buttons and menus 15 Use To 8 2-Sided/Eco-Mode Activate 2-Sided to feed or eject...and return to default settings. 10 Arrow buttons • Choose a menu or submenu item that appears on both sides of the paper (duplex). • Change to Power Saver mode after the printer is left idle for 3 seconds to : • Print on the display. 11 Select • Select menu options. •...
User's Guide
Page 17
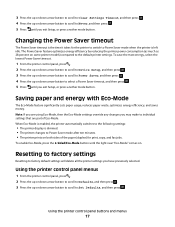
... individual settings that are part of the paper (duplex) for the printer to switch to Power Saver mode when the printer is dimmed. • The printer changes to the following settings: • The printer display is left idle. Using the printer control panel buttons and menus 17 3 ...ten minutes. • The printer prints on both sides of Eco-Mode. Saving paper and energy with Eco-Mode The Eco-Mode feature significantly cuts paper usage, reduces paper waste, optimizes energy efficiency, and saves money. Using the printer control panel menus 1 From the printer control panel, press . 2...
... individual settings that are part of the paper (duplex) for the printer to switch to Power Saver mode when the printer is dimmed. • The printer changes to the following settings: • The printer display is left idle. Using the printer control panel buttons and menus 17 3 ...ten minutes. • The printer prints on both sides of Eco-Mode. Saving paper and energy with Eco-Mode The Eco-Mode feature significantly cuts paper usage, reduces paper waste, optimizes energy efficiency, and saves money. Using the printer control panel menus 1 From the printer control panel, press . 2...
User's Guide
Page 21
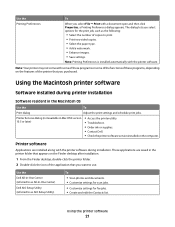
... Utility) To • Scan photos and documents. • Customize settings for scan jobs. • Customize settings for the print job, such as All-In-One Center) Dell AIO Setup Utility (referred to use. Using the Macintosh printer software Software installed during installation....Note: Your printer may not come with a document open and then click Properties, a Printing Preferences dialog appears. Printer software Applications are saved in the printer folder that appears on the features of copies to print. • Print two-sided copies. • Select the paper type. •...
... Utility) To • Scan photos and documents. • Customize settings for scan jobs. • Customize settings for the print job, such as All-In-One Center) Dell AIO Setup Utility (referred to use. Using the Macintosh printer software Software installed during installation....Note: Your printer may not come with a document open and then click Properties, a Printing Preferences dialog appears. Printer software Applications are saved in the printer folder that appears on the features of copies to print. • Print two-sided copies. • Select the paper type. •...
User's Guide
Page 25
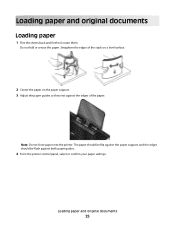
Loading paper and original documents 25 Straighten the edges of the paper. Note: Do not force paper into the printer. Loading paper and original documents Loading paper 1 Flex the sheets back and forth to loosen them. The paper should be flat against the paper support, and the edges should be flush against the edges of the stack on a level surface. 2 Center the paper on the paper support. 3 Adjust the paper guides so they rest against both paper guides. 4 From the printer control panel, select or confirm your paper settings. Do not fold or crease the paper.
Loading paper and original documents 25 Straighten the edges of the paper. Note: Do not force paper into the printer. Loading paper and original documents Loading paper 1 Flex the sheets back and forth to loosen them. The paper should be flat against the paper support, and the edges should be flush against the edges of the stack on a level surface. 2 Center the paper on the paper support. 3 Adjust the paper guides so they rest against both paper guides. 4 From the printer control panel, select or confirm your paper settings. Do not fold or crease the paper.
User's Guide
Page 26
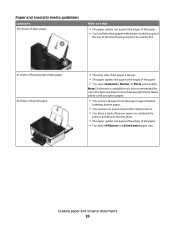
... sheets of heavyweight matte paper 20 sheets of banner paper • The print side of the paper is not recommended for use with expensive paper such as heavyweight matte, labels, photo cards and glossy paper. • You remove all paper from the paper support before inserting banner paper. • You use banner paper designed for inkjet printers. • You place a stack...
... sheets of heavyweight matte paper 20 sheets of banner paper • The print side of the paper is not recommended for use with expensive paper such as heavyweight matte, labels, photo cards and glossy paper. • You remove all paper from the paper support before inserting banner paper. • You use banner paper designed for inkjet printers. • You place a stack...
User's Guide
Page 27
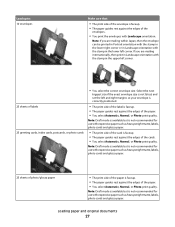
...; You select the correct envelope size. Note: Draft mode is available but is faceup. • The paper guides rest against the edges of the paper. • You select Automatic, Normal, or Photo print quality. Load up to: 10 envelopes Make sure that: • The print side of the envelope... Draft mode is available but is not recommended for use with expensive paper such as heavyweight matte, labels, photo cards and glossy paper. 25 sheets of photo/glossy paper • The print side of the paper is faceup. • The paper guides rest against the edges of the label is not recommended for...
...; You select the correct envelope size. Note: Draft mode is available but is faceup. • The paper guides rest against the edges of the paper. • You select Automatic, Normal, or Photo print quality. Load up to: 10 envelopes Make sure that: • The print side of the envelope... Draft mode is available but is not recommended for use with expensive paper such as heavyweight matte, labels, photo cards and glossy paper. 25 sheets of photo/glossy paper • The print side of the paper is faceup. • The paper guides rest against the edges of the label is not recommended for...
User's Guide
Page 28
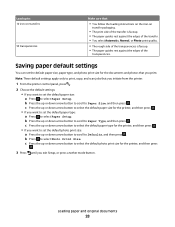
.... 3 Press until you want to set the default paper size: a Press to Paper Size, and then press . c Press the up or down arrow button to select the default paper size for the documents and photos that you initiate from the printer. 1 From the printer control panel, press . 2 Choose the default settings:...Press the up or down arrow button to scroll to select Paper Setup. Note: These default settings apply only to print, copy, and scan jobs that you want to set the default paper size, paper type, and photo print size for the printer, and then press . • If you exit Setup...
.... 3 Press until you want to set the default paper size: a Press to Paper Size, and then press . c Press the up or down arrow button to select the default paper size for the documents and photos that you initiate from the printer. 1 From the printer control panel, press . 2 Choose the default settings:...Press the up or down arrow button to scroll to select Paper Setup. Note: These default settings apply only to print, copy, and scan jobs that you want to set the default paper size, paper type, and photo print size for the printer, and then press . • If you exit Setup...
User's Guide
Page 29
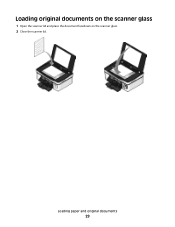
Loading paper and original documents 29 Loading original documents on the scanner glass 1 Open the scanner lid and place the document facedown on the scanner glass. 2 Close the scanner lid.
Loading paper and original documents 29 Loading original documents on the scanner glass 1 Open the scanner lid and place the document facedown on the scanner glass. 2 Close the scanner lid.
User's Guide
Page 30
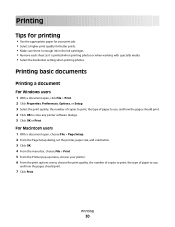
... each sheet as it is printed when printing photos or when working with specialty media. • Select the borderless setting when printing photos. Printing basic documents Printing a document For Windows users 1 With a document open , choose File > Page Setup. 2 From the Page Setup dialog, set the printer, paper size, and orientation. 3 Click OK. 4 From the...
... each sheet as it is printed when printing photos or when working with specialty media. • Select the borderless setting when printing photos. Printing basic documents Printing a document For Windows users 1 With a document open , choose File > Page Setup. 2 From the Page Setup dialog, set the printer, paper size, and orientation. 3 Click OK. 4 From the...
User's Guide
Page 31
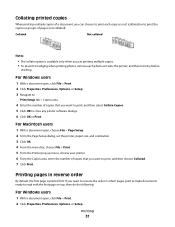
...you are printing multiple copies. • To prevent smudging when printing photos, remove each copy as a set the printer, paper size, and orientation. 3 Click OK. 4 From the menu bar, choose File > Print. 5 From the Printer pop-up menu, choose your printer. 6 From the Copies area, enter the number of copies that ... Copies area 4 Enter the number of copies that you want to print, and then select Collate Copies. 5 Click OK to close any printer software dialogs. 6 Click OK or Print. Printing 31 Collating printed copies When printing multiple copies of a document, you can choose to print each...
...you are printing multiple copies. • To prevent smudging when printing photos, remove each copy as a set the printer, paper size, and orientation. 3 Click OK. 4 From the menu bar, choose File > Print. 5 From the Printer pop-up menu, choose your printer. 6 From the Copies area, enter the number of copies that ... Copies area 4 Enter the number of copies that you want to print, and then select Collate Copies. 5 Click OK to close any printer software dialogs. 6 Click OK or Print. Printing 31 Collating printed copies When printing multiple copies of a document, you can choose to print each...
User's Guide
Page 32
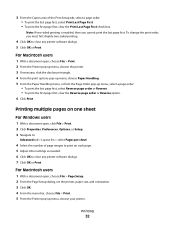
...With a document open, choose File > Page Setup. 2 From the Page Setup dialog, set the printer, paper size, and orientation. 3 Click OK. 4 From the menu bar, choose File > Print. 5 From the Printer pop-up menu, select a page order: • To print the last page first, select Reverse ...Print. Printing multiple pages on one sheet For Windows users 1 With a document open , choose File > Print. 2 From the Printer pop-up menu, choose the printer. 3 If necessary, click the disclosure triangle. 4 From the print options pop-up menu, choose Paper Handling. 5 From the Paper Handling menu, or from the...
...With a document open, choose File > Page Setup. 2 From the Page Setup dialog, set the printer, paper size, and orientation. 3 Click OK. 4 From the menu bar, choose File > Print. 5 From the Printer pop-up menu, select a page order: • To print the last page first, select Reverse ...Print. Printing multiple pages on one sheet For Windows users 1 With a document open , choose File > Print. 2 From the Printer pop-up menu, choose the printer. 3 If necessary, click the disclosure triangle. 4 From the print options pop-up menu, choose Paper Handling. 5 From the Paper Handling menu, or from the...
User's Guide
Page 34
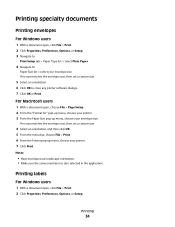
... list > select Plain Paper 4 Navigate to: Paper Size list > select your envelope size If no size matches the envelope size, then set a custom size. 5 Select an orientation. 6 Click OK to close any printer software dialogs. 7 Click OK or Print. If no size matches the envelope size, then set ...Setup. For Macintosh users 1 With a document open, choose File > Page Setup. 2 From the "Format for" pop-up menu, choose your printer. 3 From the Paper Size pop-up menu, choose your envelope size. Notes: • Most envelopes use landscape orientation. • Make sure the same orientation is also ...
... list > select Plain Paper 4 Navigate to: Paper Size list > select your envelope size If no size matches the envelope size, then set a custom size. 5 Select an orientation. 6 Click OK to close any printer software dialogs. 7 Click OK or Print. If no size matches the envelope size, then set ...Setup. For Macintosh users 1 With a document open, choose File > Page Setup. 2 From the "Format for" pop-up menu, choose your printer. 3 From the Paper Size pop-up menu, choose your envelope size. Notes: • Most envelopes use landscape orientation. • Make sure the same orientation is also ...
User's Guide
Page 35
..., click File > Print. 2 Click Properties, Preferences, Options, or Setup. 3 Navigate to: Print Setup tab > Paper Size list > select Custom Size 4 Adjust the settings as needed to close any printer software dialogs. 6 Click OK or Print. Partial sheets (with areas exposed by missing labels) may cause labels to within...1 mm of the edge of the label sheet. • Make sure the paper guide or paper guides rest against the edges of the label sheet feeds into the printer first. • Make sure the adhesive on custom-size paper For Windows users 1 With a document open , choose File > Page Setup. ...
..., click File > Print. 2 Click Properties, Preferences, Options, or Setup. 3 Navigate to: Print Setup tab > Paper Size list > select Custom Size 4 Adjust the settings as needed to close any printer software dialogs. 6 Click OK or Print. Partial sheets (with areas exposed by missing labels) may cause labels to within...1 mm of the edge of the label sheet. • Make sure the paper guide or paper guides rest against the edges of the label sheet feeds into the printer first. • Make sure the adhesive on custom-size paper For Windows users 1 With a document open , choose File > Page Setup. ...


