
User's Guide
Page 5
... Expansion Card 69 Removing an Expansion Card 77 Installing an AGP Graphics Card 79 Removing an AGP Card 82 Expansion-Card Cage (Small Desktop Computer Only 83 Removing the Expansion-Card Cage 83 Replacing the Expansion-Card Cage 84 TAPI 86 Installing a TAPI Device 86 Installing a...the Heat Sink or Heat-Sink/Blower Assembly . . . . 100 Front Panel Inserts 101 Removing Front Panel Inserts-Small Form-Factor and Small Desktop Computers 101 Removing Front Panel Inserts-Small Mini-Tower Computer . . 104 Replacing Front Panel Inserts 105 Internal Drives 106 IDE Drive Addressing 108 ...
... Expansion Card 69 Removing an Expansion Card 77 Installing an AGP Graphics Card 79 Removing an AGP Card 82 Expansion-Card Cage (Small Desktop Computer Only 83 Removing the Expansion-Card Cage 83 Replacing the Expansion-Card Cage 84 TAPI 86 Installing a TAPI Device 86 Installing a...the Heat Sink or Heat-Sink/Blower Assembly . . . . 100 Front Panel Inserts 101 Removing Front Panel Inserts-Small Form-Factor and Small Desktop Computers 101 Removing Front Panel Inserts-Small Mini-Tower Computer . . 104 Replacing Front Panel Inserts 105 Internal Drives 106 IDE Drive Addressing 108 ...

User's Guide
Page 9
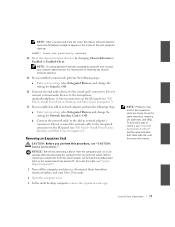
... Return Policy 250 Ergonomic Computing Habits 1 9 Microsoft® Windows® XP Features Overview 4 Help and Support Center 4 New User Interface 5 Switching to Classic View 5 Clean Desktop Wizard 6 Taskbar Grouping 7 Notification Area Cleanup 7 Files and Settings Transfer Wizard 8 Application and Device Compatibility 9 Program Compatibility Wizard 9 System Restore 10 Using System Restore 11...
... Return Policy 250 Ergonomic Computing Habits 1 9 Microsoft® Windows® XP Features Overview 4 Help and Support Center 4 New User Interface 5 Switching to Classic View 5 Clean Desktop Wizard 6 Taskbar Grouping 7 Notification Area Cleanup 7 Files and Settings Transfer Wizard 8 Application and Device Compatibility 9 Program Compatibility Wizard 9 System Restore 10 Using System Restore 11...
User's Guide
Page 20
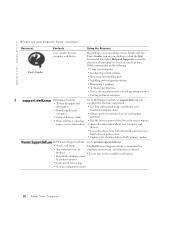
... the drivers for • Top technical issues by product number • Customized service tags • System configuration detail 18 About Yo ur Computer www.dell.com | support.dell.com Re s o u r c e s a n d S u p p o r t To o l s (continued) Resources User's Guides Contents Using the Resource User's ...operating system, double-click the User's Guides icon on your desktop or click the Start button and then select Help and Support to premiersupport.dell.com: • Service call status The Dell Premier Support website is customized for your computer papers, service information...
... the drivers for • Top technical issues by product number • Customized service tags • System configuration detail 18 About Yo ur Computer www.dell.com | support.dell.com Re s o u r c e s a n d S u p p o r t To o l s (continued) Resources User's Guides Contents Using the Resource User's ...operating system, double-click the User's Guides icon on your desktop or click the Start button and then select Help and Support to premiersupport.dell.com: • Service call status The Dell Premier Support website is customized for your computer papers, service information...

User's Guide
Page 21
Front Panel The following figures show the controls, lights, and features located on the front panel of the small form-factor, small desktop, and small mini-tower computers. Small Form-Factor Computer 12 3 4 5 1 USB connectors (2) 2 headphone connector 3 hard drive access lights 4 power button 5 power light A bout Yo ur Computer 19
Front Panel The following figures show the controls, lights, and features located on the front panel of the small form-factor, small desktop, and small mini-tower computers. Small Form-Factor Computer 12 3 4 5 1 USB connectors (2) 2 headphone connector 3 hard drive access lights 4 power button 5 power light A bout Yo ur Computer 19

User's Guide
Page 24
if you remove it or accidentally knock it off its hinges, it snaps back in place. This door is removable; Small Desktop Computer 1 23 1 USB connectors (2) 2 headphone connector 3 breakaway hinges (2) 22 About Yo ur Computer www.dell.com | support.dell.com Front Panel Door Open the front panel door to access two Universal Serial Bus (USB) connectors and one headphone connector.
if you remove it or accidentally knock it off its hinges, it snaps back in place. This door is removable; Small Desktop Computer 1 23 1 USB connectors (2) 2 headphone connector 3 breakaway hinges (2) 22 About Yo ur Computer www.dell.com | support.dell.com Front Panel Door Open the front panel door to access two Universal Serial Bus (USB) connectors and one headphone connector.

User's Guide
Page 29
Small Desktop Computer 1 2 1 PCI slots (2) 2 AC adapter A bout Yo ur Computer 27
Small Desktop Computer 1 2 1 PCI slots (2) 2 AC adapter A bout Yo ur Computer 27
User's Guide
Page 31
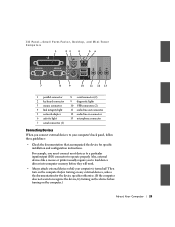
... devices, unless the documentation for specific installation and configuration instructions. For example, you must connect most devices to a particular input/output (I /O Panel-Small Form-Factor, Desktop, and Mini-Tower Computers 1 23 4 56 7 8 9 10 11 12 13 1 parallel connector 2 keyboard connector 3 mouse connector 4 link integrity light 5 network adapter 6 activity light 7 serial connector...
... devices, unless the documentation for specific installation and configuration instructions. For example, you must connect most devices to a particular input/output (I /O Panel-Small Form-Factor, Desktop, and Mini-Tower Computers 1 23 4 56 7 8 9 10 11 12 13 1 parallel connector 2 keyboard connector 3 mouse connector 4 link integrity light 5 network adapter 6 activity light 7 serial connector...

User's Guide
Page 35
Small Desktop Computer 14 1 13 2 12 3 11 4 10 9 8 7 5 6 1 cover release buttons (2) 2 hard drive 3 internal speaker 4 chassis intrusion switch 5 expansion-card cage 6 power supply 7 expansion-card slots 8 AC power connector 9 padlock ring 10 I/O ports and connectors 11 heat sink and blower assembly 12 system board 13 3.5-inch floppy drive 14 CD/DVD drive A bout Yo ur Computer 33
Small Desktop Computer 14 1 13 2 12 3 11 4 10 9 8 7 5 6 1 cover release buttons (2) 2 hard drive 3 internal speaker 4 chassis intrusion switch 5 expansion-card cage 6 power supply 7 expansion-card slots 8 AC power connector 9 padlock ring 10 I/O ports and connectors 11 heat sink and blower assembly 12 system board 13 3.5-inch floppy drive 14 CD/DVD drive A bout Yo ur Computer 33
User's Guide
Page 42
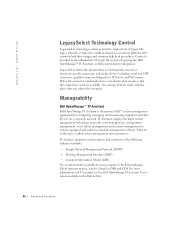
... management technology to the following industry standards: • Simple Network Management Protocol (SNMP) • Desktop Management Interface (DMI) • Common Information Model (CIM) The instrumentation available for your computer is Dell OpenManage Client instrumentation, which is the premier Dell™ systems management application for systems equipped with common hard drive images and common...
... management technology to the following industry standards: • Simple Network Management Protocol (SNMP) • Desktop Management Interface (DMI) • Common Information Model (CIM) The instrumentation available for your computer is Dell OpenManage Client instrumentation, which is the premier Dell™ systems management application for systems equipped with common hard drive images and common...
User's Guide
Page 50
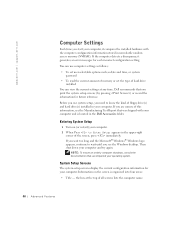
...immediately. Then shut down your computer, it generates an error messages for future reference. www.dell.com | support.dell.com Computer Settings Each time you start your computer and try again. Dell recommends that you see the Manufacturing Test Report that accompanied your computer. 2 When Press to... too long and the Microsoft® Windows® Windows logo appears, continue to know the kind of this information, see the Windows desktop. If you need to wait until you print the system setup screens (by pressing ) or record the information for each incorrect configuration...
...immediately. Then shut down your computer, it generates an error messages for future reference. www.dell.com | support.dell.com Computer Settings Each time you start your computer and try again. Dell recommends that you see the Manufacturing Test Report that accompanied your computer. 2 When Press to... too long and the Microsoft® Windows® Windows logo appears, continue to know the kind of this information, see the Windows desktop. If you need to wait until you print the system setup screens (by pressing ) or record the information for each incorrect configuration...
User's Guide
Page 53
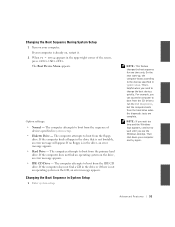
... not an operating system on the drive, an error message appears. • IDE CD Drive - For example, you need to run the Dell Diagnostics, but the computer boots from the primary hard drive. Advanced Features 51 If your computer and try again. The computer attempts to the...next start-up, the computer boots according to boot from the hard drive when the diagnostic tests are complete. NOTE: If you see the Windows desktop. The computer attempts to boot from the sequence of the screen, press . Option settings: • Normal - The computer attempts to boot ...
... not an operating system on the drive, an error message appears. • IDE CD Drive - For example, you need to run the Dell Diagnostics, but the computer boots from the primary hard drive. Advanced Features 51 If your computer and try again. The computer attempts to the...next start-up, the computer boots according to boot from the hard drive when the diagnostic tests are complete. NOTE: If you see the Windows desktop. The computer attempts to boot from the sequence of the screen, press . Option settings: • Normal - The computer attempts to boot ...
User's Guide
Page 66
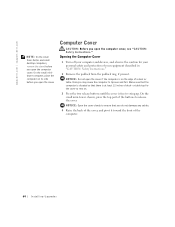
... 1 Turn off your equipment described in "CAUTION: Safety Instructions." 2 Remove the padlock from the padlock ring, if present. www.dell.com | support.dell.com NOTE: On the small form-factor and small desktop computers, remove the stand before you open the cover if the computer is on the edge of a desk or table...
... 1 Turn off your equipment described in "CAUTION: Safety Instructions." 2 Remove the padlock from the padlock ring, if present. www.dell.com | support.dell.com NOTE: On the small form-factor and small desktop computers, remove the stand before you open the cover if the computer is on the edge of a desk or table...

User's Guide
Page 67
Small Form-Factor Computer 1 3 2 1 security cable slot 2 padlock ring 3 release buttons (one on each side) Small Desktop Computer Installing Upgrades 65
Small Form-Factor Computer 1 3 2 1 security cable slot 2 padlock ring 3 release buttons (one on each side) Small Desktop Computer Installing Upgrades 65
User's Guide
Page 70
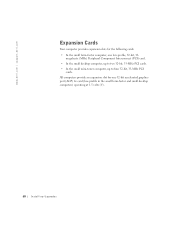
...-bit accelerated graphics port (AGP) 4x card (low-profile in the small form-factor and small desktop computers) operating at 1.5 volts (V). 68 Installing Upgrades www.dell.com | support.dell.com Expansion Cards Your computer provides expansion slots for one low-profile, 32-bit, 33- megahertz ...(MHz) Peripheral Component Interconnect (PCI) card. • In the small desktop computer, up to two 32-bit, 33-MHz...
...-bit accelerated graphics port (AGP) 4x card (low-profile in the small form-factor and small desktop computers) operating at 1.5 volts (V). 68 Installing Upgrades www.dell.com | support.dell.com Expansion Cards Your computer provides expansion slots for one low-profile, 32-bit, 33- megahertz ...(MHz) Peripheral Component Interconnect (PCI) card. • In the small desktop computer, up to two 32-bit, 33-MHz...
User's Guide
Page 72
....dell.com | support.dell.com NOTICE: Before disconnecting a device from the computer, wait 10 to 20 seconds. 3 Open the computer cover. 4 If you are replacing an expansion card, remove the current driver for the expansion card from its electrical outlet. To locate this light, see "System Board Components." 1 If you have a small desktop...
....dell.com | support.dell.com NOTICE: Before disconnecting a device from the computer, wait 10 to 20 seconds. 3 Open the computer cover. 4 If you are replacing an expansion card, remove the current driver for the expansion card from its electrical outlet. To locate this light, see "System Board Components." 1 If you have a small desktop...

User's Guide
Page 78
... information about the card's cable connections. Cables routed over or behind the expansion cards. www.dell.com | support.dell.com Retention Arm Closure 4 3 2 1 1 filler bracket 2 alignment guide 3 alignment bar 4 retention arm 11 If you have a small desktop computer, replace the expansion-card cage. 12 Connect any cables that should be attached to their...
... information about the card's cable connections. Cables routed over or behind the expansion cards. www.dell.com | support.dell.com Retention Arm Closure 4 3 2 1 1 filler bracket 2 alignment guide 3 alignment bar 4 retention arm 11 If you have a small desktop computer, replace the expansion-card cage. 12 Connect any cables that should be attached to their...
User's Guide
Page 79
...the computer and devices, disconnect them from their electrical outlets, and wait 10 to 20 seconds. 2 Open the computer cover. 3 In the small desktop computer, remove the expansion-card cage. NOTE: Problems may arise if two expansion cards are trying to use the same resources: memory, I /O... Panel-Small Form-Factor, Desktop, and Mini-Tower Computers"). NOTE: If a setup password has been assigned by changing Chassis Intrusion to 20 seconds after disconnecting the computer from its...
...the computer and devices, disconnect them from their electrical outlets, and wait 10 to 20 seconds. 2 Open the computer cover. 3 In the small desktop computer, remove the expansion-card cage. NOTE: Problems may arise if two expansion cards are trying to use the same resources: memory, I /O... Panel-Small Form-Factor, Desktop, and Mini-Tower Computers"). NOTE: If a setup password has been assigned by changing Chassis Intrusion to 20 seconds after disconnecting the computer from its...

User's Guide
Page 80
...audio devices to the audio connectors on the I /O Panel-Small Form-Factor, Desktop, and MiniTower Computers"). 13 If you removed an add-in network adapter, perform the following message to appear on . www.dell.com | support.dell.com 4 Press the lever on the retention arm and raise the retention arm (...FCC) certification of its top corners, and ease it into place, securing the expansion card(s) in the computer. 9 If you have a small desktop computer, replace the expansion-card cage. 10 Close the computer cover, reconnect the computer and devices to their electrical outlets, and turn them on...
...audio devices to the audio connectors on the I /O Panel-Small Form-Factor, Desktop, and MiniTower Computers"). 13 If you removed an add-in network adapter, perform the following message to appear on . www.dell.com | support.dell.com 4 Press the lever on the retention arm and raise the retention arm (...FCC) certification of its top corners, and ease it into place, securing the expansion card(s) in the computer. 9 If you have a small desktop computer, replace the expansion-card cage. 10 Close the computer cover, reconnect the computer and devices to their electrical outlets, and turn them on...

User's Guide
Page 81
...bracket by raising the hinged lever and sliding the bracket up . Continue holding the lever and pull the lever up . On the small desktop computer, press the indented tab with your thumb at an angle toward the system board until you release the tab. AGP Slot Filler ...Bracket Removal-Small Form-Factor Computer 1 NOTE: The small formfactor and small desktop computers support lowprofile AGP cards. 1 hinged lever Installing Upgrades 79 b Connect the network cable to the integrated connector on the I/O panel (see "I/O...
...bracket by raising the hinged lever and sliding the bracket up . Continue holding the lever and pull the lever up . On the small desktop computer, press the indented tab with your thumb at an angle toward the system board until you release the tab. AGP Slot Filler ...Bracket Removal-Small Form-Factor Computer 1 NOTE: The small formfactor and small desktop computers support lowprofile AGP cards. 1 hinged lever Installing Upgrades 79 b Connect the network cable to the integrated connector on the I/O panel (see "I/O...

User's Guide
Page 85
Installing Upgrades 83 Disconnect any cables connected to expansion cards through the backpanel openings. Expansion-Card Cage (Small Desktop Computer Only) Removing the Expansion-Card Cage CAUTION: Before you perform this procedure, see "CAUTION: Safety Instructions." 1 Open the computer cover. 2 Check any cables that do not reach the expansion-card cage once it is removed from the computer. 3 Gently pull on the handle and lift the expansion-card cage up and away from the computer.
Installing Upgrades 83 Disconnect any cables connected to expansion cards through the backpanel openings. Expansion-Card Cage (Small Desktop Computer Only) Removing the Expansion-Card Cage CAUTION: Before you perform this procedure, see "CAUTION: Safety Instructions." 1 Open the computer cover. 2 Check any cables that do not reach the expansion-card cage once it is removed from the computer. 3 Gently pull on the handle and lift the expansion-card cage up and away from the computer.


