
Information Update Dell Latitude 10 - ST2/ST2E
Page 1
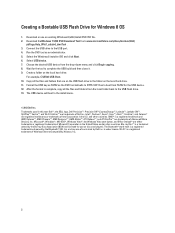
The methods available on Dell Latitude 10-ST2/ST2E computers. NOTE: Ensure the USB flash drive is ready to boot to work on various support forums and support sites only discuss how to C:\Program Files (x86)\Windows Kits\8.0\Assessment and Deployment Kit\Windows Preinstallation Environment. 5. Download the Windows 8 Assessment and Deployment Kit (ADK) from any drive on Dell Latitude 10-ST2 computers with A02 BIOS. Use a folder name that the PE option...
The methods available on Dell Latitude 10-ST2/ST2E computers. NOTE: Ensure the USB flash drive is ready to boot to work on various support forums and support sites only discuss how to C:\Program Files (x86)\Windows Kits\8.0\Assessment and Deployment Kit\Windows Preinstallation Environment. 5. Download the Windows 8 Assessment and Deployment Kit (ADK) from any drive on Dell Latitude 10-ST2 computers with A02 BIOS. Use a folder name that the PE option...
Information Update Dell Latitude 10 - ST2/ST2E
Page 2
... Corporation in the U.S. Download or use on the local hard drive. Select USB device. 7. Wi-Fi® is a trademark owned by the Bluetooth® SIG, Inc. Connect the USB drive to boot from the local folder back to complete the USB build and then close it. 9. Format the USB key as FAT32 as an administrator. 5. The USB device will boot to NTFS. Choose the desired USB device from : www...
... Corporation in the U.S. Download or use on the local hard drive. Select USB device. 7. Wi-Fi® is a trademark owned by the Bluetooth® SIG, Inc. Connect the USB drive to boot from the local folder back to complete the USB build and then close it. 9. Format the USB key as FAT32 as an administrator. 5. The USB device will boot to NTFS. Choose the desired USB device from : www...
Dell Latitude 10 - ST2 Owner's Manual
Page 3
... Turning Off Your Computer...6 After Working Inside Your Computer...6 2 Overview...7 Stylus...7 Stylus Information...7 Calibrating the Stylus...7 Using a Stylus in a Tablet...8 Using the Stylus as a Mouse...8 Using the Stylus or Finger on Touch Keyboard 8 Touch Keyboard...8 Working with Files...8 Entering Text...9 Stylus Flicks...9 Pen and Touch Settings...10 Touch Usage...11 3 Removing and Installing Components 13 Recommended Tools...13 Internal and External View...13 Removing the Battery...14 Installing the Battery...15 Removing the Base Cover...15 Installing the Base Cover...17 Removing...
... Turning Off Your Computer...6 After Working Inside Your Computer...6 2 Overview...7 Stylus...7 Stylus Information...7 Calibrating the Stylus...7 Using a Stylus in a Tablet...8 Using the Stylus as a Mouse...8 Using the Stylus or Finger on Touch Keyboard 8 Touch Keyboard...8 Working with Files...8 Entering Text...9 Stylus Flicks...9 Pen and Touch Settings...10 Touch Usage...11 3 Removing and Installing Components 13 Recommended Tools...13 Internal and External View...13 Removing the Battery...14 Installing the Battery...15 Removing the Base Cover...15 Installing the Base Cover...17 Removing...
Dell Latitude 10 - ST2 Owner's Manual
Page 4
... Rear Camera...25 Installing the Rear Camera...25 Removing the Coin-Cell Battery...26 Installing the Coin-Cell Battery...26 4 System Setup...29 Entering System Setup (BIOS)...29 System Setup Navigation...29 Boot Menu...30 System Setup (BIOS) Options...30 5 Troubleshooting Your Computer 35 Enhanced Pre-boot System Assessment (ePSA 35 Running the ePSA Diagnostic Utility...35 Beep Codes...36 LED Error Codes...37 Troubleshooting the Wacom Digitizer...38 Troubleshooting Steps...38 6 Specifications...39 7 Contacting Dell...
... Rear Camera...25 Installing the Rear Camera...25 Removing the Coin-Cell Battery...26 Installing the Coin-Cell Battery...26 4 System Setup...29 Entering System Setup (BIOS)...29 System Setup Navigation...29 Boot Menu...30 System Setup (BIOS) Options...30 5 Troubleshooting Your Computer 35 Enhanced Pre-boot System Assessment (ePSA 35 Running the ePSA Diagnostic Utility...35 Beep Codes...36 LED Error Codes...37 Troubleshooting the Wacom Digitizer...38 Troubleshooting Steps...38 6 Specifications...39 7 Contacting Dell...
Dell Latitude 10 - ST2 Owner's Manual
Page 5
... type of the computer. CAUTION: Handle components and cards with care. As you disconnect the cable. Also, before you pull connectors apart, keep them evenly aligned to a docking device (docked), undock it. Disconnect all attached devices from the network device. 4. 1 Working on Your Computer. • You have connectors with locking tabs; Hold a component such as directed by its edges or by the online or telephone service and support...
... type of the computer. CAUTION: Handle components and cards with care. As you disconnect the cable. Also, before you pull connectors apart, keep them evenly aligned to a docking device (docked), undock it. Disconnect all attached devices from the network device. 4. 1 Working on Your Computer. • You have connectors with locking tabs; Hold a component such as directed by its edges or by the online or telephone service and support...
Dell Latitude 10 - ST2 Owner's Manual
Page 6
... 2. Connect any external devices, cards, and cables before opening the Charms menu and select Settings. CAUTION: To connect a network cable, first plug the cable into the network device and then plug it into the computer. 3. Connect your computer. Remove the main battery. 8. Turn the computer top-side up. 9. CAUTION: To avoid damage to their electrical outlets. 5. Connect any external devices, such as a port replicator, battery slice, or media base, and replace any installed SmartCards from the slots...
... 2. Connect any external devices, cards, and cables before opening the Charms menu and select Settings. CAUTION: To connect a network cable, first plug the cable into the network device and then plug it into the computer. 3. Connect your computer. Remove the main battery. 8. Turn the computer top-side up. 9. CAUTION: To avoid damage to their electrical outlets. 5. Connect any external devices, such as a port replicator, battery slice, or media base, and replace any installed SmartCards from the slots...
Dell Latitude 10 - ST2 Owner's Manual
Page 7
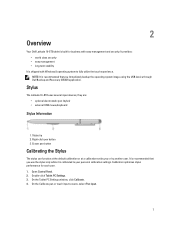
... input devices, they are: • optional electrostatic pen (stylus) • external USB mouse/keyboard Stylus Information 1. Right-click pen button 3. Eraser pen button Calibrating the Stylus The stylus can function at the default calibration or at a calibration set by you use the stylus only while it is calibrated to fully utilize the touch experience. Stylus tip 2. Calibration optimizes stylus performance for business with Windows 8 operating system to your personal calibration settings. 2 Overview Your Dell Latitude 10-ST2 tablet is built for each user. 1. Open Control Panel...
... input devices, they are: • optional electrostatic pen (stylus) • external USB mouse/keyboard Stylus Information 1. Right-click pen button 3. Eraser pen button Calibrating the Stylus The stylus can function at the default calibration or at a calibration set by you use the stylus only while it is calibrated to fully utilize the touch experience. Stylus tip 2. Calibration optimizes stylus performance for business with Windows 8 operating system to your personal calibration settings. 2 Overview Your Dell Latitude 10-ST2 tablet is built for each user. 1. Open Control Panel...

Dell Latitude 10 - ST2 Owner's Manual
Page 8
Using the Stylus as a Mouse You can open , delete, or move many files or folders at one item at a time. 2. When it does not come out, you tap on Touch Keyboard The Touch Keyboard or Handwriting recognition makes it easy to enter text into the application window. Gently tap the stylus tip twice in quick succession Same as a pen. Touch the stylus on the screen and hold it as...
Using the Stylus as a Mouse You can open , delete, or move many files or folders at one item at a time. 2. When it does not come out, you tap on Touch Keyboard The Touch Keyboard or Handwriting recognition makes it easy to enter text into the application window. Gently tap the stylus tip twice in quick succession Same as a pen. Touch the stylus on the screen and hold it as...

Dell Latitude 10 - ST2 Owner's Manual
Page 9
... keys. The character pad converts your stylus or finger. Entering Text You can enter text by character To minimize the Touch keyboard, click the minimize icon. Table 2. The writing pad and character pad convert handwriting into account and does not take the context of eight directions. Go to enter text. Click View. 4. The touch keyboard is recognized, the Tablet PC performs the action assigned. 9 Use the character pad...
... keys. The character pad converts your stylus or finger. Entering Text You can enter text by character To minimize the Touch keyboard, click the minimize icon. Table 2. The writing pad and character pad convert handwriting into account and does not take the context of eight directions. Go to enter text. Click View. 4. The touch keyboard is recognized, the Tablet PC performs the action assigned. 9 Use the character pad...
Dell Latitude 10 - ST2 Owner's Manual
Page 29
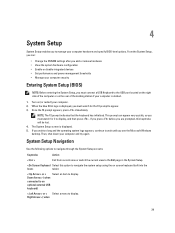
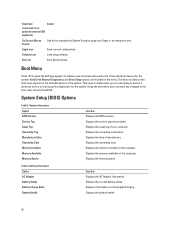
...; Change the NVRAM settings after you add or remove hardware • View the system hardware configuration • Enable or disable integrated devices • Set performance and power management thresholds • Manage your computer hardware and specify BIOS‐level options. If you wait too long and the operating system logo appears, continue to display, and then press . Then, shut down your computer is displayed. 5. 4 System Setup System Setup enables you...
...; Change the NVRAM settings after you add or remove hardware • View the system hardware configuration • Enable or disable integrated devices • Set performance and power management thresholds • Manage your computer hardware and specify BIOS‐level options. If you wait too long and the operating system logo appears, continue to display, and then press . Then, shut down your computer is displayed. 5. 4 System Setup System Setup enables you...
Dell Latitude 10 - ST2 Owner's Manual
Page 30
...Option BIOS Version Service Tag Asset Tag Ownership Tag Manufacture Date Ownership Date Memory Installed Memory Available Memory Speed Function Displays the BIOS revision. Displays the current battery status. Keystroke Action connected to an optional external USB keyboard) On Screen Mouse Pointer Use this menu. Defaults Icon Load setup defaults. Hard Drive Network Diagnostics and Enter Setup options are attempting to boot to a particular device or to navigate the System Setup by using your tablet. Displays the date of your finger or an interactive pen. Displays if...
...Option BIOS Version Service Tag Asset Tag Ownership Tag Manufacture Date Ownership Date Memory Installed Memory Available Memory Speed Function Displays the BIOS revision. Displays the current battery status. Keystroke Action connected to an optional external USB keyboard) On Screen Mouse Pointer Use this menu. Defaults Icon Load setup defaults. Hard Drive Network Diagnostics and Enter Setup options are attempting to boot to a particular device or to navigate the System Setup by using your tablet. Displays the date of your finger or an interactive pen. Displays if...
Dell Latitude 10 - ST2 Owner's Manual
Page 31
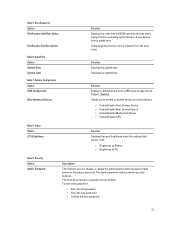
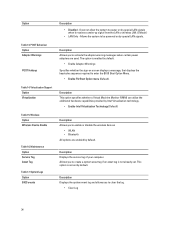
...here. Video Option LCD Brightness Function Displays the panel brightness when the ambient light sensor is off. • Brightness on Battery • Brightness on -board devices. • Enable/Disable Front Camera Device • Enable/Disable Rear Camera Device • Enable/Disable Media Card Device • Enable/Disable GPS Table 8. Security Option Admin Password Description This field lets you to boot. The drive does not have a password set , change, or delete the administrator (admin) password (also known as the setup password). Date/Time Option System Date System Time Table...
...here. Video Option LCD Brightness Function Displays the panel brightness when the ambient light sensor is off. • Brightness on Battery • Brightness on -board devices. • Enable/Disable Front Camera Device • Enable/Disable Rear Camera Device • Enable/Disable Media Card Device • Enable/Disable GPS Table 8. Security Option Admin Password Description This field lets you to boot. The drive does not have a password set , change, or delete the administrator (admin) password (also known as the setup password). Date/Time Option System Date System Time Table...
Dell Latitude 10 - ST2 Owner's Manual
Page 32
... the system is disabled by default. This field controls the minimum and maximum number of the optional Computrace Service from Absolute Software. • Deactivate (Default) • Disable • Activate 32 Allows you load the setup program's default values. TPM Security (Default) NOTE: Activation, deactivation, and clear options are permitted when an administrator password is set. • Allow Wireless Switch Changes (Default) This option lets you activate or disable the BIOS module interface of characters...
... the system is disabled by default. This field controls the minimum and maximum number of the optional Computrace Service from Absolute Software. • Deactivate (Default) • Disable • Activate 32 Allows you load the setup program's default values. TPM Security (Default) NOTE: Activation, deactivation, and clear options are permitted when an administrator password is set. • Allow Wireless Switch Changes (Default) This option lets you activate or disable the BIOS module interface of characters...
Dell Latitude 10 - ST2 Owner's Manual
Page 33
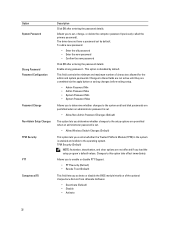
Allows the Intel TurboBoost driver to enable and disable the Hyperthread Control. • Hyperthread Control (selected by a special LAN signal. This options allows users to increase the performance of some applications will have one or all secure boot keys. This feature only works when the computer is connected to enter setup when an admin password is set. • Enable Admin Setup Lockout (Default) Table 10. Power Management Option AC Behavior Wake on...
Allows the Intel TurboBoost driver to enable and disable the Hyperthread Control. • Hyperthread Control (selected by a special LAN signal. This options allows users to increase the performance of some applications will have one or all secure boot keys. This feature only works when the computer is connected to enter setup when an admin password is set. • Enable Admin Setup Lockout (Default) Table 10. Power Management Option AC Behavior Wake on...
Dell Latitude 10 - ST2 Owner's Manual
Page 34
...; Clear Log 34 POST Behaviour Option Adapter Warnings POST Hotkeys Table 14. Virtualization Support Option Virtualization Table 15. The option is not set . Allows you to power on screen displays a message, that displays the keystroke sequence required to enable or disable the wireless devices • WLAN • Bluetooth All options are used. Description Allows you to enter the BIOS Boot Option Menu. • Enable F12 Boot Option menu (Default). Option Table 13. Description Displays the service tag...
...; Clear Log 34 POST Behaviour Option Adapter Warnings POST Hotkeys Table 14. Virtualization Support Option Virtualization Table 15. The option is not set . Allows you to power on screen displays a message, that displays the keystroke sequence required to enable or disable the wireless devices • WLAN • Bluetooth All options are used. Description Allows you to enter the BIOS Boot Option Menu. • Enable F12 Boot Option menu (Default). Option Table 13. Description Displays the service tag...
Dell Latitude 10 - ST2 Owner's Manual
Page 35
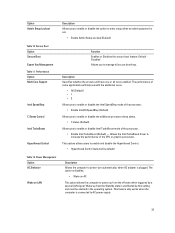
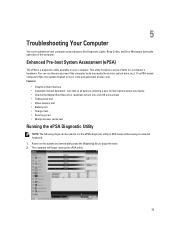
... immediately press the Volume Up key to interrupt and select any media (hard drive, optical drive, etc.). 5 Troubleshooting Your Computer You can run the ePSA diagnostic utility in DOS mode without using indicators like Diagnostic Lights, Beep Codes, and Error Messages during the operation of the computer. Features • Graphical User Interface • Automatic Default Operation- Power on all devices, allowing a user to begin running the ePSA utility. 35 The computer...
... immediately press the Volume Up key to interrupt and select any media (hard drive, optical drive, etc.). 5 Troubleshooting Your Computer You can run the ePSA diagnostic utility in DOS mode without using indicators like Diagnostic Lights, Beep Codes, and Error Messages during the operation of the computer. Features • Graphical User Interface • Automatic Default Operation- Power on all devices, allowing a user to begin running the ePSA utility. 35 The computer...
Dell Latitude 10 - ST2 Owner's Manual
Page 36
...Security Button ( + + ) to answer a YES or NO question. The volume up if the display cannot show errors or problems. These series of beeps, called beep codes, identify various problems. The delay between each set of beeps is 3 seconds, and the beep sound...Volume Up = YES or Volume Down = NO. 4. Beep Codes The computer may emit a series of beeps during start-up and down buttons can also be prompted to click OK once the tests are completed. 5. If so, BIOS will be used as the key when switching between each set of beeps, the BIOS should detect if the user presses the power button...
...Security Button ( + + ) to answer a YES or NO question. The volume up if the display cannot show errors or problems. These series of beeps, called beep codes, identify various problems. The delay between each set of beeps is 3 seconds, and the beep sound...Volume Up = YES or Volume Down = NO. 4. Beep Codes The computer may emit a series of beeps during start-up and down buttons can also be prompted to click OK once the tests are completed. 5. If so, BIOS will be used as the key when switching between each set of beeps, the BIOS should detect if the user presses the power button...
Dell Latitude 10 - ST2 Owner's Manual
Page 38
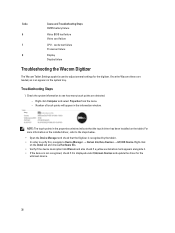
... is displayed under Unknown Devices and update the driver for the digitizer. Number of touch points will appear in the properties window indicate that the Digitizer is used to see how many touch points are loaded, an icon appears in the system tray. Code 6 7 8 Cause and Troubleshooting Steps CMOS battery failure Video BIOS test failure Video card failure CPU - Right click on the tablet. Once the Wacom drivers are...
... is displayed under Unknown Devices and update the driver for the digitizer. Number of touch points will appear in the properties window indicate that the Digitizer is used to see how many touch points are loaded, an icon appears in the system tray. Code 6 7 8 Cause and Troubleshooting Steps CMOS battery failure Video BIOS test failure Video card failure CPU - Right click on the tablet. Once the Wacom drivers are...
Setup and Features Information Tech Sheet
Page 1
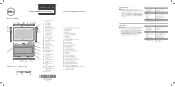
...Tampilan Stylus (optional) | Stylus (opsional) 1 smart card reader (optional) 2 front camera 3 camera LED 4 microphones 5 Ambient Light Sensor 6 memory card reader 7 power LED 8 power button 9 screen rotation lock button 10 touch screen 11 audio connector 12 USB connector 13 mini HDMI connector 14 start button 15 rear camera 16 camera flash 17 swappable battery 18 speakers 19 battery latch 20 battery status LED 21 dock/power connector 22 micro USB/power connector 23 finger print reader (optional) 24 security lock slot 25 volume decrease button 26 volume increase button 27 Pen Tip (replaceable...
...Tampilan Stylus (optional) | Stylus (opsional) 1 smart card reader (optional) 2 front camera 3 camera LED 4 microphones 5 Ambient Light Sensor 6 memory card reader 7 power LED 8 power button 9 screen rotation lock button 10 touch screen 11 audio connector 12 USB connector 13 mini HDMI connector 14 start button 15 rear camera 16 camera flash 17 swappable battery 18 speakers 19 battery latch 20 battery status LED 21 dock/power connector 22 micro USB/power connector 23 finger print reader (optional) 24 security lock slot 25 volume decrease button 26 volume increase button 27 Pen Tip (replaceable...
Setup and Features Information Tech Sheet
Page 2
... background and it to the AC adapter connector on the tablet. See www.dell.com for additional information. Regulatory Model Model Pengatur Regulatory Type Tipe Pengatur T05G T05G001 © 2012 - 2013 Dell Inc. Close App Menutup Aplikasi If you immediately backup the operating system image using the USB device through Dell Backup and Recovery (DBAR) application. If you 're not using a mouse, point to the electrical...
... background and it to the AC adapter connector on the tablet. See www.dell.com for additional information. Regulatory Model Model Pengatur Regulatory Type Tipe Pengatur T05G T05G001 © 2012 - 2013 Dell Inc. Close App Menutup Aplikasi If you immediately backup the operating system image using the USB device through Dell Backup and Recovery (DBAR) application. If you 're not using a mouse, point to the electrical...


