
Dell Latitude 10 - ST2 Owner's Manual
Page 3
... the Stylus or Finger on Touch Keyboard 8 Touch Keyboard...8 Working with Files...8 Entering Text...9 Stylus Flicks...9 Pen and Touch Settings...10 Touch Usage...11 3 Removing and Installing Components 13 Recommended Tools...13 Internal and External View...13 Removing the Battery...14 Installing the Battery......15 Removing the Base Cover...15 Installing the Base Cover...17 Removing the Front Camera...17 Installing the Front Camera...18 Removing the Speakers...18 Installing the Speakers...20...
... the Stylus or Finger on Touch Keyboard 8 Touch Keyboard...8 Working with Files...8 Entering Text...9 Stylus Flicks...9 Pen and Touch Settings...10 Touch Usage...11 3 Removing and Installing Components 13 Recommended Tools...13 Internal and External View...13 Removing the Battery...14 Installing the Battery......15 Removing the Base Cover...15 Installing the Base Cover...17 Removing the Front Camera...17 Installing the Front Camera...18 Removing the Speakers...18 Installing the Speakers...20...
Dell Latitude 10 - ST2 Owner's Manual
Page 5
...WARNING: Before working inside your computer, read the safety information that the following safety guidelines to help to prevent the computer cover from their electrical outlets. 6. CAUTION: To avoid electrostatic discharge, ground yourself by using a wrist grounding strap or by... inside the computer. 1. Ensure that is not authorized by Dell is not covered by a certified service technician. For additional safety best practices information, see the Regulatory Compliance Homepage at www.dell.com/ regulatory_compliance CAUTION: Many repairs may appear differently than shown...
...WARNING: Before working inside your computer, read the safety information that the following safety guidelines to help to prevent the computer cover from their electrical outlets. 6. CAUTION: To avoid electrostatic discharge, ground yourself by using a wrist grounding strap or by... inside the computer. 1. Ensure that is not authorized by Dell is not covered by a certified service technician. For additional safety best practices information, see the Regulatory Compliance Homepage at www.dell.com/ regulatory_compliance CAUTION: Many repairs may appear differently than shown...

Dell Latitude 10 - ST2 Owner's Manual
Page 15
Slide the battery into its slot until it clicks into place. 2. Installing the Battery 1. Remove the battery. 3. Follow the procedures in After Working Inside Your Computer. Remove the screws that secure the base cover to the computer. 15 Removing the Base Cover 1. Follow the procedures in Before Working Inside Your Computer. 2.
Slide the battery into its slot until it clicks into place. 2. Installing the Battery 1. Remove the battery. 3. Follow the procedures in After Working Inside Your Computer. Remove the screws that secure the base cover to the computer. 15 Removing the Base Cover 1. Follow the procedures in Before Working Inside Your Computer. 2.

Dell Latitude 10 - ST2 Owner's Manual
Page 16
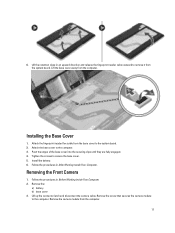
4. Pry and release the tabs that secure the base cover in the battery bay area in the diagram. 5. Pry and flip the base cover. 16 Pry and lift the tabs that secure the base cover by following the arrow sequence in an upward direction.
4. Pry and release the tabs that secure the base cover in the battery bay area in the diagram. 5. Pry and flip the base cover. 16 Pry and lift the tabs that secure the base cover by following the arrow sequence in an upward direction.
Dell Latitude 10 - ST2 Owner's Manual
Page 17
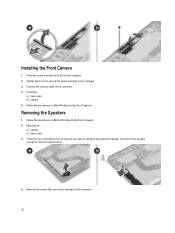
... Computer. 2. Remove the camera module from the computer. Follow the procedures in After Working Inside Your Computer. Remove the: a) battery b) base cover 3. Attach the fingerprint reader flex cable from the system board. Remove the screw that secures the camera module to the system board. 2. Push ...the edges of the base cover into the securing clips until they are fully engaged. 4. Lift the retention clasp in an upward direction and release the fingerprint reader cable...
... Computer. 2. Remove the camera module from the computer. Follow the procedures in After Working Inside Your Computer. Remove the: a) battery b) base cover 3. Attach the fingerprint reader flex cable from the system board. Remove the screw that secures the camera module to the system board. 2. Push ...the edges of the base cover into the securing clips until they are fully engaged. 4. Lift the retention clasp in an upward direction and release the fingerprint reader cable...
Dell Latitude 10 - ST2 Owner's Manual
Page 18
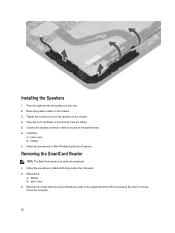
... the screws that secure the speakers to the connector. 4. Place the camera module in its cabling from below the speaker. Install the: a) base cover b) battery 5. Remove the : a) battery b) base cover 3. Follow the procedures in Before Working Inside Your Computer. 2. Lift up the coin-cell battery from the system board. 4. Tighten the screw...
... the screws that secure the speakers to the connector. 4. Place the camera module in its cabling from below the speaker. Install the: a) base cover b) battery 5. Remove the : a) battery b) base cover 3. Follow the procedures in Before Working Inside Your Computer. 2. Lift up the coin-cell battery from the system board. 4. Tighten the screw...
Dell Latitude 10 - ST2 Owner's Manual
Page 20
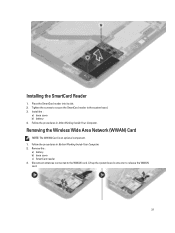
... the SmartCard Reader NOTE: The SmarCard reader is an optional component. 1. Tighten the screws to secure the speakers to the chassis. 4. Remove the : a) battery b) base cover 3. Installing the Speakers 1. Install the : a) base cover b) battery 7. Follow the procedures in its port on the chassis. 3.
... the SmartCard Reader NOTE: The SmarCard reader is an optional component. 1. Tighten the screws to secure the speakers to the chassis. 4. Remove the : a) battery b) base cover 3. Installing the Speakers 1. Install the : a) base cover b) battery 7. Follow the procedures in its port on the chassis. 3.
Dell Latitude 10 - ST2 Owner's Manual
Page 21
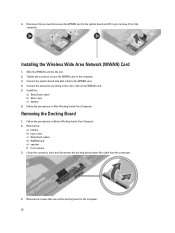
... the system board. 3. Removing the Wireless Wide Area Network (WWAN) Card NOTE: The WWAN Card is an optional component. 1. Install the : a) base cover b) battery 4. Remove the : a) battery b) base cover c) SmartCard reader 3. Lift up the system board connector to release the WWAN card. 21 Follow the procedures in After Working Inside Your Computer.
... the system board. 3. Removing the Wireless Wide Area Network (WWAN) Card NOTE: The WWAN Card is an optional component. 1. Install the : a) base cover b) battery 4. Remove the : a) battery b) base cover c) SmartCard reader 3. Lift up the system board connector to release the WWAN card. 21 Follow the procedures in After Working Inside Your Computer.
Dell Latitude 10 - ST2 Owner's Manual
Page 22
Install the : a) SmartCard reader b) base cover c) battery 6. Remove the: a) battery b) base cover c) SmartCard reader d) WWAN Card e) speaker f) front camera 3. Lift up to remove it from the connector. 4. Tighten the screws to secure the WWAN card to the ...
Install the : a) SmartCard reader b) base cover c) battery 6. Remove the: a) battery b) base cover c) SmartCard reader d) WWAN Card e) speaker f) front camera 3. Lift up to remove it from the connector. 4. Tighten the screws to secure the WWAN card to the ...
Dell Latitude 10 - ST2 Owner's Manual
Page 23
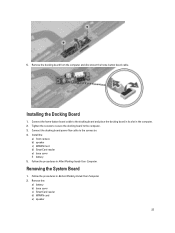
... the procedures in After Working Inside Your Computer. Installing the Docking Board 1. Install the: a) front camera b) speaker c) WWAN Card d) SmartCard reader e) base cover f) battery 5. Remove the: a) battery b) base cover c) SmartCard reader d) WWAN card e) speaker 23 Connect the home-button board cable to the computer. 3. 5. Remove the docking board from the computer and...
... the procedures in After Working Inside Your Computer. Installing the Docking Board 1. Install the: a) front camera b) speaker c) WWAN Card d) SmartCard reader e) base cover f) battery 5. Remove the: a) battery b) base cover c) SmartCard reader d) WWAN card e) speaker 23 Connect the home-button board cable to the computer. 3. 5. Remove the docking board from the computer and...
Dell Latitude 10 - ST2 Owner's Manual
Page 25
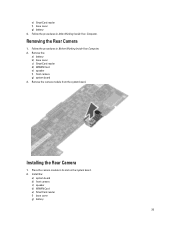
Follow the procedures in After Working Inside Your Computer. Removing the Rear Camera 1. Install the: a) system board b) front camera c) speaker d) WWAN Card e) SmartCard reader f) base cover g) battery 25 Installing the Rear Camera 1. e) SmartCard reader f) base cover g) battery 4. Follow the procedures in Before Working Inside Your Computer. 2. Remove the: a) battery b) base cover c) SmartCard reader d) WWAN Card e) speaker f) front camera g) system board 3. Remove the camera module from the system board. Place the camera module in its slot on the system board. 2.
Follow the procedures in After Working Inside Your Computer. Removing the Rear Camera 1. Install the: a) system board b) front camera c) speaker d) WWAN Card e) SmartCard reader f) base cover g) battery 25 Installing the Rear Camera 1. e) SmartCard reader f) base cover g) battery 4. Follow the procedures in Before Working Inside Your Computer. 2. Remove the: a) battery b) base cover c) SmartCard reader d) WWAN Card e) speaker f) front camera g) system board 3. Remove the camera module from the system board. Place the camera module in its slot on the system board. 2.

Dell Latitude 10 - ST2 Owner's Manual
Page 26
Replace the coin-cell battery in After Working Inside Your Computer. Remove the: a) battery b) base cover c) SmartCard reader d) WWAN Card e) speaker f) front camera g) system board 3. Install the: a) system board b) front camera c) WWAN Card d) SmartCard reader e) speaker 3....the Coin-Cell Battery 1. 3. Follow the procedures in Before Working Inside Your Computer. 2. Installing the Coin-Cell Battery 1. Install the: a) battery b) base cover 26 Disconnect the coin-cell battery cable and remove it from the system board. Connect the coin-cell battery cable to the system board. 2.
Replace the coin-cell battery in After Working Inside Your Computer. Remove the: a) battery b) base cover c) SmartCard reader d) WWAN Card e) speaker f) front camera g) system board 3. Install the: a) system board b) front camera c) WWAN Card d) SmartCard reader e) speaker 3....the Coin-Cell Battery 1. 3. Follow the procedures in Before Working Inside Your Computer. 2. Installing the Coin-Cell Battery 1. Install the: a) battery b) base cover 26 Disconnect the coin-cell battery cable and remove it from the system board. Connect the coin-cell battery cable to the system board. 2.
Dell Latitude 10 - ST2 Owner's Manual
Page 37
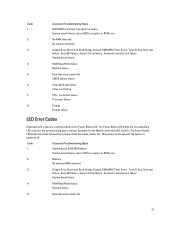
...the corresponding fault condition. Code 1 2 3 4 5 6 7 8 Cause and Troubleshooting Steps BIOS ROM checksum in progress or failure System board failure, covers BIOS corruption or ROM error No RAM detected No memory detected Chipset Error (North and South Bridge Chipset, DMA/IMR/ Timer Error) , Time-Of-... followed by a pause, blinks two times, pause, etc. Code 1 Cause and Troubleshooting Steps System board: BIOS ROM failure System board failure, covers BIOS corruption or ROM error 2 Memory No memory/RAM detected 3 Chipset Error (North and South Bridge Chipset, DMA/IMR/ Timer Error) , ...
...the corresponding fault condition. Code 1 2 3 4 5 6 7 8 Cause and Troubleshooting Steps BIOS ROM checksum in progress or failure System board failure, covers BIOS corruption or ROM error No RAM detected No memory detected Chipset Error (North and South Bridge Chipset, DMA/IMR/ Timer Error) , Time-Of-... followed by a pause, blinks two times, pause, etc. Code 1 Cause and Troubleshooting Steps System board: BIOS ROM failure System board failure, covers BIOS corruption or ROM error 2 Memory No memory/RAM detected 3 Chipset Error (North and South Bridge Chipset, DMA/IMR/ Timer Error) , ...
