
Dell Latitude 10 - ST2 Owner's Manual
Page 3
... the Stylus or Finger on Touch Keyboard 8 Touch Keyboard...8 Working with Files...8 Entering Text...9 Stylus Flicks...9 Pen and Touch Settings...10 Touch Usage...11 3 Removing and Installing Components 13 Recommended Tools...13 Internal and External View...13 Removing the Battery...14 Installing the Battery... Base Cover...15 Installing the Base Cover...17 Removing the Front Camera...17 Installing the Front Camera...18 Removing the Speakers...18 Installing the Speakers...20 Removing the SmartCard Reader ...20 Installing the SmartCard Reader ...21 Removing the Wireless Wide Area Network (WWAN) ...
... the Stylus or Finger on Touch Keyboard 8 Touch Keyboard...8 Working with Files...8 Entering Text...9 Stylus Flicks...9 Pen and Touch Settings...10 Touch Usage...11 3 Removing and Installing Components 13 Recommended Tools...13 Internal and External View...13 Removing the Battery...14 Installing the Battery... Base Cover...15 Installing the Base Cover...17 Removing the Front Camera...17 Installing the Front Camera...18 Removing the Speakers...18 Installing the Speakers...20 Removing the SmartCard Reader ...20 Installing the SmartCard Reader ...21 Removing the Wireless Wide Area Network (WWAN) ...

Dell Latitude 10 - ST2 Owner's Manual
Page 14
docking board 2. speaker 4. SmartCard reader/WWAN card (WWAN card is located below the SmartCard reader Removing the Battery 1. front camera 6. coin-cell battery 3. Slide the battery release latch to the unlock position. Follow the procedures in an outward direction and remove it from the computer. 14 Figure 2. Lift up the battery in Before Working Inside Your Computer. 2. system board 5. Internal View 1. rear camera 7.
docking board 2. speaker 4. SmartCard reader/WWAN card (WWAN card is located below the SmartCard reader Removing the Battery 1. front camera 6. coin-cell battery 3. Slide the battery release latch to the unlock position. Follow the procedures in an outward direction and remove it from the computer. 14 Figure 2. Lift up the battery in Before Working Inside Your Computer. 2. system board 5. Internal View 1. rear camera 7.
Dell Latitude 10 - ST2 Owner's Manual
Page 18
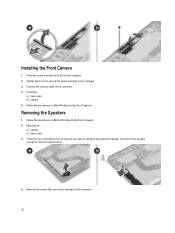
Connect the camera cable to the computer. 18 Removing the Speakers 1. Lift up the coin-cell battery from its slot and un-route its slot on the computer. 2. Place the camera module in its cabling from ... board. 4. Follow the procedures in After Working Inside Your Computer. Remove the screws that secure the speakers to the connector. 4. Follow the procedures in Before Working Inside Your Computer. 2. Disconnect the speaker connector from below the speaker. Tighten the screw to secure the camera module to the computer. 3. Remove the : a) battery b) base cover...
Connect the camera cable to the computer. 18 Removing the Speakers 1. Lift up the coin-cell battery from its slot and un-route its slot on the computer. 2. Place the camera module in its cabling from ... board. 4. Follow the procedures in After Working Inside Your Computer. Remove the screws that secure the speakers to the connector. 4. Follow the procedures in Before Working Inside Your Computer. 2. Disconnect the speaker connector from below the speaker. Tighten the screw to secure the camera module to the computer. 3. Remove the : a) battery b) base cover...

Dell Latitude 10 - ST2 Owner's Manual
Page 19
Un-route the speaker cables on the right-hand side of the computer and lift up to release the left -hand side of the computer and lift up to release the right speaker from the computer. 19 5. Un-route the speaker cables on the left speaker from the computer. 6.
Un-route the speaker cables on the right-hand side of the computer and lift up to release the left -hand side of the computer and lift up to release the right speaker from the computer. 19 5. Un-route the speaker cables on the left speaker from the computer. 6.
Dell Latitude 10 - ST2 Owner's Manual
Page 20
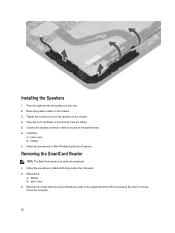
...20 Place the coin-cell battery in its port on the chassis. 3. Remove the : a) battery b) base cover 3. Route the speaker cables on the system board. 6. Follow the procedures in Before Working Inside Your Computer. 2. Remove the screws that secure the SmartCard ... procedures in After Working Inside Your Computer. Place the right and the left speakers in an upward direction to the chassis. 4. Connect the speaker connector cable to its slot and route the cables. 5. Installing the Speakers 1. Removing the SmartCard Reader NOTE: The SmarCard reader is an optional component...
...20 Place the coin-cell battery in its port on the chassis. 3. Remove the : a) battery b) base cover 3. Route the speaker cables on the system board. 6. Follow the procedures in Before Working Inside Your Computer. 2. Remove the screws that secure the SmartCard ... procedures in After Working Inside Your Computer. Place the right and the left speakers in an upward direction to the chassis. 4. Connect the speaker connector cable to its slot and route the cables. 5. Installing the Speakers 1. Removing the SmartCard Reader NOTE: The SmarCard reader is an optional component...
Dell Latitude 10 - ST2 Owner's Manual
Page 22
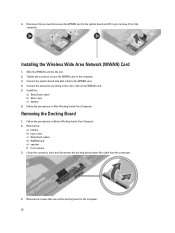
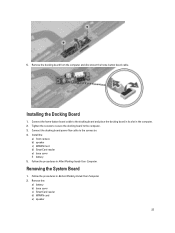
Removing the Docking Board 1. Remove the: a) battery b) base cover c) SmartCard reader d) WWAN Card e) speaker f) front camera 3. 4. Slide the WWAN card into the slot. 2. Remove the screws that secure the WWAN card to remove it up the connector latch and ...
Removing the Docking Board 1. Remove the: a) battery b) base cover c) SmartCard reader d) WWAN Card e) speaker f) front camera 3. 4. Slide the WWAN card into the slot. 2. Remove the screws that secure the WWAN card to remove it up the connector latch and ...
Dell Latitude 10 - ST2 Owner's Manual
Page 23
... the docking board in its slot in the computer. 2. Connect the home-button board cable to the connector. 4. Install the: a) front camera b) speaker c) WWAN Card d) SmartCard reader e) base cover f) battery 5. Follow the procedures in After Working Inside Your Computer. Follow the procedures in Before Working ...Inside Your Computer. 2. Installing the Docking Board 1. Remove the: a) battery b) base cover c) SmartCard reader d) WWAN card e) speaker 23 Removing the System Board 1. Tighten the screws to secure the docking board to the computer. 3.
... the docking board in its slot in the computer. 2. Connect the home-button board cable to the connector. 4. Install the: a) front camera b) speaker c) WWAN Card d) SmartCard reader e) base cover f) battery 5. Follow the procedures in After Working Inside Your Computer. Follow the procedures in Before Working ...Inside Your Computer. 2. Installing the Docking Board 1. Remove the: a) battery b) base cover c) SmartCard reader d) WWAN card e) speaker 23 Removing the System Board 1. Tighten the screws to secure the docking board to the computer. 3.
Dell Latitude 10 - ST2 Owner's Manual
Page 24
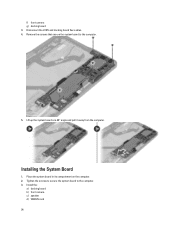
Tighten the screws to secure the system board to the computer. 5. f) front camera g) docking board 3. Place the system board in its compartment on the computer. 2. Disconnect the LVDS and docking board flex cables. 4. Remove the screws that secure the system board to the computer. 3. Installing the System Board 1. Install the: a) docking board b) front camera c) speaker d) WWAN card 24 Lift up the system board at a 45° angle and pull it away from the computer.
Tighten the screws to secure the system board to the computer. 5. f) front camera g) docking board 3. Place the system board in its compartment on the computer. 2. Disconnect the LVDS and docking board flex cables. 4. Remove the screws that secure the system board to the computer. 3. Installing the System Board 1. Install the: a) docking board b) front camera c) speaker d) WWAN card 24 Lift up the system board at a 45° angle and pull it away from the computer.
Dell Latitude 10 - ST2 Owner's Manual
Page 25
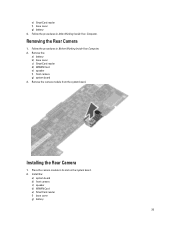
Removing the Rear Camera 1. Install the: a) system board b) front camera c) speaker d) WWAN Card e) SmartCard reader f) base cover g) battery 25 Remove the camera module from the system board. Follow the procedures in its slot on the system board. 2. Place the camera module in Before Working Inside Your Computer. 2. e) SmartCard reader f) base cover g) battery 4. Remove the: a) battery b) base cover c) SmartCard reader d) WWAN Card e) speaker f) front camera g) system board 3. Installing the Rear Camera 1. Follow the procedures in After Working Inside Your Computer.
Removing the Rear Camera 1. Install the: a) system board b) front camera c) speaker d) WWAN Card e) SmartCard reader f) base cover g) battery 25 Remove the camera module from the system board. Follow the procedures in its slot on the system board. 2. Place the camera module in Before Working Inside Your Computer. 2. e) SmartCard reader f) base cover g) battery 4. Remove the: a) battery b) base cover c) SmartCard reader d) WWAN Card e) speaker f) front camera g) system board 3. Installing the Rear Camera 1. Follow the procedures in After Working Inside Your Computer.

Dell Latitude 10 - ST2 Owner's Manual
Page 26
... 1. Install the: a) battery b) base cover 26 Follow the procedures in its slot on the computer. 4. Install the: a) system board b) front camera c) WWAN Card d) SmartCard reader e) speaker 3. Replace the coin-cell battery in After Working Inside Your Computer. Follow the procedures in Before Working Inside Your Computer. 2. 3. Remove the: a) battery b) base cover...
... 1. Install the: a) battery b) base cover 26 Follow the procedures in its slot on the computer. 4. Install the: a) system board b) front camera c) WWAN Card d) SmartCard reader e) speaker 3. Replace the coin-cell battery in After Working Inside Your Computer. Follow the procedures in Before Working Inside Your Computer. 2. 3. Remove the: a) battery b) base cover...

Dell Latitude 10 - ST2 Owner's Manual
Page 39
... Memory Memory capacity Memory type 2 GB LPDDR2 Audio Type Controller Stereo conversion Interface: Internal External Speakers Internal speaker amplifier Dual channel I2S codec Realtek ALC3261 24-bit I2 S audio interface microphone-in and stereo headphones/speakers combo connector 2 x 1 W stereo speakers 1 W per channel Video Video type Data bus Video controller integrated internal Intel Graphics Media...
... Memory Memory capacity Memory type 2 GB LPDDR2 Audio Type Controller Stereo conversion Interface: Internal External Speakers Internal speaker amplifier Dual channel I2S codec Realtek ALC3261 24-bit I2 S audio interface microphone-in and stereo headphones/speakers combo connector 2 x 1 W stereo speakers 1 W per channel Video Video type Data bus Video controller integrated internal Intel Graphics Media...
Dell Latitude 10 - ST2 Owner's Manual
Page 40
... Voltage USB 2.0 based Gigabit LAN via dock mobile broadband card (optional) one microphone-in and stereo headphones/speakers combo connector one mini HDMI connector one USB 2.0 connector one 3-in-1 memory card reader HD IPS LED 10.1 inches high definition (HD) 125.11 mm (4.93 inches) 222.52 mm (8.76 inches) 255.28... mm (10.05 inches) 222.52 mm / 125.11 mm 1366 x 768 pixels 450 nits 60 Hz 80/80...
... Voltage USB 2.0 based Gigabit LAN via dock mobile broadband card (optional) one microphone-in and stereo headphones/speakers combo connector one mini HDMI connector one USB 2.0 connector one 3-in-1 memory card reader HD IPS LED 10.1 inches high definition (HD) 125.11 mm (4.93 inches) 222.52 mm (8.76 inches) 255.28... mm (10.05 inches) 222.52 mm / 125.11 mm 1366 x 768 pixels 450 nits 60 Hz 80/80...
Setup and Features Information Tech Sheet
Page 1
Power Coin-cell battery Input voltage Output Power 3 V CR2025 lithium ion 100-240 VAC 19.5V, 1.54A Physical Height (with your tablet. Latitude 10 - right mouse click (default) 29 Eraser Tip Informasi Pengaturan dan Fitur 1 pembaca kartu smart (opsional) 2 kamera depan 3 LED kamera 4 mikrofon 5 Sensor Cahaya Sekitar 6 ... audio 12 konektor USB 13 konektor mini HDMI 14 tombol mulai 15 kamera belakang 16 lampu kilat kamera 17 baterai yang dapat diganti 18 speaker 19 kait baterai 20 LED status baterai 21 dock/konektor daya 22 USB mikro/konektor daya 23 pembaca sidik jari (opsional) 24 slot ...
Power Coin-cell battery Input voltage Output Power 3 V CR2025 lithium ion 100-240 VAC 19.5V, 1.54A Physical Height (with your tablet. Latitude 10 - right mouse click (default) 29 Eraser Tip Informasi Pengaturan dan Fitur 1 pembaca kartu smart (opsional) 2 kamera depan 3 LED kamera 4 mikrofon 5 Sensor Cahaya Sekitar 6 ... audio 12 konektor USB 13 konektor mini HDMI 14 tombol mulai 15 kamera belakang 16 lampu kilat kamera 17 baterai yang dapat diganti 18 speaker 19 kait baterai 20 LED status baterai 21 dock/konektor daya 22 USB mikro/konektor daya 23 pembaca sidik jari (opsional) 24 slot ...