
Owners Manual
Page 4
Replacing the Optical Drive 24 6 Wireless Mini-Card 25 Removing the Mini-Card 25 Replacing the Mini-Card 27 7 Palm-Rest Assembly 29 Removing the Palm-Rest Assembly 29 Replacing the Palm-Rest Assembly 32 8 Power Button Board 35 Removing the Power Button Board 35 Replacing the Power Button Board 36 9 Hard Drive 37 Removing the Hard Drive 37 Replacing the Hard Drive 39 10 Coin-Cell Battery 41 Removing the Coin-Cell Battery 41 Replacing the Coin-Cell Battery 42 4 Contents
Replacing the Optical Drive 24 6 Wireless Mini-Card 25 Removing the Mini-Card 25 Replacing the Mini-Card 27 7 Palm-Rest Assembly 29 Removing the Palm-Rest Assembly 29 Replacing the Palm-Rest Assembly 32 8 Power Button Board 35 Removing the Power Button Board 35 Replacing the Power Button Board 36 9 Hard Drive 37 Removing the Hard Drive 37 Replacing the Hard Drive 39 10 Coin-Cell Battery 41 Removing the Coin-Cell Battery 41 Replacing the Coin-Cell Battery 42 4 Contents
Owners Manual
Page 39
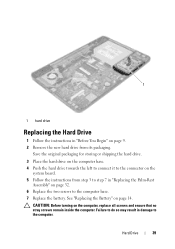
.... 5 Follow the instructions from its packaging. CAUTION: Before turning on page 9. 2 Remove the new hard drive from step 3 to step 7 in damage to the computer base. 7 Replace the battery. 1 1 hard drive Replacing the Hard Drive 1 Follow the instructions in "Before You Begin" on the computer, replace all screws and ensure that no stray screws remain inside the computer. See...
.... 5 Follow the instructions from its packaging. CAUTION: Before turning on page 9. 2 Remove the new hard drive from step 3 to step 7 in damage to the computer base. 7 Replace the battery. 1 1 hard drive Replacing the Hard Drive 1 Follow the instructions in "Before You Begin" on the computer, replace all screws and ensure that no stray screws remain inside the computer. See...
Owners Manual
Page 44
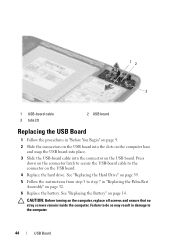
... and ensure that no stray screws remain inside the computer. CAUTION: Before turning on page 14. See "Replacing the Hard Drive" on page 39. 5 Follow the instructions from step 3 to step 7 in "Replacing the Palm-Rest Assembly" on the USB board. Failure to do so may result in damage to the... connector on the USB board. 4 Replace the hard drive. 12 3 1 USB-board cable 3 tabs (2) 2 USB board Replacing the USB Board 1 Follow the procedures in "Before You Begin" on page 9. 2 Slide the connectors on the USB board...
... and ensure that no stray screws remain inside the computer. CAUTION: Before turning on page 14. See "Replacing the Hard Drive" on page 39. 5 Follow the instructions from step 3 to step 7 in "Replacing the Palm-Rest Assembly" on the USB board. Failure to do so may result in damage to the... connector on the USB board. 4 Replace the hard drive. 12 3 1 USB-board cable 3 tabs (2) 2 USB board Replacing the USB Board 1 Follow the procedures in "Before You Begin" on page 9. 2 Slide the connectors on the USB board...

Owners Manual
Page 69
...in "Before You Begin" on page 9. 2 Slide the connectors on the system board into the slots on the computer base. 3 Replace the two screws that secure the system board to the computer base. 4 Connect the speakers cable, USB-board cable, microphone cable, and... board. 5 Replace the Mini-Card. See "Replacing the Processor Module" on page 27. 6 Replace the processor. See "Replacing the Mini-Card" on page 48. 7 Replace the thermal cooling assembly. System Board 69 1 2 1 screws (2) 2 system board Replacing the System Board 1 Follow the instructions in "Replacing the Hard Drive" on page ...
...in "Before You Begin" on page 9. 2 Slide the connectors on the system board into the slots on the computer base. 3 Replace the two screws that secure the system board to the computer base. 4 Connect the speakers cable, USB-board cable, microphone cable, and... board. 5 Replace the Mini-Card. See "Replacing the Processor Module" on page 27. 6 Replace the processor. See "Replacing the Mini-Card" on page 48. 7 Replace the thermal cooling assembly. System Board 69 1 2 1 screws (2) 2 system board Replacing the System Board 1 Follow the instructions in "Replacing the Hard Drive" on page ...


