
Owners Manual
Page 3
Contents 1 Before You Begin 9 Recommended Tools 9 Turning Off Your Computer 9 Before Working Inside Your Computer 10 2 Battery 13 Removing the Battery 13 Replacing the Battery 14 3 Keyboard 15 Removing the Keyboard 15 Replacing the Keyboard 17 4 Memory Module(s 19 Removing the Memory Module(s 19 Replacing the Memory Module(s 20 5 Optical Drive 23 Removing the Optical Drive 23 Contents 3
Contents 1 Before You Begin 9 Recommended Tools 9 Turning Off Your Computer 9 Before Working Inside Your Computer 10 2 Battery 13 Removing the Battery 13 Replacing the Battery 14 3 Keyboard 15 Removing the Keyboard 15 Replacing the Keyboard 17 4 Memory Module(s 19 Removing the Memory Module(s 19 Replacing the Memory Module(s 20 5 Optical Drive 23 Removing the Optical Drive 23 Contents 3
Owners Manual
Page 19
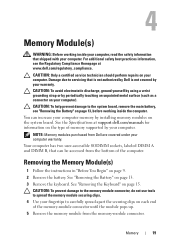
...computer. See the Specifications at www.dell.com/regulatory_compliance. Your computer has two user-accessible SODIMM sockets, labeled DIMM A and DIMM B, that is not authorized by Dell is not covered by your warranty. CAUTION: To prevent damage to the memory module connector, do not use tools ...to spread the memory module securing clips. 4 Use your fingertips to servicing that can increase your...
...computer. See the Specifications at www.dell.com/regulatory_compliance. Your computer has two user-accessible SODIMM sockets, labeled DIMM A and DIMM B, that is not authorized by Dell is not covered by your warranty. CAUTION: To prevent damage to the memory module connector, do not use tools ...to spread the memory module securing clips. 4 Use your fingertips to servicing that can increase your...
Owners Manual
Page 20
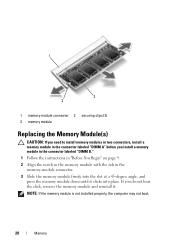
... labeled "DIMM A" before you do not hear the click, remove the memory module and reinstall it clicks into the slot at a 45-degree angle, and press the memory module down until it . If you install a memory module in the connector labeled "DIMM B." 1 Follow the instructions in "Before... You Begin" on page 9. 2 Align the notch in the memory module with the tab in the memory-module connector. 3 Slide the memory module firmly into place. NOTE: If the memory module is not installed properly...
... labeled "DIMM A" before you do not hear the click, remove the memory module and reinstall it clicks into the slot at a 45-degree angle, and press the memory module down until it . If you install a memory module in the connector labeled "DIMM B." 1 Follow the instructions in "Before... You Begin" on page 9. 2 Align the notch in the memory module with the tab in the memory-module connector. 3 Slide the memory module firmly into place. NOTE: If the memory module is not installed properly...
Owners Manual
Page 21
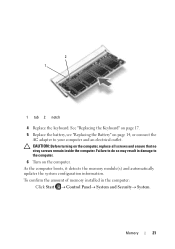
2 1 1 tab 2 notch 4 Replace the keyboard. To confirm the amount of memory installed in damage to your computer and an electrical outlet. Memory 21 As the computer boots, it detects the memory module(s) and automatically updates the system configuration information. CAUTION: Before turning on the computer. Failure to do so may result in the computer...
2 1 1 tab 2 notch 4 Replace the keyboard. To confirm the amount of memory installed in damage to your computer and an electrical outlet. Memory 21 As the computer boots, it detects the memory module(s) and automatically updates the system configuration information. CAUTION: Before turning on the computer. Failure to do so may result in the computer...

Owners Manual
Page 67
...on page 23. 7 Follow the instructions from step 3 to the system board, remove the main battery, see the Regulatory Compliance Homepage at www.dell.com/regulatory_compliance. Removing the System Board 1 Follow the instructions in -1 media card reader. 3 Remove the battery. See "Removing the Optical Drive"..." on page 45. See "Removing the Thermal Cooling Assembly" on page 13. 4 Remove the keyboard. See "Removing the Memory Module(s)" on page 15. 5 Remove the memory module(s). CAUTION: To help prevent damage to step 8 in "Removing the Palm-Rest Assembly" on page 29. 8 Follow ...
...on page 23. 7 Follow the instructions from step 3 to the system board, remove the main battery, see the Regulatory Compliance Homepage at www.dell.com/regulatory_compliance. Removing the System Board 1 Follow the instructions in -1 media card reader. 3 Remove the battery. See "Removing the Optical Drive"..." on page 45. See "Removing the Thermal Cooling Assembly" on page 13. 4 Remove the keyboard. See "Removing the Memory Module(s)" on page 15. 5 Remove the memory module(s). CAUTION: To help prevent damage to step 8 in "Removing the Palm-Rest Assembly" on page 29. 8 Follow ...
Owners Manual
Page 70
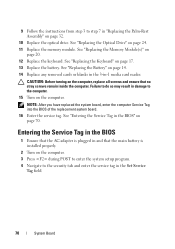
See "Replacing the Optical Drive" on page 17. 13 Replace the battery. See "Replacing the Keyboard" on page 24. 11 Replace the memory module. Failure to do so may result in -1 media card reader. CAUTION: Before turning on the computer, replace all screws and ensure that the main ..." on page 14. 14 Replace any removed cards or blanks in the 3-in damage to the computer. 15 Turn on page 70. See "Replacing the Memory Module(s)" on page 32. 10 Replace the optical drive. See "Entering the Service Tag in the Set Service Tag field. 70 System Board Entering the...
See "Replacing the Optical Drive" on page 17. 13 Replace the battery. See "Replacing the Keyboard" on page 24. 11 Replace the memory module. Failure to do so may result in -1 media card reader. CAUTION: Before turning on the computer, replace all screws and ensure that the main ..." on page 14. 14 Replace any removed cards or blanks in the 3-in damage to the computer. 15 Turn on page 70. See "Replacing the Memory Module(s)" on page 32. 10 Replace the optical drive. See "Entering the Service Tag in the Set Service Tag field. 70 System Board Entering the...


