Owner's Manual
Page 75
...hard drive may prevent the operating system from starting. Ensure that the PC Card is listed. Solving Problems 75 C L E A N T H E D R I D E D P C C A R D - See "Cleaning Your Computer" in the Windows taskbar. Try allowing the computer to return to scan for instructions. Double-click the Safely Remove Hardware icon in the Dell Inspiron... Help file for errors, and then click Properties. 3 Click the Tools tab. 4 Under Error-checking, click Check Now. 5 Click Start. Contact Dell. Ensure that the card is properly inserted into the connector. P R...
...hard drive may prevent the operating system from starting. Ensure that the PC Card is listed. Solving Problems 75 C L E A N T H E D R I D E D P C C A R D - See "Cleaning Your Computer" in the Windows taskbar. Try allowing the computer to return to scan for instructions. Double-click the Safely Remove Hardware icon in the Dell Inspiron... Help file for errors, and then click Properties. 3 Click the Tools tab. 4 Under Error-checking, click Check Now. 5 Click Start. Contact Dell. Ensure that the card is properly inserted into the connector. P R...
Owner's Manual
Page 77
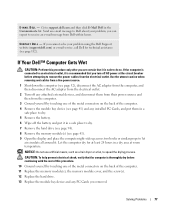
... to dry. 7 Remove the hard drive (see page 94). 8 Remove the memory module(s) (see page 112). If Your Dell™ Computer Gets Wet CAUTION: Perform this procedure only after you can expect to receive an e-mail message from the computer. 3 Ground yourself by touching one of the metal connectors on the back of the...
... to dry. 7 Remove the hard drive (see page 94). 8 Remove the memory module(s) (see page 112). If Your Dell™ Computer Gets Wet CAUTION: Perform this procedure only after you can expect to receive an e-mail message from the computer. 3 Ground yourself by touching one of the metal connectors on the back of the...

Owner's Manual
Page 95
... lift the hard drive door. NOTICE: Use firm and even pressure to Dell in its original or comparable foam packaging. Returning a Hard Drive to Dell Return your computer. foam packaging hard drive Adding and Replacing Parts 95 If you use excessive force, you may be damaged in the bay. Otherwise, the hard drive may damage the connector. 5 Insert the drive into place...
... lift the hard drive door. NOTICE: Use firm and even pressure to Dell in its original or comparable foam packaging. Returning a Hard Drive to Dell Return your computer. foam packaging hard drive Adding and Replacing Parts 95 If you use excessive force, you may be damaged in the bay. Otherwise, the hard drive may damage the connector. 5 Insert the drive into place...

Owner's Manual
Page 99
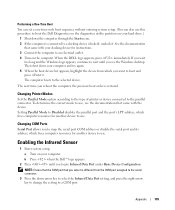
Adding and Replacing Parts 99 system board connector Bluetooth card cable Bluetooth card connector NOTE: When replacing the Bluetooth card, ensure the Bluetooth cable is routed correctly so that you do not damage the cable when you install the hard drive. 7 Remove the hard drive. 8 Pull the Bluetooth card connector out of the system board connector. 9 Pull the cable to remove the Bluetooth card from the computer.
Adding and Replacing Parts 99 system board connector Bluetooth card cable Bluetooth card connector NOTE: When replacing the Bluetooth card, ensure the Bluetooth cable is routed correctly so that you do not damage the cable when you install the hard drive. 7 Remove the hard drive. 8 Pull the Bluetooth card connector out of the system board connector. 9 Pull the cable to remove the Bluetooth card from the computer.
Owner's Manual
Page 109
...Dell™ logo appears. 2 Press until you see the documentation that came with the device. NOTE: Ensure that the COM port that came with your hard drive.) 1 Shut down the computer through the Start menu. 2 If the computer is connected to use. Then shut down your computer. The computer boots to the parallel connector.... Setting Parallel Mode to Disabled disables the parallel port and the port's LPT address, which you want to boot and press . Changing COM Ports Serial Port allows you locate Infrared Data Port under Basic Device Configuration. When the DELL logo...
...Dell™ logo appears. 2 Press until you see the documentation that came with the device. NOTE: Ensure that the COM port that came with your hard drive.) 1 Shut down the computer through the Start menu. 2 If the computer is connected to use. Then shut down your computer. The computer boots to the parallel connector.... Setting Parallel Mode to Disabled disables the parallel port and the port's LPT address, which you want to boot and press . Changing COM Ports Serial Port allows you locate Infrared Data Port under Basic Device Configuration. When the DELL logo...
Owner's Manual
Page 131
... description, 14 diagnostics Dell, 84 display description, 13 system view, 13 display latch description, 15 system view, 15 docking device latch description, 23 system view, 23 documentation help file, 9 online, 11 Setup Diagram, 9 System Information Guide, 9 drivers, 78 about, 78 identifying, 79 reinstalling, 79 drives fixing problems, 49, 74 See hard drive, 94 DVD...
... description, 14 diagnostics Dell, 84 display description, 13 system view, 13 display latch description, 15 system view, 15 docking device latch description, 23 system view, 23 documentation help file, 9 online, 11 Setup Diagram, 9 System Information Guide, 9 drivers, 78 about, 78 identifying, 79 reinstalling, 79 drives fixing problems, 49, 74 See hard drive, 94 DVD...
Owner's Manual
Page 132
... to the parallel port, 20 fixing problems, 49, 74 H hard drive description, 23 replacing, 94 returning to Dell, 95 system view, 23 hardware conflicts, 80 Dell Diagnostics, 84 Hardware Troubleshooter, 80 Help and Support Center, 10 help file, 9 I Infrared Sensor enabling, 109 infrared sensor description, 16 ... Windows label, 10 Mini PCI card installing, 91 Mini PCI card, modem, and memory module cover description, 23 system view, 23 modem connector description, 20 system view, 20 module bay about, 41 description, 18 swapping devices while the computer is running, 42 swapping devices while the...
... to the parallel port, 20 fixing problems, 49, 74 H hard drive description, 23 replacing, 94 returning to Dell, 95 system view, 23 hardware conflicts, 80 Dell Diagnostics, 84 Hardware Troubleshooter, 80 Help and Support Center, 10 help file, 9 I Infrared Sensor enabling, 109 infrared sensor description, 16 ... Windows label, 10 Mini PCI card installing, 91 Mini PCI card, modem, and memory module cover description, 23 system view, 23 modem connector description, 20 system view, 20 module bay about, 41 description, 18 swapping devices while the computer is running, 42 swapping devices while the...


