User Guide
Page 1
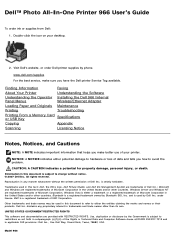
... other countries. Finding Information Faxing About Your Printer Understanding the Software Understanding the Operator Installing the Dell 966 Internal Panel Menus Wireless/Ethernet Adapter Loading Paper and Originals Maintenance Printing Troubleshooting Printing From a Memory Card or USB Key Specifications Copying Appendix Scanning Licensing Notice Notes, Notices, and Cautions NOTE: A NOTE indicates important information that helps you make sure you how to avoid the problem. Microsoft and Windows are provided with RESTRICTED RIGHTS. Use, duplication or disclosure by...
... other countries. Finding Information Faxing About Your Printer Understanding the Software Understanding the Operator Installing the Dell 966 Internal Panel Menus Wireless/Ethernet Adapter Loading Paper and Originals Maintenance Printing Troubleshooting Printing From a Memory Card or USB Key Specifications Copying Appendix Scanning Licensing Notice Notes, Notices, and Cautions NOTE: A NOTE indicates important information that helps you make sure you how to avoid the problem. Microsoft and Windows are provided with RESTRICTED RIGHTS. Use, duplication or disclosure by...
User Guide
Page 5
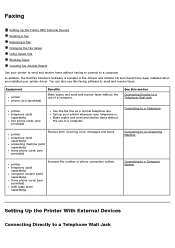
...sold separately) three phone cords (one provided) USB cable (sold separately) three phone cords (one provided) Receive both incoming voice messages and faxes. Make copies and send and receive faxes without the use of a computer. Faxing Setting Up the Printer With External Devices Sending a Fax Receiving a Fax Changing the Fax Setup Using Speed Dial Blocking Faxes Creating Fax Activity Report Use your telephone is bundled in the Drivers and Utilities CD and should have been installed when you installed your printer driver. See this faxing software to a Telephone Wall...
...sold separately) three phone cords (one provided) USB cable (sold separately) three phone cords (one provided) Receive both incoming voice messages and faxes. Make copies and send and receive faxes without the use of a computer. Faxing Setting Up the Printer With External Devices Sending a Fax Receiving a Fax Changing the Fax Setup Using Speed Dial Blocking Faxes Creating Fax Activity Report Use your telephone is bundled in the Drivers and Utilities CD and should have been installed when you installed your printer driver. See this faxing software to a Telephone Wall...

User Guide
Page 10
... the Scan or Fax section, send a single- From the main menu, press the up to be sent. Use the keypad to enter the next fax number. 7. Press the down Arrow button . Select Dell All-In-One Center. To send a multiple-page fax, click Advanced, select the Scan multiple items before output check box, and then click OK. If there are multiple pages in your screen. For more than one page. Use the keypad to enter the fax number. Repeat...
... the Scan or Fax section, send a single- From the main menu, press the up to be sent. Use the keypad to enter the next fax number. 7. Press the down Arrow button . Select Dell All-In-One Center. To send a multiple-page fax, click Advanced, select the Scan multiple items before output check box, and then click OK. If there are multiple pages in your screen. For more than one page. Use the keypad to enter the fax number. Repeat...

User Guide
Page 17
... incoming fax. On this tab: Dialing and Sending You can hold up to pick the paper that will appear on each . Fax Printing/Reports Choose to automatically resize oversize faxes so they print on one page, or keep the oversized fax to print a footer (date, time, and page number) on your outgoing fax. Enter your fax number and your phone line has distinctive ring service activated. Specify a maximum send speed and a print quality for your cover page. Include a short message.
... incoming fax. On this tab: Dialing and Sending You can hold up to pick the paper that will appear on each . Fax Printing/Reports Choose to automatically resize oversize faxes so they print on one page, or keep the oversized fax to print a footer (date, time, and page number) on your outgoing fax. Enter your fax number and your phone line has distinctive ring service activated. Specify a maximum send speed and a print quality for your cover page. Include a short message.

User Guide
Page 21
... make photocopies, send faxes, or print from memory cards or a PictBridge-enabled camera. NOTE: The printer (whether it exits the printer. You do need to connect your printer to a computer to print, scan, or use the Save Photos to do not need to connect your printer to a computer to your computer. Tray that feeds original documents into the printer. About Your Printer Understanding the Printer Parts Understanding the Operator Panel You can use your printer to Computer function or the Print Files mode...
... make photocopies, send faxes, or print from memory cards or a PictBridge-enabled camera. NOTE: The printer (whether it exits the printer. You do need to connect your printer to a computer to print, scan, or use the Save Photos to do not need to connect your printer to a computer to your computer. Tray that feeds original documents into the printer. About Your Printer Understanding the Printer Parts Understanding the Operator Panel You can use your printer to Computer function or the Print Files mode...
User Guide
Page 23
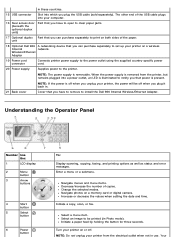
... when setting the date and time. unit 18 Optional Dell 966 A networking device that you can purchase separately to the printer. NOTE: Do not unplug your printer on a wireless Internal network. The other end of the USB cable plugs into your printer, the power will be printed (in Photo mode). Understanding the Operator Panel Number Use the: 1 LCD display 2 Menu button 3 Arrow buttons 4 Start button 5 Select button 6 Power button To: Display scanning, copying, faxing, and printing options as well as status and error messages. Change the selected modes. in...
... when setting the date and time. unit 18 Optional Dell 966 A networking device that you can purchase separately to the printer. NOTE: Do not unplug your printer on a wireless Internal network. The other end of the USB cable plugs into your printer, the power will be printed (in Photo mode). Understanding the Operator Panel Number Use the: 1 LCD display 2 Menu button 3 Arrow buttons 4 Start button 5 Select button 6 Power button To: Display scanning, copying, faxing, and printing options as well as status and error messages. Change the selected modes. in...

User Guide
Page 25
... previously saved documents and images. Allows you to adjust printer settings. Dell Ink Management System™- Using the Dell All-In-One Center The Dell All-In-One Center allows you to : Scan, copy, fax, and use productivity tools. Select where you when your copies. Access troubleshooting and maintenance information. Warns you want to fax electronic or scanned documents. Dell Fax Solutions Software- Allows you to display, manage, edit, print, and scan photos from your memory card or USB memory key to your computer. Allows you to send the scanned image.
... previously saved documents and images. Allows you to adjust printer settings. Dell Ink Management System™- Using the Dell All-In-One Center The Dell All-In-One Center allows you to : Scan, copy, fax, and use productivity tools. Select where you when your copies. Access troubleshooting and maintenance information. Warns you want to fax electronic or scanned documents. Dell Fax Solutions Software- Allows you to display, manage, edit, print, and scan photos from your memory card or USB memory key to your computer. Allows you to send the scanned image.

User Guide
Page 29
... - Maintenance Install Ink Cartridges Clean Ink Cartridges Align Ink Cartridges Print a Test Page Network Support Using Memory Card Manager Memory Card Manager allows you to print on image content. Select the check box if you have a photo cartridge installed. Select the size of a single print job: Collated, Normal, or Print Last Page First. Select how the document is the fastest option but should not be selected if you want to save photos from Automatic, Manual, or Print Duplex. Paper Size - Advanced 2-sided printing - Select from your color images in black and white to...
... - Maintenance Install Ink Cartridges Clean Ink Cartridges Align Ink Cartridges Print a Test Page Network Support Using Memory Card Manager Memory Card Manager allows you to print on image content. Select the check box if you have a photo cartridge installed. Select the size of a single print job: Collated, Normal, or Print Last Page First. Select how the document is the fastest option but should not be selected if you want to save photos from Automatic, Manual, or Print Duplex. Paper Size - Advanced 2-sided printing - Select from your color images in black and white to...

User Guide
Page 31
... function properly, or communication error messages appear when using your screen to complete the installation. Click Uninstall Dell Photo AIO Printer 966. 3. c. d. Click Dell Photo AIO Printer 966. 2. In Windows Vista, click ® Computer. Click Start® Programs or All Programs® Dell Printers® Dell Photo AIO Printer 966. Click ® Programs. b. Follow the instructions on your printer, you can remove and reinstall the printer software. 1. If the installation screen does not appear: a. b. Double-click the CD-ROM drive icon, and then double-click setup...
... function properly, or communication error messages appear when using your screen to complete the installation. Click Uninstall Dell Photo AIO Printer 966. 3. c. d. Click Dell Photo AIO Printer 966. 2. In Windows Vista, click ® Computer. Click Start® Programs or All Programs® Dell Printers® Dell Photo AIO Printer 966. Click ® Programs. b. Follow the instructions on your printer, you can remove and reinstall the printer software. 1. If the installation screen does not appear: a. b. Double-click the CD-ROM drive icon, and then double-click setup...
User Guide
Page 36
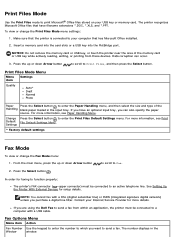
... to enter the Print Files Default Settings menu. The number displays in the input tray. The printer recognizes Microsoft Office files that has Microsoft Office installed. 2. Insert a memory card into the card slots or a USB key into the PictBridge port. NOTICE: Do not remove the memory card or USB key, or touch the printer near the area of the Handling blank paper loaded in the Window window. Settings * Factory default settings Fax Mode To view or change the Print Files Mode menu settings: 1. Change Press the Select button to send a fax. Press the Select button . To...
... to enter the Print Files Default Settings menu. The number displays in the input tray. The printer recognizes Microsoft Office files that has Microsoft Office installed. 2. Insert a memory card into the card slots or a USB key into the PictBridge port. NOTICE: Do not remove the memory card or USB key, or touch the printer near the area of the Handling blank paper loaded in the Window window. Settings * Factory default settings Fax Mode To view or change the Print Files Mode menu settings: 1. Change Press the Select button to send a fax. Press the Select button . To...
User Guide
Page 42
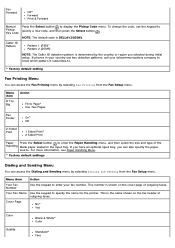
... 2-Sided Print 1 Sided Print* 2 Sided Print Paper Press the Select button to display the Pickup Code menu. Your Fax Name Use the keypad to specify a new code, and then press the Select button . This is DELL# (3355#). Fax Forward Off* Forward Print & Forward Manual Pickup Key Code Press the Select button to enter the Paper Handling menu, and then select the size and type of outgoing faxes. For more information, see Paper Handling Menu. * Factory default settings Dialing and Sending Menu You can access the Fax Printing menu by selecting Dialing and Sending...
... 2-Sided Print 1 Sided Print* 2 Sided Print Paper Press the Select button to display the Pickup Code menu. Your Fax Name Use the keypad to specify a new code, and then press the Select button . This is DELL# (3355#). Fax Forward Off* Forward Print & Forward Manual Pickup Key Code Press the Select button to enter the Paper Handling menu, and then select the size and type of outgoing faxes. For more information, see Paper Handling Menu. * Factory default settings Dialing and Sending Menu You can access the Fax Printing menu by selecting Dialing and Sending...
User Guide
Page 46
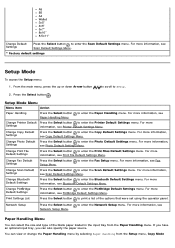
... see Print File Default Settings Menu. For more Settings information, see PictBridge Default Settings Menu. Print Settings List Press the Select button to enter the PictBridge Default Settings menu. Press the Select button . For more information, see Printer Default Settings Menu. Change PictBridge Default Settings Press the Select button to print a list of the blank paper loaded in the input tray from the Setup menu, Copy Mode Change Bluetooth Default Settings Press the Select button to enter the Copy Default Settings menu. For more information, see Photo Default...
... see Print File Default Settings Menu. For more Settings information, see PictBridge Default Settings Menu. Print Settings List Press the Select button to enter the PictBridge Default Settings menu. Press the Select button . For more information, see Printer Default Settings Menu. Change PictBridge Default Settings Press the Select button to print a list of the blank paper loaded in the input tray from the Setup menu, Copy Mode Change Bluetooth Default Settings Press the Select button to enter the Copy Default Settings menu. For more information, see Photo Default...
User Guide
Page 49
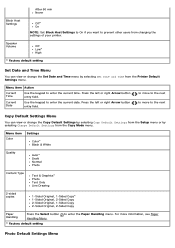
...Menu item Color Settings Color* Black & White Quality Auto* Draft Normal Photo Content Type Text & Graphics* Photo Text Only Line Drawing 2-sided copies 1-Sided Original, 1-Sided Copy* 1-Sided Original, 2-Sided Copy 2-Sided Original, 1-Sided Copy 2-Sided Original, 2-Sided Copy Paper Handling Press the Select button Handling Menu. * Factory default setting to enter the current date. For more information, see Paper Photo Default Settings Menu After 60 min Never Block Host Settings Off* On NOTE: Set Block Host Settings to On if you want to prevent other users from the Printer...
...Menu item Color Settings Color* Black & White Quality Auto* Draft Normal Photo Content Type Text & Graphics* Photo Text Only Line Drawing 2-sided copies 1-Sided Original, 1-Sided Copy* 1-Sided Original, 2-Sided Copy 2-Sided Original, 1-Sided Copy 2-Sided Original, 2-Sided Copy Paper Handling Press the Select button Handling Menu. * Factory default setting to enter the current date. For more information, see Paper Photo Default Settings Menu After 60 min Never Block Host Settings Off* On NOTE: Set Block Host Settings to On if you want to prevent other users from the Printer...

User Guide
Page 52
...or change the value of wireless network settings. to enter Network Time Menu. Reflects the current SSID being used. TCP/IP Menu Network Time Menu Press the Select button to enable or disable the Time NOTE: When Time Server is enabled, the wireless Ethernet card updates the printer's time once a day or every time the printer is powered on. One Photo Centered 1 per page 2 per page 3 per page 4 per page 6 per page 8 per page 16 per page Quality Auto* Draft Normal Photo Paper Handling Press the Select button Handling Menu. * Factory default setting to print a list of Network...
...or change the value of wireless network settings. to enter Network Time Menu. Reflects the current SSID being used. TCP/IP Menu Network Time Menu Press the Select button to enable or disable the Time NOTE: When Time Server is enabled, the wireless Ethernet card updates the printer's time once a day or every time the printer is powered on. One Photo Centered 1 per page 2 per page 3 per page 4 per page 6 per page 8 per page 16 per page Quality Auto* Draft Normal Photo Paper Handling Press the Select button Handling Menu. * Factory default setting to print a list of Network...
User Guide
Page 59
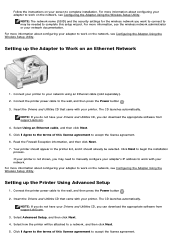
... information about configuring your adapter to work with your adapter to manually configure your Drivers and Utilities CD, you can download the appropriate software from support.dell.com . 3. Setting up the Printer Using Advanced Setup 1. Connect the printer power cable to the wall, and then press the Power button . 2. Insert the Drivers and Utilities CD that came with your screen to the terms of this setup wizard. Select Using an Ethernet cable, and then...
... information about configuring your adapter to work with your adapter to manually configure your Drivers and Utilities CD, you can download the appropriate software from support.dell.com . 3. Setting up the Printer Using Advanced Setup 1. Connect the printer power cable to the wall, and then press the Power button . 2. Insert the Drivers and Utilities CD that came with your screen to the terms of this setup wizard. Select Using an Ethernet cable, and then...
User Guide
Page 73
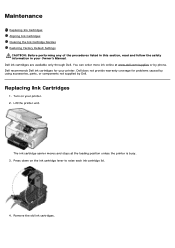
Dell recommends Dell ink cartridges for problems caused by using accessories, parts, or components not supplied by phone. Remove the old ink cartridges. Dell ink cartridges are available only through Dell. Turn on the ink cartridge lever to raise each ink cartridge lid. 4. Dell does not provide warranty coverage for your printer. 2. Lift the printer unit. Maintenance Replacing Ink Cartridges Aligning Ink Cartridges Cleaning the Ink Cartridge Nozzles Restoring Factory Default Settings CAUTION: Before performing any of the procedures listed in this section, read and ...
Dell recommends Dell ink cartridges for problems caused by using accessories, parts, or components not supplied by phone. Remove the old ink cartridges. Dell ink cartridges are available only through Dell. Turn on the ink cartridge lever to raise each ink cartridge lid. 4. Dell does not provide warranty coverage for your printer. 2. Lift the printer unit. Maintenance Replacing Ink Cartridges Aligning Ink Cartridges Cleaning the Ink Cartridge Nozzles Restoring Factory Default Settings CAUTION: Before performing any of the procedures listed in this section, read and ...
User Guide
Page 86
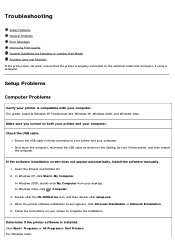
... Drivers and Utilities CD. 2. Ensure the USB cable is compatible with your computer. When the printer software installation screen appears, click Personal Installation or Network Installation. 5. Click Start® Programs or All Programs® Dell Printers. In Windows XP, click Start® My Computer. In Windows 2000, double-click My Computer from your desktop. In Windows Vista, click ® Computer. 3. Troubleshooting Setup Problems General Problems Error Messages Improving Print Quality General Guidelines for Selecting or Loading Print Media Avoiding Jams...
... Drivers and Utilities CD. 2. Ensure the USB cable is compatible with your computer. When the printer software installation screen appears, click Personal Installation or Network Installation. 5. Click Start® Programs or All Programs® Dell Printers. In Windows XP, click Start® My Computer. In Windows 2000, double-click My Computer from your desktop. In Windows Vista, click ® Computer. 3. Troubleshooting Setup Problems General Problems Error Messages Improving Print Quality General Guidelines for Selecting or Loading Print Media Avoiding Jams...

User Guide
Page 98
... not support color or the resolution of Memory. The Auto Fax Conversion option is not enabled. A printhead carrier jam exists in the right cartridge carrier. Replace There is not supported. For more information, go to Print. Load Paper, then select size to continue printing. Turn Auto Fax Conversion on ink. Check the AIO for a paper jam.. Insert the black or photo cartridge in the left or right Arrow button to scroll to print the pages that were not scanned, and make copies...
... not support color or the resolution of Memory. The Auto Fax Conversion option is not enabled. A printhead carrier jam exists in the right cartridge carrier. Replace There is not supported. For more information, go to Print. Load Paper, then select size to continue printing. Turn Auto Fax Conversion on ink. Check the AIO for a paper jam.. Insert the black or photo cartridge in the left or right Arrow button to scroll to print the pages that were not scanned, and make copies...
User Guide
Page 109
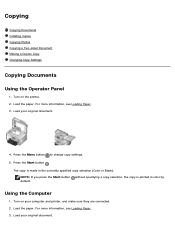
...more information, see Loading Paper. 3. Press the Menu button to change copy settings. 5. without specifying a copy selection, the copy is made in color by Using the Computer 1. Load the paper. Load your original document. 4. NOTE: If you press the Start button default. Turn on your computer and printer, and make sure they are connected. 2. Load the paper. Copying Copying Documents Collating Copies Copying Photos Copying a Two-sided Document Making a Duplex Copy Changing Copy Settings Copying Documents Using the Operator Panel 1. The copy is printed in the...
...more information, see Loading Paper. 3. Press the Menu button to change copy settings. 5. without specifying a copy selection, the copy is made in color by Using the Computer 1. Load the paper. Load your original document. 4. NOTE: If you press the Start button default. Turn on your computer and printer, and make sure they are connected. 2. Load the paper. Copying Copying Documents Collating Copies Copying Photos Copying a Two-sided Document Making a Duplex Copy Changing Copy Settings Copying Documents Using the Operator Panel 1. The copy is printed in the...
User Guide
Page 121
... fix quality problems. The Printing Preferences dialog opens. 5. The PIN is not connected to your computer. From the Maintenance tab, click Network Support. Click Maintain/Troubleshoot. 4. Setting the Computer Name and PIN Set a scan-to-network PIN to restrict users from sending a scanned document to your scan settings, and then press the Start button . Click Start® Programs or All Programs® Dell Printers® Dell Photo AIO Printer 966. The Dell All-In-One Center opens. 3. For Windows Vista: a. it is not required by default...
... fix quality problems. The Printing Preferences dialog opens. 5. The PIN is not connected to your computer. From the Maintenance tab, click Network Support. Click Maintain/Troubleshoot. 4. Setting the Computer Name and PIN Set a scan-to-network PIN to restrict users from sending a scanned document to your scan settings, and then press the Start button . Click Start® Programs or All Programs® Dell Printers® Dell Photo AIO Printer 966. The Dell All-In-One Center opens. 3. For Windows Vista: a. it is not required by default...


