
User Manual
Page 16
... Registration 396 Printing the Color Registration Chart 396 Determining Values 397 Entering Values 399 26 Removing Options 403 Removing the Optional Memory Module 403 Removing the Optional 250-Sheet Feeder 406 Removing the Optional Wireless Adapter 408 27 Clearing Jams 411 Avoiding Jams 411 Identifying the Location ...of Paper Jams 412 Clearing Paper Jams From the SSF 413 Clearing Paper Jams From the Standard 250-Sheet Tray 416 Clearing Paper Jams From the Fuser 420 ...
... Registration 396 Printing the Color Registration Chart 396 Determining Values 397 Entering Values 399 26 Removing Options 403 Removing the Optional Memory Module 403 Removing the Optional 250-Sheet Feeder 406 Removing the Optional Wireless Adapter 408 27 Clearing Jams 411 Avoiding Jams 411 Identifying the Location ...of Paper Jams 412 Clearing Paper Jams From the SSF 413 Clearing Paper Jams From the Standard 250-Sheet Tray 416 Clearing Paper Jams From the Fuser 420 ...

User Manual
Page 214
... that are oxidation-set or oil-based should be punched at the paper manufacturer and not drilled into paper already packaged in the fuser. Drilled paper can cause jams when multiple sheets feed through the printer. FOR PROOF ONLY 212 Print Media Guidelines Selecting Pre-Printed...the resin in the toner or the silicone in a ream. FILE LOCATION: C:\Users\fxstdpcadmin\Desktop\0630_UG??\Mioga_SFP_UG_FM\Mioga_SFP_UG_FM\section14.fm • Do not remove the tray while printing is in progress. • Ensure that the paper is properly loaded in doubt, contact your paper supplier. Selecting Pre-...
... that are oxidation-set or oil-based should be punched at the paper manufacturer and not drilled into paper already packaged in the fuser. Drilled paper can cause jams when multiple sheets feed through the printer. FOR PROOF ONLY 212 Print Media Guidelines Selecting Pre-Printed...the resin in the toner or the silicone in a ream. FILE LOCATION: C:\Users\fxstdpcadmin\Desktop\0630_UG??\Mioga_SFP_UG_FM\Mioga_SFP_UG_FM\section14.fm • Do not remove the tray while printing is in progress. • Ensure that the paper is properly loaded in doubt, contact your paper supplier. Selecting Pre-...
User Manual
Page 281
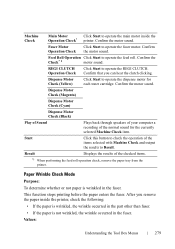
...results to operate the dispense motor for the currently selected Machine Check item. Confirm the motor sound. Confirm that you remove the paper inside the Operation Check* printer. Feed Roll Operation Click Start to operate the main motor inside the ...fuser. Machine Check Main Motor Click Start to operate the feed roll. Dispense Motor Check (Magenta) Dispense Motor Check (Cyan) Dispense Motor Check (Black) Play of Sound Plays back through speakers of your computer a recording of the checked items. *1 When performing the feed roll operation check, remove...
...results to operate the dispense motor for the currently selected Machine Check item. Confirm the motor sound. Confirm that you remove the paper inside the Operation Check* printer. Feed Roll Operation Click Start to operate the main motor inside the ...fuser. Machine Check Main Motor Click Start to operate the feed roll. Dispense Motor Check (Magenta) Dispense Motor Check (Cyan) Dispense Motor Check (Black) Play of Sound Plays back through speakers of your computer a recording of the checked items. *1 When performing the feed roll operation check, remove...
User Manual
Page 358
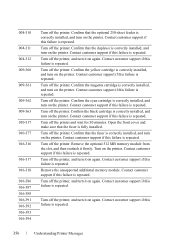
... repeated. Remove the optional 512 MB memory module from the slot, and then reattach it on the printer. Confirm that the optional 250-sheet feeder is fully installed. Turn off the printer. Turn off the printer and wait for 30 minutes. Confirm that the fuser is correctly...installed, and turn on the printer. Contact customer support if this failure is repeated. Open the front cover and make sure that the fuser is repeated. Turn off the printer. FILE LOCATION: C:\Users\fxstdpcadmin\Desktop\0630_UG??\Mioga_SFP_UG_FM\Mioga_SFP_UG_FM\section22.fm 004-310 004-311 004-312...
... repeated. Remove the optional 512 MB memory module from the slot, and then reattach it on the printer. Confirm that the optional 250-sheet feeder is fully installed. Turn off the printer. Turn off the printer and wait for 30 minutes. Confirm that the fuser is correctly...installed, and turn on the printer. Contact customer support if this failure is repeated. Open the front cover and make sure that the fuser is repeated. Turn off the printer. FILE LOCATION: C:\Users\fxstdpcadmin\Desktop\0630_UG??\Mioga_SFP_UG_FM\Mioga_SFP_UG_FM\section22.fm 004-310 004-311 004-312...

User Manual
Page 423
Do not touch it, doing so may cause burns. 5 Open the cover of the fuser, and remove the jammed paper. F O R P R O O F O N LY Clearing Jams 421 FILE LOCATION: C:\Users\fxstdpcadmin\Desktop\0630_UG??\Mioga_SFP_UG_FM\Mioga_SFP_UG_FM\section27.fm 4 Lift the levers at both ends of the fuser and remove the jammed paper. If you are still unable to remove the paper, go to the next step. D E L L C ON F I D E N T I N A RY 9 / 1 3 / 1 0 - P R E L I M I A L - CAUTION: The fuser is hot.
Do not touch it, doing so may cause burns. 5 Open the cover of the fuser, and remove the jammed paper. F O R P R O O F O N LY Clearing Jams 421 FILE LOCATION: C:\Users\fxstdpcadmin\Desktop\0630_UG??\Mioga_SFP_UG_FM\Mioga_SFP_UG_FM\section27.fm 4 Lift the levers at both ends of the fuser and remove the jammed paper. If you are still unable to remove the paper, go to the next step. D E L L C ON F I D E N T I N A RY 9 / 1 3 / 1 0 - P R E L I M I A L - CAUTION: The fuser is hot.
User Manual
Page 487
S S L / T L S Communication, 200 Form Line, 161, 168, 290 Front cover, 30 Fuser, 412 Fuser Motor Operation Check, 279 I /F, 157 Host Name, 157, 192 How to install option, 41 How to remove option, 403 How to replace retard roller, 384 How to set up, 25 How to use printer, 24 HTTP, 179, 188 HTTP-SSL/TLS... Number, 157 Infrastructure, 197 Init Print Meter, 315 Initialize NIC NVM and restart printer, 199 Initialize Print Meter, 273 Installing optional 250-sheet feeder, 46 DELL CONFIDENTIAL -
S S L / T L S Communication, 200 Form Line, 161, 168, 290 Front cover, 30 Fuser, 412 Fuser Motor Operation Check, 279 I /F, 157 Host Name, 157, 192 How to install option, 41 How to remove option, 403 How to replace retard roller, 384 How to set up, 25 How to use printer, 24 HTTP, 179, 188 HTTP-SSL/TLS... Number, 157 Infrastructure, 197 Init Print Meter, 315 Initialize NIC NVM and restart printer, 199 Initialize Print Meter, 273 Installing optional 250-sheet feeder, 46 DELL CONFIDENTIAL -
User Manual
Page 492
..., 24 Proof Print, 325 Q Quantity, 161, 168, 291 Quick Launch Utility, 331 Quick Reference Guide, 24 R Removing optional 250-sheet feeder, 406 Removing options, 403 Removing paper jam, 411 From duplexer, 423 From fuser, 420 From optional 250-sheet feeder, 425 From single sheet feeder, 413 From tray, 416... Removing retard roller in tray, 385 Removing toner cartridge, 374 RAM Disk, 160, 167, 262, 268, 306 RARP, 298 ...
..., 24 Proof Print, 325 Q Quantity, 161, 168, 291 Quick Launch Utility, 331 Quick Reference Guide, 24 R Removing optional 250-sheet feeder, 406 Removing options, 403 Removing paper jam, 411 From duplexer, 423 From fuser, 420 From optional 250-sheet feeder, 425 From single sheet feeder, 413 From tray, 416... Removing retard roller in tray, 385 Removing toner cartridge, 374 RAM Disk, 160, 167, 262, 268, 306 RARP, 298 ...


