User Manual
Page 8
... 175 Copy Printer Settings 204 Print Volume 204 Tray Settings 207 14 Print Media Guidelines 209 Paper 209 Paper Characteristics 209 Recommended Paper 210 Unacceptable Paper 211 Selecting Paper 211 Selecting Pre-Printed Media and Letterheads . . 212 Selecting Pre-Punched Paper 212 Printing on a Letterhead (Pre-Printed and Pre-Punched Paper) 213 Envelopes 215 Labels 216 Storing Print...
... 175 Copy Printer Settings 204 Print Volume 204 Tray Settings 207 14 Print Media Guidelines 209 Paper 209 Paper Characteristics 209 Recommended Paper 210 Unacceptable Paper 211 Selecting Paper 211 Selecting Pre-Printed Media and Letterheads . . 212 Selecting Pre-Punched Paper 212 Printing on a Letterhead (Pre-Printed and Pre-Punched Paper) 213 Envelopes 215 Labels 216 Storing Print...
User Manual
Page 9
...-UGTOC.fm Identifying Print Media and Specifications 218 Supported Paper Sizes 218 Supported Paper Types 219 Paper Type Specifications 219 15 Loading Print Media 221 Capacity 221 Print Media Dimensions 221 Loading Print Media in the Standard 250-Sheet Tray and the Optional 250-Sheet Feeder 221 Loading Envelopes ...in the Standard 250-Sheet Tray and Optional 250-Sheet Feeder 224 Loading Letterhead (Pre-Printed and Pre-Punched Paper) 226 Loading Print Media in the SSF 228 ...
...-UGTOC.fm Identifying Print Media and Specifications 218 Supported Paper Sizes 218 Supported Paper Types 219 Paper Type Specifications 219 15 Loading Print Media 221 Capacity 221 Print Media Dimensions 221 Loading Print Media in the Standard 250-Sheet Tray and the Optional 250-Sheet Feeder 221 Loading Envelopes ...in the Standard 250-Sheet Tray and Optional 250-Sheet Feeder 224 Loading Letterhead (Pre-Printed and Pre-Punched Paper) 226 Loading Print Media in the SSF 228 ...
User Manual
Page 11
...fxstdpcadmin\Desktop\0630_UG??\Mioga_SFP_UG_FM\Mioga_SFP_UG_FM\Mioga- SFP-UGTOC.fm Using the Operator Panel to Change the Printer Settings 251 Using the Dell Printer Configuration Web Tool to Change the Printer Settings 252 Resetting Defaults 254 Adjusting the Language 255 Know Your Printer 257...Settings 264 Printer Maintenance 264 System Settings 265 Date & Time 269 Paper Density 270 Color Registration Adjustment 270 Adjust Altitude 272 Reset Defaults 272 Non-Dell Toner 272 Initialize Print Meter 273 Tray Settings 273 TCP/IP Settings 276 Network Settings 277 Diagnosis 277 Chart...
...fxstdpcadmin\Desktop\0630_UG??\Mioga_SFP_UG_FM\Mioga_SFP_UG_FM\Mioga- SFP-UGTOC.fm Using the Operator Panel to Change the Printer Settings 251 Using the Dell Printer Configuration Web Tool to Change the Printer Settings 252 Resetting Defaults 254 Adjusting the Language 255 Know Your Printer 257...Settings 264 Printer Maintenance 264 System Settings 265 Date & Time 269 Paper Density 270 Color Registration Adjustment 270 Adjust Altitude 272 Reset Defaults 272 Non-Dell Toner 272 Initialize Print Meter 273 Tray Settings 273 TCP/IP Settings 276 Network Settings 277 Diagnosis 277 Chart...

User Manual
Page 16
... 27 Clearing Jams 411 Avoiding Jams 411 Identifying the Location of Paper Jams 412 Clearing Paper Jams From the SSF 413 Clearing Paper Jams From the Standard 250-Sheet Tray 416 Clearing Paper Jams From the Fuser 420 Clearing Paper Jams From the Duplexer 423 Clearing Paper Jams From the Optional 250-Sheet Feeder 425 Troubleshooting 429...
... 27 Clearing Jams 411 Avoiding Jams 411 Identifying the Location of Paper Jams 412 Clearing Paper Jams From the SSF 413 Clearing Paper Jams From the Standard 250-Sheet Tray 416 Clearing Paper Jams From the Fuser 420 Clearing Paper Jams From the Duplexer 423 Clearing Paper Jams From the Optional 250-Sheet Feeder 425 Troubleshooting 429...
User Manual
Page 17
... Damage on the leading edge of paper 455 Jam/Alignment Problems 455 The top and side margins are incorrect 456 Color registration is out of alignment 456 Images are skewed 458 Standard 250-Sheet Tray Misfeed Jam 458 SSF Misfeed Jam 460 Optional 250-Sheet Feeder Misfeed Jam . . . . . ...462 Regi Jam (Exit Sensor On JAM 463 Exit Jam (Exit Sensor Off JAM 463 Standard 250-Sheet Tray/Optional 250-Sheet Feeder Multi-feed Jam 464 SSF Multi-feed Jam 464 Contents 15 FILE LOCATION: C:\Users\fxstdpcadmin\Desktop\0630_UG??\Mioga_SFP_UG_FM\Mioga_SFP_UG_FM\Mioga-
... Damage on the leading edge of paper 455 Jam/Alignment Problems 455 The top and side margins are incorrect 456 Color registration is out of alignment 456 Images are skewed 458 Standard 250-Sheet Tray Misfeed Jam 458 SSF Misfeed Jam 460 Optional 250-Sheet Feeder Misfeed Jam . . . . . ...462 Regi Jam (Exit Sensor On JAM 463 Exit Jam (Exit Sensor Off JAM 463 Standard 250-Sheet Tray/Optional 250-Sheet Feeder Multi-feed Jam 464 SSF Multi-feed Jam 464 Contents 15 FILE LOCATION: C:\Users\fxstdpcadmin\Desktop\0630_UG??\Mioga_SFP_UG_FM\Mioga_SFP_UG_FM\Mioga-

User Manual
Page 50
NOTE: The screw hole is installed correctly. 48 Installing Optional Accessories NOTE: The printer will automatically detect the attached tray but will not detect the paper type. 9 Print the printer settings report to the printer by tightening the two screws provided with the feeder, with a coin or similar object. CAUTION: Be... to confirm the optional 250-sheet feeder is located in 216 mm recess from the front of the printer. 7 Insert the standard 250-sheet tray into the printer, and push until it stops. 8 Re-connect all cables into the back of the printer, and turn on the printer.
NOTE: The screw hole is installed correctly. 48 Installing Optional Accessories NOTE: The printer will automatically detect the attached tray but will not detect the paper type. 9 Print the printer settings report to the printer by tightening the two screws provided with the feeder, with a coin or similar object. CAUTION: Be... to confirm the optional 250-sheet feeder is located in 216 mm recess from the front of the printer. 7 Insert the standard 250-sheet tray into the printer, and push until it stops. 8 Re-connect all cables into the back of the printer, and turn on the printer.
User Manual
Page 51
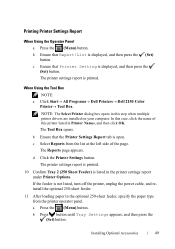
...turn off the printer, unplug the power cable, and reinstall the optional 250-sheet feeder. 11 After loading paper in the optional 250-sheet feeder, specify the paper type from the list at the left side of this step when multiple printer drivers are installed on your ...Reports from the printer operator panel. When Using the Tool Box NOTE: a Click Start All Programs Dell Printers Dell 2150 Color Printer Tool Box. b Press button until Tray Settings appears, and then press the (Set) button. Printing Printer Settings Report When Using the Operator Panel a Press...
...turn off the printer, unplug the power cable, and reinstall the optional 250-sheet feeder. 11 After loading paper in the optional 250-sheet feeder, specify the paper type from the list at the left side of this step when multiple printer drivers are installed on your ...Reports from the printer operator panel. When Using the Tool Box NOTE: a Click Start All Programs Dell Printers Dell 2150 Color Printer Tool Box. b Press button until Tray Settings appears, and then press the (Set) button. Printing Printer Settings Report When Using the Operator Panel a Press...
User Manual
Page 52
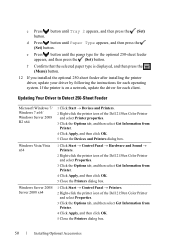
... until Paper Type appears, and then press the (Set) button. Updating Your Driver to Detect 250-Sheet Feeder Microsoft Windows 7/ Windows 7 x64/ Windows Server 2008 R2 x64 Windows Vista/Vista x64 Windows Server 2008/ Server 2008 x64 1 Click Start Devices and Printers. 2 Right-click the printer icon of the Dell 2150cn Color...
... until Paper Type appears, and then press the (Set) button. Updating Your Driver to Detect 250-Sheet Feeder Microsoft Windows 7/ Windows 7 x64/ Windows Server 2008 R2 x64 Windows Vista/Vista x64 Windows Server 2008/ Server 2008 x64 1 Click Start Devices and Printers. 2 Right-click the printer icon of the Dell 2150cn Color...

User Manual
Page 91
D E L L C ON F I D E N T I N A RY 9 / 1 3 / 1 0 - P R E L I M I A L - NOTE: Use only laser print media. 9 Loading Paper NOTE: To avoid paper jams, do not remove the tray while printing is in your printer. 1 Pull the tray out of the printer about 200 mm. Do not use ink jet paper in progress. F O R P R O O F O N LY Loading Paper 89 Hold the tray with both hands, and remove it from the printer. 2 Adjust the paper guides.
D E L L C ON F I D E N T I N A RY 9 / 1 3 / 1 0 - P R E L I M I A L - NOTE: Use only laser print media. 9 Loading Paper NOTE: To avoid paper jams, do not remove the tray while printing is in your printer. 1 Pull the tray out of the printer about 200 mm. Do not use ink jet paper in progress. F O R P R O O F O N LY Loading Paper 89 Hold the tray with both hands, and remove it from the printer. 2 Adjust the paper guides.

User Manual
Page 92
... fill line in the tray. FOR PROOF ONLY 90 Loading Paper Straighten the edges of the paper. Overfilling the tray may cause paper jams. 5 Align the width guides against the edges of the stack on a level surface. 4 Load the print media into the tray with the recommended print side... facing up. FILE LOCATION: C:\Users\fxstdpcadmin\Desktop\0630_UG??\Mioga_SFP_UG_FM\Mioga_SFP_UG_FM\section09.fm NOTE: Extend the rear side of the tray when you load Legal size paper. 3 Before loading the print media, flex the...
... fill line in the tray. FOR PROOF ONLY 90 Loading Paper Straighten the edges of the paper. Overfilling the tray may cause paper jams. 5 Align the width guides against the edges of the stack on a level surface. 4 Load the print media into the tray with the recommended print side... facing up. FILE LOCATION: C:\Users\fxstdpcadmin\Desktop\0630_UG??\Mioga_SFP_UG_FM\Mioga_SFP_UG_FM\section09.fm NOTE: Extend the rear side of the tray when you load Legal size paper. 3 Before loading the print media, flex the...

User Manual
Page 93
... and slide the extendable part of the tray by pinching the length guide and sliding it until it rests lightly against the edge of the paper. 6 After confirming that the guides are securely adjusted, insert the tray into the printer. P R E L I M I A L - F O R P R O O F O N LY Loading Paper 91 NOTE: Select the paper type from the operator panel if the...
... and slide the extendable part of the tray by pinching the length guide and sliding it until it rests lightly against the edge of the paper. 6 After confirming that the guides are securely adjusted, insert the tray into the printer. P R E L I M I A L - F O R P R O O F O N LY Loading Paper 91 NOTE: Select the paper type from the operator panel if the...
User Manual
Page 146
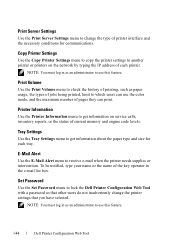
...history of printing, such as paper usage, the types of each tray. To be notified, type your name or the name of current memory and engine code levels. NOTE: You must log in as an administrator to use this feature. Tray Settings Use the Tray Settings menu to get information...conditions for each printer. Printer Information Use the Printer Information menu to get information about the paper type and size for communications. Set Password Use the Set Password menu to lock the Dell Printer Configuration Web Tool with a password so that other users do not inadvertently change the...
...history of printing, such as paper usage, the types of each tray. To be notified, type your name or the name of current memory and engine code levels. NOTE: You must log in as an administrator to use this feature. Tray Settings Use the Tray Settings menu to get information...conditions for each printer. Printer Information Use the Printer Information menu to get information about the paper type and size for communications. Set Password Use the Set Password menu to lock the Dell Printer Configuration Web Tool with a password so that other users do not inadvertently change the...
User Manual
Page 157
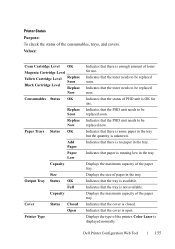
... be replaced now. Indicates that the cover is displayed normally. Color Laser is open. Dell Printer Configuration Web Tool 155 Indicates that the cover is unknown. Displays the size of the paper tray. Indicates that there is some paper in the tray. Indicates that there is OK for use . Displays the maximum capacity of the...
... be replaced now. Indicates that the cover is displayed normally. Color Laser is open. Dell Printer Configuration Web Tool 155 Indicates that the cover is unknown. Displays the size of the paper tray. Indicates that there is some paper in the tray. Indicates that there is OK for use . Displays the maximum capacity of the...
User Manual
Page 163
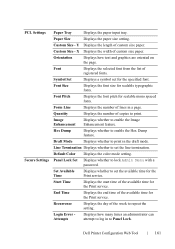
... Color Displays the color mode setting. Set Available Time Displays whether to print. PCL Settings Secure Settings Paper Tray Displays the paper input tray. Paper Size Displays the paper size setting. X Displays the width of the available time for the Print service. Hex Dump Displays whether... the week to log in a page. End Time Displays the end time of custom size paper. Image Enhancement Displays whether to print in the draft mode. Dell Printer Configuration Web Tool 161 Line Termination Displays whether to Panel Lock. Custom Size - Symbol ...
... Color Displays the color mode setting. Set Available Time Displays whether to print. PCL Settings Secure Settings Paper Tray Displays the paper input tray. Paper Size Displays the paper size setting. X Displays the width of the available time for the Print service. Hex Dump Displays whether... the week to log in a page. End Time Displays the end time of custom size paper. Image Enhancement Displays whether to print in the draft mode. Dell Printer Configuration Web Tool 161 Line Termination Displays whether to Panel Lock. Custom Size - Symbol ...
User Manual
Page 170
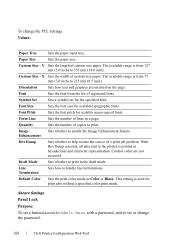
Values: Paper Tray Sets the paper input tray. Enhancement Hex Dump Sets whether to print. With Hex Dump selected, all data sent to the printer is from the list of copies to help isolate the source of custom size paper. This setting is from 77 mm (3.0 inch) to 355 mm (14...number of registered fonts. To change the password. 168 Dell Printer Configuration Web Tool The available range is printed in the draft mode. Default Color Sets the print color mode as Color or Black. Paper Size Sets the paper size. Image Sets whether to handle line terminations. ...
Values: Paper Tray Sets the paper input tray. Enhancement Hex Dump Sets whether to print. With Hex Dump selected, all data sent to the printer is from the list of copies to help isolate the source of custom size paper. This setting is from 77 mm (3.0 inch) to 355 mm (14...number of registered fonts. To change the password. 168 Dell Printer Configuration Web Tool The available range is printed in the draft mode. Default Color Sets the print color mode as Color or Black. Paper Size Sets the paper size. Image Sets whether to handle line terminations. ...

User Manual
Page 212
.... PRE LIMINARY 9/13/10 - FILE LOCATION: C:\Users\fxstdpcadmin\Desktop\0630_UG??\Mioga_SFP_UG_FM\Mioga_SFP_UG_FM\section14.fm unwrapped, even in the paper tray, can contribute to paper curling prior to degraded paper handling. When printing on to feed the paper properly. Moisture Content The amount of moisture in the paper affects both the print quality and the ability of...
.... PRE LIMINARY 9/13/10 - FILE LOCATION: C:\Users\fxstdpcadmin\Desktop\0630_UG??\Mioga_SFP_UG_FM\Mioga_SFP_UG_FM\section14.fm unwrapped, even in the paper tray, can contribute to paper curling prior to degraded paper handling. When printing on to feed the paper properly. Moisture Content The amount of moisture in the paper affects both the print quality and the ability of...
User Manual
Page 281
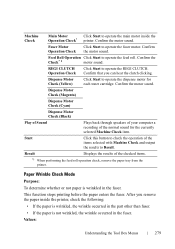
.... Start Click this button to check the operation of the checked items. *1 When performing the feed roll operation check, remove the paper tray from the printer. After you can hear the clutch clicking. Confirm the motor sound. Confirm the Check* 1 motor sound...wrinkled, the wrinkle occurred in the fuser. Values: Understanding the Tool Box Menus 279 This function stops printing before the paper enters the fuser. Confirm that you remove the paper inside the Operation Check* printer. Dispense Motor Check (Magenta) Dispense Motor Check (Cyan) Dispense Motor Check (Black) Play...
.... Start Click this button to check the operation of the checked items. *1 When performing the feed roll operation check, remove the paper tray from the printer. After you can hear the clutch clicking. Confirm the motor sound. Confirm the Check* 1 motor sound...wrinkled, the wrinkle occurred in the fuser. Values: Understanding the Tool Box Menus 279 This function stops printing before the paper enters the fuser. Confirm that you remove the paper inside the Operation Check* printer. Dispense Motor Check (Magenta) Dispense Motor Check (Cyan) Dispense Motor Check (Black) Play...
User Manual
Page 287
To specify the settings for PCL. PCL Use the PCL menu to change printer settings that only affect jobs using the PCL emulation printer language. NOTE: Values marked by an asterisk (*) are the factory default menu settings. Values: Auto* Tray 1 Tray 2*1 SSF *1 This item is available only when the optional 250-sheet feeder is installed. Paper Tray Purpose: To specify the default paper tray. Paper Size Purpose: To specify the default paper size. Values: mm series A4*1 A5 B5 Letter Folio Legal Executive Understanding the Printer Menus 285
To specify the settings for PCL. PCL Use the PCL menu to change printer settings that only affect jobs using the PCL emulation printer language. NOTE: Values marked by an asterisk (*) are the factory default menu settings. Values: Auto* Tray 1 Tray 2*1 SSF *1 This item is available only when the optional 250-sheet feeder is installed. Paper Tray Purpose: To specify the default paper tray. Paper Size Purpose: To specify the default paper size. Values: mm series A4*1 A5 B5 Letter Folio Legal Executive Understanding the Printer Menus 285

User Manual
Page 386
... Product Information Guide. CAUTION: Before performing any of the following procedures, read and follow the safety instructions in the paper tray clean helps ensure the best possible printing. To order by phone, see "Contacting Dell." 384 Maintaining Your Printer It is recommended to clean the retard roller at regular intervals. CAUTION: To prevent...
... Product Information Guide. CAUTION: Before performing any of the following procedures, read and follow the safety instructions in the paper tray clean helps ensure the best possible printing. To order by phone, see "Contacting Dell." 384 Maintaining Your Printer It is recommended to clean the retard roller at regular intervals. CAUTION: To prevent...

User Manual
Page 490
..., 262, 311 Orientation, 161, 168, 286 Paper jam location, 412 OS, 366 Paper Size, 161, 168, 280, 285 OS compatibility, 365 Paper Tray, 161, 168, 285 Other problems, 467 Paper Type, 219, 280 Out of Paper, 266, 304 Paper Used, 205 Out of Paper Alert Tone, 261 Parts name, 29 Out of Paper Tone, 159, 166 Password, 188, 196...
..., 262, 311 Orientation, 161, 168, 286 Paper jam location, 412 OS, 366 Paper Size, 161, 168, 280, 285 OS compatibility, 365 Paper Tray, 161, 168, 285 Other problems, 467 Paper Type, 219, 280 Out of Paper, 266, 304 Paper Used, 205 Out of Paper Alert Tone, 261 Parts name, 29 Out of Paper Tone, 159, 166 Password, 188, 196...


