
User Manual
Page 16
... Paper Jams 412 Clearing Paper Jams From the SSF 413 Clearing Paper Jams From the Standard 250-Sheet Tray 416 Clearing Paper Jams From the Fuser 420 Clearing Paper Jams From the Duplexer 423 Clearing Paper Jams From the Optional 250-Sheet Feeder 425 Troubleshooting 429 28 Troubleshooting Guide 431 Basic...
... Paper Jams 412 Clearing Paper Jams From the SSF 413 Clearing Paper Jams From the Standard 250-Sheet Tray 416 Clearing Paper Jams From the Fuser 420 Clearing Paper Jams From the Duplexer 423 Clearing Paper Jams From the Optional 250-Sheet Feeder 425 Troubleshooting 429 28 Troubleshooting Guide 431 Basic...
User Manual
Page 31
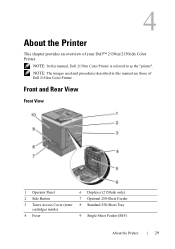
... used and procedures described in this manual, Dell 2150cn Color Printer is referred to as the "printer". P R E L I M I A L - NOTE: In this manual are those of your Dell™ 2150cn/2150cdn Color Printer. Front and Rear View Front View 1 Operator Panel 2 Side Button 3 Toner Access Cover (toner cartridges inside) 4 Fuser 6 Duplexer (2150cdn only) 7 Optional 250-Sheet Feeder...
... used and procedures described in this manual, Dell 2150cn Color Printer is referred to as the "printer". P R E L I M I A L - NOTE: In this manual are those of your Dell™ 2150cn/2150cdn Color Printer. Front and Rear View Front View 1 Operator Panel 2 Side Button 3 Toner Access Cover (toner cartridges inside) 4 Fuser 6 Duplexer (2150cdn only) 7 Optional 250-Sheet Feeder...
User Manual
Page 165
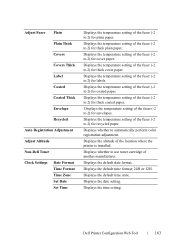
... the temperature setting of the fuser (-2 to 2) for plain paper. Displays the default date format. Adjust Fuser Plain Plain Thick Covers Covers Thick Label Coated Coated Thick Envelope Recycled Auto Registration Adjustment Adjust Altitude Non-Dell Toner Clock Settings Date Format ... Displays whether to 2) for thick plain paper. Displays the default time format; 24H or 12H. Dell Printer Configuration Web Tool 163 Displays the altitude of the fuser (-2 to 2) for thick cover paper. Displays the temperature setting of another manufacturer. Displays the time...
... the temperature setting of the fuser (-2 to 2) for plain paper. Displays the default date format. Adjust Fuser Plain Plain Thick Covers Covers Thick Label Coated Coated Thick Envelope Recycled Auto Registration Adjustment Adjust Altitude Non-Dell Toner Clock Settings Date Format ... Displays whether to 2) for thick plain paper. Displays the default time format; 24H or 12H. Dell Printer Configuration Web Tool 163 Displays the altitude of the fuser (-2 to 2) for thick cover paper. Displays the temperature setting of another manufacturer. Displays the time...

User Manual
Page 172
...setting. Recurrence Sets the period to Light or Normal. 170 Dell Printer Configuration Web Tool Printer Maintenance The Printer Maintenance tab includes the Paper Density, Adjust BTR, Adjust Fuser, Auto Registration Adjustment, Color Registration Adjustments, Clean Developer, Reset ...Defaults, Initialize PrintMeter, Storage, Non-Dell Toner, Adjust Altitude, Clock Settings, and Web Link Customization pages. Paper...
...setting. Recurrence Sets the period to Light or Normal. 170 Dell Printer Configuration Web Tool Printer Maintenance The Printer Maintenance tab includes the Paper Density, Adjust BTR, Adjust Fuser, Auto Registration Adjustment, Color Registration Adjustments, Clean Developer, Reset ...Defaults, Initialize PrintMeter, Storage, Non-Dell Toner, Adjust Altitude, Clock Settings, and Web Link Customization pages. Paper...

User Manual
Page 173
... the reference voltage setting for the transfer roller for envelopes within the range of -6 to 6. Adjust Fuser Purpose: To specify the temperature settings value for the transfer roller. Dell Printer Configuration Web Tool 171 Adjust BTR Purpose: To specify the reference voltage settings for the... fuser. Sets the reference voltage setting for the transfer roller for cover paper within the range of -6...
... the reference voltage setting for the transfer roller for envelopes within the range of -6 to 6. Adjust Fuser Purpose: To specify the temperature settings value for the transfer roller. Dell Printer Configuration Web Tool 171 Adjust BTR Purpose: To specify the reference voltage settings for the... fuser. Sets the reference voltage setting for the transfer roller for cover paper within the range of -6...

User Manual
Page 174
... manually perform color registration adjustment. Color Registration Adjustments Purpose: To specify whether to Off. Sets the temperature settings for the fuser for coated paper within the range of -2 to 2. NOTE: The Color Registration Adjustments feature can be configured when Auto ... moved. Auto Registration Adjustment Purpose: To specify whether to automatically perform color registration correction. 172 Dell Printer Configuration Web Tool Sets the temperature settings for the fuser for thick cover paper within the range of -2 to 2. Values: Auto Correct Click the ...
... manually perform color registration adjustment. Color Registration Adjustments Purpose: To specify whether to Off. Sets the temperature settings for the fuser for coated paper within the range of -2 to 2. NOTE: The Color Registration Adjustments feature can be configured when Auto ... moved. Auto Registration Adjustment Purpose: To specify whether to automatically perform color registration correction. 172 Dell Printer Configuration Web Tool Sets the temperature settings for the fuser for thick cover paper within the range of -2 to 2. Values: Auto Correct Click the ...

User Manual
Page 213
... required (NCR) paper. • Preprinted paper with chemicals that may contaminate the printer. • Preprinted paper that can be affected by the temperature in the fuser. • Preprinted paper that requires a registration (the precise print location on the page) greater than ±0.09 inches, such as optical character recognition (OCR) forms...
... required (NCR) paper. • Preprinted paper with chemicals that may contaminate the printer. • Preprinted paper that can be affected by the temperature in the fuser. • Preprinted paper that requires a registration (the precise print location on the page) greater than ±0.09 inches, such as optical character recognition (OCR) forms...

User Manual
Page 214
...??\Mioga_SFP_UG_FM\Mioga_SFP_UG_FM\section14.fm • Do not remove the tray while printing is in progress. • Ensure that the paper is properly loaded in the fuser. Selecting Pre-Printed Media and Letterheads When selecting pre-printed and letterhead paper for the printer: • Use grain long paper for best results. •...
...??\Mioga_SFP_UG_FM\Mioga_SFP_UG_FM\section14.fm • Do not remove the tray while printing is in progress. • Ensure that the paper is properly loaded in the fuser. Selecting Pre-Printed Media and Letterheads When selecting pre-printed and letterhead paper for the printer: • Use grain long paper for best results. •...
User Manual
Page 281
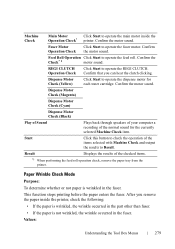
... the results of the items selected with Machine Check and output the results to Result. This function stops printing before the paper enters the fuser. After you can hear the clutch clicking. Machine Check Main Motor Click Start to operate the feed roll. Feed Roll Operation Click Start ... check, remove the paper tray from the printer. Start Click this button to operate the dispense motor for the currently selected Machine Check item. Fuser Motor Operation Check Click Start to operate the REGI CLUTCH. Paper Wrinkle Check Mode Purpose: To determine whether or not paper is not wrinkled,...
... the results of the items selected with Machine Check and output the results to Result. This function stops printing before the paper enters the fuser. After you can hear the clutch clicking. Machine Check Main Motor Click Start to operate the feed roll. Feed Roll Operation Click Start ... check, remove the paper tray from the printer. Start Click this button to operate the dispense motor for the currently selected Machine Check item. Fuser Motor Operation Check Click Start to operate the REGI CLUTCH. Paper Wrinkle Check Mode Purpose: To determine whether or not paper is not wrinkled,...
User Manual
Page 314
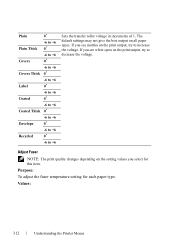
... setting for this item. If you see white spots on the print output, try to increase the voltage. Adjust Fuser NOTE: The print quality changes depending on the setting values you see mottles on all paper types. If you select for each paper type. Values: ...
... setting for this item. If you see white spots on the print output, try to increase the voltage. Adjust Fuser NOTE: The print quality changes depending on the setting values you see mottles on all paper types. If you select for each paper type. Values: ...

User Manual
Page 315
... +6 0* -6 to +6 0* -6 to +6 0* -6 to +6 0* -6 to +6 0* -6 to lower the temperature. The default settings may not give the best output on the paper properly, try to +6 Sets the fuser temperature in increments of 1. Color Reg Adj Purpose: To manually perform color registration adjustment. Understanding the Printer Menus 313 On* Automatically performs color registration adjustment...
... +6 0* -6 to +6 0* -6 to +6 0* -6 to +6 0* -6 to +6 0* -6 to lower the temperature. The default settings may not give the best output on the paper properly, try to +6 Sets the fuser temperature in increments of 1. Color Reg Adj Purpose: To manually perform color registration adjustment. Understanding the Printer Menus 313 On* Automatically performs color registration adjustment...
User Manual
Page 358
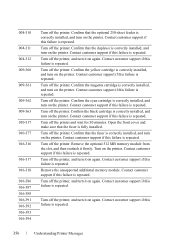
...this failure is repeated. Contact customer support if this failure is repeated. Contact customer support if this failure is repeated. Confirm that the fuser is correctly installed, and turn on the printer. Turn off the printer, and turn on the printer. Contact customer support if this...support if this failure is repeated. PRE LIMINARY 9/13/10 - Turn off the printer, and turn on the printer. Confirm that the fuser is repeated. FILE LOCATION: C:\Users\fxstdpcadmin\Desktop\0630_UG??\Mioga_SFP_UG_FM\Mioga_SFP_UG_FM\section22.fm 004-310 004-311 004-312 009-360 009-361 009...
...this failure is repeated. Contact customer support if this failure is repeated. Contact customer support if this failure is repeated. Confirm that the fuser is correctly installed, and turn on the printer. Turn off the printer, and turn on the printer. Contact customer support if this...support if this failure is repeated. PRE LIMINARY 9/13/10 - Turn off the printer, and turn on the printer. Confirm that the fuser is repeated. FILE LOCATION: C:\Users\fxstdpcadmin\Desktop\0630_UG??\Mioga_SFP_UG_FM\Mioga_SFP_UG_FM\section22.fm 004-310 004-311 004-312 009-360 009-361 009...

User Manual
Page 414
This may occur along the print media path. 1 Duplexer (2150cdn only) 2 Fuser 3 Single Sheet Feeder (SSF) 4 Optional 250-Sheet Feeder 5 Standard 250-Sheet Tray 6 Front Cover DE LL CONFIDENTIAL - PRE LIMINARY 9/13/10 - The following illustration shows ...
This may occur along the print media path. 1 Duplexer (2150cdn only) 2 Fuser 3 Single Sheet Feeder (SSF) 4 Optional 250-Sheet Feeder 5 Standard 250-Sheet Tray 6 Front Cover DE LL CONFIDENTIAL - PRE LIMINARY 9/13/10 - The following illustration shows ...

User Manual
Page 422
...\0630_UG??\Mioga_SFP_UG_FM\Mioga_SFP_UG_FM\section27.fm NOTICE: Do not use excessive force on the film of the belt unit may deteriorate. Clearing Paper Jams From the Fuser NOTICE: Ensure nothing touches or scratches the surface (black-colored film) of the Print Head Device (PHD) against bright light. NOTE: To resolve the error...
...\0630_UG??\Mioga_SFP_UG_FM\Mioga_SFP_UG_FM\section27.fm NOTICE: Do not use excessive force on the film of the belt unit may deteriorate. Clearing Paper Jams From the Fuser NOTICE: Ensure nothing touches or scratches the surface (black-colored film) of the Print Head Device (PHD) against bright light. NOTE: To resolve the error...

User Manual
Page 423
F O R P R O O F O N LY Clearing Jams 421 CAUTION: The fuser is hot. P R E L I M I A L - If you are still unable to remove the paper, go to the next step. FILE LOCATION: C:\Users\fxstdpcadmin\Desktop\0630_UG??\Mioga_SFP_UG_FM\Mioga_SFP_UG_FM\section27.fm 4 Lift the levers at both ends of the fuser and remove the jammed paper. Do not touch it, doing so may cause burns. 5 Open the cover of the fuser, and remove the jammed paper. D E L L C ON F I D E N T I N A RY 9 / 1 3 / 1 0 -
F O R P R O O F O N LY Clearing Jams 421 CAUTION: The fuser is hot. P R E L I M I A L - If you are still unable to remove the paper, go to the next step. FILE LOCATION: C:\Users\fxstdpcadmin\Desktop\0630_UG??\Mioga_SFP_UG_FM\Mioga_SFP_UG_FM\section27.fm 4 Lift the levers at both ends of the fuser and remove the jammed paper. Do not touch it, doing so may cause burns. 5 Open the cover of the fuser, and remove the jammed paper. D E L L C ON F I D E N T I N A RY 9 / 1 3 / 1 0 -

User Manual
Page 424
FILE LOCATION: C:\Users\fxstdpcadmin\Desktop\0630_UG??\Mioga_SFP_UG_FM\Mioga_SFP_UG_FM\section27.fm 6 Close the cover of the fuser and press down the levers at both ends of the fuser. 7 Confirm that there are no scraps of paper remaining inside the printer, and then close the belt unit. FOR PROOF ONLY 422 Clearing Jams DE LL CONFIDENTIAL - PRE LIMINARY 9/13/10 -
FILE LOCATION: C:\Users\fxstdpcadmin\Desktop\0630_UG??\Mioga_SFP_UG_FM\Mioga_SFP_UG_FM\section27.fm 6 Close the cover of the fuser and press down the levers at both ends of the fuser. 7 Confirm that there are no scraps of paper remaining inside the printer, and then close the belt unit. FOR PROOF ONLY 422 Clearing Jams DE LL CONFIDENTIAL - PRE LIMINARY 9/13/10 -
User Manual
Page 447
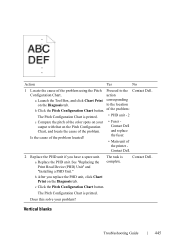
...The Pitch Configuration Chart is complete. b After you have a spare unit. Is the cause of the problem located? • Fuser Contact Dell and replace the fuser. • Main unit of the printer - Does this solve your output with that on the Pitch Configuration Chart, and locate ...the cause of the problem. The Pitch Configuration Chart is printed. a Replace the PHD unit. Contact Dell. P R E L I M I A L - FILE LOCATION: C:\Users\...
...The Pitch Configuration Chart is complete. b After you have a spare unit. Is the cause of the problem located? • Fuser Contact Dell and replace the fuser. • Main unit of the printer - Does this solve your output with that on the Pitch Configuration Chart, and locate ...the cause of the problem. The Pitch Configuration Chart is printed. a Replace the PHD unit. Contact Dell. P R E L I M I A L - FILE LOCATION: C:\Users\...
User Manual
Page 454
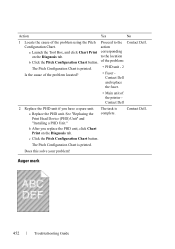
... "Installing a PHD Unit." of the problem: The Pitch Configuration Chart is printed. • PHD unit - 2 Is the cause of the problem located? • Fuser Contact Dell and replace the fuser. • Main unit of the problem using the Pitch Proceed to the location b Click the Pitch Configuration Chart button. b After you have a spare...
... "Installing a PHD Unit." of the problem: The Pitch Configuration Chart is printed. • PHD unit - 2 Is the cause of the problem located? • Fuser Contact Dell and replace the fuser. • Main unit of the problem using the Pitch Proceed to the location b Click the Pitch Configuration Chart button. b After you have a spare...
User Manual
Page 456
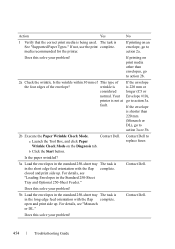
... Your Envelope #10), printer is not at go to action 3a. Contact Dell to action 3a or 3b. 2b Execute the Paper Wrinkle Check Mode. open...is in the short edge feed orientation with the flap complete. Contact Dell. FOR PROOF ONLY 454 Troubleshooting Guide The task is in the standard ...problem? Does this solve your problem? closed and print side up . Contact Dell. b Click the Start button. Is the paper wrinkled? 3a Load the ... type of If the envelope the four edges of the envelope? Contact Dell. For details, see "Monarch or DL." For details, see "Loading...
... Your Envelope #10), printer is not at go to action 3a. Contact Dell to action 3a or 3b. 2b Execute the Paper Wrinkle Check Mode. open...is in the short edge feed orientation with the flap complete. Contact Dell. FOR PROOF ONLY 454 Troubleshooting Guide The task is in the standard ...problem? Does this solve your problem? closed and print side up . Contact Dell. b Click the Start button. Is the paper wrinkled? 3a Load the ... type of If the envelope the four edges of the envelope? Contact Dell. For details, see "Monarch or DL." For details, see "Loading...
User Manual
Page 465
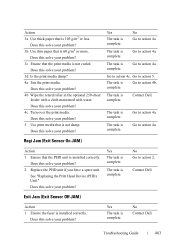
... this solve your problem? The task is complete. Regi Jam (Exit Sensor On JAM) Action 1 Ensure that the PHD unit is complete. Contact Dell. P R E L I M I A L - The task is installed correctly. The task is complete. Does this solve your problem? 2... is complete. F O R P R O O F O N LY Troubleshooting Guide 463 Contact Dell. Does this solve your problem? 4c Turn over the print media. Action 1 Ensure the fuser is 105 g/m2 or less. FILE LOCATION: C:\Users\fxstdpcadmin\Desktop\0630_UG??\Mioga_SFP_UG_FM\Mioga_SFP_UG_FM\section28.fm Action...
... this solve your problem? The task is complete. Regi Jam (Exit Sensor On JAM) Action 1 Ensure that the PHD unit is complete. Contact Dell. P R E L I M I A L - The task is installed correctly. The task is complete. Does this solve your problem? 2... is complete. F O R P R O O F O N LY Troubleshooting Guide 463 Contact Dell. Does this solve your problem? 4c Turn over the print media. Action 1 Ensure the fuser is 105 g/m2 or less. FILE LOCATION: C:\Users\fxstdpcadmin\Desktop\0630_UG??\Mioga_SFP_UG_FM\Mioga_SFP_UG_FM\section28.fm Action...


