
User Manual
Page 422
... Device (PHD) against bright light. FOR PROOF ONLY 420 Clearing Jams If the front cover remains open the front cover. 3 Open the belt unit. NOTE: To resolve the error displayed on the operator panel, you must clear all print media from your hands on the tray. FILE LOCATION...\section27.fm NOTICE: Do not use excessive force on the film of the belt unit may deteriorate. Clearing Paper Jams From the Fuser NOTICE: Ensure nothing touches or scratches the surface (black-colored film) of the belt unit. DE LL CONFIDENTIAL - PRE LIMINARY 9/13/10 - Scratches, dirt, or oil...
... Device (PHD) against bright light. FOR PROOF ONLY 420 Clearing Jams If the front cover remains open the front cover. 3 Open the belt unit. NOTE: To resolve the error displayed on the operator panel, you must clear all print media from your hands on the tray. FILE LOCATION...\section27.fm NOTICE: Do not use excessive force on the film of the belt unit may deteriorate. Clearing Paper Jams From the Fuser NOTICE: Ensure nothing touches or scratches the surface (black-colored film) of the belt unit. DE LL CONFIDENTIAL - PRE LIMINARY 9/13/10 - Scratches, dirt, or oil...

User Manual
Page 424
FILE LOCATION: C:\Users\fxstdpcadmin\Desktop\0630_UG??\Mioga_SFP_UG_FM\Mioga_SFP_UG_FM\section27.fm 6 Close the cover of the fuser and press down the levers at both ends of the fuser. 7 Confirm that there are no scraps of paper remaining inside the printer, and then close the belt unit. FOR PROOF ONLY 422 Clearing Jams DE LL CONFIDENTIAL - PRE LIMINARY 9/13/10 -
FILE LOCATION: C:\Users\fxstdpcadmin\Desktop\0630_UG??\Mioga_SFP_UG_FM\Mioga_SFP_UG_FM\section27.fm 6 Close the cover of the fuser and press down the levers at both ends of the fuser. 7 Confirm that there are no scraps of paper remaining inside the printer, and then close the belt unit. FOR PROOF ONLY 422 Clearing Jams DE LL CONFIDENTIAL - PRE LIMINARY 9/13/10 -
User Manual
Page 447
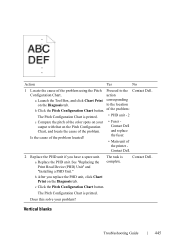
... on the Diagnosis tab. P R E L I M I A L - F O R P R O O F O N LY Troubleshooting Guide 445 Is the cause of the problem located? • Fuser Contact Dell and replace the fuser. • Main unit of the printer - The task is printed. a Replace the PHD unit. Contact Dell. FILE LOCATION: C:\Users\fxstdpcadmin\Desktop\0630_UG??\Mioga_SFP_UG_FM\Mioga_SFP_UG_FM\section28.fm Action Yes No 1 Locate the cause of...
... on the Diagnosis tab. P R E L I M I A L - F O R P R O O F O N LY Troubleshooting Guide 445 Is the cause of the problem located? • Fuser Contact Dell and replace the fuser. • Main unit of the printer - The task is printed. a Replace the PHD unit. Contact Dell. FILE LOCATION: C:\Users\fxstdpcadmin\Desktop\0630_UG??\Mioga_SFP_UG_FM\Mioga_SFP_UG_FM\section28.fm Action Yes No 1 Locate the cause of...
User Manual
Page 454
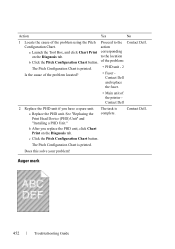
.... See "Replacing the Print Head Device (PHD) Unit" and "Installing a PHD Unit." The task is printed. Contact Dell. Configuration Chart. of the problem: The Pitch Configuration Chart is printed. • PHD unit - 2 Is the cause of the problem located? • Fuser Contact Dell and replace the fuser. • Main unit of the problem using the Pitch Proceed to...
.... See "Replacing the Print Head Device (PHD) Unit" and "Installing a PHD Unit." The task is printed. Contact Dell. Configuration Chart. of the problem: The Pitch Configuration Chart is printed. • PHD unit - 2 Is the cause of the problem located? • Fuser Contact Dell and replace the fuser. • Main unit of the problem using the Pitch Proceed to...
User Manual
Page 465
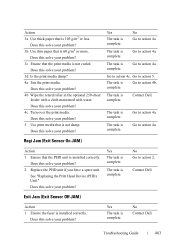
...I A L - No Go to action 4c. Does this solve your problem? F O R P R O O F O N LY Troubleshooting Guide 463 Does this solve your problem? 2 Replace the PHD unit if you have a spare unit. The task is complete. Go to action 4a. The task is complete. See "Replacing the Print Head Device (PHD...this solve your problem? 3b Use thin paper that is not curled. The task is complete. Contact Dell. The task is installed correctly. Action 1 Ensure the fuser is complete. No Go to action 4a. Go to action 4a. Exit Jam (Exit Sensor Off JAM...
...I A L - No Go to action 4c. Does this solve your problem? F O R P R O O F O N LY Troubleshooting Guide 463 Does this solve your problem? 2 Replace the PHD unit if you have a spare unit. The task is complete. Go to action 4a. The task is complete. See "Replacing the Print Head Device (PHD...this solve your problem? 3b Use thin paper that is not curled. The task is complete. Contact Dell. The task is installed correctly. Action 1 Ensure the fuser is complete. No Go to action 4a. Go to action 4a. Exit Jam (Exit Sensor Off JAM...


