User Manual
Page 4
SFP-UGTOC.fm 5 Preparing Printer Hardware 37 Removing Tape 37 Removing the Print Head Device (PHD) Ribbons . . . . . 38 Installing the Toner Cartridges 38 6 Installing Optional Accessories 41 Installing the Optional Memory Module 41 Printing Printer Settings Report 44 Updating Your Driver ...
SFP-UGTOC.fm 5 Preparing Printer Hardware 37 Removing Tape 37 Removing the Print Head Device (PHD) Ribbons . . . . . 38 Installing the Toner Cartridges 38 6 Installing Optional Accessories 41 Installing the Optional Memory Module 41 Printing Printer Settings Report 44 Updating Your Driver ...

User Manual
Page 15
... Consumables 373 Replacing the Toner Cartridges 373 Removing the Toner Cartridge 374 Installing a Toner Cartridge 375 Replacing the Print Head Device (PHD) Unit 377 Removing the PHD Unit 377 Installing a PHD Unit 379 Replacing the Retard Roller 384 Removing the Retard Roller in the Standard 250-Sheet Tray 385 Installing a Retard Roller in...
... Consumables 373 Replacing the Toner Cartridges 373 Removing the Toner Cartridge 374 Installing a Toner Cartridge 375 Replacing the Print Head Device (PHD) Unit 377 Removing the PHD Unit 377 Installing a PHD Unit 379 Replacing the Retard Roller 384 Removing the Retard Roller in the Standard 250-Sheet Tray 385 Installing a Retard Roller in...
User Manual
Page 40
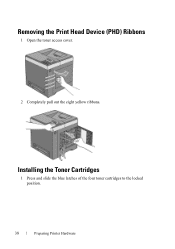
FOR PROOF ONLY 38 Preparing Printer Hardware PRE LIMINARY 9/13/10 - Installing the Toner Cartridges 1 Press and slide the blue latches of the four toner cartridges to the locked position. DE LL CONFIDENTIAL - FILE LOCATION: C:\Users\fxstdpcadmin\Desktop\0630_UG??\Mioga_SFP_UG_FM\Mioga_SFP_UG_FM\section05.fm Removing the Print Head Device (PHD) Ribbons 1 Open the toner access cover. 2 Completely pull out the eight yellow ribbons.
FOR PROOF ONLY 38 Preparing Printer Hardware PRE LIMINARY 9/13/10 - Installing the Toner Cartridges 1 Press and slide the blue latches of the four toner cartridges to the locked position. DE LL CONFIDENTIAL - FILE LOCATION: C:\Users\fxstdpcadmin\Desktop\0630_UG??\Mioga_SFP_UG_FM\Mioga_SFP_UG_FM\section05.fm Removing the Print Head Device (PHD) Ribbons 1 Open the toner access cover. 2 Completely pull out the eight yellow ribbons.
User Manual
Page 157
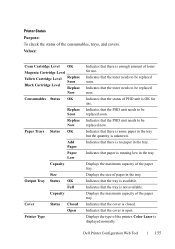
...paper tray. Indicates that the cover is not available. Displays the size of toner for use . Indicates that the PHD unit needs to be replaced soon. Dell Printer Configuration Web Tool 155 Indicates that the tray is running low in the tray. Displays the type of the ...paper in the tray. Indicates that paper is available. Printer Status Purpose: To check the status of the printer. Indicates that the PHD unit needs to be replaced now. Values: Cyan Cartridge Level OK Magenta Cartridge Level Yellow Cartridge Level Black Cartridge Level Replace Soon ...
...paper tray. Indicates that the cover is not available. Displays the size of toner for use . Indicates that the PHD unit needs to be replaced soon. Dell Printer Configuration Web Tool 155 Indicates that the tray is running low in the tray. Displays the type of the ...paper in the tray. Indicates that paper is available. Printer Status Purpose: To check the status of the printer. Indicates that the PHD unit needs to be replaced now. Values: Cyan Cartridge Level OK Magenta Cartridge Level Yellow Cartridge Level Black Cartridge Level Replace Soon ...
User Manual
Page 175
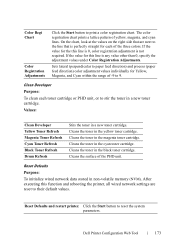
...toner cartridge. Sets lateral (perpendicular to paper feed direction) and process (paper feed direction) color adjustment values individually for each toner cartridge or PHD unit, or to print a color registration chart. Clean Developer Purpose: To clean each of -9 to reset the system parameters. Values: ...toner in the magenta toner cartridge. Cleans the toner in a new toner cartridge. Cleans the toner in the cyan toner cartridge. Dell Printer Configuration Web Tool 173 Color Regi Chart Color Registration Adjustments Click the Start button to stir the toner in non-volatile memory...
...toner cartridge. Sets lateral (perpendicular to paper feed direction) and process (paper feed direction) color adjustment values individually for each toner cartridge or PHD unit, or to print a color registration chart. Clean Developer Purpose: To clean each of -9 to reset the system parameters. Values: ...toner in the magenta toner cartridge. Cleans the toner in a new toner cartridge. Cleans the toner in the cyan toner cartridge. Dell Printer Configuration Web Tool 173 Color Regi Chart Color Registration Adjustments Click the Start button to stir the toner in non-volatile memory...
User Manual
Page 283
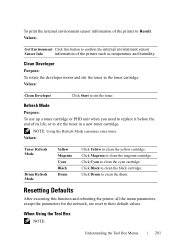
..., are reset to their default values. Values: Clean Developer Click Start to clean the cyan cartridge. Refresh Mode Purpose: To use up a toner cartridge or PHD unit when you need to replace it before the end of its life, or to Result. Resetting Defaults After executing this button to confirm the...
..., are reset to their default values. Values: Clean Developer Click Start to clean the cyan cartridge. Refresh Mode Purpose: To use up a toner cartridge or PHD unit when you need to replace it before the end of its life, or to Result. Resetting Defaults After executing this button to confirm the...
User Manual
Page 317
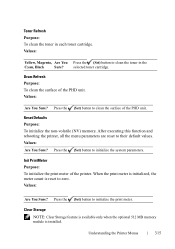
Drum Refresh Purpose: To clean the surface of the PHD unit. When the print meter is initialized, the meter count is installed. Values: Are You Sure? Press the (Set) button to initialize the system parameters. ... zero. Clear Storage NOTE: Clear Storage feature is available only when the optional 512 MB memory module is reset to clean the surface of the PHD unit. Understanding the Printer Menus 315 Init PrintMeter Purpose: To initialize the print meter of the printer. selected toner cartridge. Reset Defaults Purpose: To initialize...
Drum Refresh Purpose: To clean the surface of the PHD unit. When the print meter is initialized, the meter count is installed. Values: Are You Sure? Press the (Set) button to initialize the system parameters. ... zero. Clear Storage NOTE: Clear Storage feature is available only when the optional 512 MB memory module is reset to clean the surface of the PHD unit. Understanding the Printer Menus 315 Init PrintMeter Purpose: To initialize the print meter of the printer. selected toner cartridge. Reset Defaults Purpose: To initialize...
User Manual
Page 361
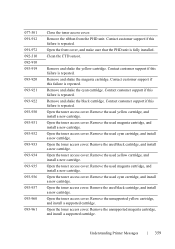
Open the front cover, and make sure that the PHD unit is repeated. Remove and shake the yellow cartridge. Contact customer support if this failure is fully installed. Remove the used black cartridge, and install a ... cover. Open the toner access cover. Remove the unsupported yellow cartridge, and install a supported cartridge. Open the toner access cover. P R E L I M I A L - Remove the ribbon from the PHD unit. Clean the CTD sensor. Open the toner access cover. Open the toner access cover. Remove the used magenta cartridge, and install a new cartridge. Open...
Open the front cover, and make sure that the PHD unit is repeated. Remove and shake the yellow cartridge. Contact customer support if this failure is fully installed. Remove the used black cartridge, and install a ... cover. Open the toner access cover. Remove the unsupported yellow cartridge, and install a supported cartridge. Open the toner access cover. P R E L I M I A L - Remove the ribbon from the PHD unit. Clean the CTD sensor. Open the toner access cover. Open the toner access cover. Remove the used magenta cartridge, and install a new cartridge. Open...
User Manual
Page 362
.... FOR PROOF ONLY 360 Understanding Printer Messages Open the toner access cover, and make sure that the black cartridge is fully installed. Remove the unsupported PHD unit, and install a supported unit. Open the toner access cover, and make sure that the magenta cartridge is fully installed. Remove the unsupported black cartridge...
.... FOR PROOF ONLY 360 Understanding Printer Messages Open the toner access cover, and make sure that the black cartridge is fully installed. Remove the unsupported PHD unit, and install a supported unit. Open the toner access cover, and make sure that the magenta cartridge is fully installed. Remove the unsupported black cartridge...
User Manual
Page 367
...413 mm (16.26 inches) Width: 400 mm (15.75 inches) Depth: 406 mm (15.98 inches) Weight (not including cartridge and PHD unit): 15.0 kg (32.47 lb) Memory Base memory 256 MB Maximum memory 768 MB (256 MB + 512 MB) Connector 144 pin... Size 512 MB Speed EP2-2100 D E L L C ON F I D E N T I N A RY 9 / 1 3 / 1 0 - F O R P R O O F O N LY Specifications 365 24 Specifications Operating System Compatibility Your Dell™ 2150cn/2150cdn Color Printer is compatible with Microsoft® Windows® XP, Windows XP 64-bit Edition, Windows Server® 2003, Windows Server 2003 x64 Edition...
...413 mm (16.26 inches) Width: 400 mm (15.75 inches) Depth: 406 mm (15.98 inches) Weight (not including cartridge and PHD unit): 15.0 kg (32.47 lb) Memory Base memory 256 MB Maximum memory 768 MB (256 MB + 512 MB) Connector 144 pin... Size 512 MB Speed EP2-2100 D E L L C ON F I D E N T I N A RY 9 / 1 3 / 1 0 - F O R P R O O F O N LY Specifications 365 24 Specifications Operating System Compatibility Your Dell™ 2150cn/2150cdn Color Printer is compatible with Microsoft® Windows® XP, Windows XP 64-bit Edition, Windows Server® 2003, Windows Server 2003 x64 Edition...

User Manual
Page 379
... 1 Ensure that the printer is turned off. 2 Pull the standard 250-sheet tray out of the Print Head Device (PHD) against bright light. Scratches, dirt, or oil from the printer. 3 Push the side button to open for more than three minutes, print quality may reduce ... mm. NOTICE: Ensure nothing touches or scratches the surface (black-colored film) of the belt unit. Maintaining Your Printer 377 Replacing the Print Head Device (PHD) Unit CAUTION: Before performing any of the following procedures, read and follow the safety instructions in your hands on the film of the belt unit...
... 1 Ensure that the printer is turned off. 2 Pull the standard 250-sheet tray out of the Print Head Device (PHD) against bright light. Scratches, dirt, or oil from the printer. 3 Push the side button to open for more than three minutes, print quality may reduce ... mm. NOTICE: Ensure nothing touches or scratches the surface (black-colored film) of the belt unit. Maintaining Your Printer 377 Replacing the Print Head Device (PHD) Unit CAUTION: Before performing any of the following procedures, read and follow the safety instructions in your hands on the film of the belt unit...

User Manual
Page 380
4 Open the belt unit. 5 Turn the four PHD lock levers 90-degrees counterclockwise. 378 Maintaining Your Printer
4 Open the belt unit. 5 Turn the four PHD lock levers 90-degrees counterclockwise. 378 Maintaining Your Printer

User Manual
Page 381
6 Hold the gray tabs, and then pull the PHD unit out of the printer. Installing a PHD Unit 1 Open the PHD packaging. Maintaining Your Printer 379
6 Hold the gray tabs, and then pull the PHD unit out of the printer. Installing a PHD Unit 1 Open the PHD packaging. Maintaining Your Printer 379

User Manual
Page 382
2 Take out the PHD unit from the packaging. 3 Completely pull out the eight yellow ribbons from the PHD unit. 380 Maintaining Your Printer
2 Take out the PHD unit from the packaging. 3 Completely pull out the eight yellow ribbons from the PHD unit. 380 Maintaining Your Printer

User Manual
Page 383
Maintaining Your Printer 381 4 Remove the rear protective cover from the PHD unit. NOTE: Do not remove the front protective cover at this moment. 5 Insert the PHD unit until the line on the handle aligns with the white line on the printer.
Maintaining Your Printer 381 4 Remove the rear protective cover from the PHD unit. NOTE: Do not remove the front protective cover at this moment. 5 Insert the PHD unit until the line on the handle aligns with the white line on the printer.

User Manual
Page 384
6 Turn the four PHD lock levers 90-degrees clockwise to lock the PHD unit. 7 Remove the front protective cover from the PHD unit. NOTICE: Ensure that you do not hit the belt unit when removing the front protective cover. 382 Maintaining Your Printer
6 Turn the four PHD lock levers 90-degrees clockwise to lock the PHD unit. 7 Remove the front protective cover from the PHD unit. NOTICE: Ensure that you do not hit the belt unit when removing the front protective cover. 382 Maintaining Your Printer

User Manual
Page 391
Maintaining Your Printer 389 5 Turn the four PHD lock levers 90-degrees counterclockwise. 6 Hold the gray tabs, and then pull out the PHD unit.
Maintaining Your Printer 389 5 Turn the four PHD lock levers 90-degrees counterclockwise. 6 Hold the gray tabs, and then pull out the PHD unit.

User Manual
Page 392
If the front cover remains open for more than three minutes, print quality may deteriorate. 7 Clean the feed roller inside the printer with a dry cloth. 390 Maintaining Your Printer NOTE: Keep the PHD unit in a dark place.
If the front cover remains open for more than three minutes, print quality may deteriorate. 7 Clean the feed roller inside the printer with a dry cloth. 390 Maintaining Your Printer NOTE: Keep the PHD unit in a dark place.

User Manual
Page 393
8 Insert the PHD unit until it stops, and then turn the four PHD lock levers 90degrees clockwise to lock the PHD unit. 9 Close the belt unit, and push at the top of the unit until it clicks. 10 Close the front cover. Maintaining Your Printer 391
8 Insert the PHD unit until it stops, and then turn the four PHD lock levers 90degrees clockwise to lock the PHD unit. 9 Close the belt unit, and push at the top of the unit until it clicks. 10 Close the front cover. Maintaining Your Printer 391

User Manual
Page 415
... found or you must clear all print media from the printer, and then pull out the jammed paper remaining inside of the Print Head Device (PHD) against bright light. NOTE: To resolve the error displayed on the operator panel, you are unable to remove the paper, go to the next step...
... found or you must clear all print media from the printer, and then pull out the jammed paper remaining inside of the Print Head Device (PHD) against bright light. NOTE: To resolve the error displayed on the operator panel, you are unable to remove the paper, go to the next step...


