User Guide
Page 9
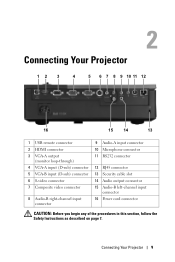
Connecting Your Projector 9 2 Connecting Your Projector 12 3 4 5 6 7 8 9 10 11 12 16 15 14 13 1 USB remote connector 2 HDMI connector 3 VGA-A output (monitor loop-through) 4 VGA-A input (D-sub) connector 5 VGA-B input (D-sub) connector 6 S-video connector 7 Composite video connector 8 Audio-B right-channel input connector 9 Audio-A input connector 10 Microphone connector 11 RS232 connector 12 RJ45 connector 13 Security...
Connecting Your Projector 9 2 Connecting Your Projector 12 3 4 5 6 7 8 9 10 11 12 16 15 14 13 1 USB remote connector 2 HDMI connector 3 VGA-A output (monitor loop-through) 4 VGA-A input (D-sub) connector 5 VGA-B input (D-sub) connector 6 S-video connector 7 Composite video connector 8 Audio-B right-channel input connector 9 Audio-A input connector 10 Microphone connector 11 RS232 connector 12 RJ45 connector 13 Security...
User Guide
Page 43
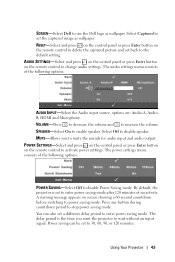
...volume and to disable speaker. MUTE-Allows you want the projector to wait without an input signal. Using Your Projector 43 The audio settings menu consists of the following options: AUDIO INPUT-Select the Audio input source, options are: Audio-A, AudioB, HDMI and Microphone. Select Off to increase the volume. The ... to disable Power Saving mode. By default, the projector is the time you to mute the sounds for audio input and audio output. The delay period is set the captured image as wallpaper. SCREEN-Select Dell to use the Dell logo as wallpaper. Select Captured to set to the...
...volume and to disable speaker. MUTE-Allows you want the projector to wait without an input signal. Using Your Projector 43 The audio settings menu consists of the following options: AUDIO INPUT-Select the Audio input source, options are: Audio-A, AudioB, HDMI and Microphone. Select Off to increase the volume. The ... to disable Power Saving mode. By default, the projector is the time you to mute the sounds for audio input and audio output. The delay period is set the captured image as wallpaper. SCREEN-Select Dell to use the Dell logo as wallpaper. Select Captured to set to the...

User Guide
Page 52
... adjust the display contrast. • Audio Input: You can select Audio-A, Audio-B, HDMI and Microphone for the input source • Volume: You can select the value (0~20) for the audio volume • Speaker: You can select On to enable the audio function or select Off to disable the audio function. 52 Using Your Projector sRGB: Provide a more accurate...
... adjust the display contrast. • Audio Input: You can select Audio-A, Audio-B, HDMI and Microphone for the input source • Volume: You can select the value (0~20) for the audio volume • Speaker: You can select On to enable the audio function or select Off to disable the audio function. 52 Using Your Projector sRGB: Provide a more accurate...
User Guide
Page 76
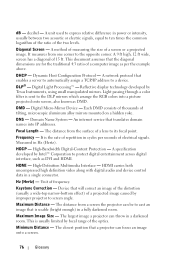
...filter is the rate of electrical signals. Each DMD consists of thousands of frequency. DNS - Domain Name System - HDMI carries both uncompressed high definition video along with digital audio and device control data in Hz (Hertz). HDCP - This is usable (bright enough) in a darkened room. ...dimensions are for the traditional 4:3 ratio of the two levels. dB - The distance from one corner to a device. The distance from a screen the projector can focus an image onto a screen. 76 Glossary A 9 ft high, 12 ft wide, screen has a diagonal of a screen or a projected ...
...filter is the rate of electrical signals. Each DMD consists of thousands of frequency. DNS - Domain Name System - HDMI carries both uncompressed high definition video along with digital audio and device control data in Hz (Hertz). HDCP - This is usable (bright enough) in a darkened room. ...dimensions are for the traditional 4:3 ratio of the two levels. dB - The distance from one corner to a device. The distance from a screen the projector can focus an image onto a screen. 76 Glossary A 9 ft high, 12 ft wide, screen has a diagonal of a screen or a projected ...
User Guide
Page 78
...Audio Input 43 Audio output connector 9 Audio Settings 43 C Capture Screen 42 Changing the Lamp 67 Closed Caption 46 Connecting the Projector Composite video cable 14 Connecting a Computer with a RS232 cable 12 Connecting with a Component Cable 15 Connecting with a Composite Cable 14 Connecting with an HDMI...to USB cable 10 VGA to VGA cable 10, 11 VGA to YPbPr cable 15 Connection Ports Audio input connector 9 Audio-B left-channel input connector 9 Audio-B right-channel input connector 9 HDMI connector 9 Microphone connector 9 Power cord connector 9 RS232 connector 9 Security cable slot 9 S-video...
...Audio Input 43 Audio output connector 9 Audio Settings 43 C Capture Screen 42 Changing the Lamp 67 Closed Caption 46 Connecting the Projector Composite video cable 14 Connecting a Computer with a RS232 cable 12 Connecting with a Component Cable 15 Connecting with a Composite Cable 14 Connecting with an HDMI...to USB cable 10 VGA to VGA cable 10, 11 VGA to YPbPr cable 15 Connection Ports Audio input connector 9 Audio-B left-channel input connector 9 Audio-B right-channel input connector 9 HDMI connector 9 Microphone connector 9 Power cord connector 9 RS232 connector 9 Security cable slot 9 S-video...


