Owners Manual
Page 1
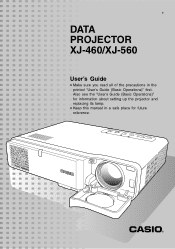
E DATA PROJECTOR XJ-460/XJ-560 User's Guide • Make sure you read all of the precautions in a safe place for future reference. Also see the "User's Guide (Basic Operations)" for information about setting up the projector and replacing its lamp. • Keep this manual in the printed "User's Guide (Basic Operations)" first.
E DATA PROJECTOR XJ-460/XJ-560 User's Guide • Make sure you read all of the precautions in a safe place for future reference. Also see the "User's Guide (Basic Operations)" for information about setting up the projector and replacing its lamp. • Keep this manual in the printed "User's Guide (Basic Operations)" first.
Owners Manual
Page 2
... shall not be held liable for any other reason. • The sample screens shown in this manual are for illustrative purposes only, and appear differently from the screens actually produced by malfunction or maintenance of...of the United States in part or its entirety, is forbidden without notice. • Copying of this manual, either in the United States and other use . shall not be registered trademarks or trademarks of their ...are subject to use of this product or this manual. • CASIO COMPUTER CO., LTD. of CASIO COMPUTER CO., LTD. • CASIO COMPUTER CO., LTD.
... shall not be held liable for any other reason. • The sample screens shown in this manual are for illustrative purposes only, and appear differently from the screens actually produced by malfunction or maintenance of...of the United States in part or its entirety, is forbidden without notice. • Copying of this manual, either in the United States and other use . shall not be registered trademarks or trademarks of their ...are subject to use of this product or this manual. • CASIO COMPUTER CO., LTD. of CASIO COMPUTER CO., LTD. • CASIO COMPUTER CO., LTD.
Owners Manual
Page 4
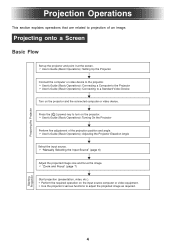
... the projected image as required. 4 Starting Projection Press the [ ] (power) key to turn on the projector and the connected computer or video device. User's Guide (Basic Operations): Adjusting the Projector Elevation Angle Select the input source. ) "Manually Selecting the Input Source" (page 6) Adjust the projected image size and focus the image. ) "Zoom and...
... the projected image as required. 4 Starting Projection Press the [ ] (power) key to turn on the projector and the connected computer or video device. User's Guide (Basic Operations): Adjusting the Projector Elevation Angle Select the input source. ) "Manually Selecting the Input Source" (page 6) Adjust the projected image size and focus the image. ) "Zoom and...
Owners Manual
Page 6
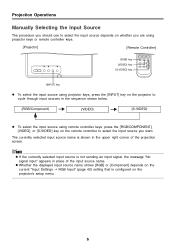
... (S-VIDEO) z To select the input source using remote controller keys, press the [RGB/COMPONENT], [VIDEO], or [S-VIDEO] key on the projector's setup menu. 6 z If the currently selected input source is shown in place of the projection screen. The currently selected input source name is... upper right corner of the input source name. Projection Operations Manually Selecting the Input Source The procedure you should use to select the input source depends on whether you are using projector keys or remote controller keys. [Projector] [Remote Controller] [RGB] key [VIDEO] key [S-VIDEO...
... (S-VIDEO) z To select the input source using remote controller keys, press the [RGB/COMPONENT], [VIDEO], or [S-VIDEO] key on the projector's setup menu. 6 z If the currently selected input source is shown in place of the projection screen. The currently selected input source name is... upper right corner of the input source name. Projection Operations Manually Selecting the Input Source The procedure you should use to select the input source depends on whether you are using projector keys or remote controller keys. [Projector] [Remote Controller] [RGB] key [VIDEO] key [S-VIDEO...
Owners Manual
Page 8
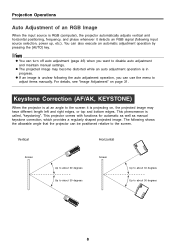
... an image is unclear following shows the allowable angle that the projector can also execute an automatic adjustment operation by pressing the [AUTO] key. This projector comes with functions for automatic as well as manual keystone correction, which provides a regularly shaped projected image. z The projected image... left and right edges, or top and bottom edges. Keystone Correction (AF/AK, KEYSTONE) When the projector is at an angle to disable auto adjustment and maintain manual settings. The following the auto adjustment operation, you want to the screen it detects an RGB signal (...
... an image is unclear following shows the allowable angle that the projector can also execute an automatic adjustment operation by pressing the [AUTO] key. This projector comes with functions for automatic as well as manual keystone correction, which provides a regularly shaped projected image. z The projected image... left and right edges, or top and bottom edges. Keystone Correction (AF/AK, KEYSTONE) When the projector is at an angle to disable auto adjustment and maintain manual settings. The following the auto adjustment operation, you want to the screen it detects an RGB signal (...

Owners Manual
Page 10
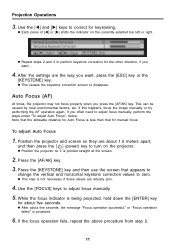
..., and then press the AF/AK button." z Proper Auto keystone correction and Auto Focus are not possible if the projector is Enabled" above. Manual Keystone Correction Manual keystone correction can be used to select either "Vertical Keystone Correction" or "Horizontal Keystone Correction". 10 Press the [AF... Auto Adjustment at Power On While [Continuous AF/AK] is within the screen area. 3. To use manual focus. Press the [KEYSTONE] key. appears, try moving the screen and/or projector so the distance between them is selected for "Option Settings2 J Power On AF/AK Mode" (page ...
..., and then press the AF/AK button." z Proper Auto keystone correction and Auto Focus are not possible if the projector is Enabled" above. Manual Keystone Correction Manual keystone correction can be used to select either "Vertical Keystone Correction" or "Horizontal Keystone Correction". 10 Press the [AF... Auto Adjustment at Power On While [Continuous AF/AK] is within the screen area. 3. To use manual focus. Press the [KEYSTONE] key. appears, try moving the screen and/or projector so the distance between them is selected for "Option Settings2 J Power On AF/AK Mode" (page ...
Owners Manual
Page 11
... focus manually, perform the steps under "To adjust Auto Focus", below. After the settings are about 1.5 meters apart, and then press the [ ] (power) key to turn on the currently selected bar left or right. If you often need to perform keystone correction for keystoning. Position the projector and...want , press the [ESC] key or the [KEYSTONE] key. While the focus indicator is projected. 6. or "Focus operation failed." z Position the projector so it is not necessary if these values are already zero. 4. Press the [KEYSTONE] key and then use the screen that for about five seconds...
... focus manually, perform the steps under "To adjust Auto Focus", below. After the settings are about 1.5 meters apart, and then press the [ ] (power) key to turn on the currently selected bar left or right. If you often need to perform keystone correction for keystoning. Position the projector and...want , press the [ESC] key or the [KEYSTONE] key. While the focus indicator is projected. 6. or "Focus operation failed." z Position the projector so it is not necessary if these values are already zero. 4. Press the [KEYSTONE] key and then use the screen that for about five seconds...
Owners Manual
Page 12
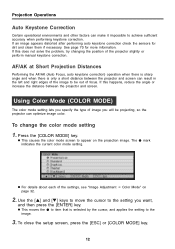
... setting to achieve sufficient accuracy when performing keystone correction. z This moves the z to item that is only a short distance between the projector and screen. See page 70 for dirt and clean them if necessary. If this happens, reduce the angle or increase the distance between the...it impossible to the image. 3. Press the [COLOR MODE] key. z For details about each of image you will be out of the projector slightly or perform manual keystone correction. Using Color Mode (COLOR MODE) The color mode setting lets you want, and then press the [ENTER] key. Use the [S]...
... setting to achieve sufficient accuracy when performing keystone correction. z This moves the z to item that is only a short distance between the projector and screen. See page 70 for dirt and clean them if necessary. If this happens, reduce the angle or increase the distance between the...it impossible to the image. 3. Press the [COLOR MODE] key. z For details about each of image you will be out of the projector slightly or perform manual keystone correction. Using Color Mode (COLOR MODE) The color mode setting lets you want, and then press the [ENTER] key. Use the [S]...
Owners Manual
Page 18
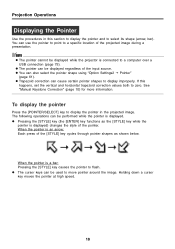
...[STYLE] key (the [ENTER] key functions as shown below. z The pointer can be used to select its shape (arrow, bar). See "Manual Keystone Correction" (page 10) for more information. Holding down a cursor key moves the pointer at high speed. 18 The following operations can be ...displayed while the projector is displayed. z The cursor keys can also select the pointer shape using "Option Settings2 J Pointer" (page 61). Projection Operations Displaying the...
...[STYLE] key (the [ENTER] key functions as shown below. z The pointer can be used to select its shape (arrow, bar). See "Manual Keystone Correction" (page 10) for more information. Holding down a cursor key moves the pointer at high speed. 18 The following operations can be ...displayed while the projector is displayed. z The cursor keys can also select the pointer shape using "Option Settings2 J Pointer" (page 61). Projection Operations Displaying the...
Owners Manual
Page 20
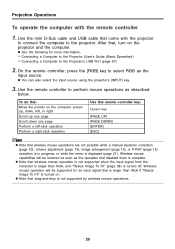
... for an input signal that wireless mouse operations are not possible while a manual keystone correction (page 10), volume adjustment (page 13), image enlargement (page...Perform a left-click operation Perform a right-click operation Use this : Move the pointer on the projector and the computer. On the remote controller, press the [RGB] key to select RGB as ... z Note that is larger than XGA, and "Resize Image To Fit" (page 38) is complete. Projection Operations To operate the computer with the projector to connect the computer to the projector. Use the mini D-Sub cable and...
... for an input signal that wireless mouse operations are not possible while a manual keystone correction (page 10), volume adjustment (page 13), image enlargement (page...Perform a left-click operation Perform a right-click operation Use this : Move the pointer on the projector and the computer. On the remote controller, press the [RGB] key to select RGB as ... z Note that is larger than XGA, and "Resize Image To Fit" (page 38) is complete. Projection Operations To operate the computer with the projector to connect the computer to the projector. Use the mini D-Sub cable and...
Owners Manual
Page 34
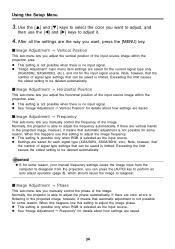
z This setting is not possible when there is no input signal. Normally, the projector is able to be saved is selected as the input source. z Settings are saved for the input signal source. When this happens use this setting ... selected as the input source. If there are saved for the current signal type only (XGA/60Hz, SXGA/60Hz, etc.), and not for each signal type (XGA/60Hz, SXGA/60Hz, etc.). z If, for some reason, your manual frequency settings cause the image input from the computer to disappear from the projection, you can...
z This setting is not possible when there is no input signal. Normally, the projector is able to be saved is selected as the input source. z Settings are saved for the input signal source. When this happens use this setting ... selected as the input source. If there are saved for the current signal type only (XGA/60Hz, SXGA/60Hz, etc.), and not for each signal type (XGA/60Hz, SXGA/60Hz, etc.). z If, for some reason, your manual frequency settings cause the image input from the computer to disappear from the projection, you can...
Owners Manual
Page 60
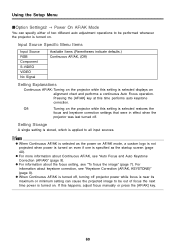
...Turning on even if one is specified as the power on AF/AK mode, a custom logo is not projected when power is turned on the projector while this setting is selected displays an alignment chart and performs a continuous Auto Focus operation. z For more information about the focus setting, see ...Turning on . For information about keystone correction, see "To focus the image" (page 7). Pressing the [AF/AK] key at this happens, adjust focus manually or press the [AF/AK] key. 60 Using the Setup Menu IOption Settings2 J Power On AF/AK Mode You can cause the projected image to...
...Turning on even if one is specified as the power on AF/AK mode, a custom logo is not projected when power is turned on the projector while this setting is selected displays an alignment chart and performs a continuous Auto Focus operation. z For more information about the focus setting, see ...Turning on . For information about keystone correction, see "To focus the image" (page 7). Pressing the [AF/AK] key at this happens, adjust focus manually or press the [AF/AK] key. 60 Using the Setup Menu IOption Settings2 J Power On AF/AK Mode You can cause the projected image to...
Owners Manual
Page 65
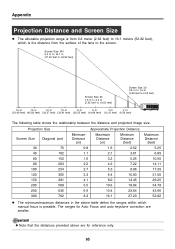
... which is possible. Appendix Projection Distance and Screen Size z The allowable projection range is from 0.8 meter (2.62 feet) to 16.1 meters (52.82 feet), which manual focus is the distance from the surface of the lens to 5.25 feet) 16 m 14 m 12 m 10 m 8 m 6 m 4 m 2 m (52.49 feet) (45.93 feet) (39.37...
... which is possible. Appendix Projection Distance and Screen Size z The allowable projection range is from 0.8 meter (2.62 feet) to 16.1 meters (52.82 feet), which manual focus is the distance from the surface of the lens to 5.25 feet) 16 m 14 m 12 m 10 m 8 m 6 m 4 m 2 m (52.49 feet) (45.93 feet) (39.37...