

Owners Manual
Page 1
E DATA PROJECTOR XJ-360 User's Guide • Make sure you read all of the precautions in a safe place for information about setting up the projector and replacing its lamp. • Keep this manual in the printed "User's Guide (Basic Operations)" first. Also see the "User's Guide (Basic Operations)" for future reference.
E DATA PROJECTOR XJ-360 User's Guide • Make sure you read all of the precautions in a safe place for information about setting up the projector and replacing its lamp. • Keep this manual in the printed "User's Guide (Basic Operations)" first. Also see the "User's Guide (Basic Operations)" for future reference.

Owners Manual
Page 2
... in the United States and other countries. • Apple and Macintosh are registered trademarks of CASIO COMPUTER CO., LTD. • CASIO COMPUTER CO., LTD. Any other use of this manual. • CASIO COMPUTER CO., LTD. You are allowed to change without the permission of Apple Computer, Inc. shall not be held liable for any...
... in the United States and other countries. • Apple and Macintosh are registered trademarks of CASIO COMPUTER CO., LTD. • CASIO COMPUTER CO., LTD. Any other use of this manual. • CASIO COMPUTER CO., LTD. You are allowed to change without the permission of Apple Computer, Inc. shall not be held liable for any...

Owners Manual
Page 4
"Manually Selecting the Input Source" (page 6) Adjust the projected image size and focus the image. User's Guide (Basic Operations): Connecting a Computer to the Projector User's Guide (Basic Operations): Connecting to turn on the projector. Press the [ ] (power) key to a ...Standard Video Device Turn on the input source computer or video equipment. • Use the projector's various functions to the projector. Preparing the Projector Projection Operations Projection Operations Projecting onto a Screen This section explains the basic steps for projecting an image. ...
"Manually Selecting the Input Source" (page 6) Adjust the projected image size and focus the image. User's Guide (Basic Operations): Connecting a Computer to the Projector User's Guide (Basic Operations): Connecting to turn on the projector. Press the [ ] (power) key to a ...Standard Video Device Turn on the input source computer or video equipment. • Use the projector's various functions to the projector. Preparing the Projector Projection Operations Projection Operations Projecting onto a Screen This section explains the basic steps for projecting an image. ...
Owners Manual
Page 6
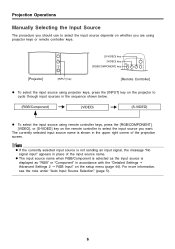
Projection Operations Manually Selecting the Input Source The procedure you should use to select the input source depends on whether you want. For more information, see the note ... with the "Detailed Settings J Advanced Settings 2 J RGB Input" on the projector to select the input source you are using projector keys or remote controller keys. [S-VIDEO] key [VIDEO] key [RGB/COMPONENT] key [Projector] [INPUT] key [Remote Controller] z To select the input source using projector keys, press the [INPUT] key on the setup menu (page...
Projection Operations Manually Selecting the Input Source The procedure you should use to select the input source depends on whether you want. For more information, see the note ... with the "Detailed Settings J Advanced Settings 2 J RGB Input" on the projector to select the input source you are using projector keys or remote controller keys. [S-VIDEO] key [VIDEO] key [RGB/COMPONENT] key [Projector] [INPUT] key [Remote Controller] z To select the input source using projector keys, press the [INPUT] key on the setup menu (page...
Owners Manual
Page 7
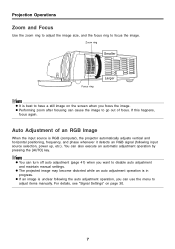
... happens, focus again. z You can turn off auto adjustment (page 41) when you can use the menu to disable auto adjustment and maintain manual settings. z If an image is in progress. For details, see "Signal Settings" on the screen when you focus the image. z The ...operation is unclear following input source selection, power up, etc.). Zoom ring Smaller Focus ring Larger z It is RGB (computer), the projector automatically adjusts vertical and horizontal positioning, frequency, and phase whenever it detects an RGB signal (following the auto adjustment operation, you want to...
... happens, focus again. z You can turn off auto adjustment (page 41) when you can use the menu to disable auto adjustment and maintain manual settings. z If an image is in progress. For details, see "Signal Settings" on the screen when you focus the image. z The ...operation is unclear following input source selection, power up, etc.). Zoom ring Smaller Focus ring Larger z It is RGB (computer), the projector automatically adjusts vertical and horizontal positioning, frequency, and phase whenever it detects an RGB signal (following the auto adjustment operation, you want to...

Owners Manual
Page 8
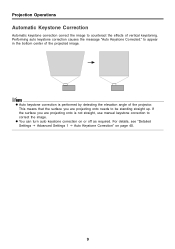
...; 768; z Keystone correction can be aligned with functions for automatic as well as manual keystone correction, which provides a regularly shaped projected image. The center of the screen (see "Setting Up the Projector" in the "User's Guide (Basic Operations)". z The projector does not support horizontal keystone correction. This phenomenon is projecting on, the projected...
...; 768; z Keystone correction can be aligned with functions for automatic as well as manual keystone correction, which provides a regularly shaped projected image. The center of the screen (see "Setting Up the Projector" in the "User's Guide (Basic Operations)". z The projector does not support horizontal keystone correction. This phenomenon is projecting on, the projected...
Owners Manual
Page 9
z Auto keystone correction is not straight, use manual keystone correction to be standing straight up. This means that the surface you are projecting onto needs to correct the image. Performing auto keystone correction ... page 40. 9 If the surface you are projecting onto is performed by detecting the elevation angle of vertical keystoning. to counteract the effects of the projector.
z Auto keystone correction is not straight, use manual keystone correction to be standing straight up. This means that the surface you are projecting onto needs to correct the image. Performing auto keystone correction ... page 40. 9 If the surface you are projecting onto is performed by detecting the elevation angle of vertical keystoning. to counteract the effects of the projector.
Owners Manual
Page 10
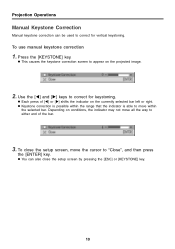
... pressing the [ESC] or [KEYSTONE] key. 10 z This causes the keystone correction screen to appear on the currently selected bar left or right. To use manual keystone correction 1. Depending on conditions, the indicator may not move all the way to either end of [W] or [X] shifts the indicator on the projected image...
... pressing the [ESC] or [KEYSTONE] key. 10 z This causes the keystone correction screen to appear on the currently selected bar left or right. To use manual keystone correction 1. Depending on conditions, the indicator may not move all the way to either end of [W] or [X] shifts the indicator on the projected image...
Owners Manual
Page 30
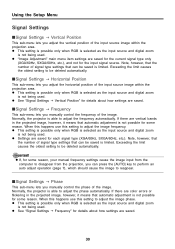
...when RGB is selected as the input source and digital zoom is not being used . Normally, the projector is able to adjust the frequency automatically. z If, for some reason, your manual frequency settings cause the image input from the computer to be saved is not being used . ISignal ...settings that automatic adjustment is not possible for details about how settings are saved for the current signal type only (XGA/60Hz, SXGA/60Hz, etc.), and not for each signal type (XGA/60Hz, SXGA/60Hz, etc.). z See "Signal Settings J Vertical Position" for some reason. If there are ...
...when RGB is selected as the input source and digital zoom is not being used . Normally, the projector is able to adjust the frequency automatically. z If, for some reason, your manual frequency settings cause the image input from the computer to be saved is not being used . ISignal ...settings that automatic adjustment is not possible for details about how settings are saved for the current signal type only (XGA/60Hz, SXGA/60Hz, etc.), and not for each signal type (XGA/60Hz, SXGA/60Hz, etc.). z See "Signal Settings J Vertical Position" for some reason. If there are ...