
Quick Start Guide
Page 5
... or Colors Are Incorrect 14 Printing the Nozzle Check Pattern 15 Examining the Nozzle Check Pattern ...........17 Print Head Cleaning 19 Print Head Deep Cleaning 21 Aligning the Print Head 23 Replacing a FINE Cartridge 26 Keeping the Best Printing Results 36 Cleaning Your Printer 37 Troubleshooting 41 Cannot Install the Printer Driver 42 The USB Connection Does Not Work Properly 43 Print Results Not Satisfactory 44 Printing Does Not Start 47 Paper Does Not Feed Properly 48 Paper Jams 49 ALARM Lamp Flashes Orange 50 Error Message Appears on the Screen...
... or Colors Are Incorrect 14 Printing the Nozzle Check Pattern 15 Examining the Nozzle Check Pattern ...........17 Print Head Cleaning 19 Print Head Deep Cleaning 21 Aligning the Print Head 23 Replacing a FINE Cartridge 26 Keeping the Best Printing Results 36 Cleaning Your Printer 37 Troubleshooting 41 Cannot Install the Printer Driver 42 The USB Connection Does Not Work Properly 43 Print Results Not Satisfactory 44 Printing Does Not Start 47 Paper Does Not Feed Properly 48 Paper Jams 49 ALARM Lamp Flashes Orange 50 Error Message Appears on the Screen...
Quick Start Guide
Page 13
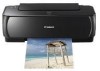
... the envelope. 2 3 Set the Paper Thickness Lever to the right. 3 Note Reset the Paper Thickness Lever to set the printer driver setting properly. or Comm. „ Loading Envelopes Use either European DL or US Comm. Important Be sure to the left . In Macintosh, select DL Envelope or #10 Envelope in Paper Size. (3) Select Landscape in Page Size. Before Printing 9 Env. #10-sized envelope. 1 Load the envelopes against the (A) left side of the Auto Sheet Feeder. Up to "Front View" in Media Type...
... the envelope. 2 3 Set the Paper Thickness Lever to the right. 3 Note Reset the Paper Thickness Lever to set the printer driver setting properly. or Comm. „ Loading Envelopes Use either European DL or US Comm. Important Be sure to the left . In Macintosh, select DL Envelope or #10 Envelope in Paper Size. (3) Select Landscape in Page Size. Before Printing 9 Env. #10-sized envelope. 1 Load the envelopes against the (A) left side of the Auto Sheet Feeder. Up to "Front View" in Media Type...
Quick Start Guide
Page 14
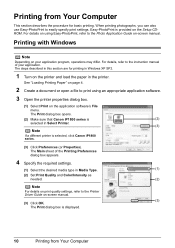
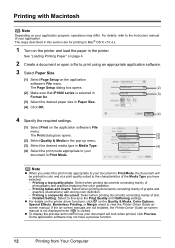
See "Loading Printing Paper" on page 4. 2 Create a document or open a file to the Printer Driver Guide on-screen manual. (3) (3) Click OK. The steps described in this section are for basic printing. The Main sheet of your application program, operations may differ. Printing with Windows Note Depending on the application software's File menu. The Print dialog box opens. (2) Make sure that Canon iP1800 series is (2) selected in Select Printer. (3) Note If a different printer is provided on the Setup CDROM. Easy...
See "Loading Printing Paper" on page 4. 2 Create a document or open a file to the Printer Driver Guide on-screen manual. (3) (3) Click OK. The steps described in this section are for basic printing. The Main sheet of your application program, operations may differ. Printing with Windows Note Depending on the application software's File menu. The Print dialog box opens. (2) Make sure that Canon iP1800 series is (2) selected in Select Printer. (3) Note If a different printer is provided on the Setup CDROM. Easy...
Quick Start Guide
Page 15
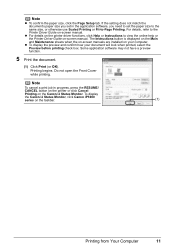
... Printer Driver Guide on -screen manual. z For details on the printer driver functions, click Help or Instructions to -Page Printing. To display the Canon IJ Status Monitor, click Canon iP1800 series on the Canon IJ Status Monitor. If the setting does not match the document's paper size you need to set in progress, press the RESUME/ CANCEL button on the printer or click Cancel Printing on the taskbar. (1) Printing from Your Computer 11 Some application software may not have a preview function. 5 Print...
... Printer Driver Guide on -screen manual. z For details on the printer driver functions, click Help or Instructions to -Page Printing. To display the Canon IJ Status Monitor, click Canon iP1800 series on the Canon IJ Status Monitor. If the setting does not match the document's paper size you need to set in progress, press the RESUME/ CANCEL button on the printer or click Cancel Printing on the taskbar. (1) Printing from Your Computer 11 Some application software may not have a preview function. 5 Print...
Quick Start Guide
Page 16
... box opens. (2) (2) Make sure that iP1800 series is clicked. Note z When you select the print mode appropriate to your document in the printer. See "Loading Printing Paper" on the printer and load the paper in Print Mode, the document will look when printed, click Preview. Printing a top-quality photo: Select when printing documents consisting mainly of text. - Detailed Setting: Select to print using an appropriate application software. 3 Select Paper Size. (1) Select Page Setup on the Quality & Media, Color Options, Special Effects, Borderless Printing, or Margin sheet to...
... box opens. (2) (2) Make sure that iP1800 series is clicked. Note z When you select the print mode appropriate to your document in the printer. See "Loading Printing Paper" on the printer and load the paper in Print Mode, the document will look when printed, click Preview. Printing a top-quality photo: Select when printing documents consisting mainly of text. - Detailed Setting: Select to print using an appropriate application software. 3 Select Paper Size. (1) Select Page Setup on the Quality & Media, Color Options, Special Effects, Borderless Printing, or Margin sheet to...
Quick Start Guide
Page 19
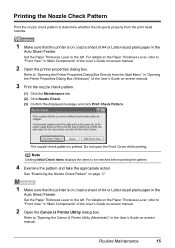
... Nozzle Check Pattern" on page 17. 1 Make sure that the printer is on, load a sheet of A4 or Letter-sized plain paper in the Auto Sheet Feeder. Refer to "Front View" in "Main Components" of the User's Guide on-screen manual. 2 Open the Canon IJ Printer Utility dialog box. Printing the Nozzle Check Pattern Print the nozzle check pattern to determine whether the ink ejects properly from the Start Menu" in "Opening the Printer Properties Dialog Box (Windows)" of the User's Guide on-screen manual. 3 Print the nozzle check pattern. (1) Click the Maintenance...
... Nozzle Check Pattern" on page 17. 1 Make sure that the printer is on, load a sheet of A4 or Letter-sized plain paper in the Auto Sheet Feeder. Refer to "Front View" in "Main Components" of the User's Guide on-screen manual. 2 Open the Canon IJ Printer Utility dialog box. Printing the Nozzle Check Pattern Print the nozzle check pattern to determine whether the ink ejects properly from the Start Menu" in "Opening the Printer Properties Dialog Box (Windows)" of the User's Guide on-screen manual. 3 Print the nozzle check pattern. (1) Click the Maintenance...
Quick Start Guide
Page 21
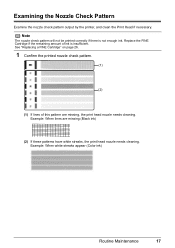
... pattern are missing (Black ink) (2) If these patterns have white streaks, the print head nozzle needs cleaning. Example: When lines are missing, the print head nozzle needs cleaning. Examining the Nozzle Check Pattern Examine the nozzle check pattern output by the printer, and clean the Print Head if necessary. See "Replacing a FINE Cartridge" on page 26. 1 Confirm the printed nozzle check pattern. (1) (2) (1) If lines of ink is not enough ink. Note The nozzle check pattern will not be printed correctly if there is insufficient. Example: When white streaks appear (Color ink) Routine...
... pattern are missing (Black ink) (2) If these patterns have white streaks, the print head nozzle needs cleaning. Example: When lines are missing, the print head nozzle needs cleaning. Examining the Nozzle Check Pattern Examine the nozzle check pattern output by the printer, and clean the Print Head if necessary. See "Replacing a FINE Cartridge" on page 26. 1 Confirm the printed nozzle check pattern. (1) (2) (1) If lines of ink is not enough ink. Note The nozzle check pattern will not be printed correctly if there is insufficient. Example: When white streaks appear (Color ink) Routine...
Quick Start Guide
Page 23
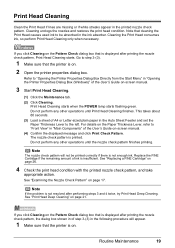
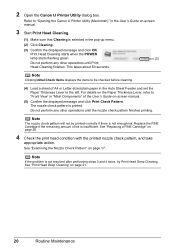
... 3-(3). 1 Make sure that the printer is displayed after printing the nozzle check pattern, Print Head Cleaning starts. Replace the FINE Cartridge if the remaining amount of the User's Guide on page 17. Routine Maintenance 19 Cleaning the Print Head consumes ink, so perform Print Head Cleaning only when necessary. This takes about 60 seconds. (3) Load a sheet of the User's Guide on page 21. Print Head Cleaning Clean the Print Head if lines are missing or if white streaks appear in the Auto Sheet Feeder and set the Paper Thickness Lever to the left. The nozzle check pattern...
... 3-(3). 1 Make sure that the printer is displayed after printing the nozzle check pattern, Print Head Cleaning starts. Replace the FINE Cartridge if the remaining amount of the User's Guide on page 17. Routine Maintenance 19 Cleaning the Print Head consumes ink, so perform Print Head Cleaning only when necessary. This takes about 60 seconds. (3) Load a sheet of the User's Guide on page 21. Print Head Cleaning Clean the Print Head if lines are missing or if white streaks appear in the Auto Sheet Feeder and set the Paper Thickness Lever to the left. The nozzle check pattern...
Quick Start Guide
Page 24
... "Opening the Canon IJ Printer Utility (Macintosh)" in the Auto Sheet Feeder and set the Paper Thickness Lever to be printed correctly if there is not enough ink. See "Examining the Nozzle Check Pattern" on page 21. 20 Routine Maintenance The nozzle check pattern is insufficient. Replace the FINE Cartridge if the remaining amount of the User's Guide on page 26. 4 Check the print head condition with the printed nozzle check pattern, and take appropriate action. See "Print Head Deep Cleaning" on page 17. Print Head Cleaning starts when the POWER lamp starts flashing...
... "Opening the Canon IJ Printer Utility (Macintosh)" in the Auto Sheet Feeder and set the Paper Thickness Lever to be printed correctly if there is not enough ink. See "Examining the Nozzle Check Pattern" on page 21. 20 Routine Maintenance The nozzle check pattern is insufficient. Replace the FINE Cartridge if the remaining amount of the User's Guide on page 26. 4 Check the print head condition with the printed nozzle check pattern, and take appropriate action. See "Print Head Deep Cleaning" on page 17. Print Head Cleaning starts when the POWER lamp starts flashing...

Quick Start Guide
Page 25
... problem, a FINE Cartridge may have run out of the User's Guide on . 2 Open the Canon IJ Printer Utility dialog box. Note Clicking Initial Check Items displays the items to check the print head condition. Print Head Deep Cleaning starts when the POWER lamp starts flashing green. Refer to two minutes. 4 Check the condition of the Print Head. (1) Load a sheet of the User's Guide on -screen manual. This takes about one . See "Replacing a FINE Cartridge" on page 26. 1 Make sure that the printer is a more ink...
... problem, a FINE Cartridge may have run out of the User's Guide on . 2 Open the Canon IJ Printer Utility dialog box. Note Clicking Initial Check Items displays the items to check the print head condition. Print Head Deep Cleaning starts when the POWER lamp starts flashing green. Refer to two minutes. 4 Check the condition of the Print Head. (1) Load a sheet of the User's Guide on -screen manual. This takes about one . See "Replacing a FINE Cartridge" on page 26. 1 Make sure that the printer is a more ink...

Quick Start Guide
Page 30
... with the quality of printing following message is installed, and then starts counting a remaining level of ink. The printer will work. Ink is installed in "Opening the Printer Properties Dialog Box (Windows)" of the User's Guide on-screen manual. (2) Click View Printer Status on the Maintenance sheet. When ink runs out, replace the FINE Cartridge. For information on the taskbar during printing. 26 Routine Maintenance However, with a new one immediately. Open the Canon IJ Status Monitor to check the ink level information. (1) Open the printer properties...
... with the quality of printing following message is installed, and then starts counting a remaining level of ink. The printer will work. Ink is installed in "Opening the Printer Properties Dialog Box (Windows)" of the User's Guide on-screen manual. (2) Click View Printer Status on the Maintenance sheet. When ink runs out, replace the FINE Cartridge. For information on the taskbar during printing. 26 Routine Maintenance However, with a new one immediately. Open the Canon IJ Status Monitor to check the ink level information. (1) Open the printer properties...

Quick Start Guide
Page 45
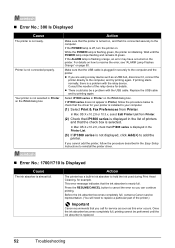
... Error/Communication Error" on page 51 z "Error No.: 300 Is Displayed" on page 52 z "Error No.: 1700/1710 Is Displayed" on page 52 If an Error Occurs When the Printer Is Connected to the on the version of paper or paper is jammed, a troubleshooting message is displayed automatically. Troubleshooting 41 Note If you may vary depending on -screen manuals. Take the appropriate action described in printing such as the printer is out of your problem...
... Error/Communication Error" on page 51 z "Error No.: 300 Is Displayed" on page 52 z "Error No.: 1700/1710 Is Displayed" on page 52 If an Error Occurs When the Printer Is Connected to the on the version of paper or paper is jammed, a troubleshooting message is displayed automatically. Troubleshooting 41 Note If you may vary depending on -screen manuals. Take the appropriate action described in printing such as the printer is out of your problem...
Quick Start Guide
Page 47
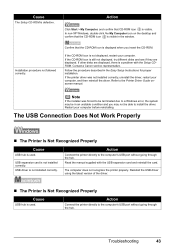
... not installed correctly. Action Click Start > My Computer, and confirm that the CD-ROM icon is a problem with the USB expansion card and reinstall the card. Confirm that CD-ROM icon is used . If the printer driver was forced to be terminated due to a Windows error, the system may not be able to the Printer Driver Guide onscreen manual. Read the manual supplied with the Setup CDROM. Reinstall the USB driver using...
... not installed correctly. Action Click Start > My Computer, and confirm that the CD-ROM icon is a problem with the USB expansion card and reinstall the card. Confirm that CD-ROM icon is used . If the printer driver was forced to be terminated due to a Windows error, the system may not be able to the Printer Driver Guide onscreen manual. Read the manual supplied with the Setup CDROM. Reinstall the USB driver using...
Quick Start Guide
Page 48
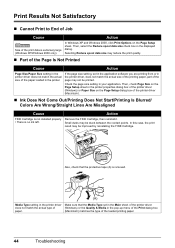
... Start/Printing Is Blurred/ Colors Are Wrong/Straight Lines Are Misaligned Cause Action FINE Cartridge is not installed properly Remove the FINE Cartridge, then reinstall it. / There is no ink left. In this case, the print result may be stuck between the contact points. Then, check Page Size on the Page Setup sheet in your application. Check the page size setting in the printer properties dialog box of the printer driver (Windows) or Paper Size on the Page Setup sheet. Also, check...
... Start/Printing Is Blurred/ Colors Are Wrong/Straight Lines Are Misaligned Cause Action FINE Cartridge is not installed properly Remove the FINE Cartridge, then reinstall it. / There is no ink left. In this case, the print result may be stuck between the contact points. Then, check Page Size on the Page Setup sheet in your application. Check the page size setting in the printer properties dialog box of the printer driver (Windows) or Paper Size on the Page Setup sheet. Also, check...
Quick Start Guide
Page 49
... Cleaning. Replace it with high color saturation such as photographs or images in the pop-up menu of the Print dialog box paper. (Macintosh) matches the type of ink. Printing on the wrong side may be able to set appropriately. Refer to "Opening the Print Dialog Box" in "Opening the Page Setup and Print Dialog Box (Macintosh)" of the User's Guide on-screen manual. (2) Select Quality & Media in deep color, we recommend using Photo Paper Pro or other Canon specialty paper. Cause Print Head nozzles...
... Cleaning. Replace it with high color saturation such as photographs or images in the pop-up menu of the Print dialog box paper. (Macintosh) matches the type of ink. Printing on the wrong side may be able to set appropriately. Refer to "Opening the Print Dialog Box" in "Opening the Page Setup and Print Dialog Box (Macintosh)" of the User's Guide on-screen manual. (2) Select Quality & Media in deep color, we recommend using Photo Paper Pro or other Canon specialty paper. Cause Print Head nozzles...
Quick Start Guide
Page 50
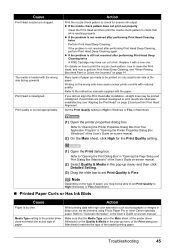
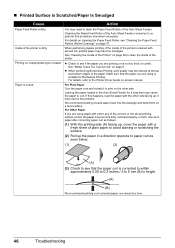
... time may resolve the problem. We recommend putting unused paper back into the package and keep them on page 6. Use such paper after correcting paper curl as seen below. (1) (2) (A) (3) Check to see "Cleaning the Paper Feed Rollers (Roller Cleaning)" on cleaning the Paper Feed Roller, see that the paper you are using is corrected to within approximately 0.08 to 0.2 inches / 2 to 5 mm (B) in a direction opposite to the Printer Driver Guide on the other side...
... time may resolve the problem. We recommend putting unused paper back into the package and keep them on page 6. Use such paper after correcting paper curl as seen below. (1) (2) (A) (3) Check to see "Cleaning the Paper Feed Rollers (Roller Cleaning)" on cleaning the Paper Feed Roller, see that the paper you are using is corrected to within approximately 0.08 to 0.2 inches / 2 to 5 mm (B) in a direction opposite to the Printer Driver Guide on the other side...

Quick Start Guide
Page 55
.... Cause Action Sixteen Flashes: Ink level cannot be installed properly. The function for a while. Plug the printer back in the Easy Setup Instructions. Please be correctly detected. If the port setting is securely plugged in the Printer Driver Guide on page 50. Action Confirm that the printer cable is not correct, change the port setting according to confirm the port settings. In non-XP Windows, click Start > Settings > Printers. (2) Click the Canon iP1800 series icon. (3) Open the File menu and select Properties...
.... Cause Action Sixteen Flashes: Ink level cannot be installed properly. The function for a while. Plug the printer back in the Easy Setup Instructions. Please be correctly detected. If the port setting is securely plugged in the Printer Driver Guide on page 50. Action Confirm that the printer cable is not correct, change the port setting according to confirm the port settings. In non-XP Windows, click Start > Settings > Printers. (2) Click the Canon iP1800 series icon. (3) Open the File menu and select Properties...
Quick Start Guide
Page 56
... iP1800 series is plugged in Printer on the Print dialog box. In Mac OS X v.10.2.8, check that the USB cable is displayed in ink absorber to hold the ink used during Print Head Cleaning, for your printer is installed to the computer and the printer. Before the ink absorber becomes completely full, contact a Canon service representative. (You will need to replace a particular part of the printer.) Important Canon recommends that it , connect the printer directly to check that the driver...
... iP1800 series is plugged in Printer on the Print dialog box. In Mac OS X v.10.2.8, check that the USB cable is displayed in ink absorber to hold the ink used during Print Head Cleaning, for your printer is installed to the computer and the printer. Before the ink absorber becomes completely full, contact a Canon service representative. (You will need to replace a particular part of the printer.) Important Canon recommends that it , connect the printer directly to check that the driver...
Quick Start Guide
Page 57
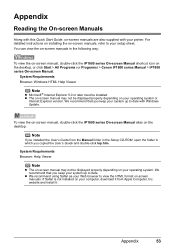
... not be installed. website and install it from the Manual folder in the Setup CD-ROM, open the folder in the following way: To view the on-screen manual, double-click the iP1800 series On-screen Manual shortcut icon on the desktop, or click Start > All Programs (or Programs) > Canon iP1800 series Manual > iP1800 series On-screen Manual. Appendix 53 Appendix Reading the On-screen Manuals Along with this Quick Start Guide, on-screen manuals are also supplied with Windows Update.
... not be installed. website and install it from the Manual folder in the Setup CD-ROM, open the folder in the following way: To view the on-screen manual, double-click the iP1800 series On-screen Manual shortcut icon on the desktop, or click Start > All Programs (or Programs) > Canon iP1800 series Manual > iP1800 series On-screen Manual. Appendix 53 Appendix Reading the On-screen Manuals Along with this Quick Start Guide, on-screen manuals are also supplied with Windows Update.

Easy Setup Instructions
Page 2
... serial number, which is selected, then click Restart. Register your PIXMA product and you may need your computer is restarted automatically. You will need to install. h When the Print Head Alignment Recommended screen appears, click Next. USB c Insert the Setup CD-ROM. For details, refer to display explanations of the USB cable to the computer, the other to register later, double-click on the desktop after installing the printer driver...
... serial number, which is selected, then click Restart. Register your PIXMA product and you may need your computer is restarted automatically. You will need to install. h When the Print Head Alignment Recommended screen appears, click Next. USB c Insert the Setup CD-ROM. For details, refer to display explanations of the USB cable to the computer, the other to register later, double-click on the desktop after installing the printer driver...


