Quick Start Guide
Page 18
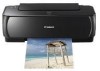
...or the Print Head position is removed from the bottom of the nozzles and then perform Print Head Cleaning. See "Aligning the Print Head" on page 15. Print the nozzle check pattern to confirm the condition of a FINE Cartridge. z Increase the Print Quality setting in the printer driver settings....are missing or if white streaks appear Step 2 See "Print Head Cleaning" on FINE Cartridges are probably clogged. Routine Maintenance When Printing Becomes Faint or Colors Are Incorrect When printing becomes faint or colors are incorrect, the print head nozzles on page 19. z If the ALARM lamp is...
...or the Print Head position is removed from the bottom of the nozzles and then perform Print Head Cleaning. See "Aligning the Print Head" on page 15. Print the nozzle check pattern to confirm the condition of a FINE Cartridge. z Increase the Print Quality setting in the printer driver settings....are missing or if white streaks appear Step 2 See "Print Head Cleaning" on FINE Cartridges are probably clogged. Routine Maintenance When Printing Becomes Faint or Colors Are Incorrect When printing becomes faint or colors are incorrect, the print head nozzles on page 19. z If the ALARM lamp is...

Quick Start Guide
Page 36
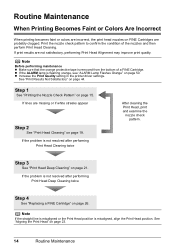
... installed, do not touch the electrical contacts or Print Head Nozzles on page 31. Color ink is reinstalled. When a FINE Cartridge is out of the Color FINE Cartridge or Black FINE Cartridge is removed, do not remove it from the printer and leave it immediately with either Black or Color ink only by changing Ink Cartridge Settings. If...
... installed, do not touch the electrical contacts or Print Head Nozzles on page 31. Color ink is reinstalled. When a FINE Cartridge is out of the Color FINE Cartridge or Black FINE Cartridge is removed, do not remove it from the printer and leave it immediately with either Black or Color ink only by changing Ink Cartridge Settings. If...

Quick Start Guide
Page 38
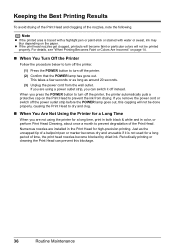
z Once the protective tape is removed, do not touch the electrical contacts or Print Head Nozzles on the removed protective tape. (A) *1 To the FINE Cartridge Holder 4 Install the FINE Cartridge. (1) Insert a new FINE Cartridge all the way into ...the replacement cartridge. (1) Unpack a new FINE Cartridge and remove the *1 orange protective tape (A) gently. The printer may not print out properly if you have removed it clicks into place. (2) Important The printer cannot be into the left slot ( B ) and the Color FINE Cartridge should be used unless both the FINE Cartridges ...
z Once the protective tape is removed, do not touch the electrical contacts or Print Head Nozzles on the removed protective tape. (A) *1 To the FINE Cartridge Holder 4 Install the FINE Cartridge. (1) Insert a new FINE Cartridge all the way into ...the replacement cartridge. (1) Unpack a new FINE Cartridge and remove the *1 orange protective tape (A) gently. The printer may not print out properly if you have removed it clicks into place. (2) Important The printer cannot be into the left slot ( B ) and the Color FINE Cartridge should be used unless both the FINE Cartridges ...
Quick Start Guide
Page 40
... following. If you remove the power cord or switch off the printer. (2) Confirm that the POWER lamp has gone out. If you are using the printer for a long time, print in both black & white and in the Print Head for a long period of time, the print head nozzles become faint or particular colors will not be printed properly. Just as...
... following. If you remove the power cord or switch off the printer. (2) Confirm that the POWER lamp has gone out. If you are using the printer for a long time, print in both black & white and in the Print Head for a long period of time, the print head nozzles become faint or particular colors will not be printed properly. Just as...
Quick Start Guide
Page 54
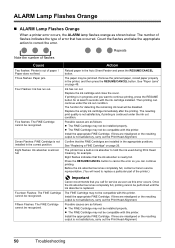
... not be jammed. Replace the empty ink cartridge immediately after the printing. Confirm that the ink absorber is replaced. Three flashes: Paper jam. Four Flashes: Ink has run out. Remove the jammed paper, reload paper properly in the Auto Sheet Feeder ...FINE Cartridge may be compatible with this printer. Then printing can continue printing. The printer has a built-in the correct position. Install the appropriate FINE Cartridge. Count the flashes and take the appropriate action to hold the ink used during Print Head Cleaning, for example. Five flashes: ...
... not be jammed. Replace the empty ink cartridge immediately after the printing. Confirm that the ink absorber is replaced. Three flashes: Paper jam. Four Flashes: Ink has run out. Remove the jammed paper, reload paper properly in the Auto Sheet Feeder ...FINE Cartridge may be compatible with this printer. Then printing can continue printing. The printer has a built-in the correct position. Install the appropriate FINE Cartridge. Count the flashes and take the appropriate action to hold the ink used during Print Head Cleaning, for example. Five flashes: ...

Easy Setup Instructions
Page 1
... cord in slots. Then open the Paper Support. The printer will flash green. c Insert the Color FINE Cartridge slightly slanted into place. Wait until the POWER lamp stops flashing and remains lit green and the printer has stopped making operating noises, before proceeding. To the ...connect the USB cable at both ends as shown below. Print Head Nozzles Note • Do not touch the electrical contacts or Print Head Nozzles on the printer, remove all the rest of the Protective Sheets. QT50918V01 Unpack the Printer Start Here Easy Setup Instructions • Please confirm the ...
... cord in slots. Then open the Paper Support. The printer will flash green. c Insert the Color FINE Cartridge slightly slanted into place. Wait until the POWER lamp stops flashing and remains lit green and the printer has stopped making operating noises, before proceeding. To the ...connect the USB cable at both ends as shown below. Print Head Nozzles Note • Do not touch the electrical contacts or Print Head Nozzles on the printer, remove all the rest of the Protective Sheets. QT50918V01 Unpack the Printer Start Here Easy Setup Instructions • Please confirm the ...

Easy Setup Instructions
Page 2
...• If your product serial number, which is not connected to align the Print Head. e When the list of Adobe Systems Incorporated in the U.S. If a message asking for your confirmation to restart your Canon PIXMA printer today, and you are trademarks of the USB cable to the computer, the ...If you may vary depending on -screen instructions to register your PIXMA product and you see the Found New Hardware Wizard, remove the USB cable. f Read the License Agreement carefully and click Yes. g When the Printer Connection screen appears, connect one end of their respective owners. ...
...• If your product serial number, which is not connected to align the Print Head. e When the list of Adobe Systems Incorporated in the U.S. If a message asking for your confirmation to restart your Canon PIXMA printer today, and you are trademarks of the USB cable to the computer, the ...If you may vary depending on -screen instructions to register your PIXMA product and you see the Found New Hardware Wizard, remove the USB cable. f Read the License Agreement carefully and click Yes. g When the Printer Connection screen appears, connect one end of their respective owners. ...


